
Categorías populares
¿Buscas un hilo?


Comentarios / Preguntas (27)
![]() Melinda escribió:
Melinda escribió:
Can you please explain on how to knit M.3. Is M.3 double M6?
17.05.2026 - 13:28DROPS Design respondió:
Dear Melinda, M.3 is the whole chart, while M.6 is only a small part of M.3 (3 stitches). These 3 stitches are used to adjust the pattern in the squares when needed, as explained in the "Squares" section. Happy knitting!
17.05.2026 - 21:12
![]() Chari escribió:
Chari escribió:
He tejido la parte delantera y me falta lana azul del color 37 para la espalda, se necesitan 200 gramos para la talla M/L de hombre en vez de 100 gramos como dice el patrón.
19.11.2025 - 10:22
![]() Chari escribió:
Chari escribió:
He tejido la parte delantera y me falta lana azul del color 37 para la espalda, con 109 Gea mis no es suficiente para hacer el elástico y todos los cuadros. Debería de corregirse en el patrón.
19.11.2025 - 00:23
![]() Mary Winterton escribió:
Mary Winterton escribió:
Have just downloaded pattern where is the M.3. thankyou
24.10.2025 - 07:38DROPS Design respondió:
Hi, Mary, M.3 should be to the right of M.5, M.6 is a part of M.3. Happy knitting!
24.10.2025 - 08:24
![]() Kim escribió:
Kim escribió:
Hello it’s me again. Thanks for your previous answers but I have more: 1. Could you please give detailed instruction for back neck decrease? Step by step please.. Do I decrease M1 first then neck or other way round? As pattern will be affected after. 2. 4 squares x 16 cm high = 64 cm long for back piece. Man size L back piece is 68 cm when start decreasing. What square pattern should I do after the last square please? Thanks so much for your help.
28.03.2025 - 23:46DROPS Design respondió:
Dear Kim, remember that you worked 6cm in rib at the beginning. So, 6cm in rib + 16cm (1st square)+ 16 cm (2nd square) + 16 cm (3rd square) + 14cm (4th square, 2cm are left when we start the decreases) = 68 cm (you can see in the size chart that the total length for men size L is 70cm). So we start at this point of the chart. We don't work the decreases at 5cm left of the front piece (they have been moved here). So we cast off the middle stitches and decrease and cast off the stitches in M.2 as in the front piece, all in the same row. Then decrease 2 sts (in the same row) on each side of the neckline and finish each shoulder separately. Happy knitting!
30.03.2025 - 20:43
![]() Kim escribió:
Kim escribió:
Hello again. Thanks very much for your answer. I have another question: is very line of M1 pattern is for the right side only? Or is 1 line for RS and the next is for WS? I find this pattern very challenging but my son wants it so I am trying my best. This won’t be my last question so pls bear with me. Thank you.
08.03.2025 - 00:34DROPS Design respondió:
Dear Kim, the charts show all rows of the pattern as seen from the right side. So the first row of M.1 is from the right side, but the second row is from the wrong side, which means that you need to work it opposite to what you see (so, you work the chart from left to right, purl on knit symbols and knit on purl symbols). You can find more information regarding our knitting charts here Happy knitting!
09.03.2025 - 18:03
![]() Kim escribió:
Kim escribió:
Hello, 1. I have started on a sleeve man size L. 50 rib stitches and inc 8 should be 58 but it’s 60 on instruction? 2. I increase every 3 and 4 ROW alternatively as written in pattern and the sleeve billowing massively right after the rib and it doesn’t look right to me. Please could you reconfirm that it is right or do I increase every 3 and 4 CM alternatively? 3. The sleeve is only 38 cm long and I have already used 2 balls of yarn. Is it about right ? Thank you.
06.03.2025 - 21:48DROPS Design respondió:
Dear Kim, you should cast on 52 sts in larger size for men, pattern has now been edited. Increases are wored alternately on every 3rd and 4th round, not cm, pattern is here right. If your tension is right in both width and heigth and if you kept the correct tension all the way, you should have enough. Happy knitting!
07.03.2025 - 09:29
![]() DELATTRE Marie-Pierre escribió:
DELATTRE Marie-Pierre escribió:
Bonjour. Je m'apprête à faire ce pull, version femme, mais je ne comprends pas dès le début. Il est indiqué de tricoter après les côtes : 1 m lis, M3, M1, M4, M5, 1 m lis. Puis de continuer le diagramme. Puis de répartir des augmentations sur M2 alors qu'il n'est pas indiqué de le tricoter. Où est-il passé ? A quel moment faut-il le tricoter ?? MERCI beaucoup. Cordialement
30.11.2024 - 19:44DROPS Design respondió:
Bonjour Mme Delattre, les explications des carrés sont indiqués au début sous Carrés et Couleurs mais aussi dans le diagramme, ainsi, lorsque vous avez tricoté les carrés 1 (M.3), 2 (M.1), 3 (M.4) et 4 (M.5), vous tricotez les carrés 5 (M.4), 6 (M.2), 7 (M.5) et 8 (M.3) dans le coloris indiqué sous Couleurs. Bon tricot!
02.12.2024 - 09:20
![]() Deborah Parsons escribió:
Deborah Parsons escribió:
Thank you for your reply to my question. I did use Karisma, my tension is correct so I do not know why I do not have enough yarn to finish the product. Should I have purchased more than 100g of that shade?
26.11.2024 - 18:01DROPS Design respondió:
Dear Deborah, we will check with the design department to see if there are any mistakes in the yarn amounts. Happy knitting!
07.12.2024 - 18:22
![]() Deborah Parsons escribió:
Deborah Parsons escribió:
Having knitted the front of the jumper I have only 8g left (out of 100g) of colour 37 which is used for 4 squares and the rib. This is not enough to complete the back and cuffs as per pattern. Is there an error in the materials list?
26.11.2024 - 15:55DROPS Design respondió:
Dear Mrs Parsons, did you get the correct tension in both width and height? Did you use DROPS Karisma or any other yarn? If another one, did you make sure to get correct metrage?
26.11.2024 - 17:13
|
|||||||||||||||||||||||||
Textures in Blue |
|||||||||||||||||||||||||
|
|
|||||||||||||||||||||||||
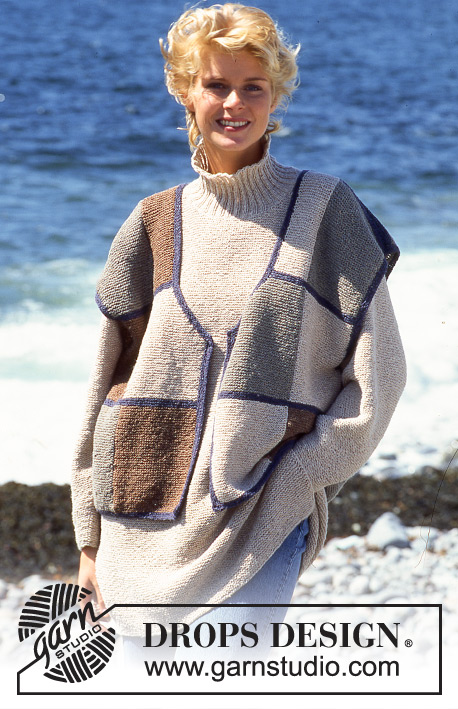
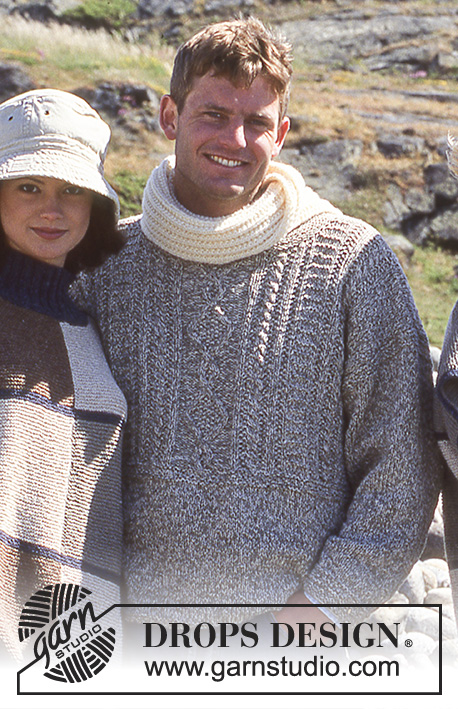
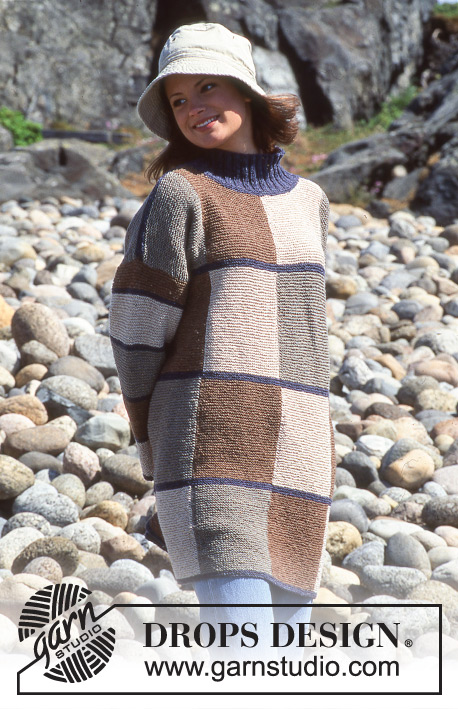
Jersey a punto para mujer y hombre con patrón de cuadrados en DROPS “Karisma”.
DROPS 40-7 |
|||||||||||||||||||||||||
|
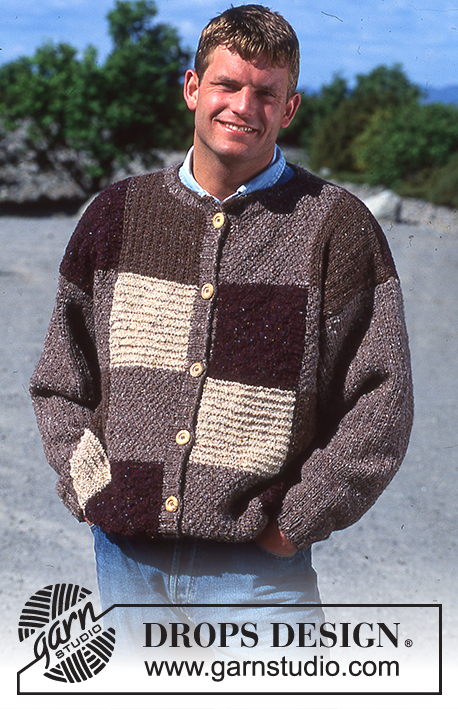
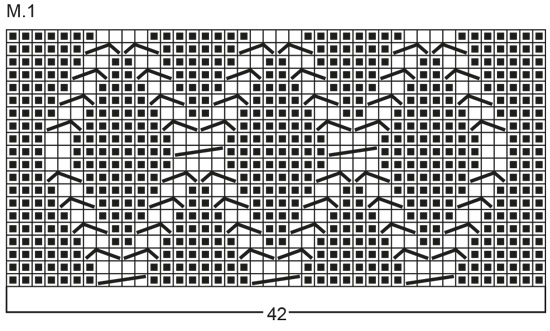
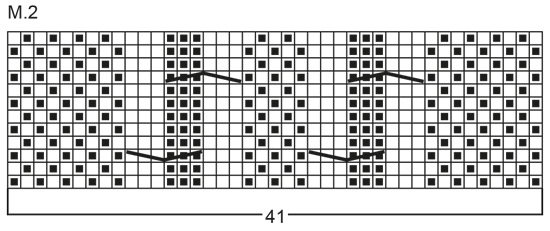
Tensión: 20 pts x 26 filas con aguja de 4 mm y el patrón = 10 x 10 cm Elástico: *1d, 1r*, repetir de * a *. Mota: Trabajar 4 pts en 1 pt. Trabajar 4 filas en pt jersey sobre estos 4 pts. Ahora levantar el 1º, después el 2º, después el 3º sobre el 4º pt. Cuadrados: Cada cuadrado = 14-15-15 (16-16) cm de altura. Trabajar 1 fila en pt jersey entre cada cuadrado. En M.4 para la talla M/L de mujer: trabajar los 3 pts más externos hacia el lado en M.6 (para evitar tener medio patrón en el lado). Patrón: Ver el diagrama. El diagrama muestra el patrón por el LD. Colores: Cuadrado 1: M.3 con el color 54, beige Cuadrado 2: M.1 con el color 51, blue claro Cuadrado 3: M.4 con el color 50, verde Cuadrado 4: M.5 con el color 03, beige claro Cuadrado 5: M.4 con el color 03, beige claro Cuadrado 6: M.2 con el color 37, azul Cuadrado 7: M.5 con el color 54, beige Cuadrado 8: M.3 con el color 37, azul Cuadrado 9: M.3 con el color 37, azul Cuadrado 10: M.4 con el color 51, azul claro Cuadrado 11: M.1 con el color 03, beige claro Cuadrado 12: M.5 con el color 50, verde Cuadrado 13: M.5 con el color 50, verde Cuadrado 14: M.3 con el color 54, beige Cuadrado 15: M.2 con el color 37, azul Cuadrado 16: M.4 con el color 51, azul claro Delantero: Los números entre ( ) se refieren a la versión de hombre. Montar 97-98-102 (102-108) pts con una aguja de 2.5 mm con azul y continuar como sigue: Mujeres: 3 cm en pt jersey, 1 fila de revés (= borde de doblaje, medir la labor desde aquí), 3 cm en pt jersey, Hombre: 6 cm del elástico. Cambiar a una aguja de 4 mm y aum 20-24-26 (20-26) pts repartidos en la 1ª fila = 116-122-128 (122-134) pts (incl. 1 pt orillo a cada lado para la costura). Continuar con el patrón de cuadrados, 1ª fila = LD, como sigue: 1 pt orillo, 27-30-33 (33-36) pts de M.3, 30-30-30 (30-30) pts de M.1, 30-30-30 (30-30) pts de M.4, 27-30-33 (33-36) pts de M.5, 1 pt orillo. Continuar con el patrón siguiendo el diagrama, pero en la 1ª fila de M.1 y M.2 aum 11 y 12 pts repartidos en los pts en el cuadrado, para que estos cuadrados se trabajen sobre 41 y 42 pts respectivamente. Recordar mantener la tensión del tejido. Cuando la labor mida 32-36-35 (37-40) cm cerrar 1 pt a cada lado = 114-120-126 (120-132) pts. Cuando queden 5 cm del último cuadrado, la labor mide aprox. 54-58-58 (61-65) cm cerrar los 28-30-30 (36-38) pts centrales para el cuello y los 12 pts extra en M.2. Ahora cerrar para la forma de la línea del escote cada 2ª fila: 2 pts 1 vez, 1 pt 1 vez. Cerrar los pts restantes en el hombro después del último cuadrado, la labor mide aprox. 59-63-63 (66-70) cm. Espalda: Montar y trabajar como el delantero. Cuando queden 2 cm del último cuadrado en el diagrama, la labor mide aprox. 57-61-61 (64-68) cm cerrar los 34-36-36 (42-44) pts centrales y los 12 pts extra de M.2 y dism 2 pts en la línea del escote en la siguiente fila. Cerrar como se describe para el delantero. Manga derecha: Trabajar en redondo con agujas de doble punta. Montar 48-48-48 (48-50) pts con agujas de doble punta de 2.5 mm con azul y continuar con el dobladillo/elástico como se describe para el delantero y la espalda. Cambiar a una aguja de 4 mm y beige continuar con M.5, al mismo tiempo aum 4-6-6 (8-8) pts repartidos en la 1ª vuelta = 52-54-54 (56-60) pts. Al mismo tiempo después del dobladillo/elástico, aum 2 pts en el centro bajo la manga un total de 28-27-29 (30-30) veces como sigue: Talla S + M de mujer, tallas S/M + M/L de hombre: cada 3ª y 4ª * vuelta alternadamente Talla L de mujer: cada 3ª vuelta = 108-108-112 (116-120) pts. Cuando la labor mida 44-43-43 (50-49) cm cerrar 6 pts en el centro bajo la manga y completar la manga de ida y vuelta en la aguja. Dism para la forma de la copa de la manga a cada lado cada 2ª fila: 6 pts 4 veces. Cerrar cuando la manga mida 48-47-47 (54-53) cm. Manga izquierda: Trabajar como la manga derecha, pero con azul claro en vez de beige. Terminación. Hacer las costuras de los hombros. Recoger aprox. 100-106 pts alrededor del cuello con una aguja de 2.5 mm con azul claro y continuar como sigue: mujeres: 6 cm del elástico, pero después de 5 cm cambiar a azul, cerrar. Hombres: 6 cm del elástico, pero después de 3 cm cambiar a blue, cerrar, doblar por la mita hacia el LR y asegurar. Colocar las mangas, sisa = 27-27-28 (29-30) cm, y hacer la costura lateral y las costuras de las mangas. Mujeres: doblar los bordes por la mitad hacia el LR y asegurar. |
|||||||||||||||||||||||||
Explicaciones del diagrama |
|||||||||||||||||||||||||
|
|||||||||||||||||||||||||
 |
|||||||||||||||||||||||||
 |
|||||||||||||||||||||||||
 |
|||||||||||||||||||||||||
 |
|||||||||||||||||||||||||
 |
|||||||||||||||||||||||||
¿Terminaste este patrón?Entonces, etiqueta tus fotos con #dropspattern o envíalas a la galería #dropsfan. ¿Necesitas ayuda con este patrón?Encontrarás 21 videos tutoriales, un espacio para comentarios/preguntas y más visitando la página del patrón en garnstudio.com © 1982-2026 DROPS Design A/S. Todos los derechos reservados. Este documento, incluyendo todas sus sub-secciones, está protegido por los derechos de autor (copyright). Lee más acerca de lo que puedes hacer con nuestros patrones en la parte de abajo de cada patrón de nuestro sitio. |
|||||||||||||||||||||||||


Con más de 40 años en el diseño de modelos de punto y de ganchillo, DROPS Design ofrece una de las más vastas colecciones de patrones gratuitos en el internet - traducidos en 17 idiomas. Al día de hoy, contamos con 325 catálogos y 12298 patrones - de los cuales 11726 están traducidos en español.
Nosotros trabajamos con mucho esmero para brindarte lo mejor que las labores de punto y ganchillo tienen para ofrecer,inspiración y consejos, así como hilos de magnífica calidad a precios increíbles! Te gustaría usar nuestros patrones para otro fin además del uso personal? Puedes leer acerca de lo que estás permitida a hacer en el texto de Copyright en la parte de abajo de todos nuestros patrones. Felices labores!
Escribe un comentario sobre DROPS 40-7
¡Nos encantaría saber qué piensas acerca de este patrón!
Si quieres escribir una pregunta referente al patrón, por favor asegúrate de elegir la categoría correcta en el formulario debajo, para acelerar el proceso de respuesta. Los campos obligatorios están marcados con un *.