
Categorías populares
¿Buscas un hilo?


Comentarios / Preguntas (15)
![]() Pia Anderberg escribió:
Pia Anderberg escribió:
Tack för svar om ojämnhet vid övergång från räta till aviga varv på rundsticka. Svaret jag fick var att se översta videon om Vågmönster, men där stickar man fram och tillbaka och då uppstår inte problemet vid övergång mellan räta och aviga varv. Det är just när man stickar runt på rundsticka som det blir ojämnt vid övergången från ett rätt till avigt och avigt till rätt varv.
22.02.2024 - 15:45DROPS Design respondió:
Hei Pia. Det vil nok alltid bli et lite "hakk" i overgangene. Prøv evnt å strikke 1.maske på ny omgang i 1.maske, men i omgangen under, slik at du "drar/trekker" omgangen litt opp. Test ut på en liten prøvelapp og se om du syns dette blir bedre. mvh DROPS Design
04.03.2024 - 08:00
![]() Pia Anderberg escribió:
Pia Anderberg escribió:
Hur gör man en snygg övergång mellan räta och aviga varv på rundsticka?
22.02.2024 - 09:16DROPS Design respondió:
Hej Pia, hur menar du....? har du set vores video med vågmönster nederst i mönsteret :)
22.02.2024 - 11:53
![]() Pia Anderberg escribió:
Pia Anderberg escribió:
Hur gör man en snygg övergång mellan räta och aviga varv på rundsticka?
22.02.2024 - 09:13
![]() Pia Anderberg escribió:
Pia Anderberg escribió:
Fråga: Mönster 45-8 Glömde fylla i min mejl.
19.02.2024 - 17:19DROPS Design respondió:
Hej Pia. Se svar under. Mvh DROPS Design
21.02.2024 - 08:35
![]() Pia Anderberg escribió:
Pia Anderberg escribió:
Hej! På mönster 45-8 ska man lägga upp på stick 5 o sedan byta till 4. Ska upplägget vara på en eller två (dubbla) Stickor? Tack
19.02.2024 - 17:17DROPS Design respondió:
Hej Pia. Du lägger upp på 1 sticka. Mvh DROPS Design
21.02.2024 - 08:35
![]() Beth-Ann Herschaft escribió:
Beth-Ann Herschaft escribió:
Hi again. The photo shows stockinette at the top of each sleeve. The armholes and sleeves are way too big for me. Is there a way to make the armholes and sleeves smaller? I tried putting a gusset in, but the arms still hang. I am 5’4 and thin. Thanks for your help.
23.04.2021 - 18:33DROPS Design respondió:
Dear Beth-Ann, the whole sleeve is knitted with pattern, what you see in stockinett is the dropped shoulder of the piece. This is an older design, and the fashion at the time was wider, dropped shoulders, and roomier sleeves, so what you have is probably correct for this piece. However if you want to make it smaller, take out a few rows, of teh armhole, before starting the meck, and leave out some increases from the sleeves (to make them narrower. Happy Knitting!
23.04.2021 - 20:01
![]() Beth-Ann Herschaft escribió:
Beth-Ann Herschaft escribió:
Hi....when I tried to pick up the stitches to knit the neckline, I found my stitches were too tight. I ended up cutting a few, and now have a mess! I tried to reknit up to the point where I had cut the stitches. Now I’m not sure how thick the shoulders should be. I have a picture of front and back before I messed it up, but it’s not helping. Do I have to rip it out in order to fix it? Thanks for your help.
16.03.2021 - 23:28DROPS Design respondió:
Hi Beth-Ann, It would be best to unravel the piece to somewhere before the cut stitches, attach a new yarn strand and continue from there. If you are having problems with the shoulders you could unravel as far as to where the piece was divided for the body and sleeves before restarting. Hope this helps and happy knitting!
17.03.2021 - 08:02
![]() Muriel Bell escribió:
Muriel Bell escribió:
When does the sleeve length change to stockinette stitch? Thank you again.
29.12.2020 - 23:28DROPS Design respondió:
Hi Muriel, The whole of the sleeve is worked with pattern. Happy knitting!
30.12.2020 - 08:02
![]() Muriel Bell escribió:
Muriel Bell escribió:
Sleeve help please this design. At cast on will I be working 13+17 (1 unit of pattern) + 13 = 43 sts and then when I have enough stitches at side edges of 17 each, another two pattern repeats of 17 become available. A total of 5 units of 17 with 7+7 stitches each end when I get to 99 stitches? Is that correct? Thank you for your advice.
18.12.2020 - 23:16DROPS Design respondió:
Dear Mrs Bell, that's correct - knit or purl the new stitches on each side (= as in M.1) so that they are worked the same way until there are enough sts to work last row in diagram. Happy knitting!
21.12.2020 - 07:05
![]() Muriel Bell escribió:
Muriel Bell escribió:
Hi, I've never knitted in the round, so will the design become distorted as there are no turning rows being worked, also will the pattern repeat use only 4 rows like the video after the initial 6 rows? Thank you. Muriel
19.11.2020 - 11:28DROPS Design respondió:
Dear Mrs Bell, not sure what you mean with "distorted" here sorry, when working the diagram in the round you will first work 1st round as first row in diagram over all stitches, then 2nd round as shown in 2nd row in diagram over all sts and so on. When working the wave pattern in height, you will repeat the 6 rows in height as diagram is showing (video shows another kind of wave pattern). You will find more explanations about diagrams here. Happy knitting!
19.11.2020 - 15:49
|
|||||||||||||
Gladys |
|||||||||||||
|
|
|||||||||||||
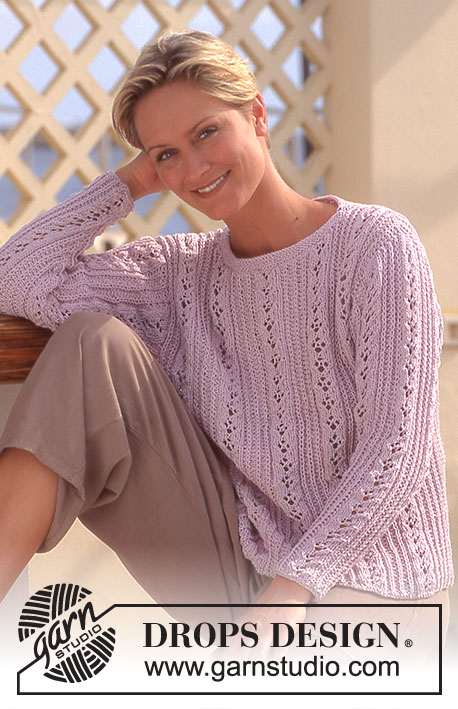
Jersey largo con patrón de calados en DROPS Muskat
DROPS 45-8 |
|||||||||||||
|
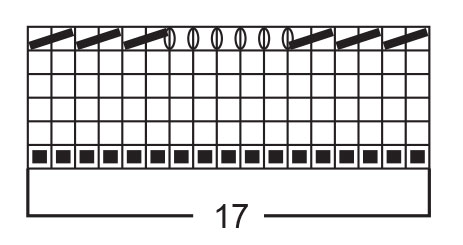
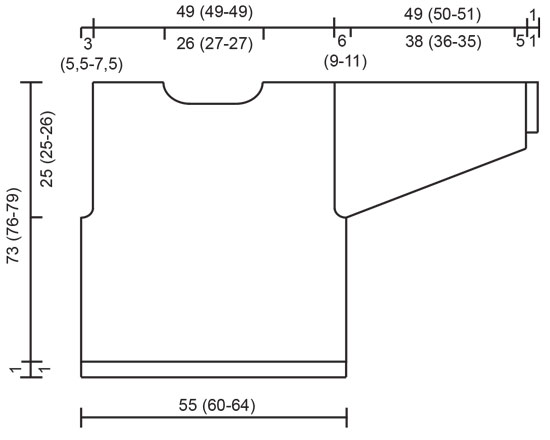
Tensión: 20 pts x 26 filas con aguja de 4 mm en punto jersey = 10 x 10 cm Pts en pt musgo con una aguja circular: Trabajar 1 vuelta de derecho, 1 vuelta de revés. Patrón: Ver el diagrama. 1 diagrama = 1 repetición. Delantero y espalda: Trabajar en redondo con una aguja circular. Montar 221-238-255 pts con una aguja circular de 5 mm con blanco hueso de Muskat. Cambiar a una aguja de 4 mm y continuar el patrón. Recordar mantener la tensión del tejido. Cuando la labor mida 43-46-48 cm - ajustar a después de la 1ª fila del patrón - terminar la labor en pt jersey. Cuando la labor mida 48-51-53 cm cerrar 4 pts a cada lado para la sisa (delantero = 107-115-124 pts, espalda = 106-115-123 pts) y terminar cada parte por separado. Delantero: = 107-115-124 pts. Dism para la sisa a cada lado cada 2ª fila: 2 pts 2-3-4 veces y 1 pt 1-3-5 veces = 97-97-98 pts. Cuando la labor mida 68-71-74 cm cerrar los 43-43-44 pts centrales para el escote y dism para dar forma de la línea del escote cada 2ª fila: 2 pts 1 vez y 1 pt 3 veces. Cerrar los pts restantes cuando la labor mida 73-76-79 cm. Espalda: = 106-115-123 pts. Dism para la sisa como se describe para el delantero = 96-97-97 pts. Cuando la labor mida 71-74-77 cm cerrar los 48-49-49 pts centrales para el escote y dism 2 pts en la línea del escote en la siguiente fila. Cerrar los pts restantes cuando la labor mida 73-76-79 cm. Mangas: Montar 43-43-43 pts con agujas de doble punta de 5 mm con blanco hueso de Muskat. Cambiar a una aguja de 4 mm y continuar con el patrón – asegurarse de tener una repetición del patrón en el centro superior de la manga y trabajar los pts que no entran en el patrón en la 6ª fila en pt jersey hasta que entren en el patrón.. Al mismo tiempo cuando la labor mida 5-5-5 cm aum 2 pts en el centro bajo la manga un total de 28-28-30 veces como sigue: talla S + M cada 3ª y 4ª vuelta, talla L cada 3ª vuelta = 99-99-103 pts – incorporar los pts aum en el patrón a la vez que se avanza. Cuando la labor mida 43-41-40 cm cerrar 4 pts en el centro bajo la manga y terminar la manga de ida y vuelta en la aguja. Dism para la copa de la manga a cada lado cada 2ª fila: 4-3-2 pts 8-12-15 veces y cerrar los pts restantes. La manga mide aprox. 49-50-51 cm. Terminación: Unir los hombros. Recoger aprox. 100 a 110 pts alrededor del escote con agujas de doble punta de 4 mm con blanco hueso de Muskat y trabajar 2 filas en pt musgo, cerrar. Borde a ganchillo: Trabajar con un ganchillo de 3mm alrededor de la cenefa inferior, las cenefas de las mangas y de la línea del escote como sigue: 1 fila de pb, girar y trabajar *4 p.de cad, 1 pa en el 1º p.de cad, saltar 2 pts y 1 pb en el sig pt*, repetir de * a *. Colocar las mangas. |
|||||||||||||
Explicaciones del diagrama |
|||||||||||||
|
|||||||||||||
 |
|||||||||||||
 |
|||||||||||||
¿Terminaste este patrón?Entonces, etiqueta tus fotos con #dropspattern o envíalas a la galería #dropsfan. ¿Necesitas ayuda con este patrón?Encontrarás 26 videos tutoriales, un espacio para comentarios/preguntas y más visitando la página del patrón en garnstudio.com © 1982-2026 DROPS Design A/S. Todos los derechos reservados. Este documento, incluyendo todas sus sub-secciones, está protegido por los derechos de autor (copyright). Lee más acerca de lo que puedes hacer con nuestros patrones en la parte de abajo de cada patrón de nuestro sitio. |
|||||||||||||


Con más de 40 años en el diseño de modelos de punto y de ganchillo, DROPS Design ofrece una de las más vastas colecciones de patrones gratuitos en el internet - traducidos en 17 idiomas. Al día de hoy, contamos con 324 catálogos y 12290 patrones - de los cuales 11675 están traducidos en español.
Nosotros trabajamos con mucho esmero para brindarte lo mejor que las labores de punto y ganchillo tienen para ofrecer,inspiración y consejos, así como hilos de magnífica calidad a precios increíbles! Te gustaría usar nuestros patrones para otro fin además del uso personal? Puedes leer acerca de lo que estás permitida a hacer en el texto de Copyright en la parte de abajo de todos nuestros patrones. Felices labores!
Escribe un comentario sobre DROPS 45-8
¡Nos encantaría saber qué piensas acerca de este patrón!
Si quieres escribir una pregunta referente al patrón, por favor asegúrate de elegir la categoría correcta en el formulario debajo, para acelerar el proceso de respuesta. Los campos obligatorios están marcados con un *.