
Categorías populares
¿Buscas un hilo?


















Comentarios / Preguntas (55)
 Kathy escribió:
It's a beautiful sweater. The only thing I don't like is when it comes to increases. It's not specific, it's easy to make a mistake and miscalculate. Have to be figured out by the crocheted. That's what makes it harder and unknowable. Sorry.
22.08.2026 - 05:56DROPS Design respondió:
Dear Kathy, to know how to increase evenly, click on the tool icon at the bottom right corner of the page, and use the "increase calculator". Happy crochetin!
24.08.2026 - 07:50
 Aiden escribió:
Hi, I understand that the pattern calls for a number of stitches divisible into 3, so I don't quite get one thing. No final number after increases for size xxxl and xxl is divisible into 3. For example, after arrow 5 increase there should be 340 stitches for size xxl according to the pattern. Yet, 340 isn't divisible into 3 and by continuing the pattern with this many stitches, we get a problem with the lace pattern that is divisible into 3. Kind regards
23.07.2026 - 03:58DROPS Design respondió:
Dear Aiden, the number of stitches include the first stitch so that when you get 340 sts you should have 340-1st stitch =339 / 3 sts each A.1 = 113 repeats of A.1 all the round. Same for each arrow. - see also INFO CROCHET. Happy crocheting!
11.08.2026 - 12:42
ELAINE escribió:
I have tried twice and i am having to many stitches i cant work how ive gone wrong i have the right number after the increase but after the 4th row and before the 2nd increase is the 3rd row miss 2 stitches between the v as i have missed one between each v ,,,,im about to give up
10.07.2026 - 12:21DROPS Design respondió:
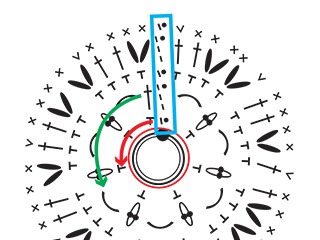
Dear Elaine, in the 2nd row, with the first arrow, you increased stitches according to your size. Regardless of the size worked the number of stitches should still be divisible into 3. So, over all stitches, including the increased ones, you will now work row 3 of the chart. This is worked as follows: *skip one, [treble crochet, chain stitch, treble crochet] in the middle stitch, skip one*. So you skip the first and last stitch in the round and skip 2 stitches between each V. Here the number of stitches will be 2/3 of the stitches in the previous round. Now, in round 4, skip all treble crochets and work 3 treble crochets in each chain stitch. After row 4, you should be back to the number of stitches in round 2. So the number of stitches is now correct and we have the lace pattern from rounds 3-4 of the chart. Happy crochetting!
13.07.2026 - 00:22
 Astrid escribió:
Hallo, mit NS 3.5 in der Maschenprobe 10x10cm habe ich 18 Maschen und 8 Reihen, möchte aber gerne diese Nadelstärke beibehalten! Stimmt es, dass ich mit 88 Maschen anfangen muss und 18 M verteilt in der 1. Reihe aufnehmen muss? Außerdem habe ich ein Problem mit dem Diagramm: die Pfeile sind doch immer an den einfachen Stäbchenreihen…? Grüßle
20.06.2026 - 21:55DROPS Design respondió:
Liebe Astrid, wenn Sie die richtigen Maschenprobe nicht haben, dann sollen Sie die ganze Anleitung für Ihtre Größe umrechnen, damit alle fertigen Maßnahmen stimmen (sonnst wird Ihre Arbeit zu klein sein). Z.B. hier beginnt mann in die 1. Größe mit 100 M = ca 50 cm; mit 88 Maschen enden Sie mit Ihrer Maschenprobe mit nur 49 cm. Die Zunahmen entstehen immer in einer Reihe, die nur mit Stäbchen gehäkelt wird. Viel Spaß beim Stricken!
22.06.2026 - 09:07
 Tiny escribió:
Leuk patroon. Maar omschrijving onduidelijk. Ik begrijp de tekentjes niet. De eerste 3 toeren heb ik af. En dan … ?? Begrijp niet ,hoe, nu verder?
17.06.2026 - 17:00DROPS Design respondió:
Dag Tiny,
De streepje met de dichte bolletjes zijn stokjes welke je om de losse haakt. Deze losse heb je op de toer daarvoor tussen 2 stokjes gehaakt.
17.06.2026 - 20:59
Iris escribió:
Ich verstehe nicht das ich vor Rumpf und Ärmelaufteilung 385 Maschen habe und nach Aufteilung 268 haben soll?Denn 385 -2x73 sind 239!Wurde im Text etwas vergessen?
24.05.2026 - 21:30DROPS Design respondió:
Liebe Iris, aber dazu kommen noch 15 Luftmaschen (anstatt die Ärmelmaschen), so haben Sie: 60 Stb + 15 Lm + 119 Stb + 15 Lm + 59 Stb = 268 Maschen. Viel Spaß beim Häkeln!
26.05.2026 - 16:32
 Lucie escribió:
Est-ce qu'on pourrait vivre au Canada ET parler français? Si on demande des info en choisissant le Canada votre système tourne automatiquement en anglais par défaut. Il y a des francophones qui vivent à l'extérieur de la France.
14.05.2026 - 14:20DROPS Design respondió:
Bonjour Lucie, tout à fait, c'est également le cas pour la Belgique et la Suisse, souvenez-vous de considérer ici le français comme une langue et pas comme le pays, vous resterez ainsi toujours sur les pages en français. Bon tricot!
15.05.2026 - 09:00
Carol escribió:
Thank you. I understand the paytern. However, the numbers are a problem. After the triangle stitches and 3dc in each triangle, i get 234. How can i inrease to 187?
11.05.2026 - 04:11DROPS Design respondió:
Dear Carol, in 3rd size you have 157 sts after the first arrow; then you repeat A.1 over 3 sts as follows: *skip 1 st, then work in the next stitch (1 dc + 1 ch + 1 dc) and skip 1 st*, repeat from *-* - so that the number of sts will not change (3 sts worked over 3 sts - you just get 2 unworked sts between each dc-group. Happy crocheting!
11.05.2026 - 09:59
Carol escribió:
Im confused about chart A1 - Double crochet 3 rows, then?? 3 double crochets in each stitch? how do I make the v.
08.05.2026 - 16:11DROPS Design respondió:
Dear Carol, start reading A.1 bottom up from the right corner. Work first 2 rows with 1 double crochet in each double crochet (make sure to increase evenly as stated for your size), then on 3rd row work (skip 1, in next dc work (1 dc+1ch+1dc), skip 1) and repeat from (to). On 4th row work 3 double crochets in each ch-space; then work 1 double in each double crochet on row for the next 4 rows (increasing evenly on each row with an arrow). And continue like that. Happy crocheting!
08.05.2026 - 16:35
Odilia escribió:
Die Anleitung finde ich sehr gut,sie ist gut umzusetzen, einfach ein Daumen hoch!
07.05.2026 - 07:54
|
|||||||||||||
Bonnie Blue#bonniebluesweater |
|||||||||||||
 |
 |
||||||||||||
Jersey a ganchillo en DROPS Belle. La labor está realizada en redondo, de arriba abajo con canesú redondo, patrón de calados, manga corta y aberturas laterales. Tallas: S - XXXL.
DROPS 250-9 |
|||||||||||||
|
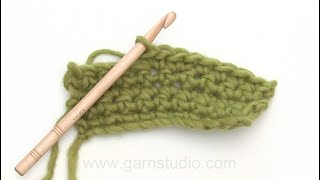
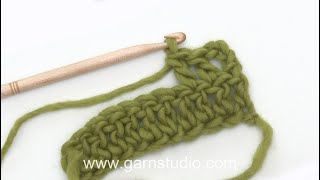
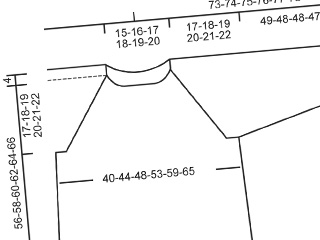
------------------------------------------------------- EXPLICACIONES PARA REALIZAR LA LABOR: ------------------------------------------------------- PUNTO DE CADENETA: Si se trabaja en la punta del ganchillo el punto de cadeneta quedará a menudo muy tenso; 1 punto de cadeneta debería ser tan largo como el ancho de 1 punto alto. INFORMACIÓN PARA TRABAJAR A GANCHILLO: Al inicio de cada vuelta, trabajar 3 puntos de cadeneta (= este es 1 punto alto) además de los puntos en el diagrama A.1. La vuelta termina con 1 punto enano en el 3º punto de cadeneta al inicio de la vuelta. PATRÓN: Ver el diagrama A.1. A.x muestra cómo se repite el patrón en vertical. TIP PARA LOS AUMENTOS (repartidos): Aumentar en una vuelta con 1 punto alto en cada punto alto. Para calcular cómo aumentar puntos repartidos, contar el número total de puntos en la vuelta (p.e., 100 puntos) y dividir entre el número de aumentos a trabajar (p.e., 22) = 4,5. En este ejemplo, aumentar trabajando 2 puntos altos en cada 4º y 5º punto alternadamente. TIP PARA LAS DISMINUCIONES (para las mangas): Disminuir en la vuelta con 1 punto alto en cada punto alto, trabajando 2 puntos altos juntos como sigue: * Hacer 1 hebra, insertar el ganchillo a través del siguiente punto alto, recoger el hilo, hacer 1 hebra y pasar el hilo por los primeros 2 bucles en el ganchillo *, trabajar de * a * un total de 2 veces, hacer 1 hebra y pasar el hilo por los 3 bucles en el ganchillo (1 punto alto disminuido). ------------------------------------------------------- COMENZAR LA LABOR AQUÍ: ------------------------------------------------------- JERSEY - RESUMEN DE LA LABOR: El cuello y el canesú se trabajan en redondo desde el centro de la espalda y de arriba abajo. El canesú se divide para el cuerpo y las mangas y el cuerpo se continúa en redondo, mientras se dejan las mangas en espera. El cuerpo se divide y se termina de ida y vuelta, trabajando una abertura a cada lado. Las mangas se trabajan en redondo. Se trabaja una vuelta de puntos bajos alrededor de la línea del escote para terminar. LÍNEA DEL ESCOTE: Trabajar 100-106-109-115-118-130 PUNTOS DE CADENETA – ver descripción arriba, con un ganchillo de 3.5 mm y DROPS Belle. Formar un anillo con 1 punto enano en el 1º punto de cadeneta. Leer INFORMACIÓN PARA TRABAJAR A GANCHILLO arriba, trabajar 1 vuelta de puntos altos y aumentar 22-22-22-25-25-25 puntos altos repartidos en la vuelta - leer TIP PARA LOS AUMENTOS = 121-127-130-139-142-154 puntos. CANESÚ: Comenzar la vuelta con 3 pupntos de cadeneta (= 1 punto alto), después repetir A.1 en la vuelta. En las vueltas marcadas con flechas en el diagrama aumentar como sigue - recordar TIP PARA LOS AUMENTOS y la TENSIÓN! FLECHA 1: Aumentar 24-27-27-30-36-39 puntos altos repartidos = 145-154-157-169-178-193 puntos. FLECHA 2: Aumentar 24-27-30-36-36-42 puntos altos repartidos = 169-181-187-205-214-235 puntos. FLECHA 3: Aumentar 27-27-30-39-42-45 puntos altos repartidos = 196-208-217-244-256-280 puntos. FLECHA 4: Aumentar 27-30-33-39-42-45 puntos altos repartidos = 223-238-250-283-298-325 puntos. FLECHA 5: Aumentar 27-30-33-39-42-45 puntos altos repartidos = 250-268-283-322-340-370 puntos. FLECHA 6: Aumentar 27-33-36-39-45-45 puntos altos repartidos = 277-301-319-361-385-415 puntos. Continuar el patrón como se muestra en A.x hasta que la labor mida 20-20-23-23-25-27 cm y la siguiente vuelta sea una vuelta con 1 punto alto en cada punto alto. La labor se mide ahora desde aquí! DIVIDIR PARA EL CUERPO Y LAS MANGAS: Trabajar 3 puntos de cadeneta (= 1 punto alto), 43-48-49-55-60-64 puntos altos (aprox. mitad de la espalda), 9-9-12-12-15-18 puntos de cadeneta (en el lado bajo la manga), saltar 52-55-61-70-73-79 puntos altos (manga), trabajar 86-95-98-110-119-128 puntos altos (delantero), 9-9-12-12-15-18 puntos de cadeneta (en el lado bajo la manga), saltar 52-55-61-70-73-79 puntos altos (manga) y trabajar 43-47-49-55-59-64 puntos altos (aprox. mitad de la espalda). El cuerpo y las mangas se terminan por separado. CUERPO: = 190-208-220-244-268-292 puntos. Trabajar 3 puntos de cadeneta (= 1 punto alto) y el patrón A.x como antes, hasta que el cuerpo mida 6-6-7-7-7-9 cm desde la división. Ahora aumentar 6-6-6-6-6-6 puntos altos repartidos - recordar TIP PARA LOS AUMENTOS = 196-214-226-250-274-298 puntos. Cuando el cuerpo mida 13-13-14-14-14-16 cm desde la división, aumentar 9-6-9-6-6-6 puntos altos repartidos = 205-220-235-256-280-304 puntos. Continuar trabajando hasta que el cuerpo mida 24-26-25-26-26-26 cm desde la división. Cortar el hilo. Ahora dividir para la abertura a cada lado. Dejar la labor a un lado e insertar 1 marcapuntos a cada lado con 102-110-117-128-140-152 puntos en el delantero y 103-110-118-128-140-152 puntos en la espalda. Terminar el delanteor y la espalda por separado. DELANTERO: = 102-110-117-128-140-152 puntos. Trabajar de ida y vuelta con 1 punto alto en cada punto alto, hasta que la abertura mida 4 cm. El jersey mide aprox. 52-54-56-58-60-62 cm desde el hombro. ESPALDA: = 103-110-118-128-140-152 puntos. Trabajar de ida y vuelta con 1 punto alto en cada punto alto, hasta que la abertura mida 4 cm. MANGAS: Comenzar la vuelta en el centro de los 9-9-12-12-15-18 puntos de cadeneta trabajados a un lado del cuerpo. Trabajar 3 puntos de cadeneta (= 1 punto alto) y A.x en redondo como antes = 61-64-73-82-88-97 puntos. Cuando la manga mida 3-3-4-4-5-5 cm, disminuir 3-3-3-3-3-3 puntos altos repartidos – leer TIP PARA LAS DISMINUCIONES = 58-61-70-79-85-94 puntos. TALLA XL: Cuando la manga mida 8 cm, disminuir 3 puntos altos repartidos – recordar TIP PARA LAS DISMINUCIONES = 76 puntos. TODAS LAS TALLAS: Continuar el patrón hasta que la manga mida 17-17-15-16-14-12, con al menos 2 vueltas sin el patrón de calados en la parte inferior de la manga. LÍNEA DEL ESCOTE: Comenzar en el centro de la espalda, asegurar el hilo con 1 punto enano y trabajar 1 punto bajo entre cada punto alto de la vuelta 1. Terminar con 1 punto enano en el 1º punto bajo. |
|||||||||||||
Explicaciones del diagrama |
|||||||||||||
|
|||||||||||||
 |
|||||||||||||
 |
|||||||||||||
¿Terminaste este patrón?Entonces, etiqueta tus fotos con #dropspattern #bonniebluesweater o envíalas a la galería #dropsfan. ¿Necesitas ayuda con este patrón?Encontrarás 13 videos tutoriales, un espacio para comentarios/preguntas y más visitando la página del patrón en garnstudio.com © 1982-2026 DROPS Design A/S. Todos los derechos reservados. Este documento, incluyendo todas sus sub-secciones, está protegido por los derechos de autor (copyright). Lee más acerca de lo que puedes hacer con nuestros patrones en la parte de abajo de cada patrón de nuestro sitio. |
|||||||||||||
Con más de 40 años en el diseño de modelos de punto y de ganchillo, DROPS Design ofrece una de las más vastas colecciones de patrones gratuitos en el internet - traducidos en 17 idiomas. Al día de hoy, contamos con 333 catálogos y 12536 patrones - de los cuales 12030 están traducidos en español.
Nosotros trabajamos con mucho esmero para brindarte lo mejor que las labores de punto y ganchillo tienen para ofrecer,inspiración y consejos, así como hilos de magnífica calidad a precios increíbles! Te gustaría usar nuestros patrones para otro fin además del uso personal? Puedes leer acerca de lo que estás permitida a hacer en el texto de Copyright en la parte de abajo de todos nuestros patrones. Felices labores!
Escribe un comentario sobre DROPS 250-9
¡Nos encantaría saber qué piensas acerca de este patrón!
Si quieres escribir una pregunta referente al patrón, por favor asegúrate de elegir la categoría correcta en el formulario debajo, para acelerar el proceso de respuesta. Los campos obligatorios están marcados con un *.