
Categorías populares
¿Buscas un hilo?


Comentarios / Preguntas (9)
![]() Sally Ann escribió:
Sally Ann escribió:
Kan ikke forstå i siger kanterne i perlestrik,når jeg forstørrer billedet, ser det ud som glatstrik på kanterne?
15.04.2026 - 11:54
![]() Roz Sherris escribió:
Roz Sherris escribió:
Thanks very much for your reply - I understand better now. But it means that 3 stitches are worked then moved to holder/thread at the beginning of EVERY row, not 'every 2nd row' as the pattern currently states.
24.05.2024 - 17:33DROPS Design respondió:
Dear Mrs Sherris, slipping stitches at the beginning of the row on each side is the same as slipping stitches one every other row on each side, just a different way to say this, but same effect. Happy knitting!
27.05.2024 - 09:11
![]() Roz Sherris escribió:
Roz Sherris escribió:
Hello Drops. Lovely pattern but don't understand this: "Then put sts on the holder for sleeve caps every 2nd row: 3 (3) sts 8 (12) times, 5 (3) sts 2 (1) times. " Do I add 3 stitches at BOTH ends of every second row to the holder with the 6 stitches around the marker? My holders only open at one end. I can't visualise it nor find a diagram or video to help me. Thanks!
24.05.2024 - 14:43DROPS Design respondió:
Dear Sherris, so that the sleeve cap is symmetrical you should add the same number of stitches on the thread on each side, ie at the beg of each row, work the first 3 stitches from right side and place them on a stitch holder/thread (it can be the same as the one with the middle 6 sts mid under sleeve) then continue row as before, turn work the first 3 stitches from wrong side on a stitch holder/thread then continue row as before, turn, repeat these 2 rows a total of 8 or 12 times, then repeat with 5 sts in first size a total of 2 times and 1 more time with 3 sts on each side in the 2nd size. Now work 2 cm reverse stocking stitch for 2 cm. Happy knitting!
24.05.2024 - 16:04
![]() Andreea escribió:
Andreea escribió:
Hi,please tell me if the whole sweater is worked in seed stitch or only the 2 cm from the beginning and then continue in stockinette stitch. Thank you.
25.03.2024 - 12:20DROPS Design respondió:
Dear Andrea, only the edging is knitted with seed stitch, the stranded pattern is knitted with stocking stitch. I hope this helps. Happy Knitting!
26.03.2024 - 22:15
![]() Sue escribió:
Sue escribió:
Hi. I have purchased the yarn and ready to start this lovely pattern. However I haven’t done steeking before and wondered how I can adapt it so I don’t have to. Hope you can help Thank you
14.07.2023 - 13:35DROPS Design respondió:
Hi Sue, if you don’t want to steek, you will have to knit all pieces (2 fronts, back and both sleeves) separately, adding 1 stitch from each side for seems. All the patterns will be worked in flat (how we do that see HERE). If you knit in a continental way, see HERE. If your yarn is not too smooth and slippery, steeking is not so difficult. If you decide to do steeking, please see our video HERE. Happy knitting!
15.07.2023 - 15:45
![]() Jenny escribió:
Jenny escribió:
Kate had a question about the 2nd line of the pattern which states to knit 7.5" of seed stitch. You said this was incorrect and the pattern would be corrected. That was in 2017 and I recently downloaded the pattern and the error has not been corrected. Regards.
06.08.2022 - 15:21DROPS Design respondió:
Dear Jenny, thanks for your feedback UK pattern has now been edited, US pattern should be edited soon. Happy knitting!
08.08.2022 - 08:16
![]() Monica escribió:
Monica escribió:
Ik vroeg me af hoeveel mm de knopen zijn, want helaas is dit nummer knoop nergens meer te koop.
30.05.2022 - 16:15DROPS Design respondió:
Dag Monica,
Eerlijk gezegd weet ik niet wat de diameter van de knopen zijn. Het is vaak het handigst om met je kledingstuk naar een verkooppunt te gaan er daar knopen bij te zoeken die door de gaatjes passen.
04.06.2022 - 21:45
![]() Francoise Decourt escribió:
Francoise Decourt escribió:
Bonjour je suis au niveau encolure a 36 cm de hauteur totale je diminue les 11mailles centrales soit 3 de chaque cote des 5 mailles steek. Ma question : dois je continuer en rang aller retour ensuite et dans ce cas continuer le jacquard sur les rangs envers ce qui est complexe ou me suis je trmpee dans l'interpretation du modele Merci pour votre reponse - desolee pour l accentuation mais impossible poster cette question avec accentuation depuis hier
02.02.2019 - 09:23DROPS Design respondió:
Bonjour Mme Decourt, effectivement, après avoir rabattu les mailles de l'encolure, vous continuez en allers et retours à partir de l'encolure, sur l'envers, lisez les diagrammes de gauche à droite, en commençant bien à la maille par laquelle vous avez terminé sur l'endroit pour que le motif tombe juste. Bon tricot!
04.02.2019 - 11:00
![]() Kate escribió:
Kate escribió:
When I made this years ago, but adjusted the pattern so I did not use a steek. It is one of my favorite sweaters. But in the 2d line of the instructions for the body. But neither the photo (nor my first jacket) shows a seed stitch or 7" in white before Pattern 1 starts. Instead, it looks like a border of no more than a few inches at most. I must be missing something! Please advise.
26.07.2017 - 22:01DROPS Design respondió:
Dear Kate, you are correct, you should work the seed stitch edge for only 2 cm (= approx. 0.79 inch). Correction will be made. Thank you. Happy knitting!
27.07.2017 - 09:12
|
|||||||
DROPS 50-14 |
|||||||
|
|
|||||||
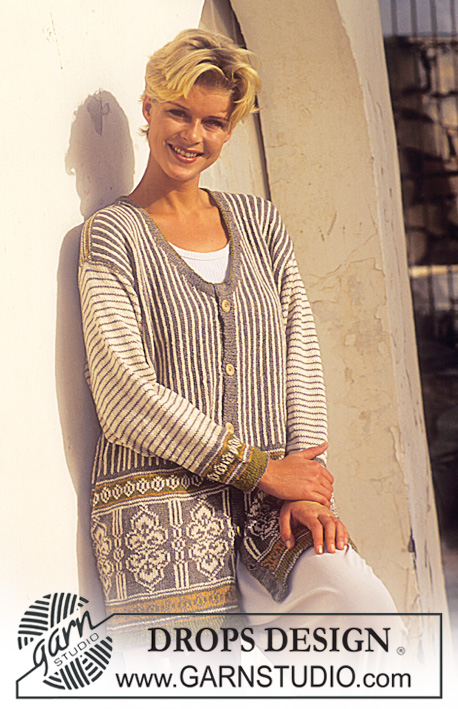
Cardigan con flores en Safran.
DROPS 50-14 |
|||||||
|
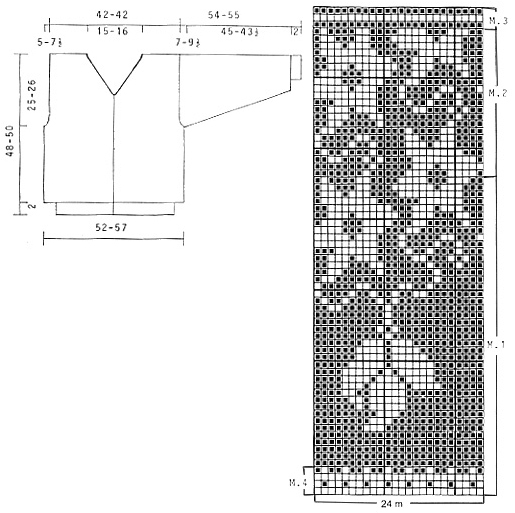
Tensión: 23 pts x 30 filas con aguja de 3.5 mm con el patrón = 10 x 10 cm Patrón: Ver diagrama. Un diagrama = una repetición del patrón. Punto arroz (con número de pts par): 1ª fila: *1d, 1r* 2ª fila: *1r, 1d* Punto arroz (con número de pts impar): todas las filas: 1d, *1r, 1d* Punto arroz en redondo: Fila 1: *1d, 1r* Fila 2: Trabajar de derecho sobre los reveses y de revés sobre los derechos de la fila anterior. CUERPO Trabajar el Borde de ida y vuelta en la aguja. Montar 230 (250) pts con una aguja de 2mm con blanco hueso y trabajar de ida y vuelta en punto arroz 2 cm. Cambiar a una aguja circular de 3.5mm y montar 5 pts en el centro del delantero para la abertura. Unir la labor, con cuidado de no retorcerla y comenzar el Patrón 1 después de 5 pts de la abertura. Al mismo tiempo, aum 10 (14) pts repartidos en la 1ª fila. 240 (264) + 5 pts de la abertura. Después del Patrón 1 trabajar el Patrón 2. Cuando la labor mida 23 (24) cm, trabajar la siguiente fila como sigue: trabajar 5 pts de la abertura, 57 (63) pts del delantero, cerrar 6 pts para las sisas, 114 (126) pts de la espalda, cerrar 6 pts para las sisas, 57 (63) pts del delantero. En la siguiente fila montar 5 pts sobre los 6 pts cerrados a cada lado para las aberturas bajo la manga. Dism para las sisas a cada lado de los 5 pts de la abertura en el lado cada 2ª fila: 1 pt 8 (14) veces. Cada Delantero = 49 (49) pts + 5 pts de la abertura en el centro del delantero. Espalda = 98 (98) pts. Cuando la labor mida 34 (36) cm, cerrar los 9 (11) pts centrales del delantero (incluyendo los 5 pts de la abertura) en el delantero para el escote. Después cerrar en la cenefa del escote cada 2ª fila: 2 pts 2 veces, 1 pt 9 veces, y después cada 4ª fila: 1 pt 3 veces. Cuando la labor mida 46 (48) cm, cerrar los 32 (34) pts centrales en la espalda para el escote. Después cerrar 2 pts a cada lado del escote en la espalda en la siguiente fila y trabar el Patrón 3 al mismo tiempo. Cerrar cuando se haya trabajado el Patrón 3 y la labor mida aprox. 48 (50) cm. MANGAS Montar 56 (58) pts con agujas de doble punta de 2mm con blanco hueso. Unir, con cuidado de no retorcer los pts. Colocar un marcapuntos en la unión y trabajar 2cm en punto arroz. Cambiar a agujas de doble punta de 3.5mm y trabajar el Patrón 4 1 vez y después en punto jersey con café hasta alcanzar las medidas finales. Al mismo tiempo, después del borde en punto arroz, aum 1 pt a cada lado del marcapuntos 30 (31) veces cada 4ª fila. 116 (120) pts. Cuando la labor mida 47 (45.5) cm, colocar 3 pts a cada lado del marcapuntos en un gancho auxiliar y trabajar la labor de ida y vuelta en la aguja. Después colocar pts en un gancho auxiliar para la copa de la manga cada 2ª fila: 3 (3) pts 8 (12) veces, 5 (3) pts 2 (1) veces. La labor mide aprox. 54 (55) cm. Colocar todos los pts en la misma aguja circular y trabajar 2 cm en punto jersey revés para la costura sobre el borde de la abertura en el cuerpo. Cerrar flojo. Terminación: Coser un marcapuntos hacia abajo por el centro de los pts de la abertura bajo la manga y en el centro del delantero. Hacer dos costuras a máquina alrededor de los marcapuntos, 1/2 punto a cada lado. Cortar las aberturas para las mangas y el centro del delantero. Hacer las costuras de los hombros. Coser las mangas al cuerpo por el lado derecho como sigue: Coser un punto alternadamente en la última fila de derecho en la manga antes del borde de costura y un punto en el cuerpo después de la costura a máquina. Girar el cardigan de dentro hacia fuera y hacer una costura a mano desde la manga sobre el borde de la abertura en el cuerpo. Recoger aprox. 75-80 pts por el delantero izquierdo con una aguja circular de 2mm con blanco hueso y trabajar 3cm en punto arroz de ida y vuelta en la aguja. Repetir en el delantero derecho, pero después de 1cm trabajar 5 ojales repartidos en la fila. 1 ojal = cerrar 2 pts y montar 2 pts nuevos sobre los pts cerrados en la siguiente fila. Recoger aprox. 140-144 pts alrededor del escote y sobre la cenefa de botones con una aguja circular de 2mm con blanco hueso y trabajar 2 cm en punto arroz. Coser los botones. |
|||||||
Explicaciones del diagrama |
|||||||
|
|||||||
 |
|||||||
¿Terminaste este patrón?Entonces, etiqueta tus fotos con #dropspattern o envíalas a la galería #dropsfan. ¿Necesitas ayuda con este patrón?Encontrarás 26 videos tutoriales, un espacio para comentarios/preguntas y más visitando la página del patrón en garnstudio.com © 1982-2026 DROPS Design A/S. Todos los derechos reservados. Este documento, incluyendo todas sus sub-secciones, está protegido por los derechos de autor (copyright). Lee más acerca de lo que puedes hacer con nuestros patrones en la parte de abajo de cada patrón de nuestro sitio. |
|||||||


Con más de 40 años en el diseño de modelos de punto y de ganchillo, DROPS Design ofrece una de las más vastas colecciones de patrones gratuitos en el internet - traducidos en 17 idiomas. Al día de hoy, contamos con 324 catálogos y 12290 patrones - de los cuales 11685 están traducidos en español.
Nosotros trabajamos con mucho esmero para brindarte lo mejor que las labores de punto y ganchillo tienen para ofrecer,inspiración y consejos, así como hilos de magnífica calidad a precios increíbles! Te gustaría usar nuestros patrones para otro fin además del uso personal? Puedes leer acerca de lo que estás permitida a hacer en el texto de Copyright en la parte de abajo de todos nuestros patrones. Felices labores!
Escribe un comentario sobre DROPS 50-14
¡Nos encantaría saber qué piensas acerca de este patrón!
Si quieres escribir una pregunta referente al patrón, por favor asegúrate de elegir la categoría correcta en el formulario debajo, para acelerar el proceso de respuesta. Los campos obligatorios están marcados con un *.