
Categorías populares
¿Buscas un hilo?


Comentarios / Preguntas (25)
![]() Anna escribió:
Anna escribió:
In English (UK), the description suggests that you first knit the hat to a length of 26 cm, then knit another 17 cm until the decrease. (You can start decreasing when the piece measures 43 cm) In Hungarian (and some other languages) the description suggests that you knit 32 cm, then knit another 23 cm. (You can start decreasing when the piece measures 55 cm.) Which is correct? What is the recommended length for a size S/M beanie?
16.01.2025 - 12:45DROPS Design respondió:
Dear Anna, since the pattern was translated and uploaded its English version was reedited. Thank you for bringing to our attention, now the online Hungarian version is also updated. Happy Knitting!
17.01.2025 - 13:42
![]() Manon escribió:
Manon escribió:
Dans l'explication en français, il y a une erreur qui m'a fait douter un long moment "Augmenter ainsi 6-7-8 fois au total". 3 propositions pour 2 tailles ... Dans l'explication en anglais c'est "augmenter 6-7..." Le 8 est en trop en français. Maintenant que j'ai compris les explications je vais commencer le bonnet :)
16.01.2025 - 12:33DROPS Design respondió:
Bonjour Manon et merci pour votre retour, les explications ont été corrigées. Bon tricot!
16.01.2025 - 17:52
![]() Laudia escribió:
Laudia escribió:
Ho un giro testa di 50 cm come faccio per gli aumenti e le diminuzioni e l‘avvio? grazie
28.11.2024 - 15:32DROPS Design respondió:
Buonasera Laudia, deve adattare le spiegazioni alle sue misure: per un aiuto più personalizzato può rivolgersi al suo rivenditore DROPS di fiducia. Buon lavoro!
26.12.2024 - 22:55
![]() Anna escribió:
Anna escribió:
Hej! Jeg er/var godt i gang med seks udtagninger i hver runde (i 7 runder) efterfulgt af udtagninger i hver anden runde i 11 runder. Men når jeg nu måler mit arbejde måler det ikke 10 cm jf. jeres opskrift, men i stedet 16 cm.. Hvad kan jeg have gjort forkert?
27.11.2024 - 11:11DROPS Design respondió:
Hej Anna, strikker du i DROPS Baby Merino og har du 24 m i bredden og 32 varv i højden på 10x10 cm får du 10 cm. Hvis du strikker løsere eller med tykkere garn, fylder pindene mere og da vil arbejdet blive større.
28.11.2024 - 14:44
![]() Debra De Witt escribió:
Debra De Witt escribió:
How do you insert a marker in the middle of three stitches?
18.11.2024 - 15:08DROPS Design respondió:
Dear Mrs De Witt, our stitch markers can be locked around a stitch and then follow piece/stitch by and by, round after round; but you can also use a marker thread around a stitch as shown in this video. Happy knitting!
19.11.2024 - 07:37
![]() Cynthia escribió:
Cynthia escribió:
Hi. Like other knitters I’m confused by this pattern. If I repeat from *~* then the last part of round 1 is a make yarn over. How is this (the last YO) knitted on the following round for round 2? Thanks!
17.11.2024 - 18:16DROPS Design respondió:
Dear Cynthia, all yarn overs are knitted twisted in the next round, including the last one. Happy knitting!
17.11.2024 - 23:28
![]() Debra escribió:
Debra escribió:
I’m confused with “Knit 3 and insert a marker in the middle of these three stitches.” How do you insert a marker in the middle 3, attach it to the second (middle) stitch? If there were 4, I’d put it between the second and third. Thank you.
14.11.2024 - 17:43
![]() Carey escribió:
Carey escribió:
Hi, I cannot get 18 stitches in the first round of increasing, I get 17! I don’t know where I am going wrong. Knit 3, make 1, knit 1, make 1, knit 3, make 1, knit 1, make 1 etc! I go from 12 stitches to 17! Please help, sorry for my ignorance.
28.10.2024 - 07:16DROPS Design respondió:
Dear Carey, there are 12 sts and 3 markers and you increase on each side of each marker (K3, YO, K1, YO) x 3 = 6 x3=18 sts (worked over (K3,K1)x3=12 sts). Happy knitting!
28.10.2024 - 10:08
![]() Carol Maitland escribió:
Carol Maitland escribió:
Hi thank you so much for your responses concerning this pattern. Have another question where does round 2 come into play,the yarn overs at the beginning and at the end only.thks so much,I aplogize for all these question with this pattern.Carol Maitland
22.10.2024 - 18:35DROPS Design respondió:
Dear Mrs Maitland, sorry I might misunderstand your question, the round 2 is worked after first round with increases, then you increase on every round and afterwards on every other round. The yarn overs worked to increase will always be knitted twisted (into back of loop) to avoid holes. Happy knitting!
23.10.2024 - 08:06
![]() Carol Maitland escribió:
Carol Maitland escribió:
Hi I have another question concerning this pattern. I understand the instructions for round 1 and round 2,but having trouble understanding the increase tip starting where it says increase like this every round 6 or 7 times.So I knit stocking stitch and increase 1 stitch on each side of marker then what do i do.Also dont understand when they say then every 2nd round 11 times,are they ref to round 2 with the yarn overs.Thks so much Carol.
21.10.2024 - 18:12DROPS Design respondió:
Dear Mrs Maitland, you are right you continue working stocking stich and increase on each side of each marker (you increase 6 sts on each increase round), you increase like this a total of 6, 7 or 8 times on every round, then increase on every other round (1 round with increases as before, 1 round without increases) a total of 11 times. Happy knitting!
22.10.2024 - 08:58
|
|
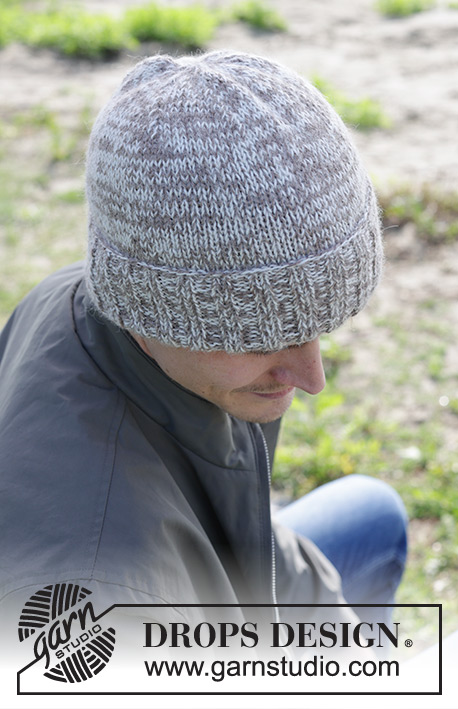
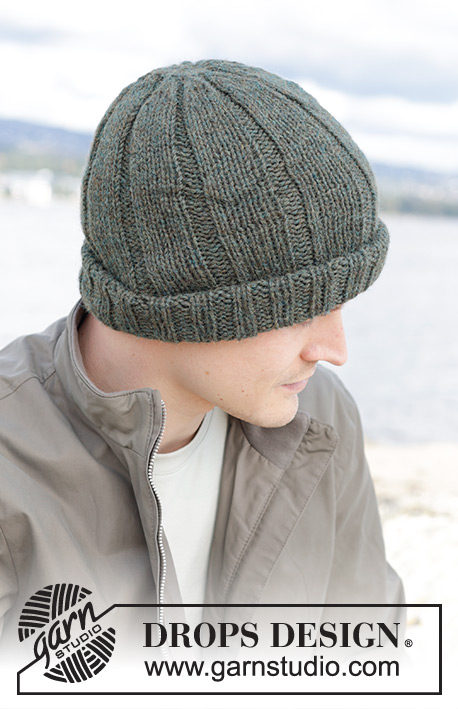
Blank Slate Hat#blankslatehat |
|
 |
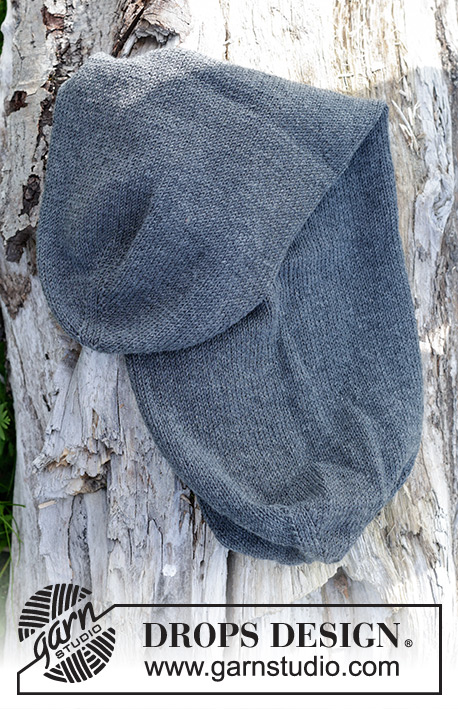 |
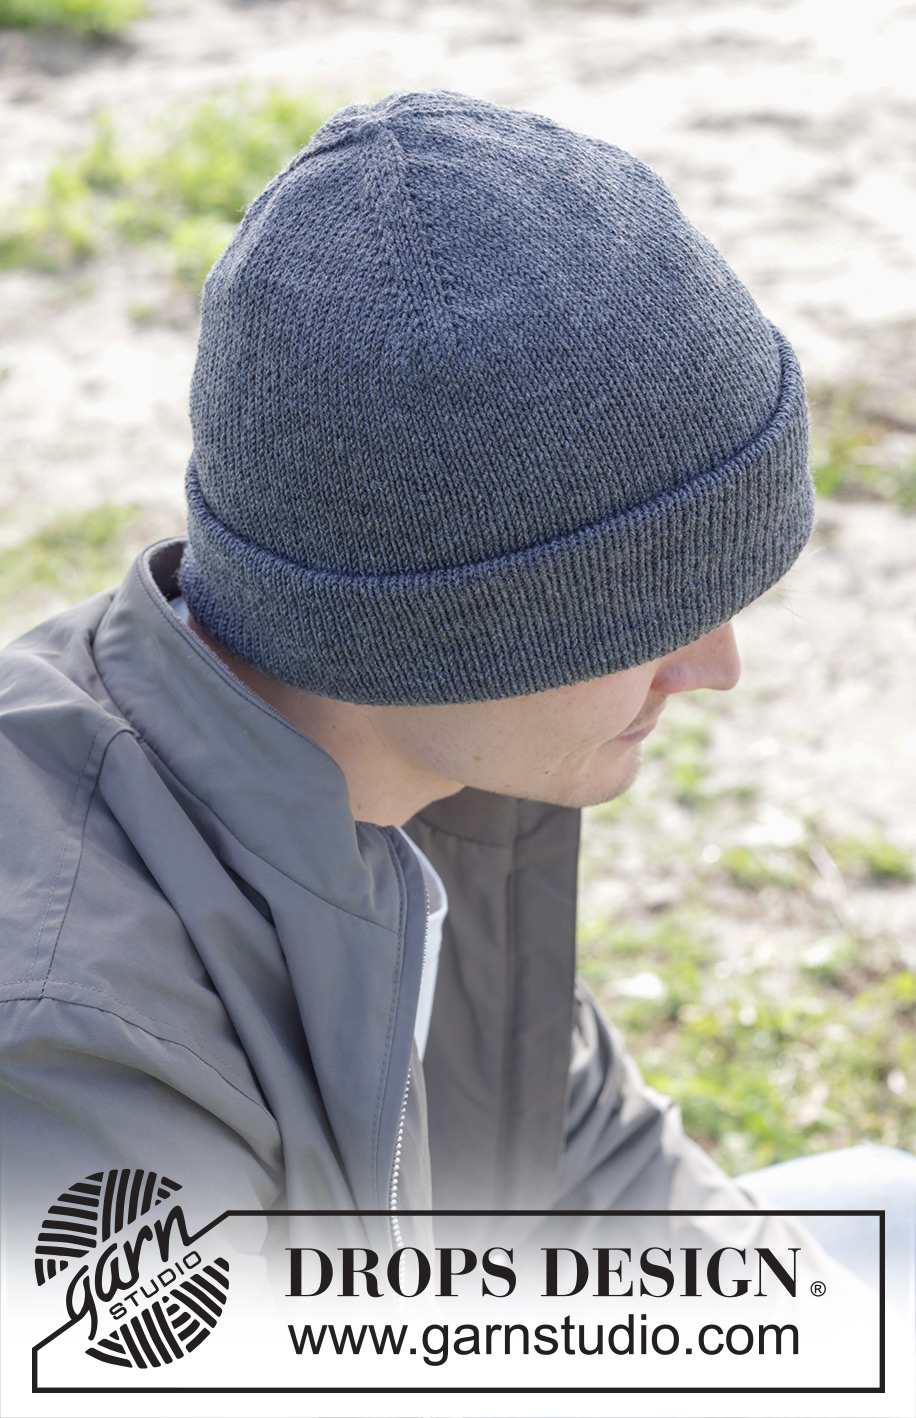
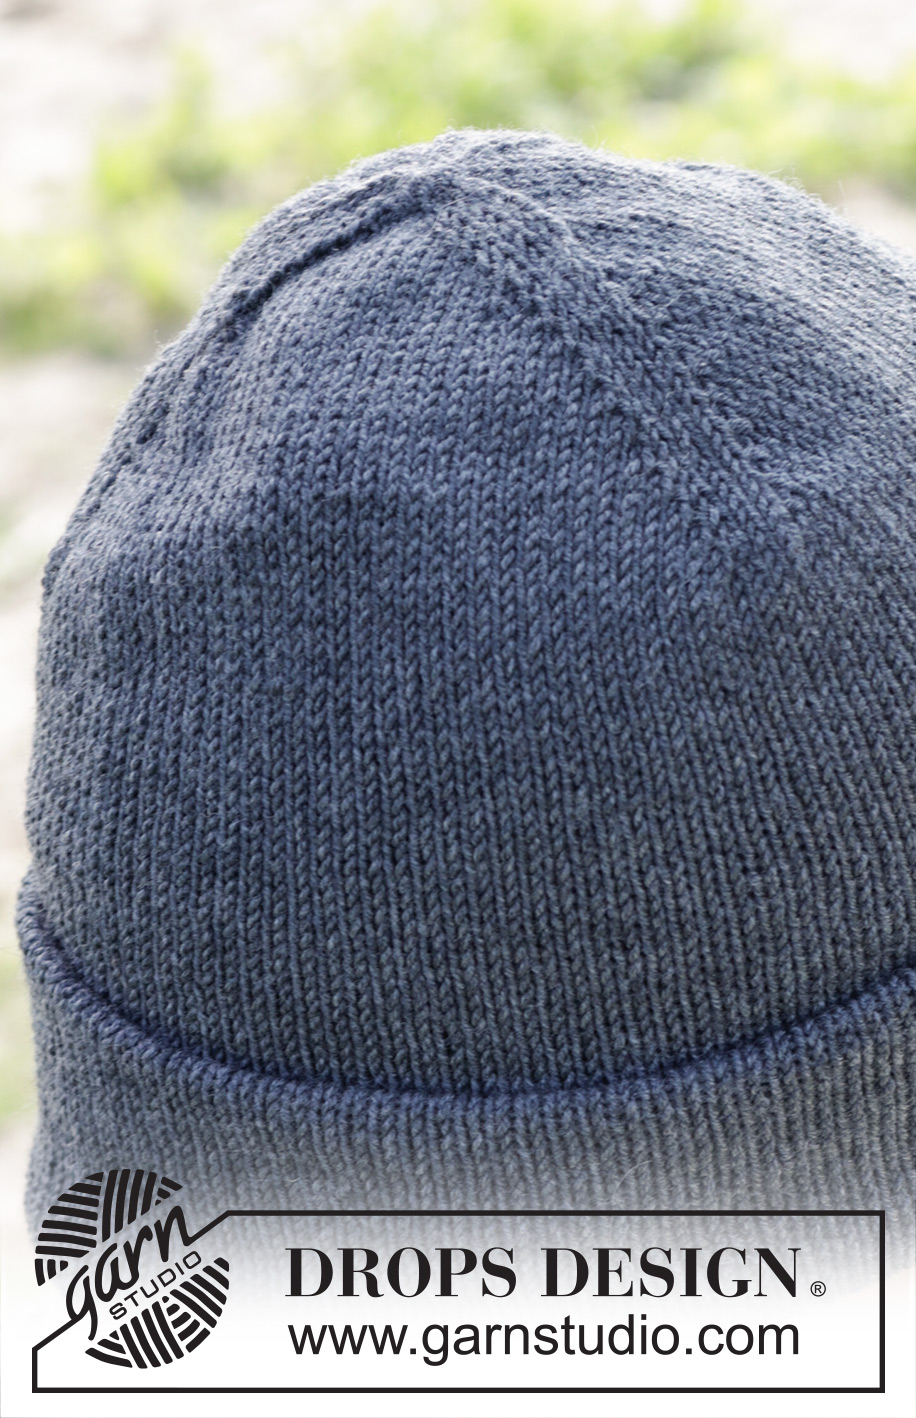
Gorro a doble cara a punto para hombre en DROPS Baby Merino. Talla M – XL.
DROPS 246-27 |
|
|
------------------------------------------------------- EXPLICACIONES PARA REALIZAR LA LABOR: ------------------------------------------------------- TIP PARA LOS AUMENTOS: Aumentar a cada lado de cada punto con marcapuntos como sigue: trabajar hasta que quede 1 punto antes del punto con marcapuntos, hacer 1 hebra, 3 derechos (el punto con marcapuntos está en el punto central), hacer 1 hebra (= 2 puntos aumentados). En la siguiente vuelta trabajar las hebras de derecho retorcido para evitar que se formen agujeros. TIP PARA LAS DISMINUCIONES: Disminuir a cada lado de cada punto con marcapuntos como sigue: Trabajar hasta que queden 2 puntos antes del punto con marcapuntos, 2 puntos juntos de derecho, 1 derecho (punto con marcapuntos), deslizar 1 punto como de derecho, 1 derecho y pasar el punto deslizado sobre el punto trabajado (2 puntos disminuidos). ------------------------------------------------------- COMENZAR LA LABOR AQUÍ: ------------------------------------------------------- GORRO - RESUMEN DE LA LABOR: El gorro se trabaja en redondo con agujas de doble punta, cambiar a una aguja circular a la vez que se aumenta. El gorro se trabaja aumentando puntos, trabajando hacia abajo, después disminuir puntos en el otro extremo. El gorro parecerá un tubo, cerrado en ambos extremos. El tubo se inserta en sí mismo para crear un tejido doble en punto jersey. GORRO: Montar 12 puntos con agujas de doble punta de 3.5 mm y DROPS Baby Merino. VUELTA 1: * 3 derechos e insertar 1 marcapuntos en el medio de estos puntos, hacer 1 hebra, 1 derecho, hacer 1 hebra *, trabajar de * a * hasta el final de la vuelta = 3 marcapuntos. VUELTA 2: Trabajar de derecho, las hebras se trabajan de derecho retorcido = 18 puntos. Continuar con punto jersey y aumentar 1 punto a cada lado del punto con marcapuntos - leer TIP PARA LOS AUMENTOS (= 6 puntos aumentados). Aumentar de esta manera cada vuelta un total de 6-7 veces, después cada 2ª vuelta 11 veces. Todos los aumentos están terminados, hay 120-126 puntos y la labor mide aprox. 9-10 cm desde el borde de montaje. RECORDAR MANTENER LA TENSIÓN DEL TEJIDO! Permitir que los marcapuntos sigan la labor hacia delante – se usarán también al disminuir. NOTA! Es importante cerrar el agujero en la parte superior ahora. Usar una aguja y pasar el hilo a través de los puntos, estirar y asegurar por el lado revés. Continuar con punto jersey en redondo hasta que la labor mida 26-27 cm; la mitad del gorro está terminado. Insertar un marcapuntos (usado para medir desde aquí). Continuar con punto jersey en redondo hasta que la labor mida 17-17 cm desde el marcapuntos. Ahora disminuir 1 punto a cada lado de cada punto con marcapuntos - leer TIP PARA LAS DISMINUCIONES (= 6 puntos repartidos). Disminuir de esta manera cada 2ª vuelta un total de 11 veces, después cada vuelta 6-7 veces. Cuando se hayan terminado todas las disminuciones quedan 18 puntos. Trabajar la siguiente vuelta como sigue: * 2 puntos juntos de derecho, 1 derecho *, trabajar de * a * hasta el final de la vuelta = 12 puntos. Cortar el hilo. Pasarlo por los puntos restantes y estirar. Asegurar el hilo para que sea invisible por el lado derecho. Insertar el gorro en sí mismo, desde el marcapuntos, para obtener un tejido doble en punto jersey tanto por dentro como por fuera; se puede usar por ambos lados. Doblar los 6 cm inferiores hacia arriba por el lado derecho. |
|
¿Terminaste este patrón?Entonces, etiqueta tus fotos con #dropspattern #blankslatehat o envíalas a la galería #dropsfan. ¿Necesitas ayuda con este patrón?Encontrarás 12 videos tutoriales, un espacio para comentarios/preguntas y más visitando la página del patrón en garnstudio.com © 1982-2026 DROPS Design A/S. Todos los derechos reservados. Este documento, incluyendo todas sus sub-secciones, está protegido por los derechos de autor (copyright). Lee más acerca de lo que puedes hacer con nuestros patrones en la parte de abajo de cada patrón de nuestro sitio. |
|


Con más de 40 años en el diseño de modelos de punto y de ganchillo, DROPS Design ofrece una de las más vastas colecciones de patrones gratuitos en el internet - traducidos en 17 idiomas. Al día de hoy, contamos con 324 catálogos y 12290 patrones - de los cuales 11675 están traducidos en español.
Nosotros trabajamos con mucho esmero para brindarte lo mejor que las labores de punto y ganchillo tienen para ofrecer,inspiración y consejos, así como hilos de magnífica calidad a precios increíbles! Te gustaría usar nuestros patrones para otro fin además del uso personal? Puedes leer acerca de lo que estás permitida a hacer en el texto de Copyright en la parte de abajo de todos nuestros patrones. Felices labores!
Escribe un comentario sobre DROPS 246-27
¡Nos encantaría saber qué piensas acerca de este patrón!
Si quieres escribir una pregunta referente al patrón, por favor asegúrate de elegir la categoría correcta en el formulario debajo, para acelerar el proceso de respuesta. Los campos obligatorios están marcados con un *.