
Categorías populares
¿Buscas un hilo?


Comentarios / Preguntas (25)
![]() Carol Maitland escribió:
Carol Maitland escribió:
Hi thank you for your response.I am not understanding completely so I will ask the question another way. Do we increase on both rows round 1and round 2 before and after the marker.2nd round has the yo do I increase on this row. Sorry,thks so much Carol.
02.03.2026 - 16:59DROPS Design respondió:
Hi Carol, Yes you increase every round 6-7 times (depending on the size you are working), then every 2nd round 11 times. Regards, Drops Team.
03.03.2026 - 06:49
![]() Carol Maitland escribió:
Carol Maitland escribió:
Hi I am not understanding the pattern and just want to verify that I am reading it correctly. After putting on the 18 stitches,I start knitting the first round incl 1 stitch on each side of the marker.Then round two I knit the yarn overs twisted.My question is do I still include 1 stitch on each side of the markeralong with knitting the yarn overs twisted on the second round only.Thks Carol.
01.03.2026 - 20:07DROPS Design respondió:
Hi Carol, After working the yarn overs twisted, on round 3 you increase right before and straight after the marker-stitches in the same way as on round 1 (the first yarn overs are now incorporated into the stocking stitch). Regards, Drops Team.
02.03.2026 - 06:51
![]() Carol Maitland escribió:
Carol Maitland escribió:
Hi I am a bit confused.I knit the first 3 stitches putting a marker on the middle stitch which would be the second stitch.Then I do a yo then knit 1 then it asked for another yo then what.I keep redoing and redoing and end up always with 17 stitches instead of 18.Thks Carol.
04.01.2026 - 17:28DROPS Design respondió:
Hi Carol, You repeat from the first asterix to the second x 3: Knit 3 and insert the marker in the second stitch. 1 YO, knit 1, 1 YO, knit 3 and insert marker in 2nd stitch, 1 YO, knit 1, 1 YO, knit 3 and insert marker in 2nd stitch, 1 YO, knit 1, 1 YO. You have made 6 YOs and your original 12 stitches are now 18. Regards, Drops Team.
05.01.2026 - 06:53
![]() Judi escribió:
Judi escribió:
I have a question about the location of marking when the hat is half finished. For the first half, if I read correctly, for size XL I knit 10 cm over the increases, then an additional 9 cm with no increase or decreases, for a total of 33 cm from the cast on (23 cm from end of increases). However the instructions state to knit only 17 cm before starting to decrease. Is there a misprint in where to mark the midpoint? Also do you have a video on how to invisably fasten the end yarn on right side?
21.12.2025 - 13:59DROPS Design respondió:
Hi Judi, the marker in size XL will be after 27 cm from the cast-on edge - half the hat is finished. How to invisably fasten the end yarn you will find HERE. Happy knitting!
29.01.2026 - 15:32
![]() Bogi escribió:
Bogi escribió:
Eine schöne und gut verständliche Anleitung, dies war die allererste Mütze, die ich je gestrickt habe. Allerdings habe ich mich darüber geärgert, dass ich nur 2 Knäuel also 100g verbraucht habe. In der Anleitung sind als Verbrauch jedoch 3 Knäuel (150g) angegeben. Vielleicht korrigieren Sie diese Angabe 😊
01.12.2025 - 14:09
![]() Kath escribió:
Kath escribió:
Bonjour, j'aurais 2 questions de clarification: 1) A quel rang commence t-on à tricoter en rond? 2) Je ne comprends pas comment il est possible de terminer un rang avec un jeté plutôt qu'entre 2 mailles? Merci
02.11.2025 - 21:55DROPS Design respondió:
Bonjour Kath, le bonnet se tricote en rond dès le début; vous allez donc pouvoir terminer par 1 jeté vu que vous tricotez en rond. Si vous voulez tricoter ce bonnet en allers et retours, cette leçon pourra vous aider. Bon tricot!
03.11.2025 - 08:50
![]() Lisa Lebrija escribió:
Lisa Lebrija escribió:
For at udtagningerne skal lige dem på billedet, skal der tages ud på følgende måde efter der er slået 12 masker op. Strik 2 m ret, slå om, strik 2 m ret, slå om, Dette gøres 2 gange endnu. 2. omgang strikkes på følgende måde: 2 m ret, omslaget strikkes drejet ret til højre, 2 m ret, næste omslag strikkes ret til venstre. Så kommer det til at ligne udtagningerne på billedet af huen.
05.07.2025 - 17:45
![]() Lisa Lebrija escribió:
Lisa Lebrija escribió:
Jeg kan ikke få udtagningerne til at passe med udtagningerne på billedet. På billedet er der udtagninger på hver side af 2 masker. I opskriften er der kun 1 maske imellem hver udtagning. Så hvor er fejlen? Der står efter 2. omgang der nu skal tages ud på HVER pind. Vil det sige 2. omgang ikke skal strikkes før der er 18 masker ialt? Det bliver jo meget "hullet" med udtagninger på hver pind, uden en omgang ret uden udtagninger.
05.07.2025 - 11:14DROPS Design respondió:
Hei Lisa. Husk å lese UDTAGNINGSTIPS: Der tages ud på hver side af hver maske med mærke således: Strik til der er 1 maske tilbage før masken med mærke, slå om, strik 3 masker ret (mærket sidder i den midterste af disse masker), slå om (= 2 masker taget ud). Så det er 3 masker mellom hver kast. Strikk slik det er forklart på 1. og 2. pinne. Når du skal strikke 3. pinne (og videre), strikkes det glattstrikk og økninger (les udtagningstips), det økes på hver omgang totalt 6-7 ganger, før det skal økes på hver 2. omgang. mvh DROPS Design
07.07.2025 - 13:14
![]() Lalita escribió:
Lalita escribió:
Please let me ask about increasing and decreasing. After increasing 1 set, there will be 3 knitted stitches between the yarn over each side, but for decreasing, after knitting 2 together, knit 1 at the marker stitch, slip 1 knit 1 and pass the slipped knit over, the will be only 2 stitches between the decreased knit. Shouldn't we knit 2 (including the maker-stitch) before slipping 1 stitch?
08.04.2025 - 04:12DROPS Design respondió:
Dear Lalita, feel free to adjust where you will work the last (K2 tog) to get either K2 tog, K1 all the round or rather K1, K2 tog all the round, as you think it will look better, this round is the last one and this shouldn't be that visible. Happy knitting!
08.04.2025 - 09:47
![]() Tina escribió:
Tina escribió:
Hej Drops. Jeg vil gerne strikke denne her i 2 farver, hvor mange centimeter er der til midten?
13.02.2025 - 16:34DROPS Design respondió:
Hej Tina, Hele huen måler 26 eller 27 cm og så bukker du 6 cm op :)
18.02.2025 - 10:01
|
|
Blank Slate Hat#blankslatehat |
|
 |
 |
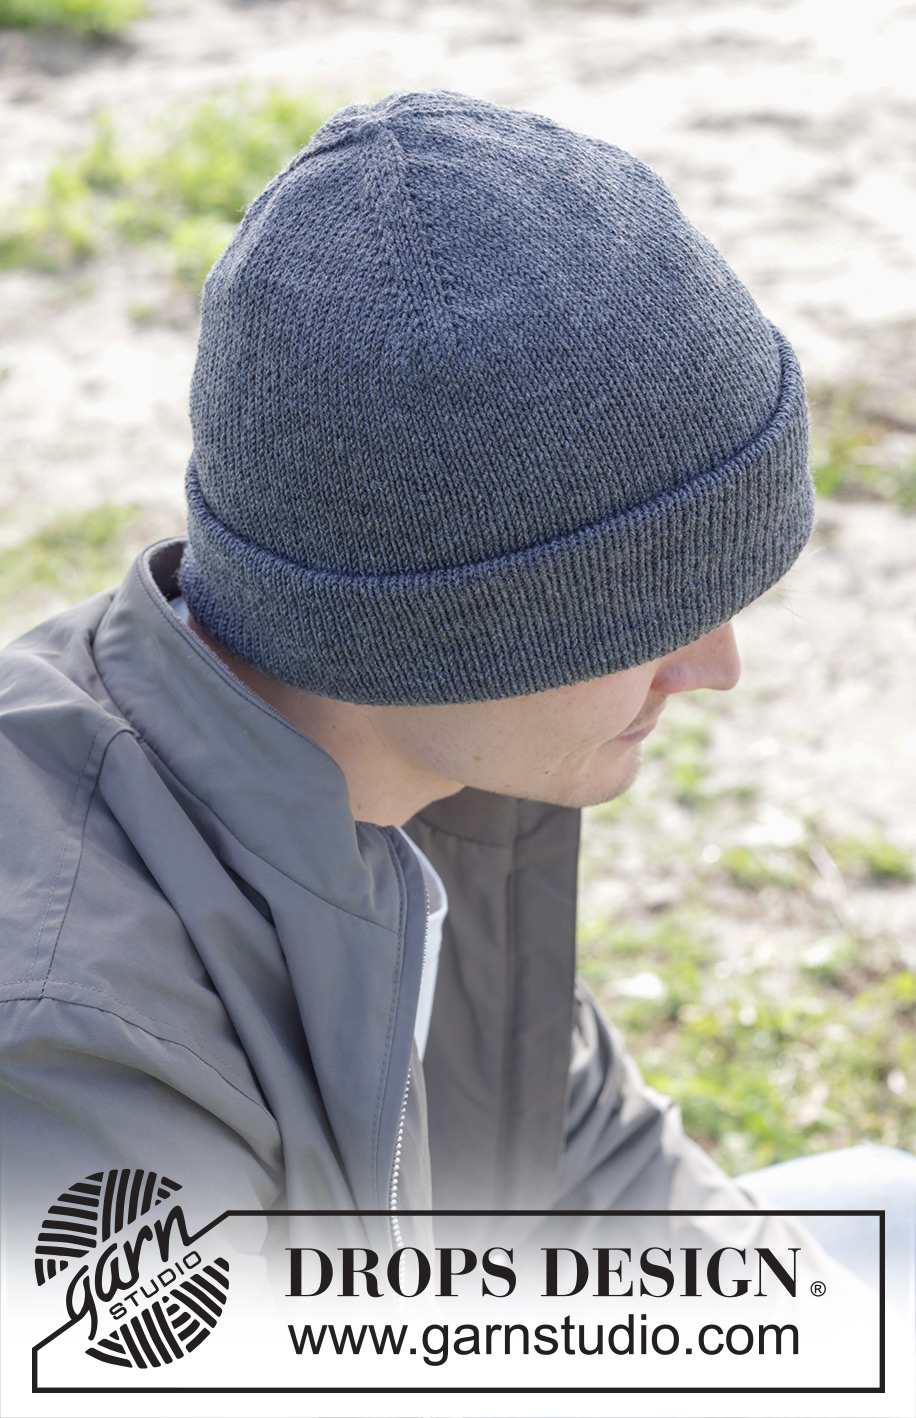
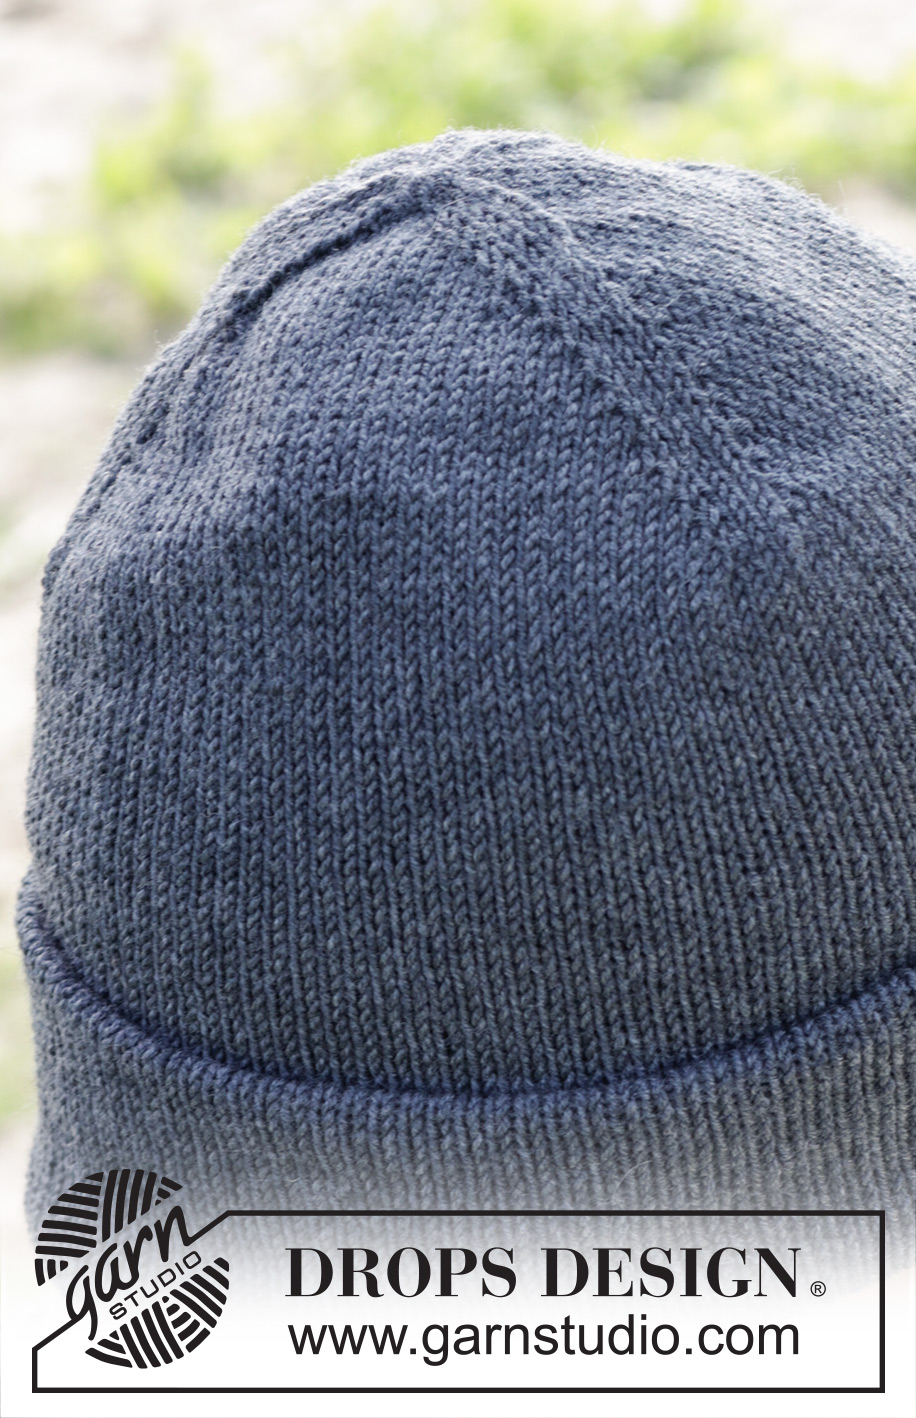
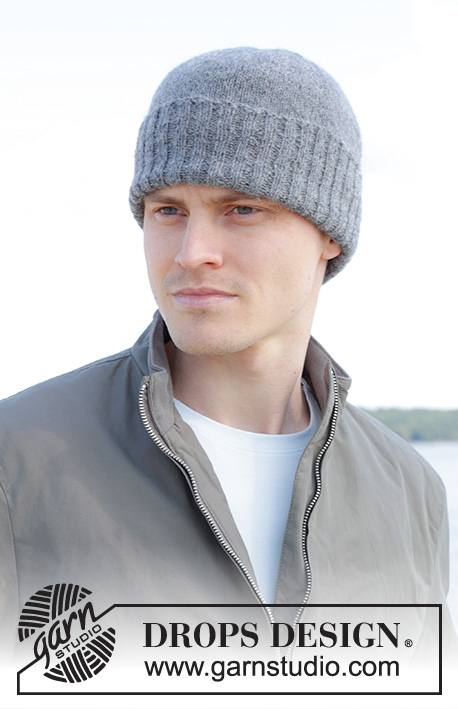
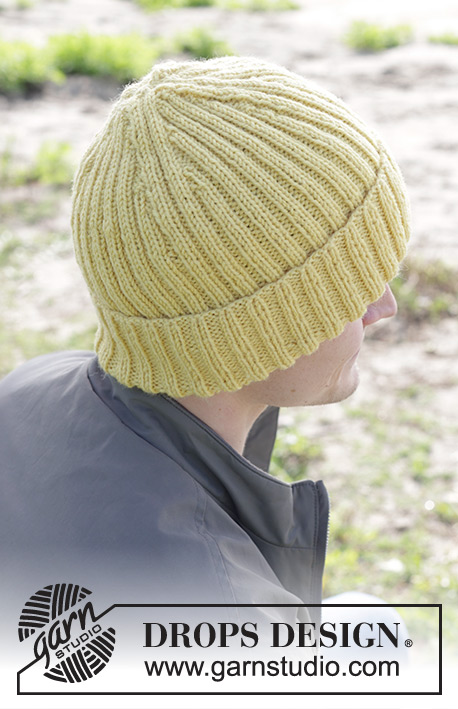
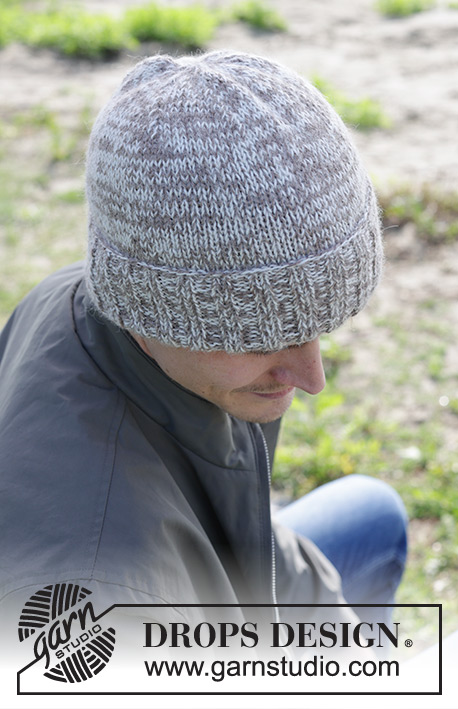
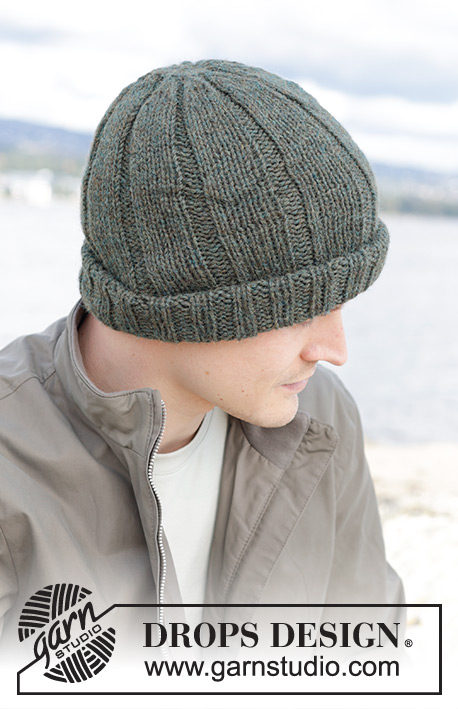
Gorro a doble cara a punto para hombre en DROPS Baby Merino. Talla M – XL.
DROPS 246-27 |
|
|
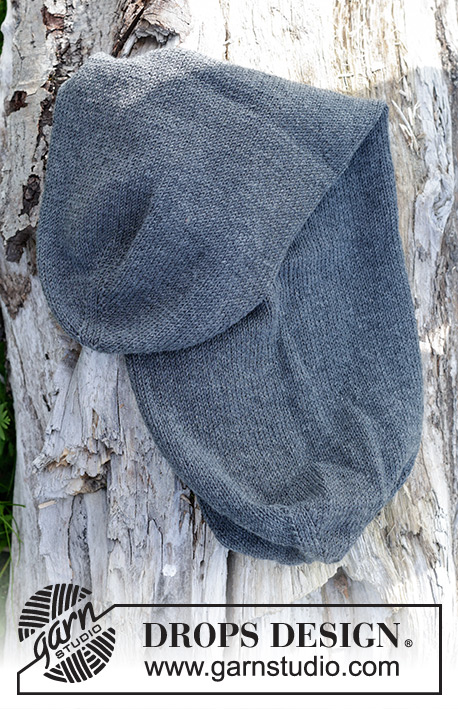
------------------------------------------------------- EXPLICACIONES PARA REALIZAR LA LABOR: ------------------------------------------------------- TIP PARA LOS AUMENTOS: Aumentar a cada lado de cada punto con marcapuntos como sigue: trabajar hasta que quede 1 punto antes del punto con marcapuntos, hacer 1 hebra, 3 derechos (el punto con marcapuntos está en el punto central), hacer 1 hebra (= 2 puntos aumentados). En la siguiente vuelta trabajar las hebras de derecho retorcido para evitar que se formen agujeros. TIP PARA LAS DISMINUCIONES: Disminuir a cada lado de cada punto con marcapuntos como sigue: Trabajar hasta que queden 2 puntos antes del punto con marcapuntos, 2 puntos juntos de derecho, 1 derecho (punto con marcapuntos), deslizar 1 punto como de derecho, 1 derecho y pasar el punto deslizado sobre el punto trabajado (2 puntos disminuidos). ------------------------------------------------------- COMENZAR LA LABOR AQUÍ: ------------------------------------------------------- GORRO - RESUMEN DE LA LABOR: El gorro se trabaja en redondo con agujas de doble punta, cambiar a una aguja circular a la vez que se aumenta. El gorro se trabaja aumentando puntos, trabajando hacia abajo, después disminuir puntos en el otro extremo. El gorro parecerá un tubo, cerrado en ambos extremos. El tubo se inserta en sí mismo para crear un tejido doble en punto jersey. GORRO: Montar 12 puntos con agujas de doble punta de 3.5 mm y DROPS Baby Merino. VUELTA 1: * 3 derechos e insertar 1 marcapuntos en el medio de estos puntos, hacer 1 hebra, 1 derecho, hacer 1 hebra *, trabajar de * a * hasta el final de la vuelta = 3 marcapuntos. VUELTA 2: Trabajar de derecho, las hebras se trabajan de derecho retorcido = 18 puntos. Continuar con punto jersey y aumentar 1 punto a cada lado del punto con marcapuntos - leer TIP PARA LOS AUMENTOS (= 6 puntos aumentados). Aumentar de esta manera cada vuelta un total de 6-7 veces, después cada 2ª vuelta 11 veces. Todos los aumentos están terminados, hay 120-126 puntos y la labor mide aprox. 9-10 cm desde el borde de montaje. RECORDAR MANTENER LA TENSIÓN DEL TEJIDO! Permitir que los marcapuntos sigan la labor hacia delante – se usarán también al disminuir. NOTA! Es importante cerrar el agujero en la parte superior ahora. Usar una aguja y pasar el hilo a través de los puntos, estirar y asegurar por el lado revés. Continuar con punto jersey en redondo hasta que la labor mida 26-27 cm; la mitad del gorro está terminado. Insertar un marcapuntos (usado para medir desde aquí). Continuar con punto jersey en redondo hasta que la labor mida 17-17 cm desde el marcapuntos. Ahora disminuir 1 punto a cada lado de cada punto con marcapuntos - leer TIP PARA LAS DISMINUCIONES (= 6 puntos repartidos). Disminuir de esta manera cada 2ª vuelta un total de 11 veces, después cada vuelta 6-7 veces. Cuando se hayan terminado todas las disminuciones quedan 18 puntos. Trabajar la siguiente vuelta como sigue: * 2 puntos juntos de derecho, 1 derecho *, trabajar de * a * hasta el final de la vuelta = 12 puntos. Cortar el hilo. Pasarlo por los puntos restantes y estirar. Asegurar el hilo para que sea invisible por el lado derecho. Insertar el gorro en sí mismo, desde el marcapuntos, para obtener un tejido doble en punto jersey tanto por dentro como por fuera; se puede usar por ambos lados. Doblar los 6 cm inferiores hacia arriba por el lado derecho. |
|
¿Terminaste este patrón?Entonces, etiqueta tus fotos con #dropspattern #blankslatehat o envíalas a la galería #dropsfan. ¿Necesitas ayuda con este patrón?Encontrarás 12 videos tutoriales, un espacio para comentarios/preguntas y más visitando la página del patrón en garnstudio.com © 1982-2026 DROPS Design A/S. Todos los derechos reservados. Este documento, incluyendo todas sus sub-secciones, está protegido por los derechos de autor (copyright). Lee más acerca de lo que puedes hacer con nuestros patrones en la parte de abajo de cada patrón de nuestro sitio. |
|


Con más de 40 años en el diseño de modelos de punto y de ganchillo, DROPS Design ofrece una de las más vastas colecciones de patrones gratuitos en el internet - traducidos en 17 idiomas. Al día de hoy, contamos con 324 catálogos y 12290 patrones - de los cuales 11675 están traducidos en español.
Nosotros trabajamos con mucho esmero para brindarte lo mejor que las labores de punto y ganchillo tienen para ofrecer,inspiración y consejos, así como hilos de magnífica calidad a precios increíbles! Te gustaría usar nuestros patrones para otro fin además del uso personal? Puedes leer acerca de lo que estás permitida a hacer en el texto de Copyright en la parte de abajo de todos nuestros patrones. Felices labores!
Escribe un comentario sobre DROPS 246-27
¡Nos encantaría saber qué piensas acerca de este patrón!
Si quieres escribir una pregunta referente al patrón, por favor asegúrate de elegir la categoría correcta en el formulario debajo, para acelerar el proceso de respuesta. Los campos obligatorios están marcados con un *.