
Categorías populares
¿Buscas un hilo?


Comentarios / Preguntas (14)
![]() Janet escribió:
Janet escribió:
Important pattern information, the designers vision on how to wear, when added to a pattern is highly appreciated by knitters/crocheters, for example: “ The coat is designed for an oversized fit with approx. 20-25 cm / 8-10 inches of positive ease, meaning it is designed to be about 20–25 cm / 8-10 inches larger in circumference than your bust measurement, depending on preference.” Thank you.
10.02.2025 - 08:59
![]() Janet escribió:
Janet escribió:
Dear Drops Design, Referring to my question of 28.01.2025: your given answer is very all round and a bit insulting on the intelligent of the human being actually. I'm not asking where I can find the measurement chart, I'm asking for other details which are not in the measurement chart. If you don't have those details, that’s an answer too: honest and not insulting. So, can you please look at my question again for an apropropiate answer? Love to hear from you and thank you in advance.
30.01.2025 - 08:43DROPS Design respondió:
Dear Janet, our models wear an M size; we don't have the exact bust measurements of each of our models. In the measurement chart you can find the exact measurement of the garment's bust for size M, which would be 140cm all around. If what you want to find out is the amount of ease, this will vary greatly for each wearer, depending on your exact measurements. So we don't use that kind of terminology normally in our patterns. Happy knitting!
02.02.2025 - 19:44
![]() Janet escribió:
Janet escribió:
Dear Drops Design, What high-bust circumference has the human model in the photographs and what size Pearl Falls Slipover is she wearing? Love to hear from you and thank you in advance.
27.01.2025 - 16:50DROPS Design respondió:
Hi Janet, There is a measurements chart at the bottom of the pattern, with all the measurements for the different sizes. Happy knitting!
28.01.2025 - 06:45
![]() Bodil Lindell escribió:
Bodil Lindell escribió:
Hej Hur syr man ihop med maskstygn när plagget är stickat i moss stickning? Hittar beskrivning på detta bara för slätstickning
30.10.2024 - 21:10DROPS Design respondió:
Hej Bodil, det er samme teknik når du syr maskstygn oavsett om du syr slätstickat eller mosstickat :)
31.10.2024 - 09:27
![]() Artemys escribió:
Artemys escribió:
How much ease should this garment have? To be honest the size chart doesn’t help me a lot, neither the explanation of how to choose the size (as the explanation goes something in between the lines of measure yourself and choose the closest one to your measurement), and I get that some garments can have different eases and this should be noted so the garments can be made as they should.
19.10.2024 - 00:31DROPS Design respondió:
Dear Artemys, since each piece have its own fit and drape, and each person has his/her own preference, we do not use one cm/size conversion table, nor do we give the eaxact ease. Each pattern has a schematic drawing and we usually suggest that you look for a similar piece in that fits the intended wearer and compare measurements. Happy Knitting!
19.10.2024 - 07:30
![]() Katarzyna escribió:
Katarzyna escribió:
ZROBIŁAM!!! Boucle w popielu a Silk bladoróżowy. Rozmiar XL, fajny oversize, zostało mi po 1,5 motka z każdej wełny. Pulower jest mięciutki, nazwałam go PUDEL i z pewnością będzie też ciepły. Jutro inauguracja :)
24.03.2024 - 21:19DROPS Design respondió:
Brawo Kasiu, koniecznie zamieść zdjęcia gotowego sweterka na naszej grupie na facebooku Drops Workshop albo dodaj projekt do naszej galerii TUTAJ. Pozdrawiamy i życzymy kolejnych udanych projektów!
25.03.2024 - 13:54
![]() Barbara escribió:
Barbara escribió:
I tweaked this a bit. I cast on 70 stitches and reduced to 58 . It turned out 55cm wide which is loose but not massive. I had lots of spare ends of brushed alpaca silk so used denim blue, lilac, and dusky pink to do random stripes. I did stocking stitch rather that the K1,P1 because I like the texture & it is much quicker. Finally, I knit the neck with boucle and melody ( a thicker brushed alpaca) and it is fantastic. The pattern neck looks floppy - mine sits beautifully. Love it.
12.02.2024 - 21:24
![]() Wioletta escribió:
Wioletta escribió:
Dzień dobry, nie rozumiem co to znaczy,\"Przerabiać kolejny rząd na prawej stronie robótki następująco: 3 oczka ściegiem francuskim, przerabiać dżersejem równomiernie zamykając 13-15-15-17-17-19 oczek ponad 71-79-83-89-93-99 następnymi oczkami, zakończyć przerabiając 3 oczka ściegiem francuskim ,czy chodziło o równomierne zgubienie tyłu oczek zamykając 2 razem? Na zdjęciu kamizelki nie widać takiego wcięcia..... Wygląda na prostą
27.10.2023 - 10:01DROPS Design respondió:
Witaj Wioletto, aby zamknąć 1 oczko należy przerobić 2 oczka razem na prawo. Jak równomiernie zamykać oczka znajdziesz TUTAJ. Na zdjęciu nie widać wcięcia właśnie dzięki temu, że oczka zostały zamknięte w rzędzie za ściągaczem. Bez tego zabiegu ściągacz ściągnąłby kamizelkę na dole i nie byłaby ona prosta. Nie układałaby się dobrze. Pozdrawiamy!
27.10.2023 - 12:40
![]() Janet escribió:
Janet escribió:
Dear Drops Design, I'm not really sure how to execute the following instruction for the Front Piece: “Work as before and cast off on each row from the neck as follows: 2 stitches 1 time and 1 stitch 2 times = 22-25-26-28-29-31 stitches.” Is there a video tutorial about how to “ 2 stitches 1 time and 1 stitch 2 times”? Love to hear from you and thank you in advance.
14.09.2023 - 22:20DROPS Design respondió:
Dear Janet, after the middle stitches are slipped on a thread, you finish each shoulder spearately, and cast off at the beg of the row from neck ie from RS on right shoulder/from WS on left shoulder: 2 sts 1 time, then 1 stith 2 times (= 1 stitch at the beg of next 2 rows starting from neck). Happy knitting!
15.09.2023 - 08:24
![]() Margaretha escribió:
Margaretha escribió:
Maggies dreamy snow
06.08.2023 - 16:38
|
|||||||
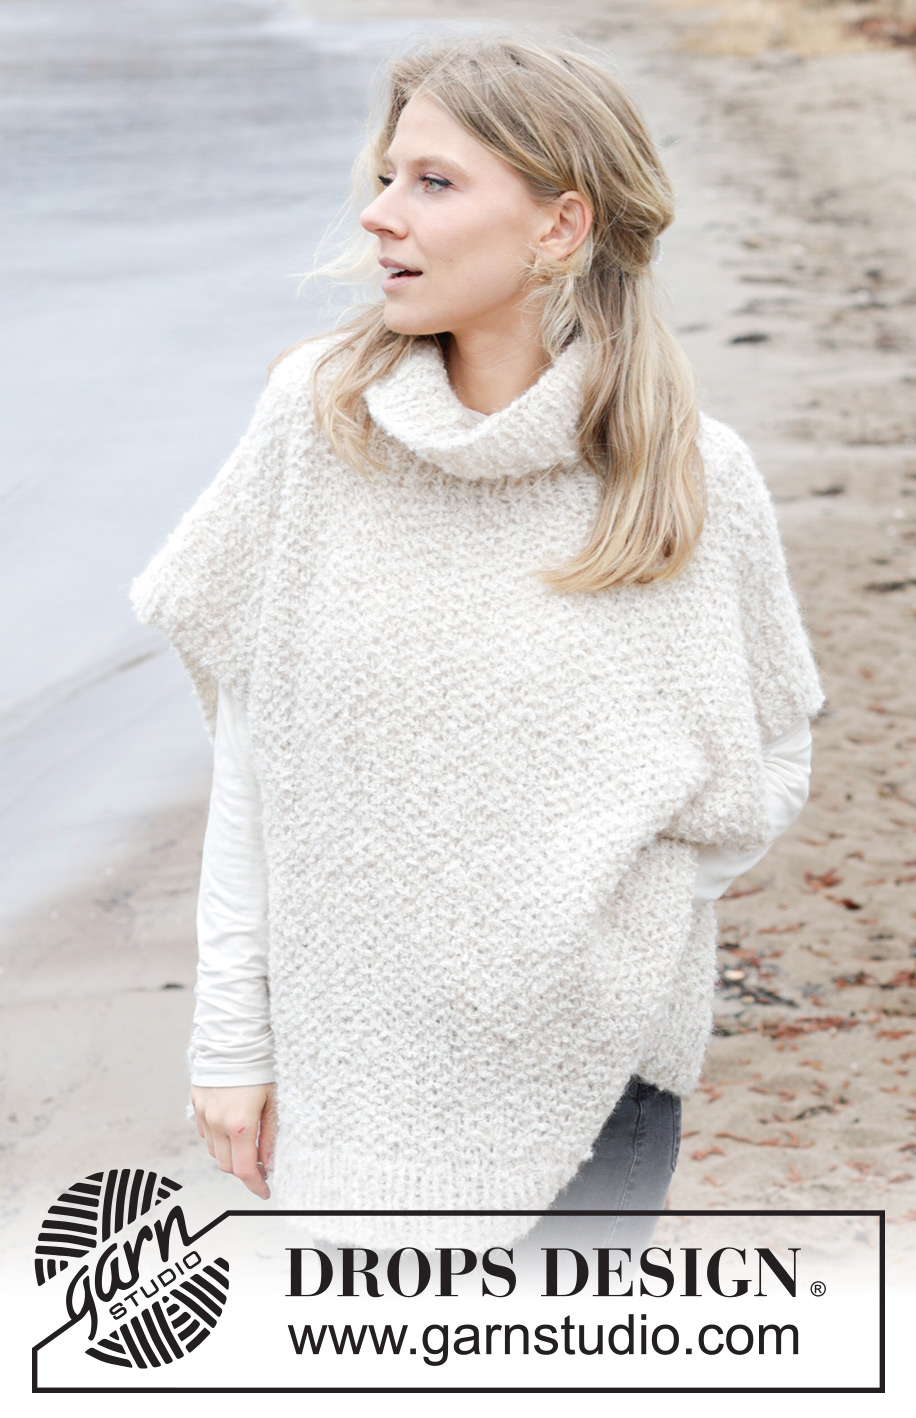
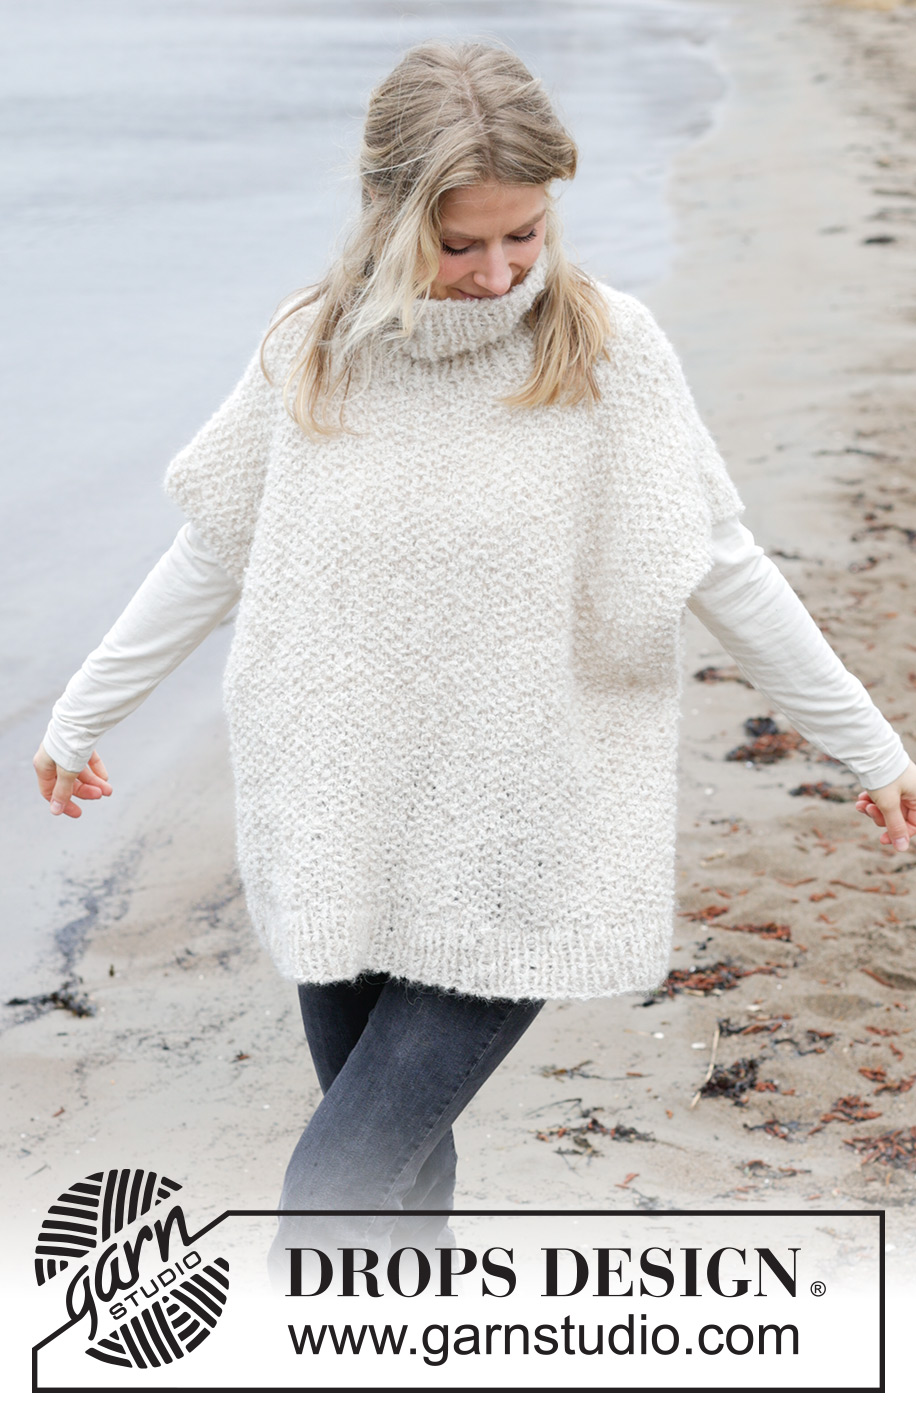
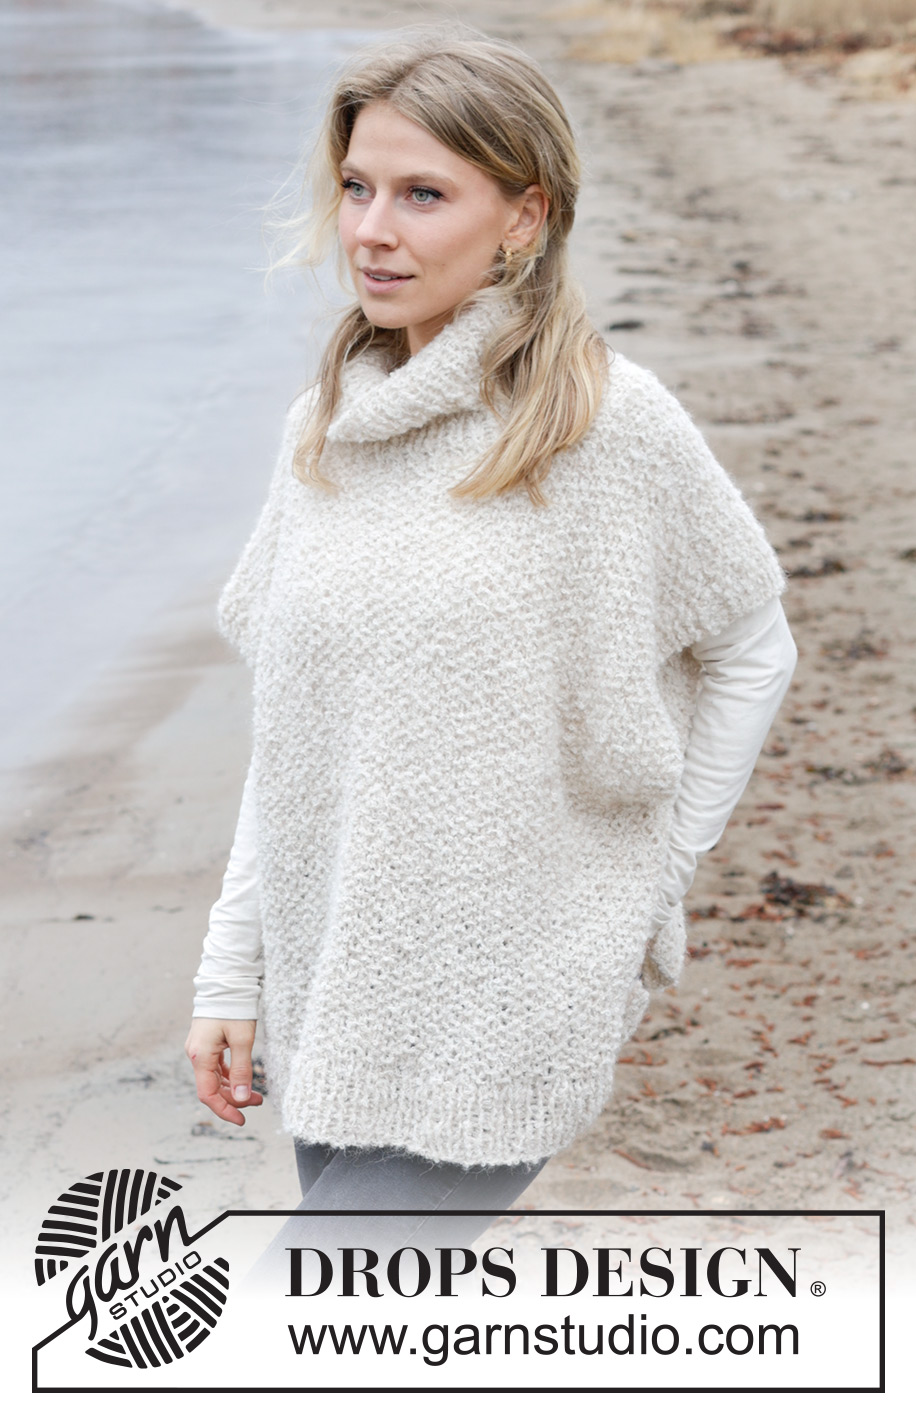
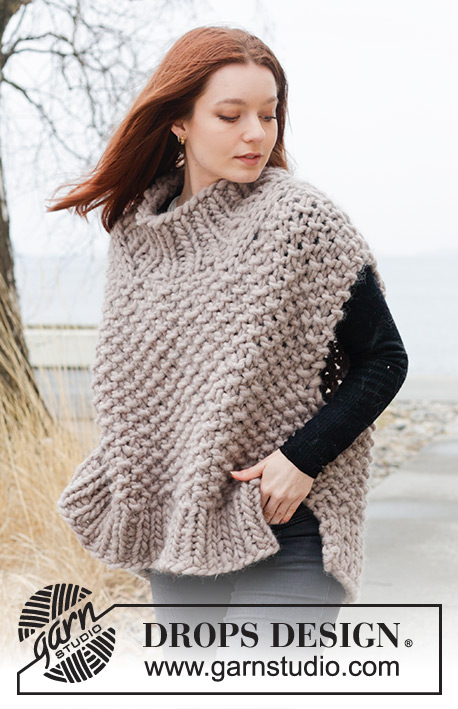
Pearl Falls#pearlfallsvest |
|||||||
 |
 |
||||||
Chaleco / slipover de punto en DROPS Alpaca Bouclé y DROPS Brushed Alpaca Silk. La pieza está tejida con punto arroz y cuello alto. Tallas S – XXXL.
DROPS 243-9 |
|||||||
|
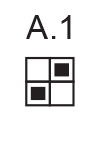
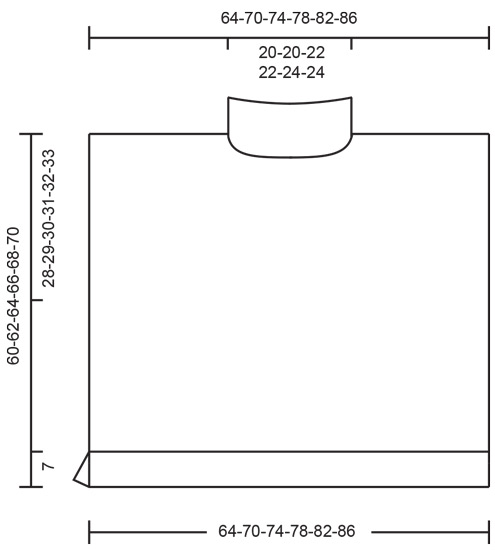
EXPLICACIONES PARA REALIZAR EL PATRÓN: ------------------------------------------------ PUNTO MUSGO (tejido de ida y vuelta): Tejer todas las hileras de derecho. 1 surco = tejer 2 hileras de derecho. PATRÓN: Ver diagrama A.1. El diagrama muestra todas las hileras del patrón por el lado derecho. ------------------------------------------------ COMENZAR LA PIEZA AQUÍ: ------------------------------------------------ CHALECO – RESUMEN DE LA PIEZA: La pieza del frente y la pieza de la espalda se tejen separadamente, de ida y vuelta en aguja circular y de abajo hacia arriba. El cuello se teje al final. ESPALDA: Montar 77-85-89-95-99-105 puntos con aguja circular tamaño 8 mm y 1 hilo DROPS Alpaca Bouclé y 1 hilo DROPS Brushed Alpaca Silk (= 2 hilos). Tejer de la manera siguiente por el lado derecho: 3 puntos en PUNTO MUSGO – leer descripción arriba, resorte (1 derecho, 1 revés) hasta que resten 4 puntos, tejer 1 derecho y 3 puntos en punto musgo. Continuar este resorte de ida y vuelta durante 7 cm. Tejer la hilera siguiente por el lado derecho de la manera siguiente: 3 puntos en punto musgo, tejer punto jersey y disminuir 13-15-15-17-17-19 puntos distribuidos equitativamente sobre los 71-79-83-89-93-99 puntos siguientes, 3 puntos en punto musgo = 64-70-74-78-82-86 puntos. Cambiar a aguja circular tamaño 9 mm y tejer A.1, con 3 puntos en punto musgo a cada lado, hasta completar las medidas. ¡RECORDAR MANTENER LA MISMA TENSIÓN DE TEJIDO DE LA MUESTRA! Cuando la pieza mida 32-33-34-35-36-37 cm, insertar un hilo marcador a cada lado (marcan las sisas). Cuando la pieza mida 58-60-62-64-66-68 cm, rematar los 18-18-20-20-22-22 puntos centrales para el escote y terminar cada hombro separadamente. Tejer como antes y disminuir 1 punto en la hilera siguiente a partir del escote = 22-25-26-28-29-31 puntos. Cuando la pieza mida 60-62-64-66-68-70 cm, colocar los puntos en un hilo. Tejer el otro hombro de la misma manera. FRENTE: Montar y tejer de la misma manera como la pieza de la espalda hasta que el frente mida 32-33-34-35-36-37 cm. Insertar un hilo marcador a cada lado. Cuando la pieza mida 54-56-58-60-62-64 cm, colocar los 12-12-14-14-16-16 puntos centrales en un hilo para el cuello y terminar cada hombro separadamente. Tejer como antes y rematar en cada hilera a partir del escote de la manera siguiente: 2 puntos 1 vez y 1 punto 2 veces = 22-25-26-28-29-31 puntos. Cuando la pieza mida 60-62-64-66-68-70 cm, colocar los puntos en un hilo. Tejer el otro hombro de la misma manera. ENSAMBLAJE: Usar puntadas de grafting para coser juntos los puntos de los hombros. Coser las costuras de los lados, en el bucle externo del punto externo, de manera que la costura quede plana. Comenzar en los hilos marcadores y coser hacia abajo hasta el resorte, dejando una abertura a cada lado. CUELLO: Usar aguja circular corta tamaño 8 mm. Comenzar en uno de los hombros por el lado derecho y levantar aprox. 64 a 78 puntos, en el interior de 1 punto alrededor del escote (incluyendo los puntos del hilo). Tejer en resorte en redondo (1 derecho, 1 revés) durante 15 cm. Rematar con derecho sobre derecho y revés sobre revés. |
|||||||
Explicaciones del diagrama |
|||||||
|
|||||||
 |
|||||||
 |
|||||||
¿Terminaste este patrón?Entonces, etiqueta tus fotos con #dropspattern #pearlfallsvest o envíalas a la galería #dropsfan. ¿Necesitas ayuda con este patrón?Encontrarás 24 videos tutoriales, un espacio para comentarios/preguntas y más visitando la página del patrón en garnstudio.com © 1982-2026 DROPS Design A/S. Todos los derechos reservados. Este documento, incluyendo todas sus sub-secciones, está protegido por los derechos de autor (copyright). Lee más acerca de lo que puedes hacer con nuestros patrones en la parte de abajo de cada patrón de nuestro sitio. |
|||||||


Con más de 40 años en el diseño de modelos de punto y de ganchillo, DROPS Design ofrece una de las más vastas colecciones de patrones gratuitos en el internet - traducidos en 17 idiomas. Al día de hoy, contamos con 324 catálogos y 12290 patrones - de los cuales 11675 están traducidos en español.
Nosotros trabajamos con mucho esmero para brindarte lo mejor que las labores de punto y ganchillo tienen para ofrecer,inspiración y consejos, así como hilos de magnífica calidad a precios increíbles! Te gustaría usar nuestros patrones para otro fin además del uso personal? Puedes leer acerca de lo que estás permitida a hacer en el texto de Copyright en la parte de abajo de todos nuestros patrones. Felices labores!
Escribe un comentario sobre DROPS 243-9
¡Nos encantaría saber qué piensas acerca de este patrón!
Si quieres escribir una pregunta referente al patrón, por favor asegúrate de elegir la categoría correcta en el formulario debajo, para acelerar el proceso de respuesta. Los campos obligatorios están marcados con un *.