
Categorías populares
¿Buscas un hilo?


Comentarios / Preguntas (12)
![]() Tracy escribió:
Tracy escribió:
Hello, I tried to explain earlier. I completed the dress, it fit my daughter perfectly but the decreasing creates a very obvious slant. Wish I'd taken a picture. The first decrease slants towards the front but the second one, sends this slant towards the back, and since it stretches over such a large number of rows, it looked really odd. My daughter said "it's not wearable like this," and she was right. There must be a different way to decrease but I did what was said.
23.03.2026 - 01:48DROPS Design respondió:
Dear Tracy, this is an older pattern, so the decrease used was the one used at the time, while nowadays there are more invisible techniques that are more visually appealing. For example, you can slip 1 stitch knitwise, knit 1, pass slipped stitch over the knitted stitch, then work the middle stitch if needed and knit 2 together on the other side of the side stitch. This way, both decreases will lean inwards, which will look better as you work from the bottom up. You can make them even more invisible by tightening the stitches so that they look neater. Happy knitting!
26.04.2026 - 23:19
![]() Tracy escribió:
Tracy escribió:
Hello? Can someone provide further explanation of the process of discarding?
14.03.2026 - 02:10DROPS Design respondió:
Dear Tracy, I'm not sure to understand properly which part of the pattern you need help with, could you please tell us more? Thanks in advance for your comprehension.
16.03.2026 - 07:50
![]() Tracy escribió:
Tracy escribió:
Also wondering if you have more photos of this dress? Specifically at the sides, where the decreases would be? They were very obvious the way I did them...would like to see how they turned out by the professionals! Thank you. Also, if anyone else who has made this dress has photos of the side of the dress, I would very much appreciate it!!! Tracy
22.02.2026 - 16:27
![]() Tracy escribió:
Tracy escribió:
Hello, I finished the dress, including all the crocheting. While it fit perfectly it looks horrible because of the decreasing for the waist. When knitting in the round, the decreases at both sides go in the same angled direction. So, for the second decrease in each round, that angle goes towards the back, instead of in towards the waist. Hard to explain and Unfortunately I tore it out until just before the start of decreasing so can't take a photo but it was unwearable. Please advise!!!
19.02.2026 - 16:05
![]() Tracy escribió:
Tracy escribió:
I don't understand the following instruction: Then crochet a row of dc the opposite way, i.e. from left to right without twisting the piece. Crochet dc from RS in each dc from previous row. Do you dc other way without twisting by doing it from the wrong side?
07.02.2026 - 20:56DROPS Design respondió:
Hi Tracy, You work double crochets from the right side, but in the opposite direction. This is called Lobster Stitch. Here is a link to our video showing you the technique: https://www.garnstudio.com/video.php?id=35&lang=en Regards, Drops Team.
10.02.2026 - 07:19
![]() Johanna escribió:
Johanna escribió:
Om man kollar på videon ni länkat i en engelsk kommentar nedan så stämmer minskningen inte med beskrivning. Ni beskriver att man lyfter en m, stickar två m tillsammans och sen lyfter över den lyfta maskan. Vilket bli två minskade maskor. Men på videon sticker hon inte ihop två m
14.04.2025 - 18:32
![]() Johanna escribió:
Johanna escribió:
Mönstret är ganska otydligt när det kommer till minskningarna efter att man har stickat 27cm. Har jag fattat det rätt att man ska minska 2 gånger per varv (vartannat och var tredje) tills man har minskat 2x12?
06.04.2025 - 18:33
![]() Elisabeth escribió:
Elisabeth escribió:
Hej, Jag har stickad 27 cm och ska nu börja med minskningarna. Men jag förstår inte hur jag ska sticka ihop maskan innan och efter sidmaskan? Tack på förhand. Elisabeth
05.03.2025 - 19:25DROPS Design respondió:
Hej Elisabeth. Det är lite otydligt, men du ska lyfta 1 maska på sidan av klänningen, sticka ihop de 2 nästkommande maskorna och sedan dra den lyfta maskan över de maskorna som stickades ihop och så göra samma sak på andra sidan. Mvh DROPS Design
06.03.2025 - 13:27
![]() Rhia escribió:
Rhia escribió:
It says to bind off 12 (14,15) times each side and refers to side stitches, but does it actually just mean decrease? Do I switch to working flat to do bind offs or do I keep working in the round and do decreases? And how will I know which are the side stitches to tell when to do these decreases?
23.02.2025 - 17:19DROPS Design respondió:
Hi Ria, Yes, you are decreasing not binding off and continuing to work in the round. The side stitches are at the beginning of the round (insert 1 marker) and then after half the stitches on the round (insert 1 marker). Happy knitting!
24.02.2025 - 06:59
![]() Jen escribió:
Jen escribió:
How stretchy is this dress when done? Should we take our normal size? The final chest measurements provided seem small.
05.02.2025 - 20:54DROPS Design respondió:
Dear Jen, texture is quite stretchy, to find out the best matching size, measure a garment you have and like the size and compare these measurements to the one in the chart, that's the best appropriate way to find out the matching size. Read more here. Happy knitting!
07.02.2025 - 08:16
|
|
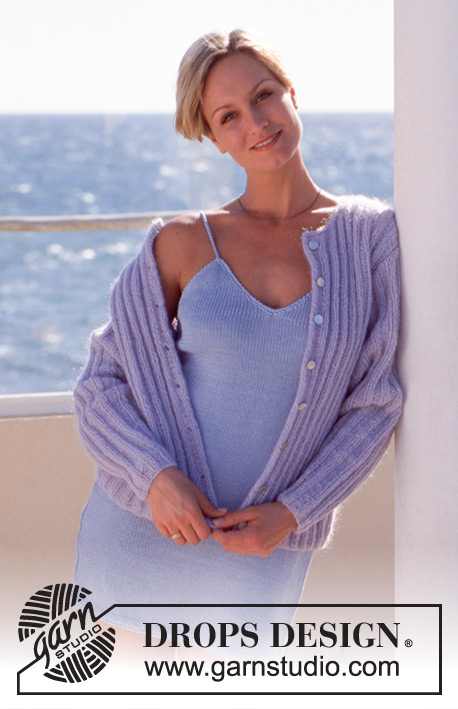
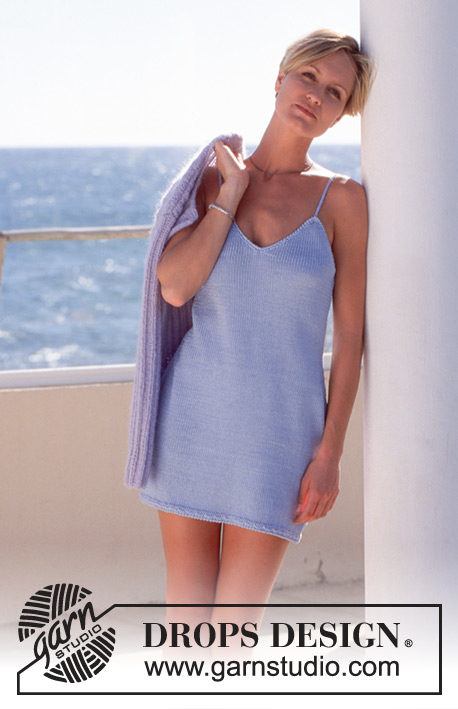
Above Deck Dress |
|
 |
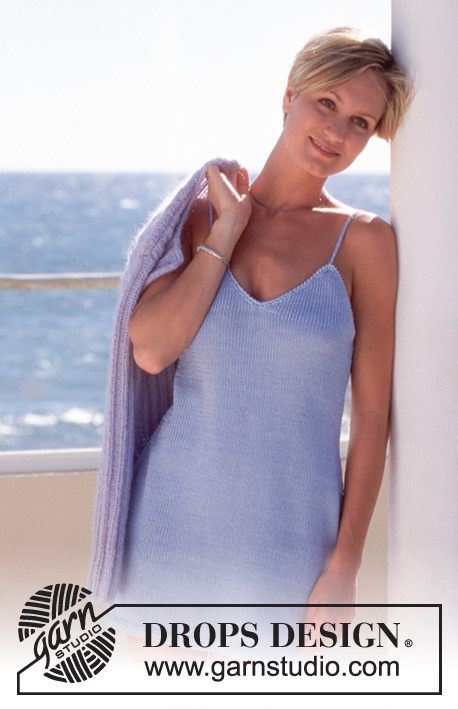 |
Vestido de punto en DROPS Muskat
DROPS 46-24 |
|
|
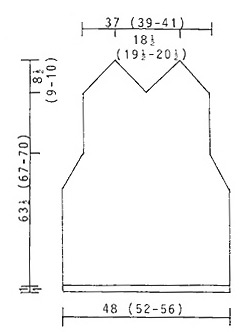
EXPLICACIONES PARA REALIZAR EL PATRÓN: ------------------------------------------------ Surco (en aguja circular): 1 surco = 2 vueltas. 1ª vuelta: Tejer de derecho. 2ª vuelta: tejer de revés. ------------------------------------------------ COMENZAR LA PIEZA AQUÍ: ------------------------------------------------ Vestido: Montar 202 (218-234) puntos en aguja circular tamaño 3 mm con lavanda y tejer 2 surcos. Cambiar a aguja circular tamaño 3.5 mm y continuar en punto jersey. Recordar mantener la misma tensión de tejido de la muestra. Cuando la pieza mida 27 (30-30) cm, rematar 12 (14-15) veces a cada lado: Deslizar 1 punto como de derecho, 1 punto derecho, pasar el punto deslizado por encima del punto tejido. Talla S: alternadamente cada 2ª y 3ª vuelta Tallas M+L: a cada 2 hileras = 154 (162-174) puntos. Continuando, cuando la pieza mida 55 (58-60) cm, rematar todos los 77 (81-87) puntos en la pieza de la espalda y 2 puntos a cada lado de la pieza del frente = 73 (77-83) puntos. Completar la pieza del frente de la manera siguiente: Rematar los 3 (3-1) puntos centrales para el escote y rematar a cada lado en la línea del escote y la sisa de la manera siguiente: 1 punto 16 (17-19) veces alternadamente en todas las hileras y a cada 2 hileras = 3 puntos en cada hombro. Rematar los 3 puntos restantes de una sola vez. La pieza mide aprox. 63.5 (67-70) cm. Ensamblaje: Orilla a ganchillo: Trabajar con 1 hilo por el lado derecho con lavanda en aguja de ganchillo tamaño 3.5 mm de la manera siguiente: la 1ª hilera con aprox. 154 (166-180) puntos bajos alrededor de la orilla de surcos en la parte de abajo del vestido. Después, trabajar una hilera de puntos bajos en punto cangrejo, es decir, de izquierda a derecha teniendo cuidado de no torcer la pieza. Trabajar puntos bajos por el lado derecho en cada punto bajo de la hilera anterior. Repetir ambas hileras en la parte de arriba del vestido sobre la pieza de la espalda y del frente con aprox. 150 (158-168) puntos bajos. Trabajar una hilera de puntos de cadena con 2 hilos y aguja de ganchillo tamaño 4 mm de aprox. 40 cm a partir de cada punta de la pieza del frente – ajustar al largo deseado = tirante. Pasar los tirantes a través de la orilla a ganchillo de la pieza de la espalda donde terminan las puntas de las piezas del frente y atar un nudo en el largo deseado. Repetir en la otra pieza del frente. |
|
 |
|
¿Terminaste este patrón?Entonces, etiqueta tus fotos con #dropspattern o envíalas a la galería #dropsfan. ¿Necesitas ayuda con este patrón?Encontrarás 19 videos tutoriales, un espacio para comentarios/preguntas y más visitando la página del patrón en garnstudio.com © 1982-2026 DROPS Design A/S. Todos los derechos reservados. Este documento, incluyendo todas sus sub-secciones, está protegido por los derechos de autor (copyright). Lee más acerca de lo que puedes hacer con nuestros patrones en la parte de abajo de cada patrón de nuestro sitio. |
|


Con más de 40 años en el diseño de modelos de punto y de ganchillo, DROPS Design ofrece una de las más vastas colecciones de patrones gratuitos en el internet - traducidos en 17 idiomas. Al día de hoy, contamos con 324 catálogos y 12290 patrones - de los cuales 11685 están traducidos en español.
Nosotros trabajamos con mucho esmero para brindarte lo mejor que las labores de punto y ganchillo tienen para ofrecer,inspiración y consejos, así como hilos de magnífica calidad a precios increíbles! Te gustaría usar nuestros patrones para otro fin además del uso personal? Puedes leer acerca de lo que estás permitida a hacer en el texto de Copyright en la parte de abajo de todos nuestros patrones. Felices labores!
Escribe un comentario sobre DROPS 46-24
¡Nos encantaría saber qué piensas acerca de este patrón!
Si quieres escribir una pregunta referente al patrón, por favor asegúrate de elegir la categoría correcta en el formulario debajo, para acelerar el proceso de respuesta. Los campos obligatorios están marcados con un *.