
Categorías populares
¿Buscas un hilo?


Comentarios / Preguntas (9)
![]() Birgit Falkenberg escribió:
Birgit Falkenberg escribió:
Fejl i opskrift. Forside 5. Pind: der skal da laves 3 knaphuller, ikke? (Se billede, tegning og montering - 3 knapper) I jeres opskrift strikkes kun 2 knaphuller!
22.09.2025 - 13:19DROPS Design respondió:
Hei Birgit. Nei, i oppskriften står det: På neste pinne fra retten felles det til 3 knapphull slik: Strikk 3-3-4-4 (4-4) rett, * 1 kast, 2 rett sammen, 4-4-5-5 (6-6) masker rett *, gjenta fra *-* 1 gang til, 2 rett sammen, 1 kast og 4-4-4-4 (4-4) masker rett. Altså, det lages 3 kast (=3 knappehull og det strikkes 2 masker rett 3 ganger. mbh DROPS Design
29.09.2025 - 14:17
![]() Birgit Falkenberg escribió:
Birgit Falkenberg escribió:
Hvorfor 3 knapper/huller på billede og tegning, når der i opskriften kun skal strikkes 2 huller? Der er også omtalt 5 knapper i alt. (3 +2 til seler)
18.09.2025 - 21:11DROPS Design respondió:
Hei Birgit. Nederst i oppskriften under MONTERING står det: Sy 3 knapper nederst på romperen på bakstykket. mvh DROPS Design
22.09.2025 - 13:06
![]() Julia escribió:
Julia escribió:
I’ve just finished the top of the front and moved the stitches to a string to begin the back. Do I cut the string at the end of the front and then use the same ball of yarn for the back or do I need to do two separate balls of yarn? If I am doing two separate balls of yarn do i then use each side respective yarn ball to do the rows when working in the round? Sorry if this doesn’t make sense I am a complete beginner so I don’t know the terms yet!
23.01.2025 - 05:34DROPS Design respondió:
Hi Julia, It is easiest to cut the strand and continue with the same ball for the back piece. Happy knitting!
23.01.2025 - 07:09
![]() Birgit Johansson escribió:
Birgit Johansson escribió:
Tack då vet jag.
17.12.2024 - 13:14
![]() Birgit Johansson escribió:
Birgit Johansson escribió:
Hej. Ska man inte sticka ngn kant vid armar och ben?
16.12.2024 - 19:29DROPS Design respondió:
Hej Birgit, ikke i den her opskrift - men du må gerne vælge en kant og strikke eller hækle på hvis du vil det :)
17.12.2024 - 13:08
![]() Rina escribió:
Rina escribió:
Good day, 1-3. romper and finished up to the body back piece where have to bind stitches off. begin with 51 stitches and bind of but i count 30 stitches as to the pattern"s 21 stitches ? please assist me
08.05.2024 - 10:18DROPS Design respondió:
Dear Rina, in 2nd size you will cast off on each side = at the beg of every row on each side 2 sts 6 times (2 x 6 x 2 sides= 24 sts in total) and 1 stitch 3 times (1x3x2 sides = 6 sts in total), so that you get: 51-24-6= 21 sts left. Happy knitting!
08.05.2024 - 13:11
![]() Rene escribió:
Rene escribió:
Can you explain the first line about the straps I don’t understand what it means saying knit up one stitch from uppermost can’t get it at all thank you
02.02.2024 - 21:45DROPS Design respondió:
Dear Rene, the outermost stitches in the back piece are the stitches closer to the side edges at the very top of the back piece; you can see the second photo of the pattern to better locate them. To learn how to knit up stitches or pick up as knit stitches, you can watch the following video: https://www.garnstudio.com/video.php?id=59&lang=en. Happy knitting!
04.02.2024 - 22:39
![]() YS escribió:
YS escribió:
First part - front piece - size 6/9. At the end of this part, when the pattern says to increase every 4 rows 5 times, does that mean the increase section will have 17 or 20 rows? In this section the increases would be at row 1, 5, 9, 13, and 17. Do I make the first 3 for the armholes at row 18 or at row 21?
08.05.2023 - 19:39DROPS Design respondió:
Dear Ys, increase first 4 times on every 2nd row like this: (1 row with increase, 1 row without increase), work from (to) a total of 3 times, then work 1 row with increase. Now increase on every 4th row: (work 3 rows without increase, increase on next row from RS), work these 4 rows a total of 5 times. Happy knitting!
09.05.2023 - 07:35
![]() Astrid escribió:
Astrid escribió:
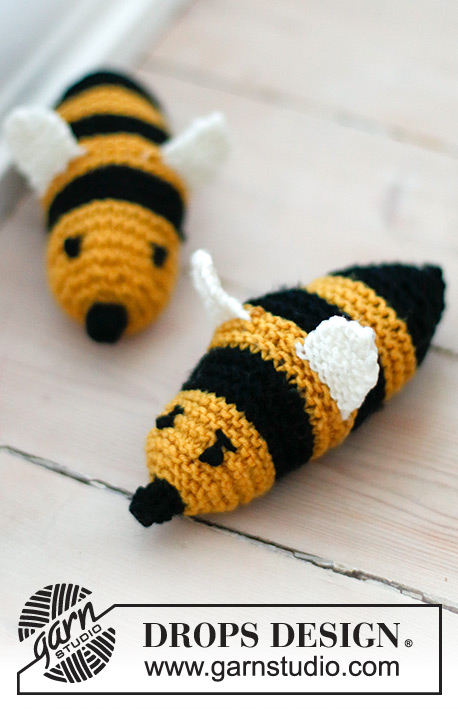
Hallo, gibt es eine Anleitung von der Hummel? LG Astrid
18.03.2023 - 09:30DROPS Design respondió:
Hallo Astrid, ja, die Anleitung finden Sie unter diesem Link. Viel Spaß beim Stricken!
18.03.2023 - 13:31
|
|
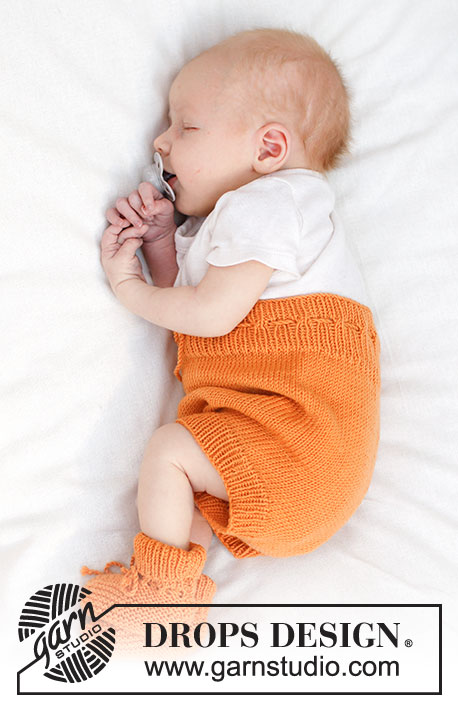
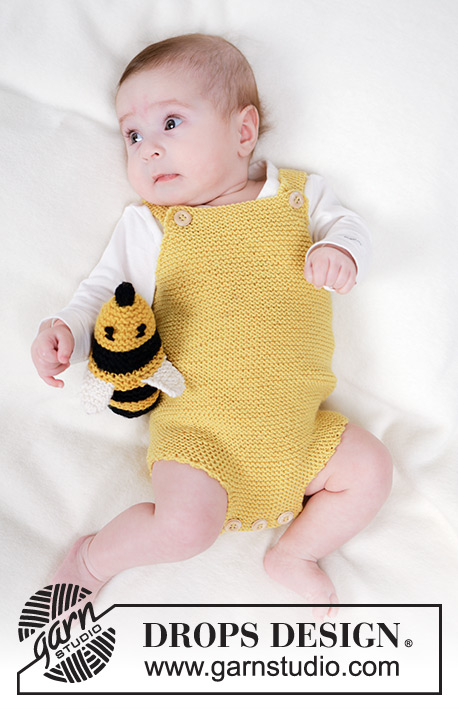
Bumblebee Romper#bumblebeeromper |
|
 |
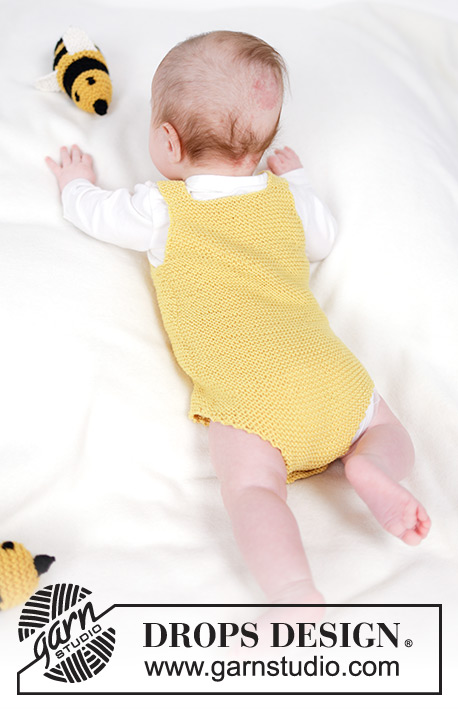 |
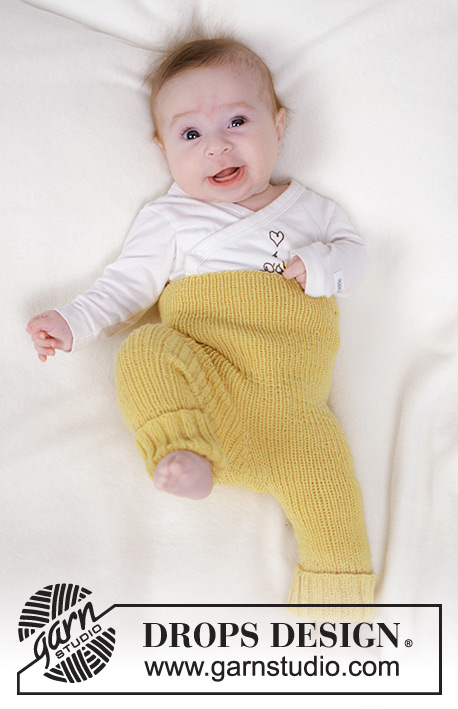
Mono a punto para bebés en DROPS BabyMerino. La prenda está realizada de arriba abajo en punto musgo. Tallas 0 - 4 años.
DROPS Baby 45-3 |
|
|
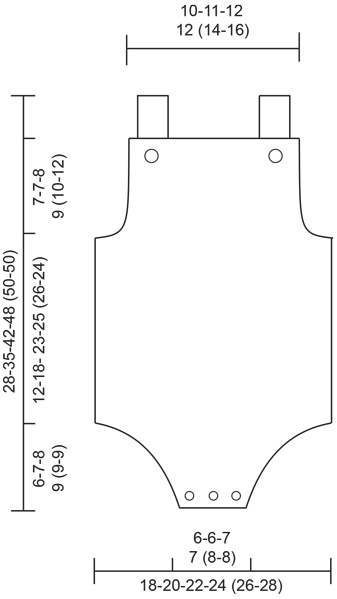
EXPLICACIONES PARA REALIZAR LA LABOR: ------------------------------------------------------- PLIEGUE/ PUNTO MUSGO (de ida y vuelta): Trabajar todas las filas de derecho. 1 pliegue = 2 filas de derecho. PLIEGUE/ PUNTO MUSGO (en redondo): 1 pliegue en vertical = 2 vueltas; trabajar 1 vuelta de derecho y 1 vuelta de revés. TIP PARA LOS AUMENTOS: Todos los aumentos se trabajan por el lado derecho. Aumentar 1 punto dentro de 1 punto orillo a cada lado, haciendo 1 hebra que se trabaja de derecho retorcido en la siguiente fila para evitar que se formen agujeros. ------------------------------------------------------- COMENZAR LA LABOR AQUÍ: ------------------------------------------------------- MONO - RESUMEN DE LA LABOR: La labor se trabaja en 2 secciones, de ida y vuelta y de arriba abajo, antes de unir y continuar en redondo con una aguja circular corta. Se divide otra vez y la parte inferior se termina de ida y vuelta. Se trabajan tirantes para terminar. DELANTERO: Montar 27-29-32-32 (36-42) puntos con una aguja circular de 3 mm y DROPS Baby Merino. Trabajar en PUNTO MUSGO sobre todos los puntos – leer descripción arriba. En la fila 5 trabajar 2 ojales como sigue: 3 derechos, hacer 1 hebra, 2 puntos juntos de derecho, trabajar de derecho hasta que queden 4 puntos, hacer 1 hebra, 2 puntos juntos de derecho, 2 derechos. Cuando la labor mida 2-2-3-3 (3-4) cm aumentar 1 punto a cada lado - leer TIP PARA LOS AUMENTOS! Aumentar de esta manera cada 2ª fila un total de 2-3-4-6 (7-4) veces, después cada 4ª fila 5-5-5-4 (6-8) veces. Cuando los aumentos estén terminados, montar 3 puntos al final de las siguientes 2 filas para las sisas = 47-51-56-62 (68-72) puntos. RECORDAR MANTENER LA TENSIÓN DEL TEJIDO! La labor mide aprox. 7-7-8-9 (10-12) cm. Dejar la labor a un lado y trabajar la espalda. ESPALDA: Montar y trabajar de la misma manera que en el delantero pero sin trabajar los ojales = 47-51-56-62 (68-72) puntos. Ahora unir las 2 secciones y continuar trabajando en redondo. CUERPO: Colocar los puntos del delantero y la espalda en la misma aguja circular de 3 mm = 94-102-112-124 (136-144) puntos – la labor se mide ahora desde aquí. Insertar 1 marcapuntos entre cada sección, en el medio de los puntos montados a cada lado. Trabajar en PUNTO MUSGO en redondo - leer descripción arriba 12-18-23-25 (26-24) cm más. Ahora dividir la labor de nuevo en cada marcapuntos y terminar el delantero y la espalda por separado. ESPALDA: = 47-51-56-62 (68-72) puntos. Continuar con punto musgo de ida y vuelta y cerrar al inicio de cada fila como sigue: 3 puntos 1-0-0-0 (0-1) vez a cada lado. Después cerrar 2 puntos 5-6-7-8 (10-10) veces y 1 punto 0-3-2-3 (1-0) veces a cada lado = 21-21-24-24 (26-26) puntos. Continuar trabajando hasta que la labor mida 18-25-31-34 (35-33) cm. Cerrar de derecho. DELANTERO: = 47-51-56-62 (68-72) puntos. Trabajar de la misma manera que la espalda hasta que la labor mida 17-23-29-34 (35-33) cm. En la siguiente fila por el lado derecho trabajar 3 ojales como sigue: 3-3-4-4 (4-4) derechos, * 1 hebra, 2 puntos juntos de derecho, 4-4-5-5 (6-6) derechos *, repetir de * a * 1 vez más, 2 puntos juntos de derecho, 1 hebra y 4-4-4-4 (4-4) derechos. Continuar trabajando hasta que la labor mida 18-25-31-34 (35-33) cm. Cerrar de derecho. TIRANTES: Recoger 1 punto en cada uno de los 6-7-7-8 (8-8) puntos más externos en un lado de la espalda. Trabajar en punto musgo de ida y vuelta 9-15 cm (o hasta el largo deseado). Así se obtiene una solapa de 3-5 cm para que se pueda ajustar el tirante. Cerrar de derecho. Trabajar un tirante en el otro lado de la espalda de la misma manera. TERMINACIÓN: Coser los botones a los tirantes y a la entrepierna en la espalda. |
|
 |
|
¿Terminaste este patrón?Entonces, etiqueta tus fotos con #dropspattern #bumblebeeromper o envíalas a la galería #dropsfan. ¿Necesitas ayuda con este patrón?Encontrarás 18 videos tutoriales, un espacio para comentarios/preguntas y más visitando la página del patrón en garnstudio.com © 1982-2026 DROPS Design A/S. Todos los derechos reservados. Este documento, incluyendo todas sus sub-secciones, está protegido por los derechos de autor (copyright). Lee más acerca de lo que puedes hacer con nuestros patrones en la parte de abajo de cada patrón de nuestro sitio. |
|


Con más de 40 años en el diseño de modelos de punto y de ganchillo, DROPS Design ofrece una de las más vastas colecciones de patrones gratuitos en el internet - traducidos en 17 idiomas. Al día de hoy, contamos con 324 catálogos y 12290 patrones - de los cuales 11675 están traducidos en español.
Nosotros trabajamos con mucho esmero para brindarte lo mejor que las labores de punto y ganchillo tienen para ofrecer,inspiración y consejos, así como hilos de magnífica calidad a precios increíbles! Te gustaría usar nuestros patrones para otro fin además del uso personal? Puedes leer acerca de lo que estás permitida a hacer en el texto de Copyright en la parte de abajo de todos nuestros patrones. Felices labores!
Escribe un comentario sobre DROPS Baby 45-3
¡Nos encantaría saber qué piensas acerca de este patrón!
Si quieres escribir una pregunta referente al patrón, por favor asegúrate de elegir la categoría correcta en el formulario debajo, para acelerar el proceso de respuesta. Los campos obligatorios están marcados con un *.