
Categorías populares
¿Buscas un hilo?


Comentarios / Preguntas (27)
![]() Rosy escribió:
Rosy escribió:
Buongiorno xfavore non capisco come lavorare il rovescio di questo diagramma grazie
15.04.2021 - 13:38DROPS Design respondió:
Buonasera Rosy, i diagrammi si leggono dal basso verso l'alto, da destra verso sinistra nei ferri di andata e da sinistra verso destra nei ferri di ritorno. Quindi sul rovescio deve leggere il diagramma da sinistra verso destra e lavorare come indicato. Buon lavoro!
15.04.2021 - 19:22
![]() Rosy escribió:
Rosy escribió:
Buongiorno xfavore non capisco come lavorare il rovescio di questo diagramma grazie
15.04.2021 - 13:37DROPS Design respondió:
Buonasera Rosy, i diagrammi si leggono dal basso verso l'alto, da destra verso sinistra nei ferri di andata e da sinistra verso destra nei ferri di ritorno. Quindi sul rovescio deve leggere il diagramma da sinistra verso destra e lavorare come indicato. Buon lavoro!
15.04.2021 - 19:22
![]() Linda LYNN escribió:
Linda LYNN escribió:
Please can I knit this garment on straight needles even if I have to knit back and front separately hopefully you can help
19.08.2020 - 17:38DROPS Design respondió:
Dear Mrs Lynn, sure you can, you will read more about how to adapt a pattern into straight needles here. Happy knitting!
20.08.2020 - 09:54
![]() Angela Barnes escribió:
Angela Barnes escribió:
Hello I cannot work the sizes out please? Please can you tell me the three sizes? I am about a 40 inch chest Thank you
04.02.2020 - 12:19DROPS Design respondió:
Dear Mrs Barnes, measure a similar garment you have and like the shape and compare to the measurements in chart to find out the matching size. read more about sizing here. Happy knitting!
04.02.2020 - 12:39
![]() Judith Foley escribió:
Judith Foley escribió:
You have indicated that patter for 1 and 2 are below the measurment section. I do not see any information for pattern 1 or 2 on the printed pattern. Do you have an updated version?
22.07.2019 - 15:56DROPS Design respondió:
Dear Judith, if you have in your printed version drawing/ chart of the sweater with measures, you will find pattern diagram chart on the right - see M.1, M.2. If you have no chart, there is probably one whole page missing in you printed version, so check all then pages for print. Happy knitting!
22.07.2019 - 16:07
![]() Judith Foley escribió:
Judith Foley escribió:
I just downloaded this pattern. In the QA section Elaine Singer asked for the patterns 1 & 2. You indicated they were below the measurement chart. I cannot find them when I print the pattern. Do you have an updated version?
22.07.2019 - 15:54
![]() Vicky Williams escribió:
Vicky Williams escribió:
I assume that when you do the M1 and M2 pattern that the even rows are worked from the left and are the wrong side of the top so need to be purl stitch instead of knit etc??
10.02.2019 - 20:39DROPS Design respondió:
Hello Vicky. Yes, the even rows are worked on the wrong side of the work, from the left to the right. You will knit the black squares, and purl the white squares. Happy knitting!
10.02.2019 - 23:00
![]() Gunnel escribió:
Gunnel escribió:
Ytterligare en fråga till förra, från avigsidan, ska man inte sticka avig på räta och räta på avig? I diagrammets förklaring står det att tom ruta är rm och prick i ruta är avigruta. Och då blir det ju på de tre maskorna rätstickning i stället för slätstickning? Enligt diagrammet så stickar man på varv 2, 4 etc 7 aviga och 3 räta! Rätt eller fel? Dessutom ser inte hålmönstret likadant ut på mönstret och bilden!
28.03.2018 - 17:42DROPS Design respondió:
Hej, diagrammet visar mönstret sett från rätsidan, så du har helt rätt i att det ska vara 3 maskor i slätstickning i början på diagrammet.
05.04.2018 - 16:45
![]() Gunnel escribió:
Gunnel escribió:
I M1 och M2 visar skissen att de tre första maskorna ska stickas räta på varje varv men de de tre första och de tre sista på varje varv ska stickas i slätstickning. På bilden ser det ut som om även de tre maskorna i M1 och M2 är stickat som slätstickning. Ska alla dessa tre maskor stickas som rätstickning eller slätstickning?
28.03.2018 - 16:52
![]() Dia escribió:
Dia escribió:
Thank you for the clarification, I clearly missed that part. :)
12.10.2017 - 13:41
|
|||||||||||||
South Bay#southbaycardi |
|||||||||||||
|
|
|||||||||||||
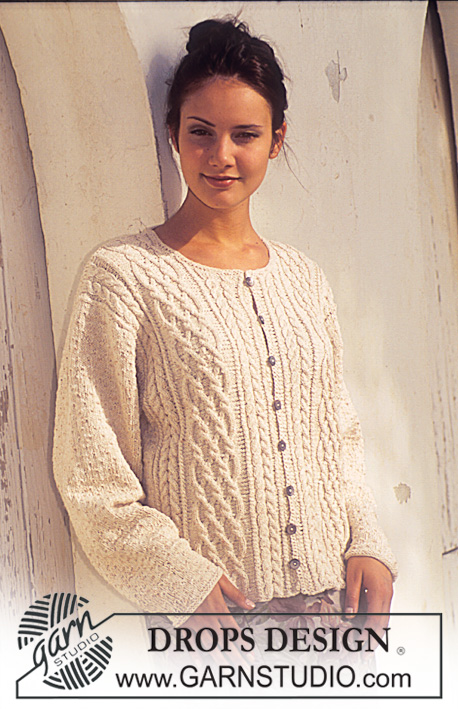
Chaqueta DROPS en Safran con patrón de calados y manga corta
DROPS 51-8 |
|||||||||||||
|
Tensión: 23 pts x 30 filas en pt jersey = 10 x 10 cm Patrón: ver diagrama (1 diagrama = 1 repetición). El patrón se muestra por el LD. Pt musgo (de ida y vuelta): Trabajar todas las filas de derecho. ----------------------------------------------------------------------- CUERPO Mont 235 (245-255) pts (incl 1 pt orillo a cada lado en pt musgo) y trabajar el Patrón 1 como sigue: 1 pt orillo, repetir el Patrón 1 23 (24-25) vcs, 3 pts en pt jersey, 1 pt orillo (en pt musgo siempre). Cuando la labor mida 29 (29-29) cm trabajar el Patrón 2 hasta finalizar las medidas, como sigue: 1 pt orillo, repetir el Patr´ón 2 23 (24-25) vcs, 3 pts en pt jersey, 1 pt orillo. Al mismo tiempo, cuando la labor mida 33 cm, trabajar la sig fila como sigue: 58 (61-63) pts del delantero, cerrar 4 pts para la sisa, 111 (115-121) pts de la espalda, cerrar 4 pts para la sisa, 58 (61-63) pts del delantero. Trabajar el resto de cada parte por separado. DELANTERO: = 58 (61-63) pts. Cerrar para la sisa cada 2ª fila como sigue: 2 pts 2 (2-2) vcs, después 1 pt 3 (4-5) vcs = 51 (53-54) pts. Cuando la labor mida 45 (46-47) cm, cerrar para el escote cada 2ª fila: 6 (8-7) pts 1 vez, 3 pts 1 vez, 2 pts 3 vcs y finalmente 1 pt 2 vcs; ahora cerrar 1 pt cada 4ª fila 2 vcs. Rematar todos los pts cuando la labor mida 55 (56-57) cm. ESPALDA: = 111 (115-121) pts. Cerrar para la sisa como en el delantero = 97 (99-103) pts. Cuando la labor mida 53 (54-55) cm, cerrar los 29 (31-31) pts centrales para el escote. Ahora cerrar 2 pts a cada lado del escote en la sig fila. Rematar todos los pts cuando la labor mida 55 (56-57) cm. MANGAS: Mont 78 (78-82) pts con las ag de doble punta; unir y colocar 1 MP en la unión. Trabajar el Patrón 2. Al mismo tiempo, aum 1 pt a cada lado del MP cada 2ª fila 12 (14-14) vcs = 102 (106-110) pts (los pts aumentados deben trabajarse dentro del patrón). Cuando la labor mida 5 (5.5-6) cm, cerrar 2 pts a cada lado del MP y trabajar el resto de ida y vta. Ahora cerrar para la copa de la manga cada 2ª fila: 3 pts 8 (9-9) vcs, 4 pts 2 vcs, rematar los pts restantes. La labor mide 12 (13-14) cm. TERMINACIÓN: Hacer la costura de los hombros. Recoger 120 pts alrededor del escote y trabajar 4 filas en pt musgo. Rematar. CENEFA DEL DELANTERO: Trabajar con ag de ganchillo en el delantero izquierdo como sigue: 2 filas de 75 p.b. Repetir a lo largo del delantero derecho, pero después de la primera fila (que debes empezar en la parte inferior), hacer los ojales en la 2ª fila como sigue: 2 p.b., *2 p.de cad, saltar 2 p.b., 8-9 p.b.*. repetir de *a* (debe de haber 7-8 ojales). Coser las mangas y los botones. |
|||||||||||||
Explicaciones del diagrama |
|||||||||||||
|
|||||||||||||
 |
|||||||||||||
¿Terminaste este patrón?Entonces, etiqueta tus fotos con #dropspattern #southbaycardi o envíalas a la galería #dropsfan. ¿Necesitas ayuda con este patrón?Encontrarás 24 videos tutoriales, un espacio para comentarios/preguntas y más visitando la página del patrón en garnstudio.com © 1982-2026 DROPS Design A/S. Todos los derechos reservados. Este documento, incluyendo todas sus sub-secciones, está protegido por los derechos de autor (copyright). Lee más acerca de lo que puedes hacer con nuestros patrones en la parte de abajo de cada patrón de nuestro sitio. |
|||||||||||||


Con más de 40 años en el diseño de modelos de punto y de ganchillo, DROPS Design ofrece una de las más vastas colecciones de patrones gratuitos en el internet - traducidos en 17 idiomas. Al día de hoy, contamos con 324 catálogos y 12290 patrones - de los cuales 11685 están traducidos en español.
Nosotros trabajamos con mucho esmero para brindarte lo mejor que las labores de punto y ganchillo tienen para ofrecer,inspiración y consejos, así como hilos de magnífica calidad a precios increíbles! Te gustaría usar nuestros patrones para otro fin además del uso personal? Puedes leer acerca de lo que estás permitida a hacer en el texto de Copyright en la parte de abajo de todos nuestros patrones. Felices labores!
Escribe un comentario sobre DROPS 51-8
¡Nos encantaría saber qué piensas acerca de este patrón!
Si quieres escribir una pregunta referente al patrón, por favor asegúrate de elegir la categoría correcta en el formulario debajo, para acelerar el proceso de respuesta. Los campos obligatorios están marcados con un *.