
Categorías populares
¿Buscas un hilo?


Comentarios / Preguntas (19)
![]() Sally escribió:
Sally escribió:
Hello, I am stuck on the neck/armhole decreases for the back, knitting size XS. I have cast off my 18 middle stitches so I am now starting with 12 stitches for each shoulder. How am I supposed to decrease to end up with 7 stitches per shoulder, if I am decreasing both for the neck (beginning of row) and the armhole (end of row)? Wouldn't I end up with an even number?
02.05.2026 - 05:49DROPS Design respondió:
Dear Sally you will now decrease for neck as explained under DECREASE TIP ie always from RS: 5 sts 1 time towards neck, this means at the end of row from RS for right shoulder and at the beg of row from RS for left shoulder. Just remember to continue decrease for armholes if they are not finished yet (at the beg of row from RS for right shoulder/end of row from RS for left shoulder). Happy knitting!
04.05.2026 - 11:17
![]() Vivien escribió:
Vivien escribió:
If I make L Size, how many ball to make it.
26.03.2026 - 11:34DROPS Design respondió:
Dear Vivien, you'll find the total amount of yarn required for each size under tab "Pattern" at the top of the pattern page; select L to get all relevant numbers for this size, incl. 400 g DROPS Paris/50 g a ball = 8 balls DROPS Paris are required in size L. Happy knitting!
26.03.2026 - 16:01
![]() Anna escribió:
Anna escribió:
I have just started decreasing for the armholes on the back piece. Just for clarification, when it says to “decrease on each side for a total of 12 times” (I’m knitting a size xs), then that means I knit 6 rows with 2 decreases on each side of the piece, right?
08.06.2025 - 04:36DROPS Design respondió:
Dear Anna, you need to decrease 12 times on each side (not 12 stitches). So you work 12 rows with decreases on each side and decrease 12 stitches on each side (or 24 stitches in total). Happy knitting!
08.06.2025 - 15:36
![]() Mayzie escribió:
Mayzie escribió:
Hi ! I'm approaching the shoulders of the front piece. Rather than bind off the neck, the front is placed on a thread. I knit up to the middle stitches, slipped them onto a thread, but now my working yarn is stuck in the middle of the row and I don't know how to continue the row without knitting the shoulders together. how to I finish this row so I can start one of the shoulders?
30.03.2025 - 16:46DROPS Design respondió:
Dear Mayzie, you should have worked one shoulder before reaching the neck stitches. You can now work in two ways: 1) you work the neck stitches as you slip them. Therefore, the thread will move forward and reach the second shoulder, which you can now work. From now on, only work this second shoulder (the other shoulder's stitches will be on a separate thread) and, after finishing this shoulder, cut the thread and rejoin at the first shoulder and work this shoulder. 2) You slip the neck stitches to a thread without working them and place the stitches on the second shoulder in another thread. The thread should be at the end of the first shoulder; work this shoulder first. Happy knitting!
30.03.2025 - 19:20
![]() Danubis Perez escribió:
Danubis Perez escribió:
Hola. Yo soy talla L y me dicen que monte 108 ptos , sabiendo que la espalda y el delantero se hacen por separado. El gráfico me dice que para mi talla son 52 cm...no habra un error ?, ya que de acuerdo a la tensión, 108 puntos no corresponden 52 cm. Me podías explicar eso por favor? Igual que para las cenefas de las mangas me parece muchos puntos... no será que los puntos estan mal calculados? Gracias, esperando su pronta respuesta!!
10.03.2025 - 05:00
![]() Alicja escribió:
Alicja escribió:
Dzień dobry, zupełnie nie rozumiem fragmentu dotyczącego tyłu, który zaczyna się od "PRZED DALSZĄ PRACĄ NAD ROBÓTKĄ UWAŻNIE PRZECZYTAĆ DALSZĄ CZĘŚĆ OPISU:" - jakbym nie robila wychodzi mi jedno ramiączko, nie ma dekoltu, mogę prosić o doprecyzowanie jak zamykać na dekolt i ramiona, żeby faktycznie wyszły?
26.01.2025 - 13:43DROPS Design respondió:
Witaj Alicjo, Teraz będziesz przerabiać tylko 1 ramię - i zamykać oczka z każdej strony, czyli jednocześnie na formowanie podkroju rękawa i na dekolt. Jak zakończysz 1 ramię, to wykonujesz drugie, tylko zamykasz oczka na dekolt i podkrój rękawa z drugiej strony (aby robótka była symetryczna). Pozdrawiamy!
27.01.2025 - 14:48
![]() JO escribió:
JO escribió:
Hi, Are you including edge stitch in your stitch counts? Or is it separate. Im finding it confusing the way its written.
27.07.2024 - 13:52DROPS Design respondió:
Hi Jo, edge stitch is included in stitch count. Happy knitting!
28.07.2024 - 17:57
![]() Veronica escribió:
Veronica escribió:
Hi, on this section for the decreases do I still do the one edge stitch in garter stitch in the beginning and end of each row? “Continue with stockinette stitch and decrease 1 stitch on each side of every row from the right side 12-13-13-15-15-19 times.” Thank you!
27.05.2024 - 05:56DROPS Design respondió:
Hi Veronica, When decreasing for the armholes and neck, use Decrease Tip at the top of the page: decrease after 3 stitches at the beginning of the row by knitting 1, slipping 1 stitch and passing the slipped stitch over; decrease at the end of the row by knitting 2 together before the last 3 stitches. So, yes you continue the edge stitches. Happy knitting!
27.05.2024 - 06:38
![]() Amelia escribió:
Amelia escribió:
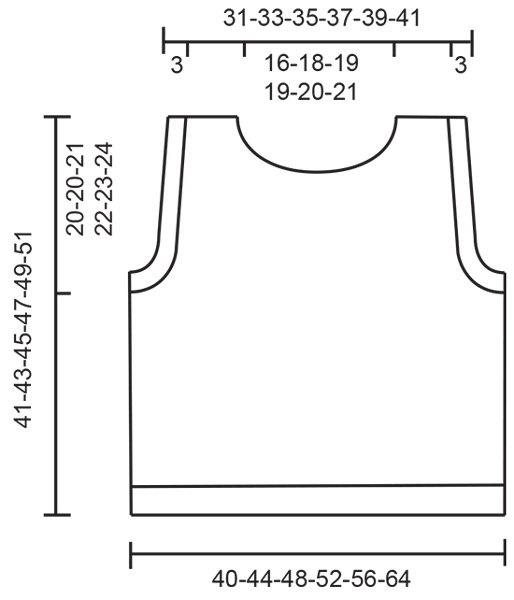
What are the finished measurements for this piece?
12.03.2024 - 08:59DROPS Design respondió:
Dear Amelia, you can find the finished measurements of the piece on the schematic drawing below the instructions. I hope this helps. Happy Knitting!
12.03.2024 - 09:57
![]() Sonja escribió:
Sonja escribió:
Nach Abnahme am Ende des Bündchens habe ich mit 84 Maschen weitergestrickt. Nach der entsprechenden Länge dann mit abketten für die Armausschnitte weitergemacht. Dies in Größe M 13 beidseitig (=26 Maschen). Es blieben noch 50 übrig. Dann 20 Maschen für den Halsausschnitt abgegettet. Damit bleiben pro Schulter noch 15 Maschen übrig. Nun habe ich nur noch 9 Maschen übrig, aber es fehlen noch 10cm Länge. Habe ich zuviel abgenommen?
11.06.2023 - 12:39DROPS Design respondió:
Liebe Sonja, Maschenanzahl stimmt so, Halsausschnitt beginnt nach 37cm + ca 6 cm Abnahmen (6 Mal in jeder 2. Reihe) sind ca 42,5 cm, es fehlt nur noch 2,5 cm nach der 1. Abnahmen bis Abketten (45 cm) (mit 22 Reihen glatt rechts = 10 cm) - kann das Ihnen helfen?
12.06.2023 - 08:54
|
|
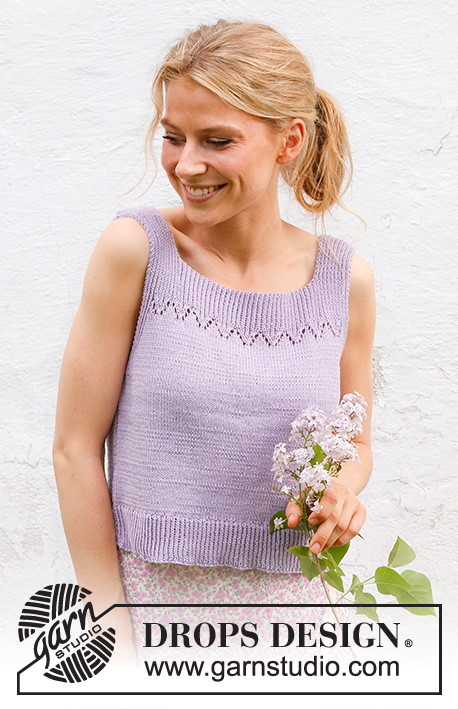
Bayou Belle#bayoubelletop |
|
 |
 |
Top a punto en DROPS Paris. La labor está realizada de abajo arriba, en punto jersey. Tallas: XS -XXL
DROPS 230-51 |
|
|
EXPLICACIONES PARA REALIZAR LA LABOR: ------------------------------------------------------- PLIEGUE/PUNTO MUSGO (de ida y vuelta): Trabajar todas las filas de derecho. 1 pliegue = 2 filas de derecho. TIP PARA LAS DISMINUCIONES (aplicar a las sisas y al escote) Todas las disminuciones se trabajan por el lado derecho. Disminuir después de los primeros 3 puntos al inicio de la fila: Deslizar 1 punto, 1 derecho y pasar el punto deslizado sobre el punto trabajado de derecho (1 punto disminuido). Disminuir antes de los últimos 3 puntos en la fila: Trabajar 2 puntos juntos de derecho (1 punto disminuido). ------------------------------------------------------- COMENZAR LA LABOR AQUÍ: ------------------------------------------------------- TOP - RESUMEN DE LA LABOR: El delantero y la espalda se trabajan por separado, de ida y vuelta con una aguja circular, de abajo arriba. Las partes se cosen juntas en los hombros y en los lados. Se trabajan cenefas alrededor de las sisas y el escote para finalizar. ESPALDA: Montar 84-96-102-108-120-132 puntos con una aguja circular de 4 mm y DROPS Paris. Trabajar el elástico por el lado derecho como sigue: 1 punto orillo en PUNTO MUSGO - leer la explicación arriba, el elástico (1 derecho, 2 reveses) hasta que queden 2 puntos, 1 derecho y 1 punto orillo en punto musgo. Trabajar punto musgo sobre punto musgo, derecho sobre derecho y revés sobre revés 5 cm - la siguiente fila es por el lado derecho. Cambiar a una aguja circular de 5 mm y trabajar la siguiente fila por el lado derecho como sigue: 1 punto orillo en punto musgo, 82-94-100-106-118-130 puntos de derecho y disminuir 14-20-18-18-22-22 puntos sobre estos puntos, 1 punto orillo en punto musgo = 70-76-84-90-98-110 puntos. Continuar con punto jersey y 1 punto orillo en punto musgo a cada lado hasta que la labor mida 21-23-24-25-26-27 cm y la siguiente fila sea una fila por el lado derecho. RECORDAR MANTENER LA TENSIÓN DEL TEJIDO! Cerrar 2-2-4-4-6-6 puntos al inicio de las siguientes 2 filas para las sisas = 66-72-76-82-86-98 puntos. LEER TODA LA SECCIÓN SIGUIENTE ANTES DE CONTINUAR. Ahora se trabajan las disminuciones para las sisas, pero antes de finalizar se trabajan las disminuciones para el escote. Leer TIP PARA LAS DISMINUCIONES! Continuar con punto jersey y disminuir 1 punto a cada lado de cada fila por el lado derecho 12-13-13-15-15-19 veces. AL MISMO TIEMPO cuando la labor mida 34-36-37-39-40-42 cm y la siguiente fila sea una fila por el lado derecho cerrar los 18-20-20-20-20-22 puntos centrales para el escote. Cada hombro se finaliza por separado. Continuar disminuyendo para la sisa y disminuir 1 punto para el escote en cada fila por el lado derecho 5-5-6-6-7-7 veces - recordar TIP PARA LAS DISMINUCIONES. Después de completar todas las disminuciones para la sisa y el escote, hay 7-8-9-10-11-12 puntos. Trabajar hasta que la labor mida 41-43-45-47-49-51 cm. Cerrar con derecho por el lado derecho. Trabajar el otro hombro de la misma manera. DELANTERO: Montar puntos y trabajar de la misma manera que la espalda hasta que la labor mida 21-23-24-25-26-27 cm y la siguiente fila sea una fila por el lado derecho. Cerrar 2-2-4-4-6-6 puntos al inicio de las siguientes 2 filas para las sisas = 66-72-76-82-86-98 puntos. LEER TODA LA SECCIÓN SIGUIENTE ANTES DE CONTINUAR. Ahora disminuir para las sisas, pero antes de finalizar también trabajar las disminuciones para el escote. Continuar en punto jersey y disminuir 1 punto a cada lado de cada fila por el lado derecho 12-13-13-15-15-19 veces. AL MISMO TIEMPO cuando la labor mida 28-30-31-33-34-36 cm colocar los 10-12-14-14-16-18 puntos centrales en un gancho para el escote. Cada hombro se finaliza por separado. Continuar disminuyendo para la sisa y disminuir 1 punto para el escote en cada fila por el lado derecho 9 veces - recordar TIP PARA LAS DISMINUCIONES! Después de completar todas las disminuciones para la sisa y el escote hay 7-8-9-10-11-12 puntos. Trabajar hasta que la labor mida 41-43-45-47-49-51 cm. Cerrar con derecho por el lado derecho. Trabajar el otro hombro de la misma manera. TERMINACIÓN: Hacer la costura en los hombros. Hacer las costuras laterales, dejando 5 cm para las aberturas laterales en la parte inferior. CENEFAS DE LAS MANGAS: Comenzar en la costura lateral, por el lado derecho, con una aguja circular de 4 mm y recoger aprox. 75-84-93-96-105-117 puntos alrededor de la sisa - el número de puntos debe ser divisible entre 3. Trabajar el elástico en redondo (1 derecho, 2 reveses) 3 cm. Cerrar con derecho sobre derecho y revés sobre revés. Trabajar la cenefa de la otra manga de la misma manera. ESCOTE: Comenzar en la costura de un hombro y por el lado derecho, con una aguja circular de 4 mm y recoger aprox. 93-102-105-108-111-117 puntos alrededor del escote (incluyendo los puntos en un gancho auxiliar en el delantero) - el número de puntos debe ser divisible entre 3. Trabajar el elástico en redondo (1 derecho, 2 reveses) 3 cm. Cerrar los puntos con derecho sobre derecho y revés sobre revés. |
|
 |
|
¿Terminaste este patrón?Entonces, etiqueta tus fotos con #dropspattern #bayoubelletop o envíalas a la galería #dropsfan. ¿Necesitas ayuda con este patrón?Encontrarás 29 videos tutoriales, un espacio para comentarios/preguntas y más visitando la página del patrón en garnstudio.com © 1982-2026 DROPS Design A/S. Todos los derechos reservados. Este documento, incluyendo todas sus sub-secciones, está protegido por los derechos de autor (copyright). Lee más acerca de lo que puedes hacer con nuestros patrones en la parte de abajo de cada patrón de nuestro sitio. |
|


Con más de 40 años en el diseño de modelos de punto y de ganchillo, DROPS Design ofrece una de las más vastas colecciones de patrones gratuitos en el internet - traducidos en 17 idiomas. Al día de hoy, contamos con 325 catálogos y 12298 patrones - de los cuales 11726 están traducidos en español.
Nosotros trabajamos con mucho esmero para brindarte lo mejor que las labores de punto y ganchillo tienen para ofrecer,inspiración y consejos, así como hilos de magnífica calidad a precios increíbles! Te gustaría usar nuestros patrones para otro fin además del uso personal? Puedes leer acerca de lo que estás permitida a hacer en el texto de Copyright en la parte de abajo de todos nuestros patrones. Felices labores!
Escribe un comentario sobre DROPS 230-51
¡Nos encantaría saber qué piensas acerca de este patrón!
Si quieres escribir una pregunta referente al patrón, por favor asegúrate de elegir la categoría correcta en el formulario debajo, para acelerar el proceso de respuesta. Los campos obligatorios están marcados con un *.