
Categorías populares
¿Buscas un hilo?


Comentarios / Preguntas (49)
![]() Alicia escribió:
Alicia escribió:
Hola, ya he terminado de hacer el top, y ensamblar las dos partes, pero veo que el remate de los tirantes no me queda como en las fotos que veo del patrón. ¿Dónde puedo ver como hacer ese remate? Gracias
16.04.2026 - 16:33DROPS Design respondió:
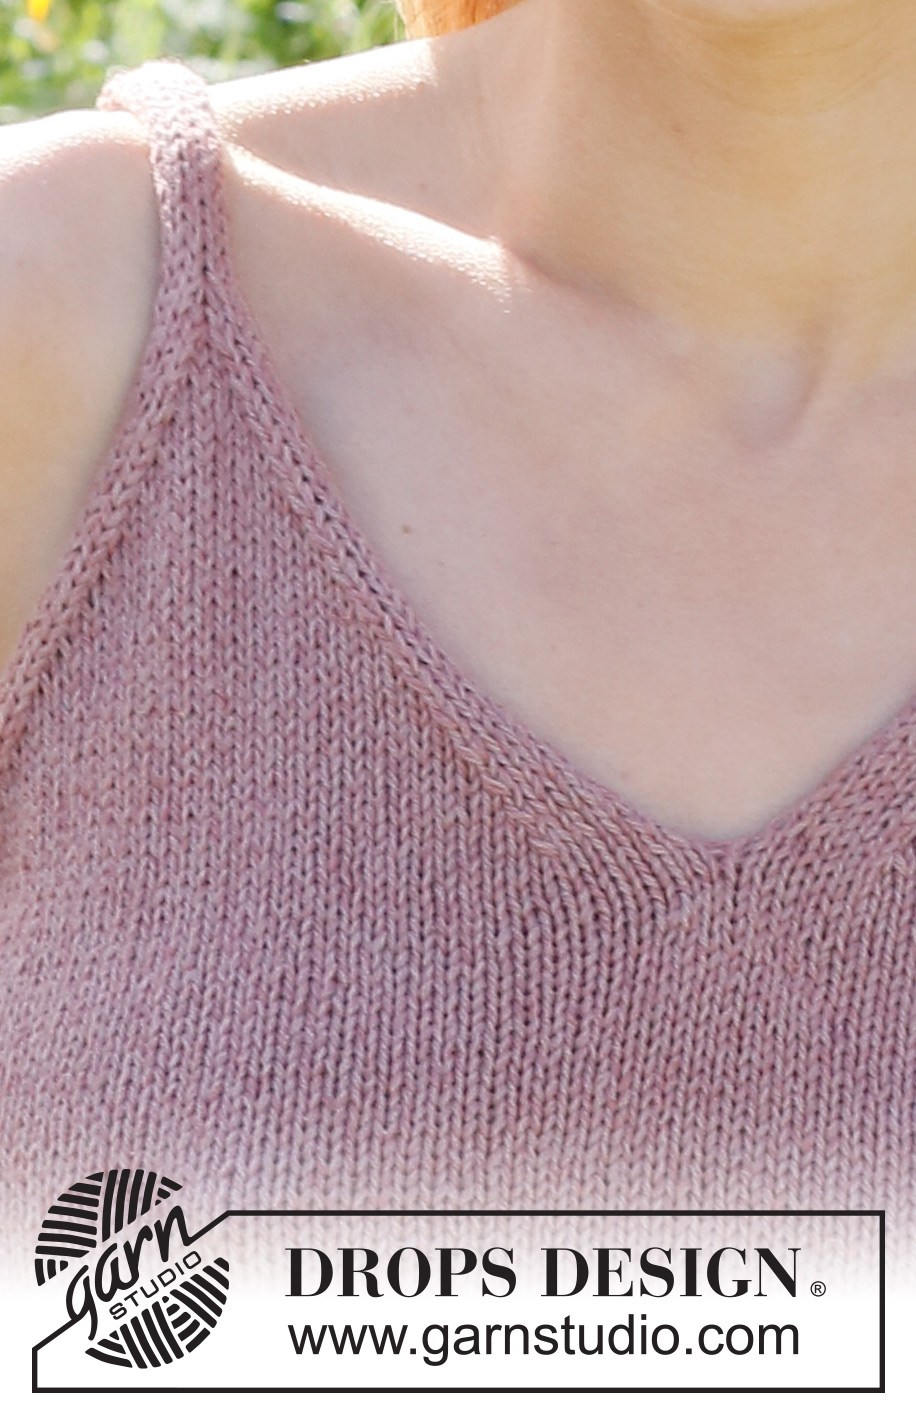
Hola Alicia, la forma del tirante es similar al I-cord. Esta forma se obtiene en los bordes de la labor, ya que es la forma que nos dan las disminuciones, si trabajas según el TIP PARA LAS DISMINUCIONES. Como los puntos restantes para el tirante son los puntos sobrantes del I-cord del cuello y la sisa, el tirante tendrá una estructura similar al I-cord. El tirante después se trabaja en punto jersey.
27.04.2026 - 01:13
![]() Agnieszka escribió:
Agnieszka escribió:
Zaczęłam przerabiać dżersejem od dołu ale bardzo się zawija. Czy kilka pierwszych rzędów robi się ściegiem francuskim?
15.04.2026 - 16:03DROPS Design respondió:
Witaj Agnieszko, zgodnie z opisem przerabiasz dół dżersejem, dlatego będzie się lekko zwijał. Jeśli ten efekt ci się nie podoba, możesz oczywiście wykonać kilka rzędów ściegiem francuskim. Pozdrawiamy!
16.04.2026 - 09:27
![]() Alina escribió:
Alina escribió:
"Zamykać na dekolt 15-17-18-19-21 razy na końcu każdego rzędu na prawej stronie robótki. W tym samym czasie zamykać na podkrój rękawa na początku rzędu na prawej stronie robótki 4 razy co 4 rzędy i 7-9-10-11-13 razy co 2 rzędy. Po zamknięciu wszystkich oczek zostaje 10-10-10-12-12 oczek na ramię." Czy jezeli mamy zamykać co 4 rzedy i co 2 to liczymy również rzedy lewe czy tylko prawe?
28.02.2026 - 16:15DROPS Design respondió:
Witaj Alino, liczysz wszystkie rzędy, czyli te na prawej i na lewej stronie robótki. Jeżeli zamykasz oczka na prawej stronie robótki: gdy zamykasz co 2 rzędy, to znaczy że zamykasz oczka zawsze gdy jesteś na prawej stronie robótki; gdy co 4 rzędy tzn., że zamykasz oczka co drugi rząd na prawej stronie robótki. Pomocny może być kurs DROPS TUTAJ. Pozdrawiamy!
02.03.2026 - 09:08
![]() Lavagnoli escribió:
Lavagnoli escribió:
Bonjour, Diminuer pour l'encolure 15-17-18-19-21 fois au début de chaque rang sur l'endroit."" doit t'on diminuer 15 mailles en une fois ,en début de rang? ou doit t 'on diminuer 15 fois une mailles. pour emmanchures : diminuer 4 fois tous les 4 rangs doit je diminuer 4 mailles tous les 4 rangs? je vous remercie. cordialement
04.11.2025 - 14:14DROPS Design respondió:
Bonjour Mme Lavagnoli, vous devez diminuer pour l'encolure come indiqué sous DIMINUTIONS, autrement dit, vous diminuerez tous les rangs sur l'endroit: 1 m en début de rang (devant gauche) / 1 m en fin de rang (devant droit). En même temps, diminuer pour l'emmanchure (de la même façon que pour l'encolure) soit 1 maille à chaque fois: en début de rang sur l'endroit pour le devant droit / en fin de rang sur l'endroit pour le devant gauche. Vous pourrez ainsi diminuer soit 2 mailles sur l'endroit (encolure + emmanchure) soit juste 1 maille (encolure tous les 2 rangs quand on diminue tous les 4 rangs pour l'emmanchure). Bon tricot!
04.11.2025 - 17:19
![]() Özi escribió:
Özi escribió:
Hi Drops Team, könnte man das Teil in Runden ohne Naht stricken ? Danke im voraus!
15.10.2025 - 21:04DROPS Design respondió:
Hi Ozi, lower part (until armholes) may be knitted in the round, but without splits. Upper part is made in rows, so you will have to knit back and forth for a while. Happy knitting!
16.10.2025 - 09:07
![]() Mette escribió:
Mette escribió:
Kan jeg slå fx 208 masker op til en str L og strikke rundt og så derefter strikke bagstykke og forstykke færdig for sig selv? Jeg ved godt, at der så ikke vil være en slids.
12.06.2025 - 09:16DROPS Design respondió:
Hei Mette. Du trenger ikke kantmaskene i hver side om du skal strikke rundt, men du må da tilpasse antall masker det står at du skal felle til ermhull. mvh DROPS Design
16.06.2025 - 08:11
![]() Susana Araujo escribió:
Susana Araujo escribió:
Do I keep working garter stitch on each side while decreasing for neck and armhole?
27.05.2025 - 23:07DROPS Design respondió:
Dear Mrs Araujo, you don't work edge sts in garter stitch but work the 5 stitches in stocking stitch on each side (after decreasing at the beg of row and before increasing at the end of the row) , both on neck side and on the armhole side - see DECREASE TIP. Happy knitting!
28.05.2025 - 08:42
![]() Susana Araujo escribió:
Susana Araujo escribió:
Hi! I'm not sure I understand the decreasing for the arm and neck. If starting on the right side, every fourth needle would be on the wrong side? But decreasing only happens on the right side. Or do you mean every fourth time you are on the right side?
27.05.2025 - 22:47DROPS Design respondió:
Dear Mrs Araujo, you decrease on a row from the right side, then work 3 rows without decreasing (= 1 from the wrong side +. 1 from the right side + 1 from the wrong side) then decrease on next row from the right side = you have increased on every 4th row (and still from the right side). Happy knitting!
28.05.2025 - 08:40
![]() Susana Araujo escribió:
Susana Araujo escribió:
Hi there, I've decided to knit this top in the round from the bottom rather than 2 pieces flat. I understand both parts (front and back) would then be sewed on the sides on the outermost loop of the garter sts which are 4 in total. As I have decided to knit in the round and ignore the garter sts I won't need to then decrease the 2sts on each side for the armholes. Will this affect the overall fit? Will I still have space for the underarm?
22.05.2025 - 22:08DROPS Design respondió:
Dear Mrs Araujo, if you like to work this in the round you have to remove the edge stitches (cast on 4 minus less) than cast off a total of 2 sts less on each armhole so that each part is still matching the correct number of stitches. Happy knitting!
23.05.2025 - 08:51
![]() Minimi escribió:
Minimi escribió:
In der Anleitung steht 4 Maschen beidseitig in den nächsten 2 Reihen abketten. Heißt das einmal in der Hinreihe 2 Maschen beidseitig und einmal in der Rückreihe je 2 Maschen? Oder einmal 4 Maschen in der Hinreihe und dann 4 Maschen in der Rückreihe
01.04.2025 - 16:21DROPS Design respondió:
Liebe Mimimi, am Anfang der nächsten Hinreihe die 4 ersten Maschen abketten; die Reihe bis zum Ende stricken, wenden und die ersten 4 Maschen am Anfang der Rückreihe abketten, die Reihe bis zum Ende stricken = so werden 4 Maschen beidseitig abgekettet. Viel Spaß beim Stricken!
02.04.2025 - 07:36
|
|
About Spring#aboutspringtop |
|
 |
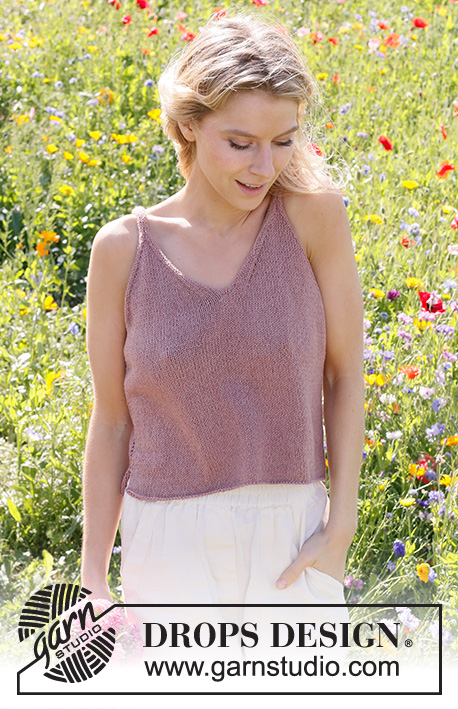 |
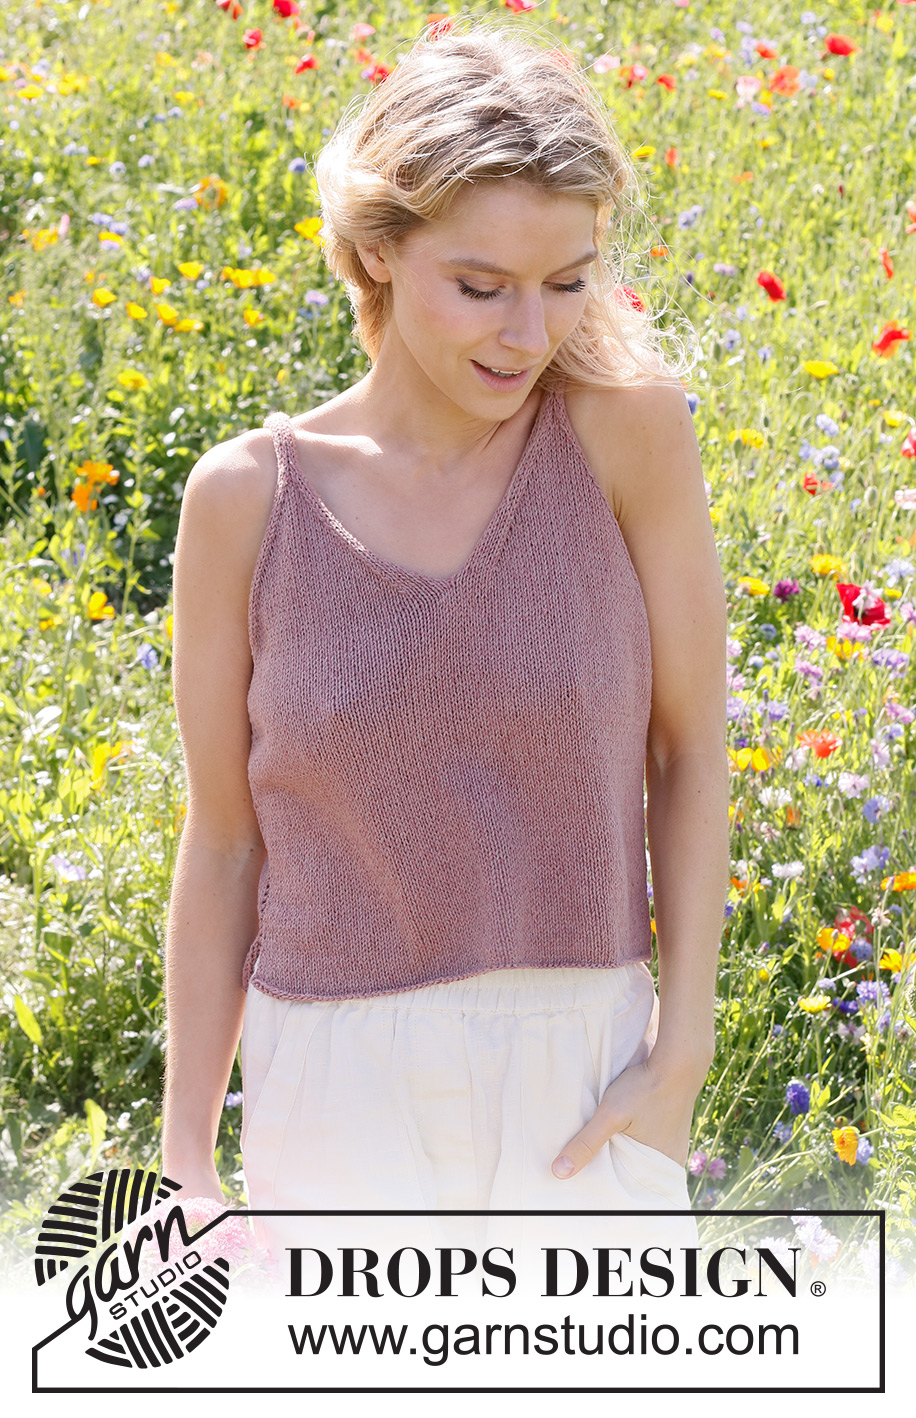
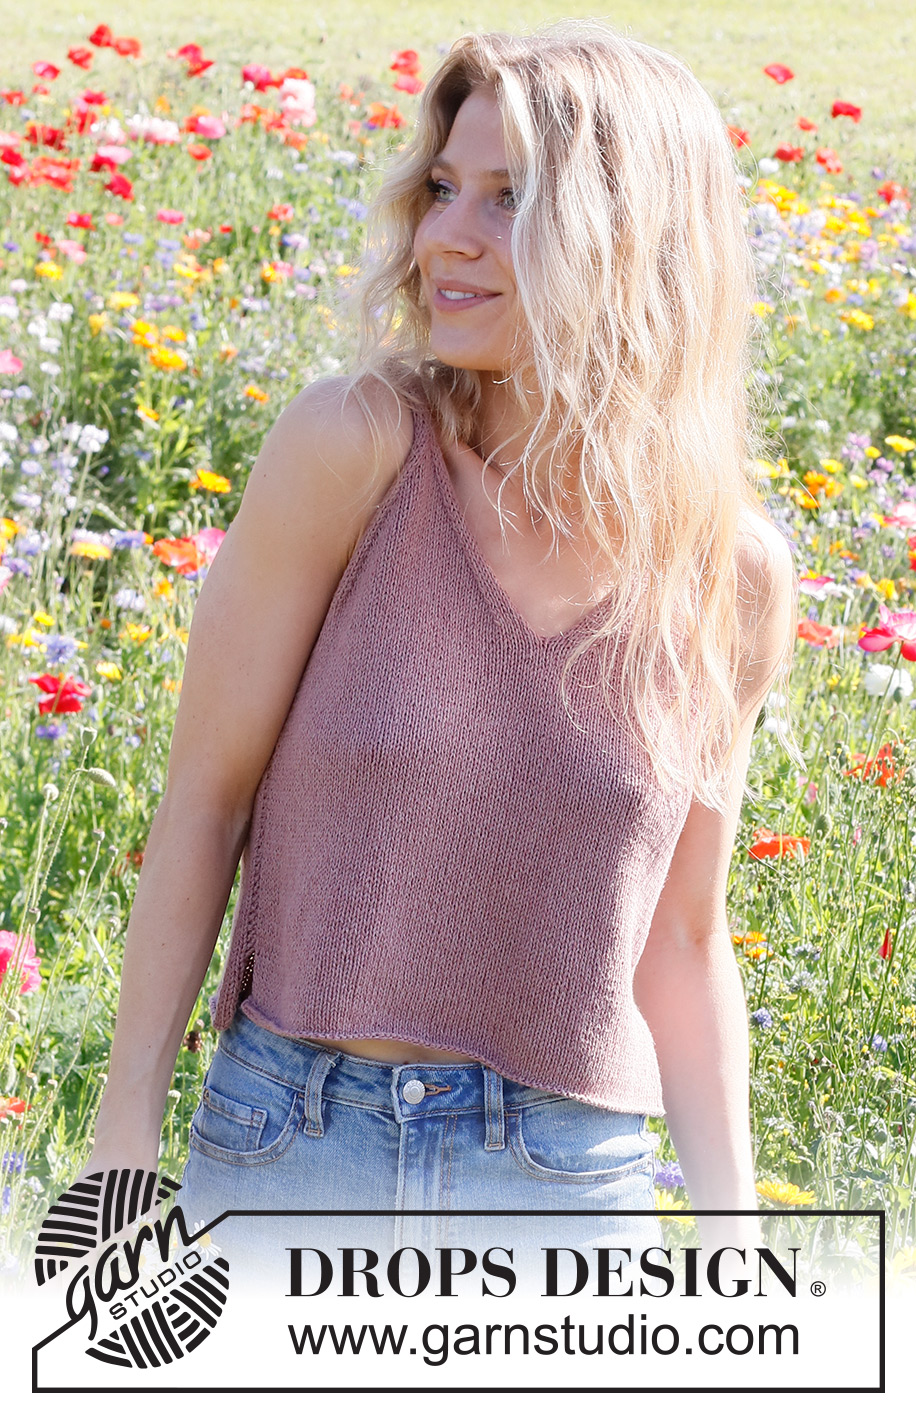
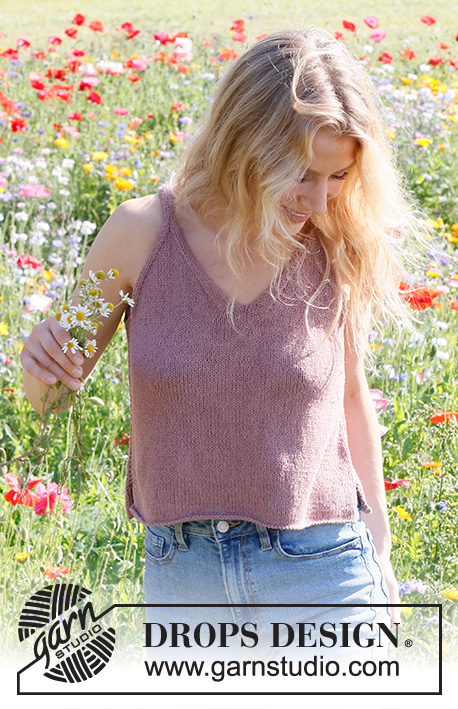
Top de punto en DROPS Belle. La pieza está tejida de abajo hacia arriba con escote en V. Tallas XS – XXL.
DROPS 231-26 |
|
|
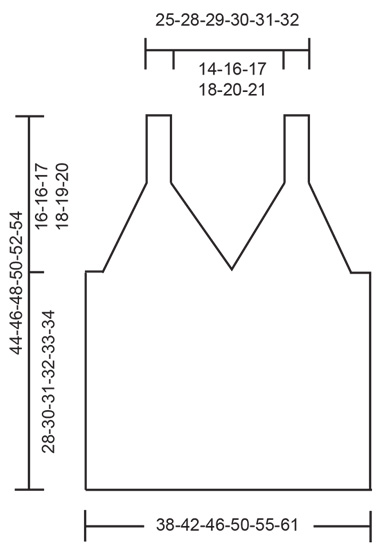
EXPLICACIONES PARA REALIZAR EL PATRÓN: ------------------------------------------------ SURCO/PUNTO MUSGO (tejido de ida y vuelta): Tejer todas las hileras de derecho. 1 surco = tejer 2 hileras de derecho. TIP PARA DISMINUIR: ¡Todas las disminuciones son hechas por el lado derecho! DISMINUIR 1 PUNTO AL PRINCIPIO DE LA HILERA: Tejer 5 puntos derechos, deslizar 1 punto como de derecho, tejer 1 punto derecho y pasar el punto deslizado por encima. DISMINUIR 1 PUNTO AL FINAL DE LA HILERA: Tejer hasta que resten 7 puntos, tejer 2 puntos juntos de derecho, tejer 5 puntos derechos. ------------------------------------------------ COMENZAR LA PIEZA AQUÍ: ------------------------------------------------ TOP: La pieza del frente y la pieza de la espalda son iguales, y se tejen separadamente de ida y vuelta con aguja circular, de abajo hacia arriba. ESPALDA: Montar 80-88-96-104-116-128 puntos con aguja circular tamaño 4 mm y DROPS Belle. Tejer punto jersey de ida y vuelta con 1 punto de orillo en PUNTO MUSGO a cada lado – leer descripción arriba. Tejer hasta que la pieza mida 28-30-31-32-33-34 cm a partir de la orilla de montaje y que la hilera siguiente sea por el lado derecho. ¡RECORDAR MANTENER LA MISMA TENSIÓN DE TEJIDO DE LA MUESTRA! Rematar 4-4-6-6-8-8 puntos al principio de las 2 hileras siguientes para las sisas = 72-80-84-92-100-112 puntos. Insertar 1 marcador, ¡AHORA MEDIR LA PIEZA A PARTIR DE AQUÍ! Ahora dividir para el escote de la manera siguiente: Tejer los primeros 36-40-42-46-50-56 puntos y colocar estos puntos en un hilo (parte-2). Tejer los 36-40-42-46-50-56 puntos siguientes (parte-1). PARTE-1: = 36-40-42-46-50-56 puntos. En la hilera siguiente por el lado derecho comenzar a disminuir para el escote y la sisa al mismo tiempo de la manera siguiente en las diferentes tallas – leer TIP PARA DISMINUIR: TALLAS XS – S – M – L – XL: Disminuir para el escote al principio de cada hilera por el lado derecho 15-17-18-19-21 veces. Al mismo tiempo, disminuir para la sisa al final de cada 4ª hilera 4 veces, después cada 2ª hilera 7-9-10-11-13 veces. Cuando todas las disminuciones estén terminadas, hay 10-10-10-12-12 puntos en el hombro. TALLA: XXL: Disminuir al principio y al final de cada hilera por el lado derecho (para el escote y para la sisa) 22 veces. Cuando todas las disminuciones estén terminadas, hay 12 puntos en el hombro. TODAS LAS TALLAS: = 10-10-10-12-12-12 puntos para el tirante. Tejer hasta que la pieza mida aprox. 44-46-48-50-52-54 cm a partir de la orilla de montaje. Rematar de derecho. PARTE-2: Colocar los 36-40-42-46-50-56 puntos del hilo de vuelta en aguja circular tamaño 4 mm. Tejer 1 hilera de revés por el lado revés. ¡Recordar el TIP PARA DISMINUIR! Ahora comenzar a disminuir para el escote y la sisa de la manera siguiente en las diferentes tallas: TALLAS XS – S – M – L – XL: Disminuir para el escote al final de cada hilera por el lado derecho 15-17-18-19-21 veces. Al mismo tiempo, disminuir para la sisa al principio de cada 4ª hilera 4 veces, después cada 2ª hilera 7-9-10-11-13 veces. Cuando todas las disminuciones estén terminadas, hay 10-10-10-12-12 puntos en el hombro. TALLA XXL: Disminuir al principio y al final de cada hilera por el lado derecho (para el escote y para la sisa) 22 veces. Cuando todas las disminuciones estén terminadas, hay 12 puntos en el hombro. TODAS LAS TALLAS: = 10-10-10-12-12-12 puntos para el tirante. Tejer hasta que la pieza mida aprox. 44-46-48-50-52-54 cm a partir de la orilla de montaje. Rematar de derecho. FRENTE: Montar y tejer de la misma manera como la pieza de la espalda. ENSAMBLAJE: Coser los tirantes, cosiendo en el bucle más externo del punto más externo. Coser las costuras laterales entre sí, en el bucle más externo de los puntos en punto musgo – dejar una abertura de 5 cm en la parte de abajo. |
|
 |
|
¿Terminaste este patrón?Entonces, etiqueta tus fotos con #dropspattern #aboutspringtop o envíalas a la galería #dropsfan. ¿Necesitas ayuda con este patrón?Encontrarás 19 videos tutoriales, un espacio para comentarios/preguntas y más visitando la página del patrón en garnstudio.com © 1982-2026 DROPS Design A/S. Todos los derechos reservados. Este documento, incluyendo todas sus sub-secciones, está protegido por los derechos de autor (copyright). Lee más acerca de lo que puedes hacer con nuestros patrones en la parte de abajo de cada patrón de nuestro sitio. |
|


Con más de 40 años en el diseño de modelos de punto y de ganchillo, DROPS Design ofrece una de las más vastas colecciones de patrones gratuitos en el internet - traducidos en 17 idiomas. Al día de hoy, contamos con 324 catálogos y 12290 patrones - de los cuales 11675 están traducidos en español.
Nosotros trabajamos con mucho esmero para brindarte lo mejor que las labores de punto y ganchillo tienen para ofrecer,inspiración y consejos, así como hilos de magnífica calidad a precios increíbles! Te gustaría usar nuestros patrones para otro fin además del uso personal? Puedes leer acerca de lo que estás permitida a hacer en el texto de Copyright en la parte de abajo de todos nuestros patrones. Felices labores!
Escribe un comentario sobre DROPS 231-26
¡Nos encantaría saber qué piensas acerca de este patrón!
Si quieres escribir una pregunta referente al patrón, por favor asegúrate de elegir la categoría correcta en el formulario debajo, para acelerar el proceso de respuesta. Los campos obligatorios están marcados con un *.