
Categorías populares
¿Buscas un hilo?


Comentarios / Preguntas (31)
![]() Laura escribió:
Laura escribió:
I’m finished with Decrease 2 every 2nd round total of 10 times with 63 stitches on needles. Directions state: then every round 2 times=14 stitches. Don’t understand how that’s done.
28.04.2026 - 22:08DROPS Design respondió:
Hi Laura, You decrease 7 stitches on each decrease-round (1 stitch decreased after each marker) x 11. 98- 70 = 28 stitches. Then decrease every round x 2. 28 - 14 = 14 stitches left on the needle. Regards, Drops Team.
29.04.2026 - 06:02
![]() Su escribió:
Su escribió:
Can you tell me where the amount of wool required on patterns is please.
01.03.2026 - 13:18DROPS Design respondió:
Hi Su, The yarn amounts are to the lower right of the main photo, under the title Materials. Regards, Drops Team.
02.03.2026 - 07:08
![]() Katharina escribió:
Katharina escribió:
Jeg forstår ikke helt linierne med indtagning efter at have strikket en omgang med indtagning efter hver markør. Dublin Town hat str s
17.01.2026 - 13:50
![]() Tania escribió:
Tania escribió:
I have read further along in the pattern and can see that the length is the same for all sizes. Apologies. My former question is answered.
26.11.2025 - 02:17
![]() Tania escribió:
Tania escribió:
Clarification required. Dublin Town pattern 225-29 knitted hat. Size M/L says to knit for 18cm before decreasing for the crown. The S size requires you to knit 19cm in length. Is the pattern correct for the M/L size hat?? Thank you.
26.11.2025 - 00:17DROPS Design respondió:
Hi Tania, You work further up the hat before decreasing in size S as there are fewer decreases to the top of the hat than in size M/L. Regards, Drops Team.
26.11.2025 - 06:50
![]() Julie escribió:
Julie escribió:
I don’t understand why the pattern calls for needle size US4 when the pattern states the yarn used was Drops Alaska which is a US8. Can you explain?
03.09.2025 - 21:10
![]() Merja escribió:
Merja escribió:
Haluaisin tehdä saman mallisen myssyn paksummalla langalla ja paksummilla puikoilla, saisikohan sille ohjeen?
08.01.2025 - 17:20DROPS Design respondió:
Valitettavasti emme suunnittele uusia myssyjä juuri nyt, mutta voit käydä selaamassa jo olemassa olevia myssyohjeitamme. Toivottavasti löydät mieluisan mallin!
08.01.2025 - 17:57
![]() Jo Pitcairn escribió:
Jo Pitcairn escribió:
Got it, I now see the ribbing has been folded up plus some of the stocking stitch !
06.10.2024 - 19:06
![]() Jo Pitcairn escribió:
Jo Pitcairn escribió:
Looking at the hat it looks as if you knit in stocking stitch for 2 cms, then rib up to 7 then stocking stitch again. The turn up doesnyt look like rib. Please clarify? thanks
06.10.2024 - 16:03
![]() Elina escribió:
Elina escribió:
Ohjeessa pipo aloitetaan 2o, 2n joustinneuleella. Kuvassa pipon alareuna näyttää kuitenkin olevan sileää neuletta, joka rullautuu kauniisti. Onko ohjeessa virhe?
06.01.2024 - 10:29
|
|
Dublin Town#dublintownhat |
|
 |
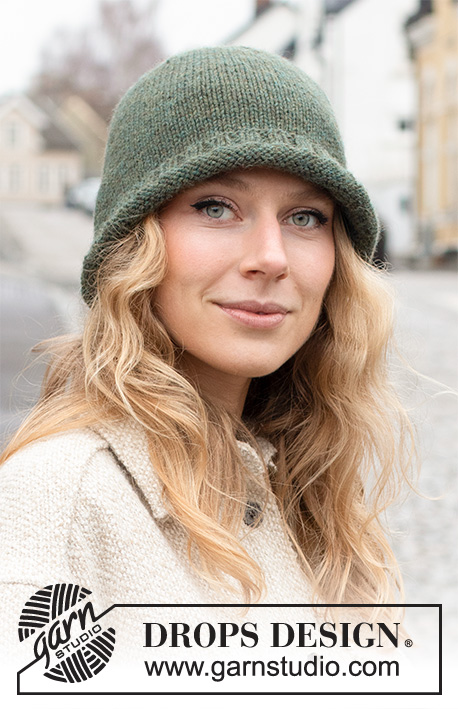 |
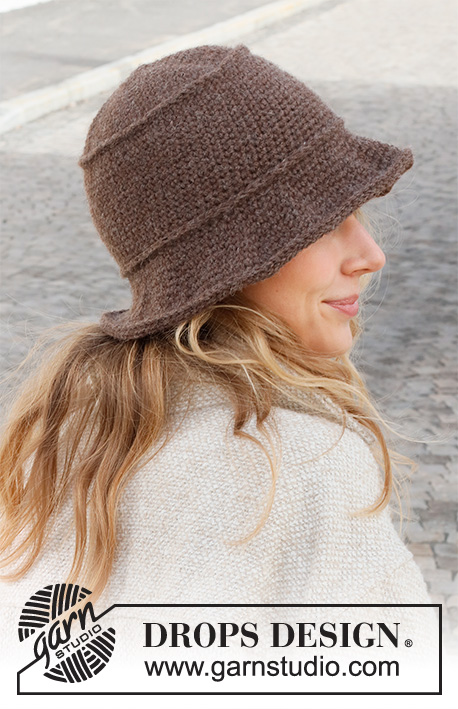
Gorro de punto en DROPS Alaska. La pieza está tejida de abajo hacia arriba.
DROPS 225-29 |
|
|
EXPLICACIONES PARA REALIZAR EL PATRÓN: ------------------------------------------------ TIP-1 PARA DISMINUIR (distribuidos equitativamente): Para calcular cómo disminuir equitativamente, contar el número total de puntos en la aguja (p. ej. 132 puntos) y dividirlo entre el número de disminuciones a hacer (p. ej. 34) = 3.8. En este ejemplo, disminuir tejiendo juntos de derecho aprox. cada 3er y 4º punto. TIP-2 PARA DISMINUIR: Disminuir de la manera siguiente después de cada marcador: Deslizar 1 punto como de derecho, tejer 1 derecho y pasar el punto deslizado por encima del punto tejido (= 1 punto disminuido). ------------------------------------------------ COMENZAR LA PIEZA AQUÍ: ------------------------------------------------ GORRO – RESUMEN DE LA PIEZA: La pieza se teje en redondo con aguja circular, de abajo hacia arriba. Cambiar a agujas de doble punta cuando sea necesario. GORRO: Montar 132-140 puntos con aguja circular tamaño 3.5 mm y DROPS Alaska. Tejer en resorte en redondo (2 derechos, 2 reveses) durante 2 cm. Continuar con punto jersey hasta que la pieza mida 7 cm. ¡RECORDAR MANTENER LA MISMA TENSIÓN DE TEJIDO DE LA MUESTRA! En la vuelta siguiente, disminuir 34-35 puntos distribuidos equitativamente – leer TIP-1 PARA DISMINUIR = 98-105 puntos. Continuar con punto jersey. Cuando la pieza mida 19-18 cm, insertar 7 marcadores con 14-15 puntos entre cada uno. En la vuelta siguiente, disminuir 1 punto después de cada marcador – leer TIP-2 PARA DISMINUIR (= 7 puntos disminuidos). Disminuir así cada 2ª vuelta un total de 10-11 veces, después en cada vuelta 2-2 veces = 14 puntos restantes. En la vuelta siguiente, tejer todos los puntos juntos de derecho de 2 en 2 = 7 puntos. Cortar el hilo, pasarlo a través de los puntos restantes, fruncir y rematar bien. El gorro mide aprox. 26 cm de la parte de arriba hacia abajo en ambas tallas. Doblar el resorte hacia el lado derecho de la labor. |
|
¿Terminaste este patrón?Entonces, etiqueta tus fotos con #dropspattern #dublintownhat o envíalas a la galería #dropsfan. ¿Necesitas ayuda con este patrón?Encontrarás 15 videos tutoriales, un espacio para comentarios/preguntas y más visitando la página del patrón en garnstudio.com © 1982-2026 DROPS Design A/S. Todos los derechos reservados. Este documento, incluyendo todas sus sub-secciones, está protegido por los derechos de autor (copyright). Lee más acerca de lo que puedes hacer con nuestros patrones en la parte de abajo de cada patrón de nuestro sitio. |
|


Con más de 40 años en el diseño de modelos de punto y de ganchillo, DROPS Design ofrece una de las más vastas colecciones de patrones gratuitos en el internet - traducidos en 17 idiomas. Al día de hoy, contamos con 324 catálogos y 12290 patrones - de los cuales 11675 están traducidos en español.
Nosotros trabajamos con mucho esmero para brindarte lo mejor que las labores de punto y ganchillo tienen para ofrecer,inspiración y consejos, así como hilos de magnífica calidad a precios increíbles! Te gustaría usar nuestros patrones para otro fin además del uso personal? Puedes leer acerca de lo que estás permitida a hacer en el texto de Copyright en la parte de abajo de todos nuestros patrones. Felices labores!
Escribe un comentario sobre DROPS 225-29
¡Nos encantaría saber qué piensas acerca de este patrón!
Si quieres escribir una pregunta referente al patrón, por favor asegúrate de elegir la categoría correcta en el formulario debajo, para acelerar el proceso de respuesta. Los campos obligatorios están marcados con un *.