
Categorías populares
¿Buscas un hilo?


Comentarios / Preguntas (24)
![]() Pauline escribió:
Pauline escribió:
I’m having trouble understanding how the collar works. Start with 2cm 1x1 ribbing then pattern for the body. Medium size 200 stitches. The last part says go back to add neck, knit up 88-120 st and work 1x1 rib for another 2cm. How does that work?
18.08.2025 - 15:35DROPS Design respondió:
Hi Pauline, the top is worked bottom up. The neck is knitted at the end. You have to cast on 88 to 120 stitches (number divisible by 2) around the neck from the right side and work rib (knit 1, purl 1) in the round for 2 cm. Happy knitting!
18.08.2025 - 15:59
![]() Antonia escribió:
Antonia escribió:
Hallo, ich fange gerade nach dem Rippenmuster A1 und A2 an, in der Anleitung steht Hinreihen werden von rechts nach links gelesen und Rückreihen von links nach rechts, wenn ich in der Reihe mit dem Pfeil anfange ist es also eine Rückreiheund ich muss von links nach rechts lesen obwohl ich in Runden stricke? Sehe ich das richtig?
17.08.2025 - 09:19DROPS Design respondió:
Liebe Antonia, wenn die Diagramme in der Runde gestrickt sind, liest man jede Reihe rechts nach links, erst wenn man später in Hin- und Rückreihen strickt, wird man die Rückreihen links nach rechts lesen. Viel Spaß beim Stricken!
18.08.2025 - 09:10
![]() Emmanuelle escribió:
Emmanuelle escribió:
Bonjour, Je n'ai toujours pas compris. Qu'appelez-vous "tricotez A2 au-dessus des 88 mailles en diminuant de 11 mailles"? Je dois faire 11 diminutions de façon harmonieuse et après les 88 premières mailles moins les 11 diminutions, je commence à tricoter les 5 premières mailles de A2?Dans ce cas pourquoi dire "au-dessus de" puisque nous ne faisons que des diminutions et non A2? Je vous remercie . A ce rythme je crois que je vais abandonner et faire autre chose avec.
26.04.2025 - 15:31DROPS Design respondió:
Bonjour Emmanuelle, vous tricotez les 88 mailles suivantes comme indiqué dans le 2ème rang du diagramme A.2 (celui avec la flèche) = vous allez ainsi répéter 11 fois les 8 mailles du diagramme, et, en même temps, vous diminuez 1 m comme indiqué par le symbole "/" soit: (1 m env, glissez 1 m à l'end, 1 m end, passez la m glissée par-dessus la m tricotée, 1 m end, 1 m env, 3 m end) = Il reste 7 m, répétez de (à) encore 10 fois (11 fois au total). Au tour suivant, tricotez le 3ème rang de A.2: 1 m env, 2 m end, 1 m env, 3 m end. Bon tricot!
28.04.2025 - 08:04
![]() Emmanuelle escribió:
Emmanuelle escribió:
Bonjour, Pourriez-vous m'aider s'il vous plait pour la taille L et la première ligne de A1 et de A2? J'obtiens 8 diminutions en tout. Ensuite, comment obtenez-vous 194 mailles alors qu'au départ il y avait 224 mailles? Cela fait donc 20 diminutions... Je suis perdue. Merci pour votre aide.
22.04.2025 - 07:45DROPS Design respondió:
Bonjour Emmanuelle, on va effectivement diminuer 1 maille dans A.1 et dans A.2 mais au 2ème rang = celui avec la flèche; tricotez ainsi * A.1 (= 7 m et on diminue 1 m), 6 m endroit en diminuant 1 m, tricotez A.2 au-dessus des 88 m suivantes (= on diminue 11 m au total = 1 dans chacun des 11 répétitions de A.2), tricoter les 5 premières mailles de A.2 (= on diminue 1 maille), 6 m endroit en diminuant 1 m*, répéter de *-* encore 1 fois = [(7-1)+(6-1)+(88-11)+(5-1)+(6-1)]x2= 194 mailles. Bon tricot!
22.04.2025 - 16:44
![]() Katt escribió:
Katt escribió:
Hello, I am stuck on the part where the piece measures 4-4cm. Increase stitch on each side part of A.3 part. I think I'm getting ready to do the sleeve or arm holes not too sure but am having a hard time as it's hard for me to read and understand most knitting patterns and I am a fairly beginner/novice knitter.
12.02.2025 - 16:10DROPS Design respondió:
Dear Katt, you work the increases as indicated in INCREASE TIP. You work 1 yarn over before and after each repeat of A.3 in the round. Start with 1 yarn over, work chart A.3, work 1 yarn over. Continue with knit stitches and A.4 over the other stitches and, when you reach the next A.3 chart (under the second sleeve) make 1 yarn over, work A.3, 1 yarn over. Continue with knit stitches and A.4 over the other stitches until the end of the round. Here you increase for the sleeves and then you will cast off to form the armhole. Happy knitting!
17.02.2025 - 00:17
![]() Sara Logue escribió:
Sara Logue escribió:
For the beginning of the Body the pattern says "Work the last round in A.1 and A.2, and knit the remaining stitches on round." What does this mean? Thank you.
17.01.2025 - 04:22DROPS Design respondió:
Dear Mrs Logue, you just have worked the row in A.1 and A.2 decreasing 1 stitch in each diagram and on this same round you knitted some stitches decreasing evenly; on the next round you will work the last row in À.1 and A.2 just as shown in diagram and knit all remaining stitches (just without decrease this time). Happy knitting!
17.01.2025 - 08:51
![]() Marjon escribió:
Marjon escribió:
Goedemiddag, Klopt het dat zowel de boord als het kantpatroon gebreid wordt met nldn 3 mm? Alleen de mouwtjes ( tricotsteek ) met 4 mm? Ik hoor het graag Alvast bedankt, Marjon
03.06.2024 - 18:06DROPS Design respondió:
Dag Marjon,
Nee, de boord wordt met naald 3 mm gebreid en de rest met 4 mm. Bij het lijf staat ook dat je op een gegeven moment over gaat naar rondbreinaald 4 mm. (Niet direct na de boordsteek, maar een beetje verderop.
03.06.2024 - 20:26
![]() Gail Stein escribió:
Gail Stein escribió:
My question is; In A1 and A2 the third row shows a blank space, over the decreased stitch. How do I handle this?. Is this meant to be a decrease in the pattern, or do you pick up a stitch to keep the stitch count?
09.04.2024 - 00:23
![]() Toni escribió:
Toni escribió:
The instructions are incorrect b/c you CANNOT cast off at the end of a row (ie both sides) unless you have finished. Instructions SHOULD BE ........sleeve cap back and forth, AT THE SAME TIME cast off beginning of each row as follows: 2 st 6-6-6-6-4-4 times, 1 st 4-6-10-16-28-28 times, 2 st 8-8-6-4-2-2 times and 4-3-3-4-3-3 st 2 times = 26-28-30-30-30-34 stitches. Cast off. The sleeve measures approx. 13-14-14-15-18-18 cm. I saw others had the same problem. Thanks!
30.03.2024 - 17:41
![]() Toni escribió:
Toni escribió:
I have too many st when finishing dec on the sleeve (sz lg) and it's too short 74 + 6 = 80 st, ok When piece is 5 cm long, -10 = 70 st, ok Then at beg of each (new) row, -2 x 3 = -6 =64 st (c/o 2 st beg next 3 rows {makes it non symmetrical}) -1 x 5 = -5 = 59 st -2 x 3 = -6 = 53 t -3 x 1 = -3 = 50 st but there should only be 30 st. And my piece is only 9cm long. Please clarify. Thanks so much - I really appreciate your quick response on my last qst!
30.03.2024 - 17:03DROPS Design respondió:
Dear Toni, cast off at the beginning of each row from each side (right and wrong sides). So 2 stitches on the next 3 rows from the right side and next 3 rows from the wrong side (so 12 stitches), 1 stitch 5 times from the right side and 5 times from the wrong side (so 10 stitches), 2 stitches 3 times from the right side and 3 times from the wrong side (so 12 stitches) and 3 stitches once from the right side and once from the wrong side (so 6 stitches). You have cast off 40 stitches and have 30 stitches left. At the same time, you should have worked 24 more rows which, according to the gauge should be approx. 8.5 cm. So your sleeve should measure almost 14cm. Happy knitting!
01.04.2024 - 01:00
|
||||||||||||||||||||||
Coral Gables#coralgablestop |
||||||||||||||||||||||
 |
 |
|||||||||||||||||||||
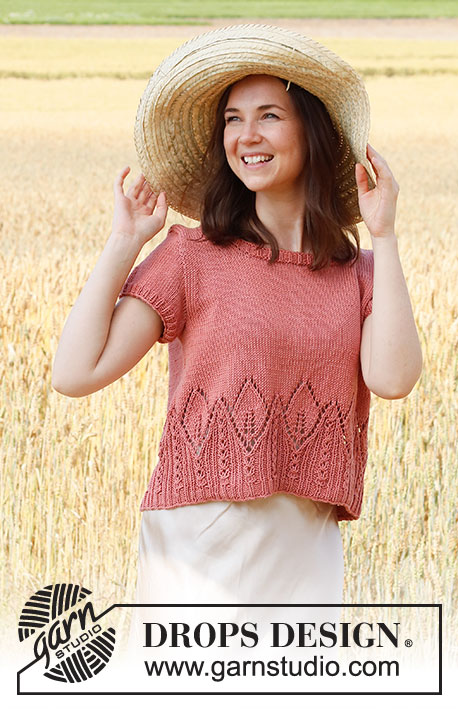
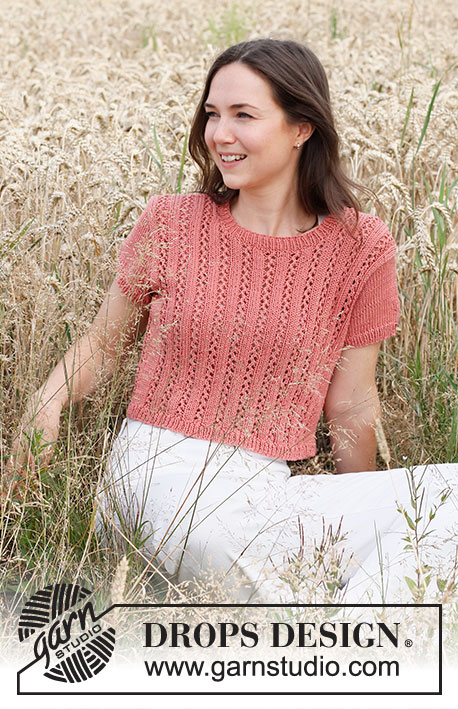
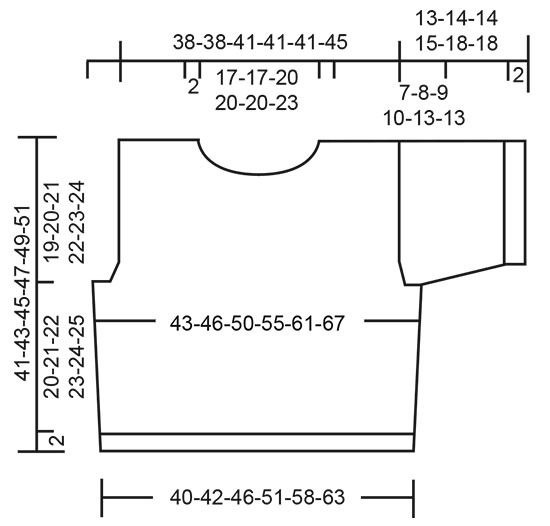
Top a punto en DROPS Muskat. La labor está realizada con el patrón de calados y mangas cortas. Talla: S - XXXL
DROPS 220-27 |
||||||||||||||||||||||
|
EXPLICACIONES PARA REALIZAR LA LABOR: ------------------------------------------------------- PATRÓN: Ver los diagramas A.1-A.4. Los diagramas muestran todas las filas del patrón vistas por el lado derecho. TIP PARA LOS AUMENTOS: Trabajar hasta A.3, hacer 1 hebra, A.3, hacer 1 hebra. En la siguiente vuelta trabajar la hebra de derecho retorcido para evitar que se formen agujeros. Después trabajar los puntos nuevos en punto jersey. ------------------------------------------------------- COMENZAR LA LABOR AQUÍ: ------------------------------------------------------- TOP - RESUMEN DE LA LABOR: El cuerpo se trabaja en redondo con una aguja circular, hasta las sisas. El delantero y la espalda se finalizan por separado, de ida y vuelta. Las mangas se trabajan en redondo con agujas de doble punta/ una aguja circular corta hasta las sisas, después se finaliza la copa de la manga de ida y vuelta. Las partes se cosen juntas y se trabaja una cenefa del cuello en redondo para terminar. CUERPO: Montar 192-200-224-240-272-296 puntos con una aguja circular de 3 mm y Muskat. Trabajar 1 vuelta de derecho. Después trabajar el elástico (1 derecho, 1 revés) en redondo 2 cm. La siguiente vuelta se trabaja como sigue - comenzar en la vuelta con una flecha en cada diagrama:* A.1 sobre los primeros 7 puntos (= 1 punto disminuido), 2-4-6-10-18-20 derechos y al mismo tiempo disminuir 0-0-1-0-1-1 punto trabajando 2 puntos juntos de derecho, trabajar A.2 sobre los siguientes 80-80-88-88-88-96 puntos (= 10-10-11-11-11-12 puntos disminuidos), trabajar los primeros 5 puntos en A.2 (= 1 punto disminuido), 2-4-6-10-18-20 derechos y al mismo tiempo disminuir 0-0-1-0-1-1 punto trabajando 2 puntos juntos de derecho*, trabajar de * a * una vez más = 168-176-194-214-242-264 puntos. Cambiar a una aguja circular de 4 mm. Trabajar la última vuelta en A.1 y A.2 y trabajar de derecho los puntos restantes en la vuelta. Ahora trabajar el patrón como sigue; *A.3 sobre A.1 (= bajo la manga), 2-4-5-10-17-19 derechos, trabajar A.4 sobre los siguientes 70-70-77-77-77-84 puntos, trabajar los primeros 4 puntos en A.4, 2-4-5-10-17-19 derechos *, trabajar de * a * 1 vez más. Continuar con este patrón. RECORDAR MANTENER LA TENSIÓN DEL TEJIDO! Cuando la labor mida 4-4-5-5-5-5 cm, aumentar 1 punto a cada lado de A.3 bajo ambas mangas - leer TIP PARA LOS AUMENTOS. Aumentar de esta manera cada 7-5-5-5-5½-6 cm un total de 3-4-4-4-4-4 veces = 180-192-210-230-258-280 puntos. Cuando la labor mida 22-23-24-25-26-27 cm, cerrar para las sisas como sigue: Cerrar 6-7-8-9-10-11 puntos, trabajar los siguientes 84-88-95-103-115-124 puntos, cerrar 6-8-10-12-14-16 puntos, trabajar los siguientes 84-88-95-103-115-124 puntos, cerrar los últimos 0-1-2-3-4-5 puntos. Terminar la espalda y el delantero por separado. ESPALDA: = 84-88-95-103-115-124 puntos. Continuar con el patrón de ida y vuelta, AL MISMO TIEMPO cerrar para las sisas a cada lado al inicio de cada fila como sigue: Cerrar 2 puntos 0-1-1-2-5-5 veces, después 1 punto 1-1-1-3-3-4 veces = 82-82-89-89-89-96 puntos. Cuando la labor mida 17-18-19-20-21-22 cm desde la división (la labor entera mide aprox. 39-41-43-45-47-49 cm desde el borde de montaje), cerrar los 34-34-39-39-39-46 puntos centrales para el cuello y cada hombro se termina por separado. Ahora cerrar 1 punto en la siguiente fila desde el escote = 23-23-24-24-24-24 puntos para el hombro. Continuar trabajando hasta que la labor mida 41-43-45-47-49-49 cm. Cerrar. Trabajar el otro hombro de la misma manera. DELANTERO: = 84-88-95-103-115-124 puntos. Continuar con el patrón de ida y vuelta, AL MISMO TIEMPO cerrar para las sisas a cada lado al inicio de cada fila como sigue: Cerrar 2 puntos 0-1-1-2-5-5 veces, después 1 punto 1-1-1-3-3-4 veces = 82-82-89-89-89-96 puntos Cuando la labor mida 11-12-12-13-13-14 cm desde la división (la labor entera mide aprox. 33-35-36-38-39-41 cm desde el borde de montaje), cerrar 18-18-23-23-23-24 puntos para el escote y finalizar cada hombro por separado. Ahora cerrar en cada fila desde el escote: 3 puntos 1 vez, 2 puntos 2-2-2-2-2-3 veces y 1 punto 2-2-2-2-2-3 veces = 23-23-24-24-24-24 puntos para el hombro. Continuar trabajando hasta que la labor mida 41-43-45-47-49-51 cm. Cerrar. Trabajar el otro hombro de la misma manera. MANGAS: Montar 66-70-74-80-84-90 puntos con agujas de doble punta de 3 mm y Muskat. Trabajar 1 vuelta de derecho. Ahora trabajar el elástico en redondo (1 derecho, 1 revés) 2 cm. Trabajar 1 vuelta de derecho y al mismo tiempo aumentar 6 puntos repartidos = 72-76-80-86-90-96 puntos. Cambiar a agujas de doble punta de 4 mm y trabajar en punto jersey. Cuando la labor mida 6-6-5-5-5-5 cm, cerrar 6-8-10-12-14-16 puntos en el centro bajo la manga = 66-68-70-74-76-80 puntos. Después trabajar la copa de la manga de ida y vuelta, AL MISMO TIEMPO cerrar puntos al inicio de cada fila como sigue: 2 puntos 3-3-3-3-2-2 veces, 1 punto 2-3-5-8-14-14 veces, 2 puntos 4-4-3-2-1-1 veces y 4-3-3-4-3-3 puntos 1 vez = 26-28-30-30-30-34 puntos. Cerrar. La manga mide aprox. 13-14-14-15-18-18 cm. Trabajar la otra manga de la misma manera. TERMINACIÓN: Coser los hombros. Coser las mangas. CUELLO: Recoger 88-120 puntos (un número divisible entre 2) alrededor del escote por el lado derecho, con una aguja circular corta de 3 mm y Muskat. Trabajar el elástico (1 derecho, 1 revés) en redondo 2 cm. Cerrar con derecho sobre derecho y revés sobre revés. |
||||||||||||||||||||||
Explicaciones del diagrama |
||||||||||||||||||||||
|
||||||||||||||||||||||
 |
||||||||||||||||||||||
 |
||||||||||||||||||||||
¿Terminaste este patrón?Entonces, etiqueta tus fotos con #dropspattern #coralgablestop o envíalas a la galería #dropsfan. ¿Necesitas ayuda con este patrón?Encontrarás 26 videos tutoriales, un espacio para comentarios/preguntas y más visitando la página del patrón en garnstudio.com © 1982-2026 DROPS Design A/S. Todos los derechos reservados. Este documento, incluyendo todas sus sub-secciones, está protegido por los derechos de autor (copyright). Lee más acerca de lo que puedes hacer con nuestros patrones en la parte de abajo de cada patrón de nuestro sitio. |
||||||||||||||||||||||


Con más de 40 años en el diseño de modelos de punto y de ganchillo, DROPS Design ofrece una de las más vastas colecciones de patrones gratuitos en el internet - traducidos en 17 idiomas. Al día de hoy, contamos con 324 catálogos y 12290 patrones - de los cuales 11675 están traducidos en español.
Nosotros trabajamos con mucho esmero para brindarte lo mejor que las labores de punto y ganchillo tienen para ofrecer,inspiración y consejos, así como hilos de magnífica calidad a precios increíbles! Te gustaría usar nuestros patrones para otro fin además del uso personal? Puedes leer acerca de lo que estás permitida a hacer en el texto de Copyright en la parte de abajo de todos nuestros patrones. Felices labores!
Escribe un comentario sobre DROPS 220-27
¡Nos encantaría saber qué piensas acerca de este patrón!
Si quieres escribir una pregunta referente al patrón, por favor asegúrate de elegir la categoría correcta en el formulario debajo, para acelerar el proceso de respuesta. Los campos obligatorios están marcados con un *.