
Categorías populares
¿Buscas un hilo?


Comentarios / Preguntas (13)
![]() Kath escribió:
Kath escribió:
Bonjour! Je ne suis pas certaine de bien saisir pourquoi en tricotant une housse de coussin carré, nous devons faire des augmentations suite au montage initial et des diminutions vers la fin du tricot avant le rabattage. S'il est carré, ne devrait-il pas y avoir un nombre de mailles constant. Merci beaucoup pour les précisions.
30.11.2025 - 22:29DROPS Design respondió:
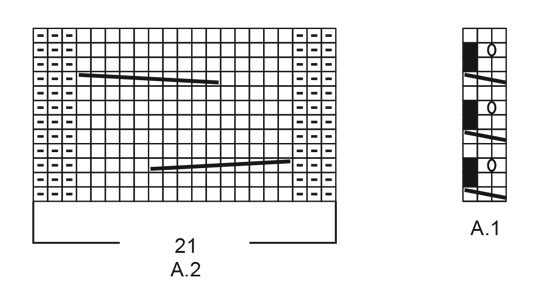
Bonjour Kath, il faut plus de mailles pour tricoter des torsades que pour du jersey, ainsi, lorsque l'on monte le nombre de mailles requis, on va avoir la bonne largeur pour du jersey, mais il faudra ensuite augmenter pour conserver la même largeur quand on va faire les torsades, et, à la fin, il faudra donc diminuer les mailles augmentées pour éviter que le bord ne gondole/ne soit plus large que la partie torsades. Bon tricot!
01.12.2025 - 10:57
![]() Annabelle Garcia Y Vallejo escribió:
Annabelle Garcia Y Vallejo escribió:
Bonjour, Concernant le diagramme A1 ligne 1 : faut il tricoter les mailles sur lesquelles on fait passer la maille? Ligne 2 sur la torsade ,tricote-t-on à l'endroit où à l'envers? Merci pour votre réponse
18.02.2025 - 11:02DROPS Design respondió:
Bonjour Mme Garcia Y Vallejo, notez que la housse se tricote en rond = tous les tours à l'endroit; au 1er rang de A.1, tricotez les 3 mailles de A.1à l'endroit puis passez la 1ère de ces 3 mailles par-dessus les 2 autres, ainsi, il ne reste plus que 2 mailles. Au tour suivant, tricotez ces 2 mailles à l'endroit, puis au3ème tour, tricotez: 1 m end, 1 jeté, 1 m end = vous avez de nouveau 3 mailles, tricotez ces 3 mailles à l'endroit au rang suivant. Répétez ces 4 rangs. Retrouvez ici, en vidéo comment tricoter ce type de petite torsade. Bon tricot!
18.02.2025 - 17:17
![]() Rachel escribió:
Rachel escribió:
Hi. Am knitting Pillars of Valhalla . Am struggling with the no stitch squares. My reading about it seems to indicate that it balances out decreases, however there are no decreases only increases and I end up with extra stitches at the end of each row! Would love some help!!
18.01.2025 - 01:13DROPS Design respondió:
Dear Rachel, the A.1 pattern have differents stitchcount in different rows. In the first row, you have 3 stitches, from which you decrease 1, thus in the 2-3. row you ill have 2 stitches there, but in the 3rd row, you make a YO (the little O sign between the two stitches on the diagram) between the two stitches so you will have 3 stitches again. Happy Knitting!
18.01.2025 - 01:54
![]() Rose escribió:
Rose escribió:
Hi, How do we follow the A.1 and A.2 pattern? From top to bottom? How do we follow A.1? Would it be for example: 1st A.1: K3 2nd A.1: K3 3rd A.1: skip and KYOK or 1st A.1: K3 2nd A.1: skip KYOK 3rd A.1: skip and K2 Thank you!
22.09.2024 - 11:44DROPS Design respondió:
Dear Rose, you can read our lesson on knitting charts here: https://www.garnstudio.com/lesson.php?id=68&cid=19. The charts are read from the bottom up. Since it's worked in the round all rows of the chart are read from left to right. In the 1st row of A.1 you have: knit 3, pass the first stitch knitted over the other 2, so it lies around them (= 1 stitch decreased). On the next round, knit 2 (the black square is ignored, don't skip stitches). Happy knitting!
23.09.2024 - 01:11
![]() Genise Huey escribió:
Genise Huey escribió:
I am getting more decreases when I do as pattern says: I knit 2 stitches and then knit two together and then knit 3 and then knit two together. K2, k2tg k3, k2tg…..
17.09.2024 - 22:09DROPS Design respondió:
Dear Mrs Huey, adjust the number of stitches worked between each decrease so that you decrease the correct number of stitches - read more here. Happy knitting!
18.09.2024 - 08:26
![]() Maureen Gillespie escribió:
Maureen Gillespie escribió:
For the pattern repeat, on the wrong side (even) rows, should I reverse the stokinette stitch to be p1, k1? [Original instructions show "11-20 stitches in stockinette stitch (*k1, p1*)"] Thank you!
08.11.2023 - 21:58DROPS Design respondió:
Dear Mrs Gillepsie, there is no wrong side rows as the piece is worked in the round, diagrams are showing all the rows, so work all rows in diagram reading from right towards the left and knit all stitches in stocking stitch. Happy knitting!
09.11.2023 - 08:26
![]() Maureen escribió:
Maureen escribió:
NO STITCH: What do I do with the first stitch? K together with 2nd stitch? transfer to the right needle? drop? Thank you!
12.10.2023 - 22:05DROPS Design respondió:
Dear Maureen, after you have worked 1st row in A.1 (= knit 3 and pass the first of these 3 sts over the 2 sts), there are only 2 sts left, just knit these 2 sts . On next round, you will then work K1, YO, K1 (there are 3 sts again). Happy knitting!
13.10.2023 - 08:45
![]() Maureen escribió:
Maureen escribió:
Pattern repeat *A1, A2* If A1 is hold 3 sticthes on cable needle, k3, then k3 from cable needle = 28 stitches (not 25)
12.10.2023 - 19:46DROPS Design respondió:
Dear Maureen, A.1 is first worked over 3 stitches but on the first row you will decrease 1 stitch (knit 3, pass the first of these 3 sts over the next 2), and on row 2 you will make 1 yarn over to get 3 sts again - so that A.1 is counted over 3 sts. You will then work: A.1, A.2, A.1, A.2, A.1, A.2, A.1. = 3+21+3+21+3+21+3=75 sts in total. Happy knitting!
13.10.2023 - 08:35
![]() Judy escribió:
Judy escribió:
This pillow comes in two sizes which are accounted for in the two numbers of sts to cast on and work. However, when you get to the length of the pillow, there is only one number. Doesn't the larger pillow need to be made a little longer in order to make it square? I am assuming the 38 cm is for the smaller pillow. How long should I make it for the larger pillow?
06.10.2022 - 19:36DROPS Design respondió:
Hi Judy, for the larger pillow you should work until work measures 43 cm - added on pattern,thanks for nociting. Happy knitting!
18.11.2022 - 14:26
![]() UteEspunkt escribió:
UteEspunkt escribió:
Tolle Anleitung! Perfekt beschrieben u einfach zum Nacharbeiten! Und ein wunderbares Garn (Nepal) .. meine Freundinnen sind ganz neidisch auf mein Kissen 😁
03.02.2021 - 18:34
|
||||||||||||||||||||||
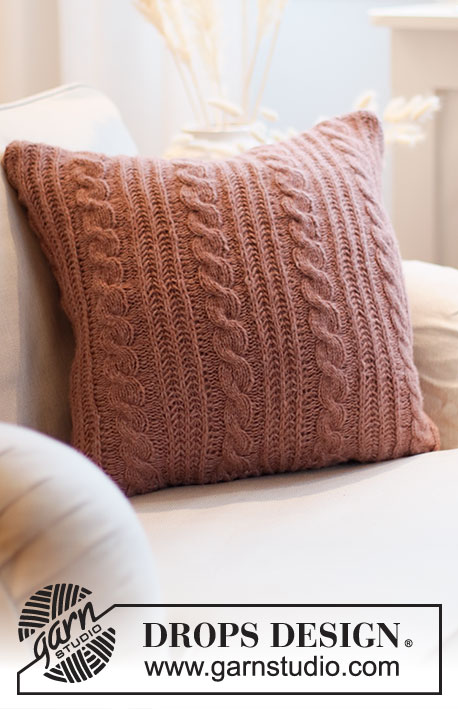
Columns of Valhalla Pillow#columnsofvalhallapillow |
||||||||||||||||||||||
 |
 |
|||||||||||||||||||||
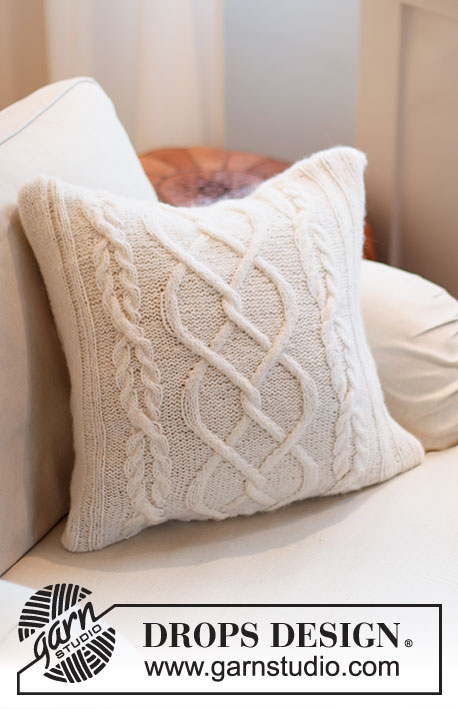
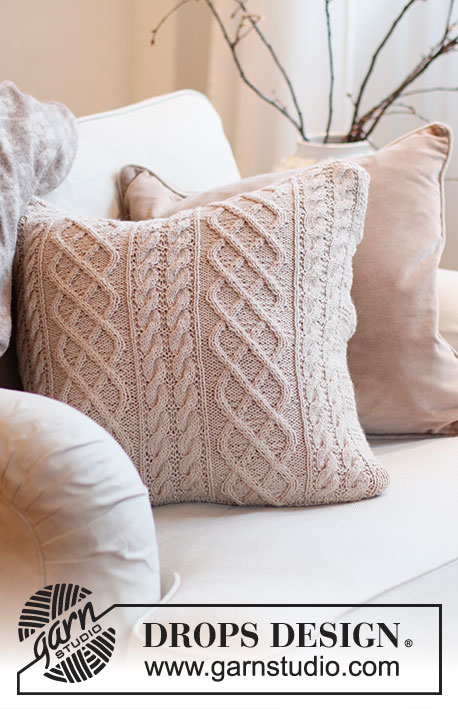
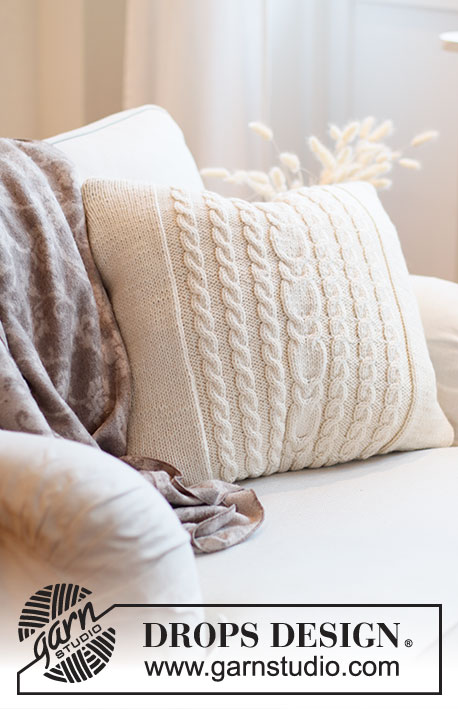
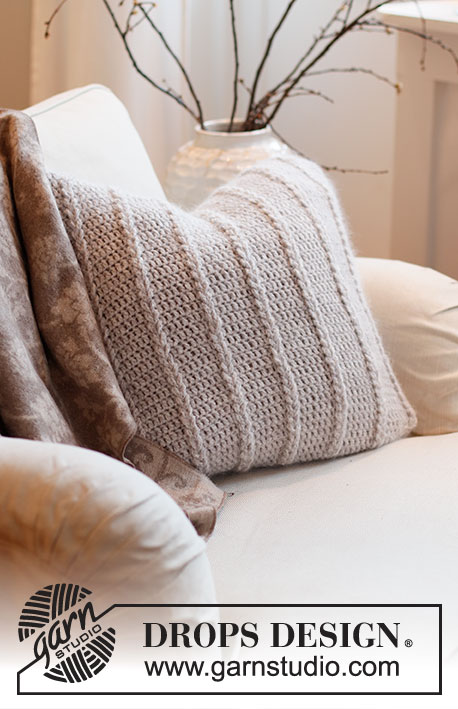
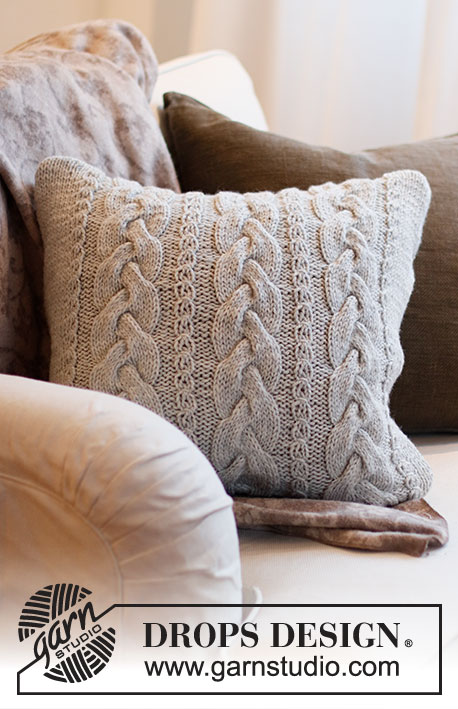
Funda de cojín de punto con torsadas en DROPS Nepal.
DROPS 215-42 |
||||||||||||||||||||||
|
EXPLICACIONES PARA REALIZAR EL PATRÓN: ------------------------------------------------ SURCO/PUNTO MUSGO (A) (tejido en redondo): 1 surco en altura = 2 vueltas; tejer 1 vuelta de revés y 1 vuelta de derecho. SURCO/PUNTO MUSGO (B) (tejido en redondo): 1 surco en altura = 2 vueltas; tejer 1 vuelta de derecho y 1 vuelta de revés. TIP PARA AUMENTAR/DISMINUIR (distribuidos equitativamente): Para calcular cómo aumentar/disminuir equitativamente, contar el número total de puntos en la aguja (p. ej. 61 puntos), y dividirlo entre el número de aumentos/disminuciones a hacer (p. ej. 14) = 4.3. AUMENTOS: Hacer 1 lazada después de cada 4º y 5º punto alternadamente. En la hilera siguiente, tejer las lazadas retorcidas para evitar que se formen agujeros. DISMINUCIONES: Tejer juntos de derecho cada 3er y 4º punto y cada 4º y 5º punto alternadamente. REPETICIONES DEL PATRÓN: Ver diagramas A.1 y A.2 – tejer los 75 puntos siguientes de la manera siguiente: A.1, A.2, A.1, A.2, A.1, A.2, A.1. ------------------------------------------------ COMENZAR LA PIEZA AQUÍ: ------------------------------------------------ FUNDA DE COJÍN – RESUMEN DE LA PIEZA: La pieza se teje en redondo con aguja circular y de abajo para arriba. La parte superior e inferior se cosen al final. Las torsadas se tejen en el frente y en la parte de atrás. FUNDA: Montar 144-162 puntos con aguja circular tamaño 4.5 mm y tejer 2 SURCOS A – leer descripción arriba. Después tejer 1 vuelta de derecho y, AL MISMO TIEMPO, aumentar de la manera siguiente: Sobre los primeros 61 puntos aumentar 14 puntos distribuidos equitativamente – leer TIP PARA AUMENTAR/DISMINUIR (= 75 puntos), tejer 11-20 puntos derechos, sobre los 61 puntos siguientes aumentar 14 puntos distribuidos equitativamente (= 75 puntos) y terminar con 11-20 puntos derechos = 172-190 puntos. Continuar de la manera siguiente: Tejer 75 puntos de REPETICIONES DEL PATRÓN – leer descripción arriba, 11-20 puntos en punto jersey, 75 puntos en repeticiones del patrón y terminar con 11-20 puntos en punto jersey. ¡RECORDAR MANTENER LA MISMA TENSIÓN DE TEJIDO DE LA MUESTRA! Continuar así hasta que la pieza mida 38-43 cm – ajustar para después de la vuelta 4 o 12 de las repeticiones del patrón. En la vuelta siguiente, disminuir de la manera siguiente: Tejer 1 vuelta de derecho disminuyendo 14 puntos distribuidos equitativamente sobre los primeros 75 puntos – leer TIP PARA AUMENTAR/DISMINUIR (= 61 puntos), tejer 11-20 puntos derechos y después disminuir 14 puntos distribuidos equitativamente sobre los 75 puntos siguientes (= 61 puntos), terminar con 11-20 puntos derechos = 144-162 puntos. Tejer 2 SURCOS B – leer descripción arriba y rematar flojo. ENSAMBLAJE: Doblar la pieza de modo que las torsadas estén al centro del frente y al centro de la parte de atrás. Coser la orilla de montaje entre sí en el bucle más externo del punto más externo, colocar el cojín dentro de la funda y coser la orilla de remate entre sí de la misma manera. |
||||||||||||||||||||||
Explicaciones del diagrama |
||||||||||||||||||||||
|
||||||||||||||||||||||
 |
||||||||||||||||||||||
¿Terminaste este patrón?Entonces, etiqueta tus fotos con #dropspattern #columnsofvalhallapillow o envíalas a la galería #dropsfan. ¿Necesitas ayuda con este patrón?Encontrarás 18 videos tutoriales, un espacio para comentarios/preguntas y más visitando la página del patrón en garnstudio.com © 1982-2026 DROPS Design A/S. Todos los derechos reservados. Este documento, incluyendo todas sus sub-secciones, está protegido por los derechos de autor (copyright). Lee más acerca de lo que puedes hacer con nuestros patrones en la parte de abajo de cada patrón de nuestro sitio. |
||||||||||||||||||||||


Con más de 40 años en el diseño de modelos de punto y de ganchillo, DROPS Design ofrece una de las más vastas colecciones de patrones gratuitos en el internet - traducidos en 17 idiomas. Al día de hoy, contamos con 324 catálogos y 12290 patrones - de los cuales 11675 están traducidos en español.
Nosotros trabajamos con mucho esmero para brindarte lo mejor que las labores de punto y ganchillo tienen para ofrecer,inspiración y consejos, así como hilos de magnífica calidad a precios increíbles! Te gustaría usar nuestros patrones para otro fin además del uso personal? Puedes leer acerca de lo que estás permitida a hacer en el texto de Copyright en la parte de abajo de todos nuestros patrones. Felices labores!
Escribe un comentario sobre DROPS 215-42
¡Nos encantaría saber qué piensas acerca de este patrón!
Si quieres escribir una pregunta referente al patrón, por favor asegúrate de elegir la categoría correcta en el formulario debajo, para acelerar el proceso de respuesta. Los campos obligatorios están marcados con un *.