
Beliebte Kategorien
Suchen Sie nach einem Garn?


Kommentare / Fragen (47)
![]() Nemtanu Anisoara hat geschrieben:
Nemtanu Anisoara hat geschrieben:
Si puo tradure in italiano?
09.03.2026 - 15:27DROPS Design hat geantwortet:
Hi, the Italian version is availableHERE. Happy knitting!
08.04.2026 - 14:22
![]() Sabine hat geschrieben:
Sabine hat geschrieben:
Wer das Tuch auch in Big Merino (Garngruppe C) stricken möchte: meines wiegt 349 gr, ich habe 144 gr für den Zopf und 205 gr für den Hauptteil des Schals benötigt. Viel Spaß, es lohnt sich! :-)
28.09.2025 - 15:41
![]() Sabine hat geschrieben:
Sabine hat geschrieben:
Ein wunderschönes Tuch, das ich, um es etwas dünner zu haben, mit Drops Big Merino (Garngruppe C) gestrickt habe mit einer 6,5er Nadel und zweifarbig, so dass sich der Zopfrand noch mehr hervorhebt. Bei einer Länge von 85cm habe ich, damit sich die Spitze des Tuchs bei dieser dünneren Wolle nicht einrollt 5 verkürzte Reihen gestrickt (statt 3). Beim nächsten Mal stricke ich es wieder mit Garngruppe C mit einer 7 - 8er Nadel und mit 16 Maschen für den Zopf - freue mich schon!
28.09.2025 - 15:25
![]() Carol Maitland hat geschrieben:
Carol Maitland hat geschrieben:
Hi I was just answered my question by the Drops Team but my question was not really answered.I understand the increase in the first row,it’s the 4 row increase I do not understand.Where do I do this increase on the 4th row and where do I do the decrease on the 4th row, Thks again Carol.
12.09.2025 - 14:16DROPS Design hat geantwortet:
Dear Carol, you have one 4-row increase section explained in the pattern. In this section, in ROW 1 you increase 1 stitch, by working 2 stitches in the first stitch after the marker. Then you work ROWS 2-4 with knit and A.1. Now you repeat these 4 rows, increasing always in the ROW 1 repeat, in the stitch right after the marker. That is, you increase not in ROW 4 but in every 4th row (out of rows 1-4 you increase in one of them, row 1). The decreases follow the same format, where you decrease 2 stitches after the marker every time that you repeat ROW 1 of the decreases. Happy knitting!
15.09.2025 - 01:39
![]() Carol Maitland hat geschrieben:
Carol Maitland hat geschrieben:
Hi I sent a question yesterday,about where to add the extra stitch in the 4 th row.Has not been answered.
10.09.2025 - 18:01DROPS Design hat geantwortet:
Dear Carol, please see our answer above. Happy knitting!
15.09.2025 - 01:40
![]() Carol Maitland hat geschrieben:
Carol Maitland hat geschrieben:
Hi itsays on the shawl to increase every 4th row,where do I do this and when I decrease where do I do that. Thks Carol.c
09.09.2025 - 21:05DROPS Design hat geantwortet:
Hi Carol, After the first 14 rows, you work 4 new rows which are then repeated onwards increasing 1 stitch in the first stitch after the marker-thread on the first of these 4 rows. The decreases begin after the short rows, and again 1 stitch is decreased straight after the marker-thread on the first of the 4 rows which are repeated onwards. Regards, Drops Team.
12.09.2025 - 11:03
![]() Carol Maitland hat geschrieben:
Carol Maitland hat geschrieben:
Then it says repeat 1st to 4th row,so every 4th row I add a stitch,where at the beginning. sorry my keyboard keys were stuck,thks Carol Maitland
15.08.2025 - 19:56DROPS Design hat geantwortet:
Dear Mrs Maitland, work as previously explained under rows 1-4: you will increase 1 stitch just after A.1 on first row = you will increase 1 stitch on every 4th row. Happy knitting!
18.08.2025 - 08:15
![]() Carol Maitland hat geschrieben:
Carol Maitland hat geschrieben:
Hi I currently working on this pattern,have some questions. Row 2 on second part says knit until marker then A1 over the next 12 stitches,does this mean I purl them because the pattern says to purl from the wrong side. Row 3,is this the cable row.so I put 6 cable stitches at back and knit the next 6 then do the cable stitches,but have noticed that the beginning of my working yarn is at the cable end.Do I carry it at the back before knitting the 6 stitches on the cable needle.
15.08.2025 - 19:52DROPS Design hat geantwortet:
Dear Mrs Maitland, from wrong side you will purl the stitches of A.1, on 3rd row start diagram - see in this video how to work this diagram and how to work the cable at the beginning of the row. Happy knitting!
18.08.2025 - 08:13
![]() Renate Huber hat geschrieben:
Renate Huber hat geschrieben:
Sehr schön gefällt mir ausgezeichnet
03.09.2024 - 15:54
![]() Monique hat geschrieben:
Monique hat geschrieben:
Une fois le produit fini, avec la même laine et j'ai obtenu un châle beaucoup trop long par rapport à sa largeur. Il faut peut être faire des augmentations plus rapides pour avoir un châle plus large.
09.03.2023 - 09:08
|
|||||||
Winter Cozy#wintercozyset |
|||||||
 |
 |
||||||
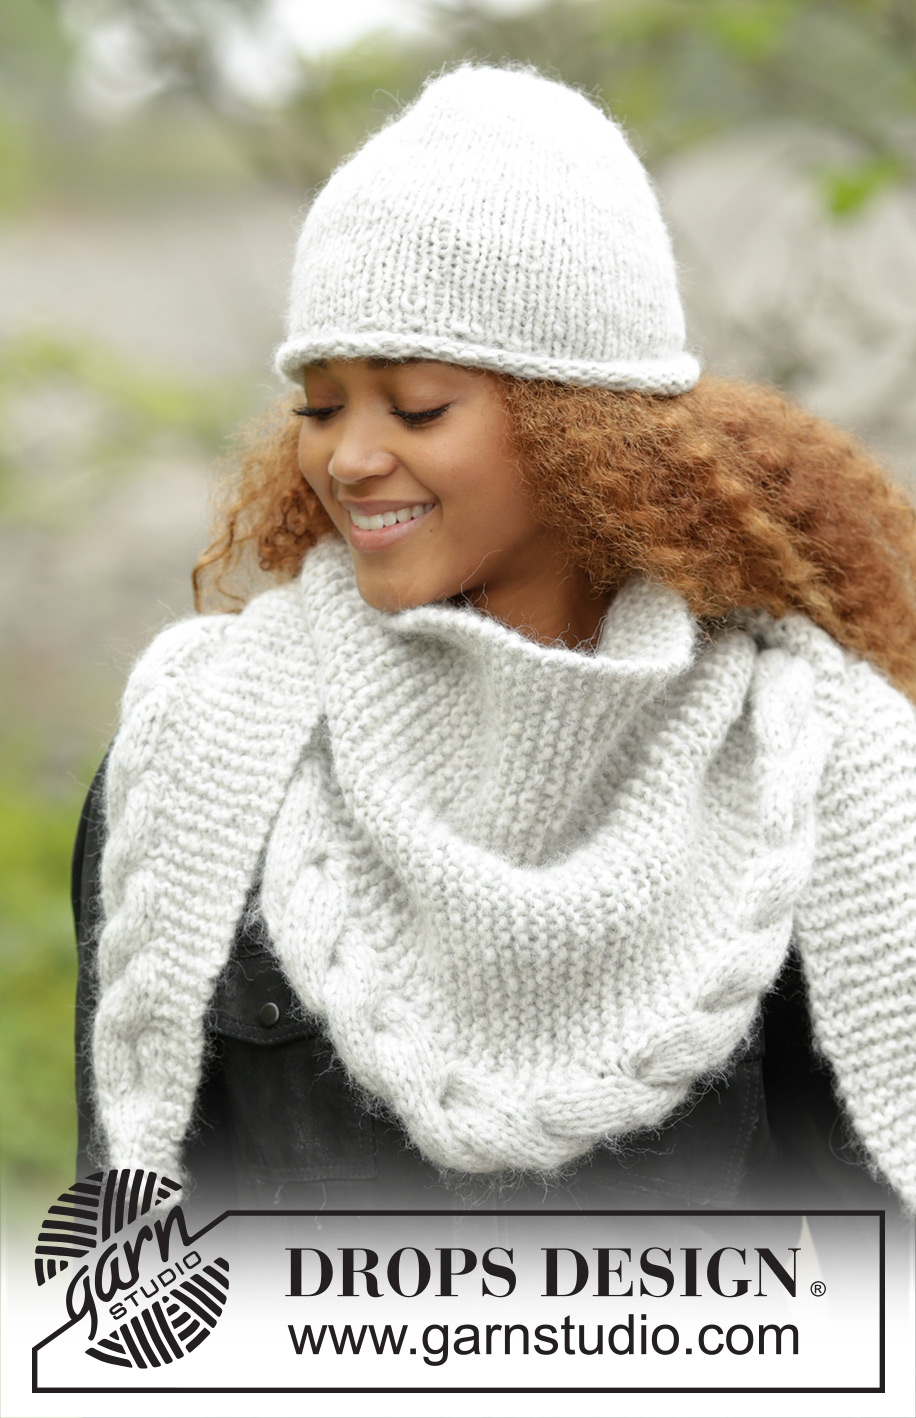
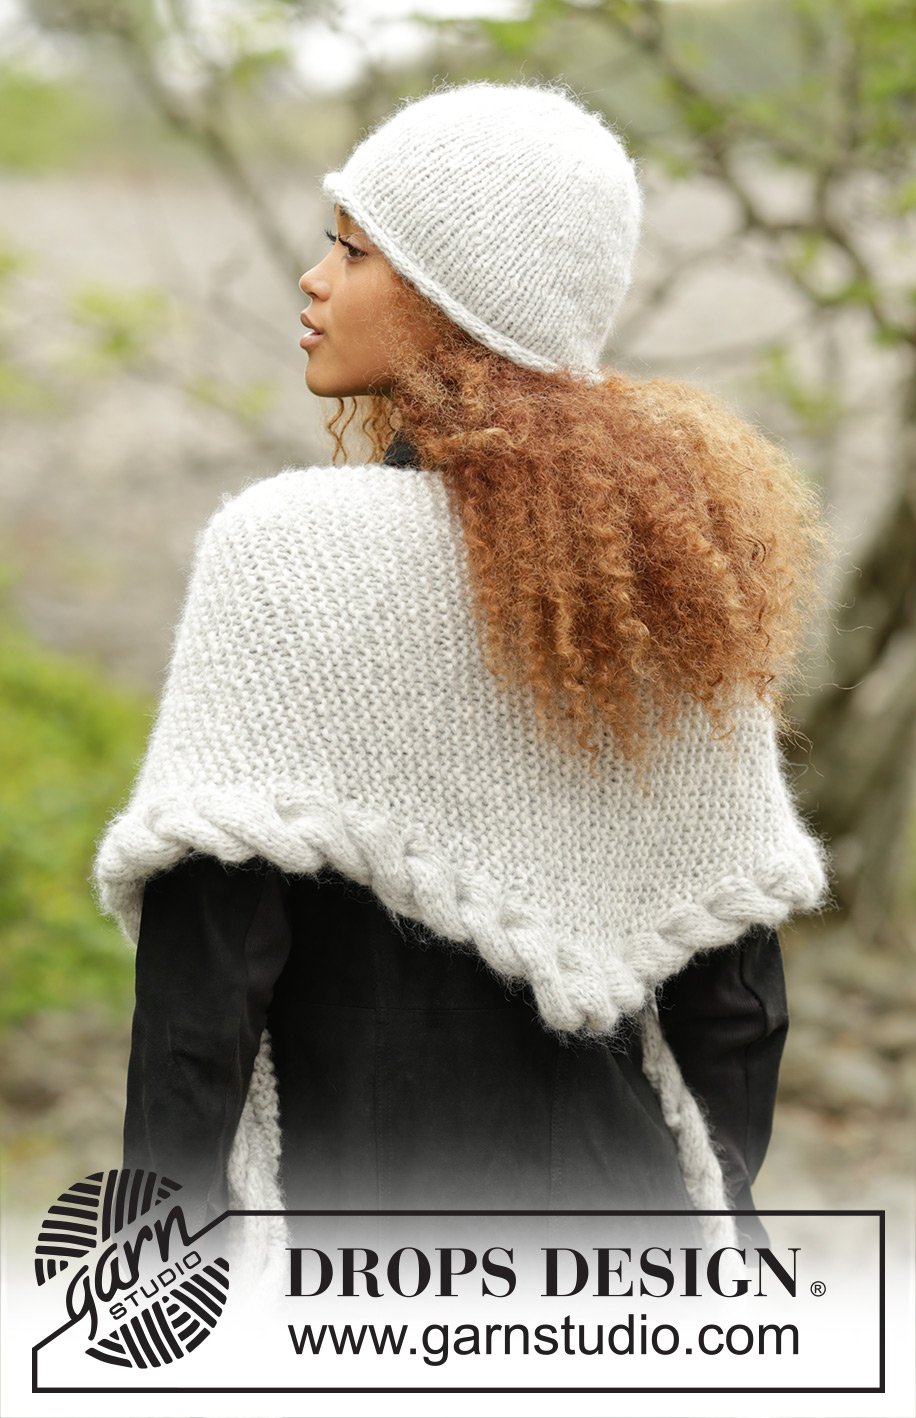
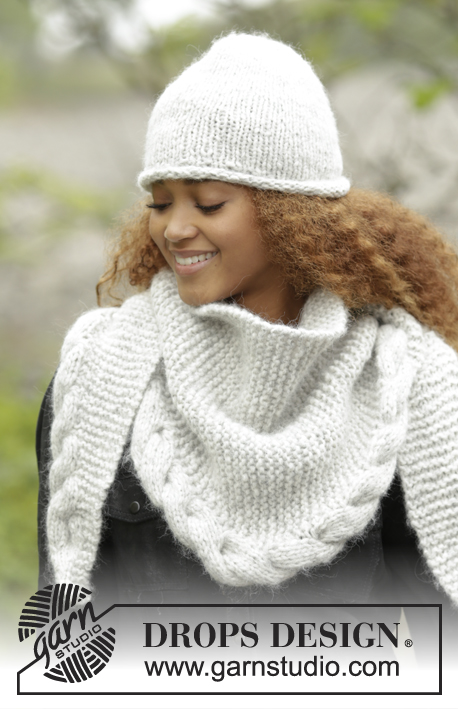
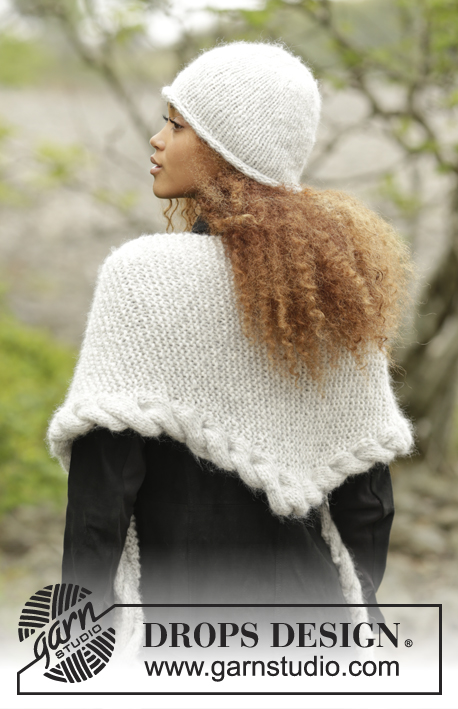
Das Set umfasst: Gestrickte Mütze in DROPS Cloud oder 2 Fäden DROPS Air und quer gestricktes Tuch in DROPS Cloud oder 2 Fäden DROPS Air mit Krausrippen und Zopfrand.
DROPS 172-10 |
|||||||
|
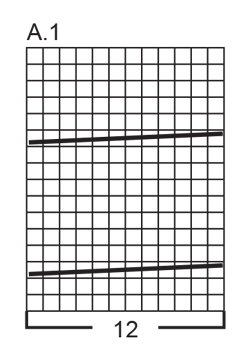
MÜTZE: ABNAHMETIPP: 1 M wie zum Rechtsstr abheben, 1 M re, die abgehobene M überziehen. ---------------------------------------------------------- MÜTZE: 56-60 M auf Rundnadel Nr. 7 mit 1 Faden Cloud oder 2 Fäden Air anschlagen. 4 Rd glatt re str (= Rollrand). Die nächste Rd wie folgt str: * 1 M re, 1 M li *, von *-* bis Rd-Ende wdh. Noch 1 Rd die M str, wie sie erscheinen (d.h. re M re und li M li str). Dann glatt re bis zum fertigen Maß weiterstr. MASCHENPROBE BEACHTEN! Bei einer Gesamtlänge von 21-22 cm 8-10 Markierer im Abstand von je 7-6 M anbringen. In der nächsten Rd 1 M nach jedem Markierer abnehmen – ABNAHMETIPP lesen (= 8-10 M abgenommen). In dieser Weise in jeder 2. Rd insgesamt 3 x abnehmen, dann in jeder Rd insgesamt 2 x. In der nächsten Rd stets 2 M re verschränkt zusstr = 8-5 M übrig. Den Faden abschneiden, durch die restlichen M fädeln, zusammenziehen und gut vernähen. Die Mütze misst ca. 26-27 cm von oben nach unten (einschl. Rollrand). ---------------------------------------------------------- TUCH: STRICKTIPP: Das Tuch wird quer kraus re mit einem Zopfrand am unteren Rand des Tuchs gestrickt. Dieser Zopfrand wird über die äußersten 12 M gestr. Damit der Zopfrand voll wird und sich rollt, wird außen keine Rand-M gestr (d.h. die äußerste M von A.1 wird in Hin- und Rück-R wie eine normale M glatt re gestr). MUSTER: Siehe Diagramm A.1. Die Diagramme zeigen alle Hin- und Rück-R, Hin-R werden von rechts nach links, Rück-R von links nach rechts gelesen. TIPP ZUM MESSEN: Das Tuch wird am geraden Rand gemessen, d.h. an dem Rand ohne Zunahmen/Abnahmen. ---------------------------------------------------------- TUCH: Das Tuch wird quer von Spitze zu Spitze gestr. 3 M auf Rundnadel Nr. 8 mit 1 Faden Cloud oder 2 Fäden DROPS Air anschlagen und wie folgt str: 1. R (= Hin-R): re str. 2. R (= Rück-R): 2 M re, 2 M aus der nächsten M herausstr (d.h. 1 x in das vordere und 1 x in das hintere M-Glied einstechen) = 4 M auf der Nadel. 3. R (= Hin-R): 1 M re, 1 Umschlag, 3 M re = 5 M. 4. R (= Rück-R): 3 M re, den Umschlag li verschränkt str, 1 M li. 5. R (= Hin-R), 2 M re, 1 Umschlag, 3 M re = 6 M. 6. R (= Rück-R): 3 M re, den Umschlag li verschränkt str, 2 M li. 7. R (= Hin-R), 3 M re, 1 Umschlag, 3 M re = 7 M. 8. R (= Rück-R), 3 M re, den Umschlag li verschränkt str, 3 M li. 9. R (= Hin-R): 4 M re, 1 Umschlag, 3 M re = 8 M. 10. R (= Rück-R): 3 M re, den Umschlag li verschränkt str, 4 M li. 11. R (= Hin-R): 5 M re, 1 Umschlag, 3 M re = 9 M. 12. R (= Rück-R): 3 M re, den Umschlag li verschränkt str, 5 M li. 13. R (= Hin-R): je 2 M aus den ersten 6 M herausstr (d.h. jeweils 1 x in das vordere und 1 x in das hintere M-Glied jeder M einstechen), 1 Markierer anbringen, 3 M re = 15 M. 14. R (= Rück-R): 3 M re, Markierer, 12 M li. Dann wie folgt str und dabei wie folgt zunehmen – STRICKTIPP lesen und MASCHENPROBE BEACHTEN: 1. R (= Hin-R): Im Muster A.1 über die ersten 12 M, 2 M aus der ersten M nach dem Markierer herausstr und die R re zu Ende str (= 1 M zugenommen). 2. R (= Rück-R): re bis zum Markierer und A.1 über die letzten 12 M. 3. R (= Hin-R): A.1 über die ersten 12 M, Markierer, die R re zu Ende str. 4. R (= Rück-R): re bis zum Markierer und A.1 über die letzten 12 M. Die 1.- 4. R wdh (d.h. 1 M in jeder 4. R zunehmen), bis 56 M auf der Nadel sind. Die Arb misst nun ca. 81 cm – TIPP ZUM MESSEN lesen. Nun verkürzte R str, um zu verhindern, dass der Zopf über der mittleren Spitze des Tuchs spannt, wie folgt str: * 2 R hin und zurück über die 12 M von A.1, 2 R hin und zurück über alle M auf der Nadel wie zuvor, jedoch nicht zunehmen *, von *-* insgesamt 3 x arb, dann 2 R hin und zurück über die 12 M von A.1 str. Nun wie folgt str und dabei wie folgt abnehmen: 1. R (= Hin-R): Im Muster A.1 über die ersten 12 M, die 2 ersten M nach dem Markierer re zusstr und die R re zu Ende str (= 1 M abgenommen). 2. R (= Rück-R): re bis zum Markierer str und A.1 über die letzten 12 M. 3. R (= Hin-R): A.1 über die ersten 12 M, Markierer, die R re zu Ende str. 4. R (= Rück-R): re bis zum Markierer und A.1 über die letzten 12 M. Die 1.- 4. R wdh (d.h. in jeder 4. R 1 M abnehmen), bis noch 15 M übrig sind (die Arb misst nun ca. 159 cm). Wie folgt weiterstr: 1. R (= Hin-R): Alle M von A.1 jeweils paarweise zusstr, Markierer, 3 M re = 9 M übrig. 2. R (= Rück-R): 3 M re, 6 M li. 3. R (= Hin-R): 4 M re, 2 M re zusstr, 3 M re = 8 M. 4. R (= Rück-R): 3 M re, 5 M li. 5. R (= Hin-R), 3 M re, 2 M re zusstr, 3 M re = 7 M. 6. R (= Rück-R): 3 M re, 4 M li. 7. R (= Hin-R), 2 M re, 2 M re zusstr, 3 M re = 6 M. 8. R (= Rück-R), 3 M re, 3 M li. 9. R (= Hin-R): 1 M re, 2 M re zusstr, 3 M re = 5 M. 10. R (= Rück-R): 3 M re, 2 M li. 11. R (= Hin-R): 2 M re zusstr, 3 M re = 4 M. 12. R (= Rück-R): 4 M re. 13. R (= Hin-R): 2 M re zusstr, 2 M re. 14. R (= Rück-R): re abketten. |
|||||||
Erklärungen zum Diagramm |
|||||||
|
|||||||
 |
|||||||
Haben Sie diese Anleitung nachgearbeitet?Dann taggen Sie Ihre Fotos mit #dropspattern #wintercozyset oder schicken Sie sie an die #dropsfan Galerie Brauchen Sie Hilfe bei dieser Anleitung?Sie finden 25 Videotutorials, einen Kommentar/Fragen-Bereich und vieles mehr, wenn sie die Anleitung bei garnstudio.com aufrufen. © 1982-2026 DROPS Design A/S. Wir besitzen alle Rechte. Dieses Dokument, einschließlich aller Untersektionen, hat Urheberrechte. Mehr dazu, was Sie mit unseren Anleitungen machen können, finden Sie ganz unten auf der Seite zu jeder Anleitung. |
|||||||


Mit über 40 Jahren Tätigkeit im Entwerfen von Strick- und Häkelmustern bietet Ihnen DROPS Design eine der umfangreichsten Sammlungen von kostenlosen Anleitungen im Internet - in 17 Sprachen übersetzt. Zum jetzigen Zeitpunkt haben wir insgesamt 324 Handarbeitshefte und 12291 Anleitungen auf Deutsch. 12203
Unser Ziel ist es, Ihnen die besten Angebote zum Stricken und Häkeln, Inspirationen und Ratschläge sowie qualitativ hochstehende Garne zu unglaublichen Preisen zu bieten! Möchten Sie unsere Anleitungen nicht nur für den persönlichen Gebrauch nutzen? Unsere Copyright Bedingungen finden Sie bei allen unseren Anleitungen ganz unten auf der jeweiligen Seite. Viel Spaß beim Handarbeiten!
Kommentieren Sie die Anleitung DROPS 172-10
Wir würden gerne Ihre Meinung zu diesem Modell erfahren!
Wenn Sie eine Frage stellen möchten, prüfen Sie bitte, dass Sie die richtige Kategorie im unten stehenden Formular gewählt haben - so bekommen Sie schneller eine Antwort. Die obligatorischen Felder sind mit einem * gekennzeichnet.