
Beliebte Kategorien
Suchen Sie nach einem Garn?


Kommentare / Fragen (239)
![]() Chrissy hat geschrieben:
Chrissy hat geschrieben:
Wenn ich mit DROPS Air stricke, wieviele Maschen schlage ich für M an? Die Anleitung enthält ja nur die Maschenanzahl für Alpaca Silk, oder? Wie rechne ich fürAir um?
12.05.2026 - 17:43DROPS Design hat geantwortet:
Liebe Chrissy, diese Jacke kann mit Silke Alpaca (diese Wolle ist aber jetzt ausgelaufen) oder Air gestrickt werden, so lange Sie die richtige Maschenprobe haben, dann brauchen Sie die selbe Maschenanzahl in Air wie in Silke Alpaca. Viel Spaß beim Stricken!
13.05.2026 - 08:04
![]() Andrea hat geschrieben:
Andrea hat geschrieben:
Hallo, eine Frage: Wenn ich mit den verkürzten Reihen fertig bin, muss ich dann direkt wieder über alle 124M (Gr.xxl) stricken, oder nach dem selben Schema wie beim verkürzen die Reihen wieder verlängern? LG
23.02.2026 - 16:37DROPS Design hat geantwortet:
Liebe Andrea, Sie beginnen erneut mit den verkürzten Reihen (die ersten 2 Runden stricken Sie über alle Maschen) , um den Kreis weiter zu erweitern. Viel Spaß beim Stricken!
24.02.2026 - 09:02
![]() Lotta hat geschrieben:
Lotta hat geschrieben:
Äh glöm min fråga, repar upp & använder ett för mig mer begripligt mönster.
27.11.2025 - 17:23
![]() Lotta hat geschrieben:
Lotta hat geschrieben:
Hej igen! Storlek XL/XXL totalt antal maskor 124 st och märktråden sitter på maska 73. Just nu är stickningen bananformad, maska 73 sitter närmare innercirkeln och fattar att det är från den jag ska mäta. Men hur ska jag mäta, mot vad? Ska fortsätta med att minska med 8 maskor för första gången. Vi hörs!
25.11.2025 - 16:04DROPS Design hat geantwortet:
Hei Lotta. Da har vi "glemt" ditt spørsmål og ønsker deg lykke til på ditt neste prosjekt :) mvh DROPS Design
01.12.2025 - 11:27
![]() Lotta hat geschrieben:
Lotta hat geschrieben:
Begriper inte hur jag ska mäta från märktråden för ärmhål!? Skickar gärna en bild men det går ju inte i detta formulär. Kontakta gärna mig via e-post. Tack på förhand!
24.11.2025 - 18:29DROPS Design hat geantwortet:
Hej Lotta, skriv hvilken størrelse du strikker. Skriv hvor mange masker og cm du har og skriv den sætning du ikke forstår, så skal vi prøve at hjælpe dig her :)
25.11.2025 - 13:58
![]() Lisa hat geschrieben:
Lisa hat geschrieben:
Hi, Just trying to clarify; on the second row, do I leave 2 stitches on needle and turn, work 14 stitches then turn and work 16 stitches? Then repeat row 1 and do I leave 4 stitches unworked or just 2 again?
11.11.2025 - 19:16
![]() Lisa hat geschrieben:
Lisa hat geschrieben:
Pattern instructions far too difficult. I love the jacket and I love a challenge but this? What happened to row 1 all the way through to last row with specific instructions such as ask or dec or s1k1. Etc? I give up😞
27.07.2025 - 20:09
![]() Lisa hat geschrieben:
Lisa hat geschrieben:
So, am I leaving the the uncorked stitches on the needle or just not knitting them?
27.07.2025 - 19:38DROPS Design hat geantwortet:
Dear Lisa, work the first 2 rows over all 112 stitches. In the 3rd row work only over the first 16 sts of the row. Now, start working the next row over all stitches but turn when you have worked 110 stitches. Work the next row back over all stitches, but turn when you have worked 108; so you work 2 less stitches on each side. Repeat rows 3 and 4 exactly as before. Continue working 2 less stitches on each side on the "long" rows 9 more times, then 4 less stitches 9 times and 8 less stitches 5 times. The stitches are simply left unworked until we "start at the beginning" the short rows technique. Happy knitting!
27.07.2025 - 20:36
![]() Lisa hat geschrieben:
Lisa hat geschrieben:
Where do I start the pattern? At the top of page or where it says circle? Also, what does it mean under the short row section to start again from beginning over all stitches? How many sections is this piece? I’m reading cast on 112 sts. Twice and under short row section start over from beginning? So, cast on another 112sts?
27.07.2025 - 19:06DROPS Design hat geantwortet:
Dear Lisa, yes, the written instructions start at "Circle"; all of the instructions above are tips for when you are crochetting. In the short rows you work by turning the piece (but not decreasing) in order to get the correct circle shape. After reaching the remaining 18-16-20-20 outermost sts of circle, you will now work over all stitches again (not the pattern from the beginning); they were not decreased, just left behind. You work a single circle: you cast on 112 stitches, over which you will work the chart and short rows. Then you work the armholes, and continue working the other half-circle on the other side. Then you work the sleeves. Happy knitting!
27.07.2025 - 19:25
![]() Lisa hat geschrieben:
Lisa hat geschrieben:
Is there a row by row instruction for this pattern (ie, row 1, row 2 etc)? I find this really confusing
27.07.2025 - 15:44DROPS Design hat geantwortet:
Dear Lisa, this is the only version of the pattern available, with both charts and written instructions. If you have any doubts as you read and work the pattern you can write us a comment here and we will try to answer all of your questions as clearly as possible. Happy knitting!
27.07.2025 - 18:59
|
||||||||||||||||
Blue Moon |
||||||||||||||||
 |
 |
|||||||||||||||
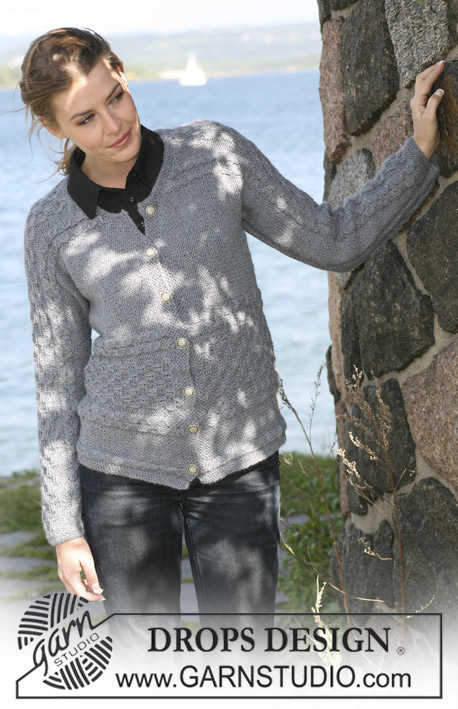
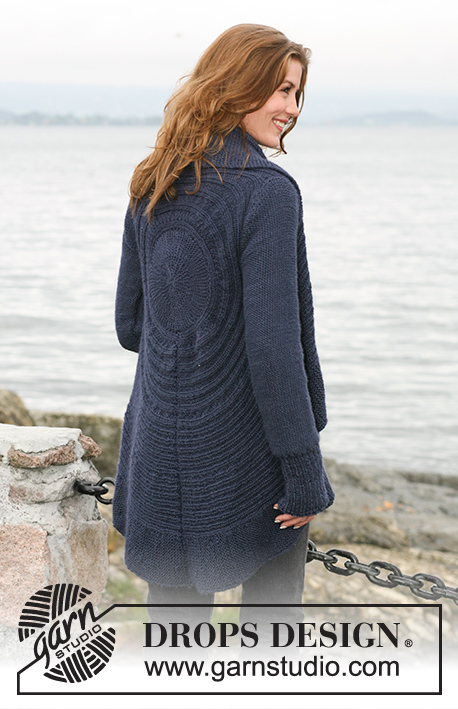
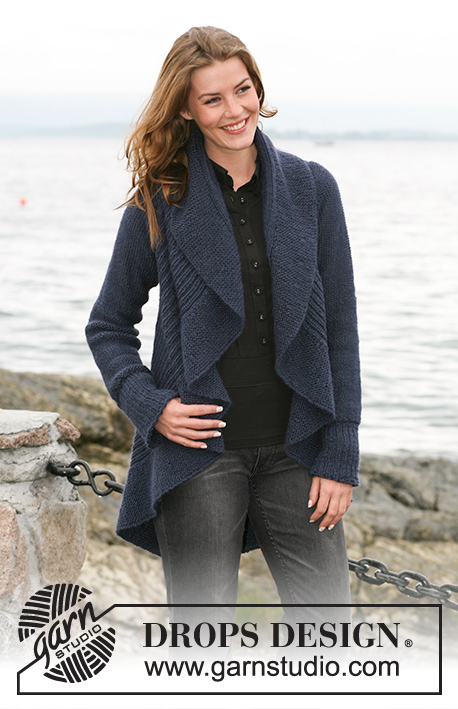
Rund gestrickt DROPS Jacke in „Silke-Alpaca“. In Grösse S-XXXL.
DROPS 102-6 |
||||||||||||||||
|
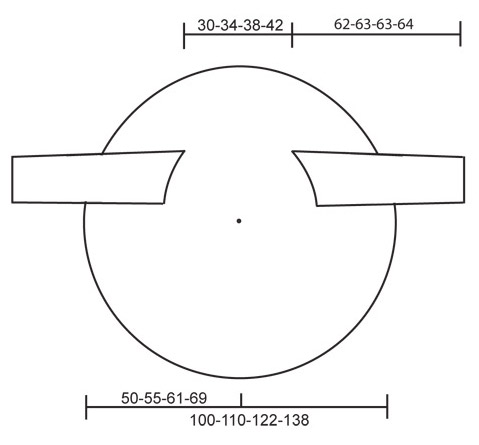
Maschenprobe: Achtung, die Nadelnummer (Ndl) ist nur ein Vorschlag! Muster: Siehe Diagramm M1. Das Diagramm zeigt das Muster von rechts. Achtung! Jede Grösse hat ihr eigenes Diagramm. Verkürzte Runden: Um die Form der Jacke zu erhalten, strickt man verkürzte Runden: 1./2. R.: 102-112-124-140 M. stricken, Arbeit drehen und zurück stricken. 3./4. R.: über die 18-16-20-20 äussersten M. hin und zurück stricken – siehe Stricktipp unten. Von der 1. bis zur 4. R. wiederholen, jedoch bei jeder Wiederholung der 1. und 2. R. 2 M. weniger stricken total 10-10-12-12 Mal, 4 M. weniger total 6-9-8-12 Mal und 8 M. weniger total 5-5-6-6 Mal, bis aussen am Kreis nur noch 18-16-20-20 M. übrig sind. Jetzt wieder über alle M. stricken. STRICKTIPP 1: Wenn in der Mitte der R. abgedreht wird, wird die erste M. abgehoben und der Faden angezogen, damit es kein Loch gibt. STRICKTIPP 2: in den R, in denen alle Maschen gestrickt werden, stricken Sie bitte die inneren 20-20-24-24 M links (von der Vorderseite gesehen). Dann mit M1 fortfahren. Tipp zum Messen: Die Arbeit wird liegend gemessen. Nicht quer über die Arbeit messen. Die Messungen folgen dem Bogen bis zur 63.-69.-73.-81. M. Kreis: Die Arbeit wird auf einer Rundstricknadel hin und zurück gestrickt. Mit Silke-Alpaca auf Rundstricknadel Nr. 4,5, 102-112-124-140 M. anschlagen und nach 63-69-73-81 M. einen Markierungsfaden einziehen. M1 (jede Grösse hat sein eigenes Diagramm), von rechts nach links stricken (d.h. von aussen nach innen) 1. R = rechte Seite. Gleichzeitig verkürzte Runden stricken – siehe oben. Nach 37-40-49-57 cm (vom Markierungsfaden) – siehe Tipp zum Messen – wird das Armloch gestrickt. Armloch: Die äussersten 63-69-73-81 M. auf eine Hilfsnadel Nr. 4,5 legen (eine Rundstricknadel, damit alle M. Platz haben). Jetzt die nächsten 2 M. abk. (= Armloch). Die restlichen M. auf der Nadel behalten. Die 2 Teile (die Maschen vor und nach dem Armloch) werden jetzt einzeln gestrickt. Man strickt die Teile jedoch gleichzeitig mit je einem Wollknäuel, damit die verkürzten Nadeln richtig gestrickt werden. Mit dem Muster und den verkürzten Nadeln wie gehabt weiterfahren. Nachdem das Armloch 18-21-23-25 cm misst darüber (zwischen den 2 Teilen) 2 neue M. anschlagen und alle M. wieder auf dieselbe Rundstricknadel legen = 102-112-124-140 M. Nach 63-69-73-81 M. einen Markierungsfaden einziehen. Die Arbeit wird von hier weiter gemessen. Jetzt über alle Maschen M1 und verkürzte Runden stricken. Nach weiteren ca. 15-17-19-21 cm sollte ein Halbkreis entstanden sein. Weiter stricken bis die Arbeit ca. 30-34-38-42 cm (vom Markierungsfaden) misst – siehe Messtipp. Jetzt das zweite Armloch stricken. Nachdem wieder alle M. auf einer Nadel liegen nach 63-69-73-81 M. eine Markierungsfaden einziehen. Die Arbeit wird jetzt von hier gemessen. Mit M1 und den verkürzten Runden weiterstricken bis die Arbeit ca. 37-40-49-57 cm vom Markierungsfaden (nach einem Rapport mit verkürzten Runden) misst. Danach locker abk. Ärmel: Mit Silke-Alpaca auf Ndl. Nr. 4,5, 56-59-65-68 M. anschlagen (Inkl. 1 Randm. auf beiden Seiten) und 1 R. li. auf Links stricken. Weiter ein Bündchen (2 re./ 1 li.) mit 1 Randm auf beiden Seiten stricken. Nach 14 cm 1 R. re. auf Links stricken und gleichzeitig gleichmässig verteilt 10-11-13-14 M. abn. = 46-48-52-54 M. Weiter glatt, mit der linken Seite nach aussen, stricken. Nach 16 cm auf beiden Seiten je 1 M. aufnehmen und alle 9-4½-3½-3 cm wiederholen total 5-9-11-13 Mal = 56-66-74-80 M. Nach 56 cm, auf beiden Seiten, bei jeder 2. R. gegen die Schulter abk.: 4 M. 1-2-2-2 Mal. Danach auf beiden Seiten 2 M. abk. bis die Arbeit ca. 61-62-62-63 cm misst. Danach, auf beiden Seiten 4 M. 1 Mal abk. Die Arbeit misst jetzt ca. 62-63-63-64 cm. Zum Schluss die restlichen M. abk. Zusammennähen: Den Kreis Kante an Kante zusammennähen. Die Ärmel so hinein nähen, dass die Naht genau auf die Markierungsfäden zu liegen kommt. Die Schulter sollte genau auf die oberen Markierungsfäden zu liegen kommen. Ärmel zusammennähen. |
||||||||||||||||
Erklärungen zum Diagramm |
||||||||||||||||
|
||||||||||||||||
 |
||||||||||||||||
 |
||||||||||||||||
Haben Sie diese Anleitung nachgearbeitet?Dann taggen Sie Ihre Fotos mit #dropspattern oder schicken Sie sie an die #dropsfan Galerie Brauchen Sie Hilfe bei dieser Anleitung?Sie finden 15 Videotutorials, einen Kommentar/Fragen-Bereich und vieles mehr, wenn sie die Anleitung bei garnstudio.com aufrufen. © 1982-2026 DROPS Design A/S. Wir besitzen alle Rechte. Dieses Dokument, einschließlich aller Untersektionen, hat Urheberrechte. Mehr dazu, was Sie mit unseren Anleitungen machen können, finden Sie ganz unten auf der Seite zu jeder Anleitung. |
||||||||||||||||


Mit über 40 Jahren Tätigkeit im Entwerfen von Strick- und Häkelmustern bietet Ihnen DROPS Design eine der umfangreichsten Sammlungen von kostenlosen Anleitungen im Internet - in 17 Sprachen übersetzt. Zum jetzigen Zeitpunkt haben wir insgesamt 325 Handarbeitshefte und 12298 Anleitungen auf Deutsch. 12210
Unser Ziel ist es, Ihnen die besten Angebote zum Stricken und Häkeln, Inspirationen und Ratschläge sowie qualitativ hochstehende Garne zu unglaublichen Preisen zu bieten! Möchten Sie unsere Anleitungen nicht nur für den persönlichen Gebrauch nutzen? Unsere Copyright Bedingungen finden Sie bei allen unseren Anleitungen ganz unten auf der jeweiligen Seite. Viel Spaß beim Handarbeiten!
Kommentieren Sie die Anleitung DROPS 102-6
Wir würden gerne Ihre Meinung zu diesem Modell erfahren!
Wenn Sie eine Frage stellen möchten, prüfen Sie bitte, dass Sie die richtige Kategorie im unten stehenden Formular gewählt haben - so bekommen Sie schneller eine Antwort. Die obligatorischen Felder sind mit einem * gekennzeichnet.