
Beliebte Kategorien
Suchen Sie nach einem Garn?


Kommentare / Fragen (62)
Lusi hat geschrieben:
Continue to crochet around the edge of the leg in Puddel as follows. 1st round: 1 sc in each sc around all of the leg (incl the slit at the centre front). Finish with a sl st in the first sc. 2nd round: *3 ch, 1 sc in the following sc*, repeat from *-*, and finish with a sl st in the first ch from beg of round. Cut the thread. can you explain this i dont quite understand
19.03.2014 - 12:13DROPS Design hat geantwortet:
Dear Lusi, with Puddel, you will work first 1 round sc all around of the leg (=1 sc in each sc around), then on 2nd round work a ch-loop edge: *ch 3, 1 sc in next sc*, repeat from *-* around. Happy crocheting!
19.03.2014 - 13:47Luci hat geschrieben:
What does it mean to crochet back until 1sc left?
19.03.2014 - 11:48DROPS Design hat geantwortet:
Dear Lucy, work 1 row sc leaving 1 sc unworked at the end of row. Happy crocheting!
19.03.2014 - 11:55Luci hat geschrieben:
What does it mean to crochet back until 1sc left?
19.03.2014 - 11:46
![]() Lucia Green hat geschrieben:
Lucia Green hat geschrieben:
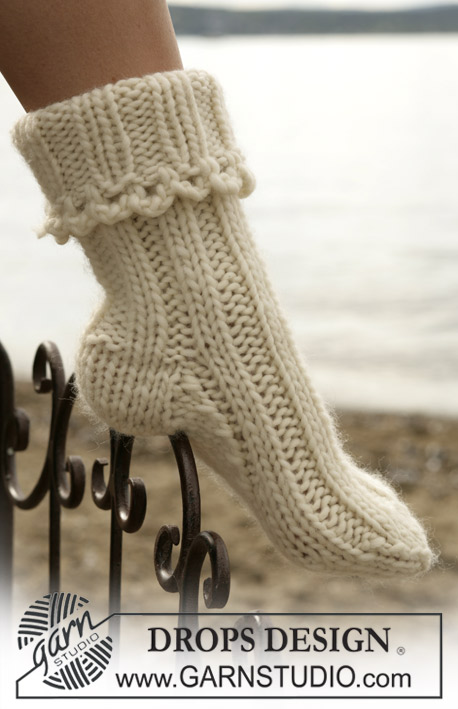
When I join at the back of the heel I end up with a weird little point at the bottom. It's not rounded like the slipper in the picture appears. I've gone over and over the pattern and don't see that I'm missing a step. It seems like to have a pretty rounded heel I'm going to have to alter the pattern. Did I miss something?
31.10.2013 - 13:32DROPS Design hat geantwortet:
Dear Mrs Green, a little point may appear when crocheting heel together, but when wearing them, it shouldn't be that visible. Happy crocheting!
31.10.2013 - 15:49
![]() Soraya Va A Compartir 300 Monedas! hat geschrieben:
Soraya Va A Compartir 300 Monedas! hat geschrieben:
Este patron tiene una forma elegante y la figura del pie se ve bonita quiero probar haber como queda!
05.08.2013 - 22:55
![]() Maria hat geschrieben:
Maria hat geschrieben:
Hallo, wenn in Runde 2 steht: "5 fM häkeln", heißt das dann 1 LM + 4 fM oder 1 LM + 5 fM? Wie wird das generell in Ihren Anleitungen gehandhabt? Vielen Dank im Voraus
17.01.2013 - 12:05DROPS Design hat geantwortet:
Liebe Maria, in der Häkelinfo finden Sie die Information dazu: „Die erste fM jeder R. wird mit 1 Lm ersetzt“, es wird also nicht in jeder Runde nochmals speziell erwähnt. Viel Spaß beim Häkeln!
17.01.2013 - 13:16Guadalupe Suárez hat geschrieben:
Según puedo entender falta la vuelta 9 ya que si continuamos tejiendo con 20 puntos quedará un cono pequeño que no da aumento al pie en la parte del empeine...corríganme si estoy mal, gracias
15.12.2012 - 19:28
![]() DROPS Design hat geschrieben:
DROPS Design hat geschrieben:
Til hele tøffelen måler ca 22-25-28 cm.
19.01.2012 - 09:18
![]() Lovise hat geschrieben:
Lovise hat geschrieben:
Hvor mange masker skal jeg hekle frem og tilbake på hælen?
19.01.2012 - 00:03Shaima hat geschrieben:
I couldn't make the end of this sock .. i mean this final row that have mini sagged threads .. could anyone help me ??
21.12.2011 - 22:18
|
|
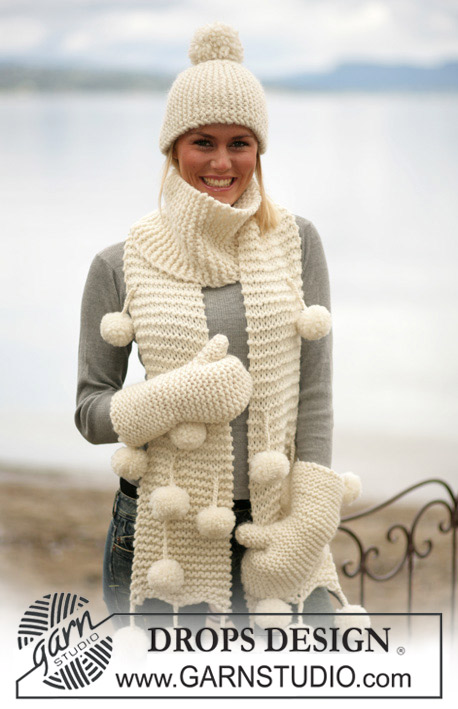
Pom Pom Adore Slippers |
|
|
|
|
Socken in „Snow“
DROPS 98-7 |
|
|
Maschenprobe: Achtung, die Nadelnummer (Ndl) ist nur ein Vorschlag! 11 fM auf Ndl. Nr. 8 = 10 cm breit. Häkelinfo: Die erste fM jeder R. wird mit 1 Lm ersetzt. Und jede R. wird mit 1 Kettm in die Lm des Anfanges abgeschlossen, (wenn hin und zurück gehäkelt wird: in die Lm der vorherigen R.). Socke: Diese Anleitung ist ein Grundmuster, das für 4 verschiedene Socken benutzt werden kann. Fuss: Man beginnt vorne am Fuss, mit Snow auf Ndl. Nr. 8. 1. R.: 3 Lm häkeln und mit 1 Kettm in die erste Lm zu einem Ring schliessen. 2. R.: 5-5-6 fM in den Ring häkeln – siehe Häkelinfo! 3. R.: 2 fM in jede fM = 10-10-12 fM. 4. R.: * 1 fM in die erste fM, 2 fM in die nächste fM *, von *-* wiederholen = 15-15-18 fM. 5. - 7. R.: 1 fM in jede fM. 8. R.: * 1 fM in die erste fM, 1 fM in die andere fM und 2 fM in die dritte fM *, von *-* wiederholen = 20-20-24 fM. Weiter 1 fM in jede fM häkeln bis die Arbeit ca. 11-13-14 cm misst. Ferse: Jetzt wird die Arbeit geteilt und man häkelt hin und zurück (auf dem Fussrücken) – siehe Häkelinfo. Nach ca. 22-25-28 cm diesen Teil flach legen und hinten in der Mitte zusammenhäkeln. Faden abscheiden und vernähen. Schaft: 1 R. mit fM rund um die Arbeit häkeln (vorne in der Mitte anfangen). Mit 1 fM in jede fM weiterfahren bis der Schaft 11 cm misst und danach, wie folgt, hin und zurück häkeln: 1. R.: Die Arbeit drehen und zurückhäkeln bis nur noch 1 fM übrig ist (diese fM wird nicht mehr gehäkelt). 2. R.: Die Arbeit drehen und über die M. der vorherigen R. häkeln bis noch 1 fM übrig ist (diese fM wird nicht mehr gehäkelt) = 2 M. vorne in der Mitte. 3. R.: Die Arbeit drehen und über die restlichen M. zurückhäkeln. Faden abschneiden. Danach wird mit Puddel auf Ndl. Nr. 8 eine Kante gehäkelt: 1. R.: 1 fM in jede fM (inkl. Schlitz in der vorderen Mitte). Mit 1 Kettm in die erste fM abschliessen. 2. R.: * 3 Lm, 1 fM in die nächste M. *, von *-* wiederholen und mit 1 Kettm in die erste Lm des Anfanges abschliessen. Faden abschneiden. Zusammennähen: Machen Sie einen Bommel mit ca. 5 cm Durchmesser und nähen Sie ihn zwischen Fuss und Schaft an. |
|
Haben Sie diese Anleitung nachgearbeitet?Dann taggen Sie Ihre Fotos mit #dropspattern oder schicken Sie sie an die #dropsfan Galerie Brauchen Sie Hilfe bei dieser Anleitung?Sie finden 9 Videotutorials, einen Kommentar/Fragen-Bereich und vieles mehr, wenn sie die Anleitung bei garnstudio.com aufrufen. © 1982-2026 DROPS Design A/S. Wir besitzen alle Rechte. Dieses Dokument, einschließlich aller Untersektionen, hat Urheberrechte. Mehr dazu, was Sie mit unseren Anleitungen machen können, finden Sie ganz unten auf der Seite zu jeder Anleitung. |


Mit über 40 Jahren Tätigkeit im Entwerfen von Strick- und Häkelmustern bietet Ihnen DROPS Design eine der umfangreichsten Sammlungen von kostenlosen Anleitungen im Internet - in 17 Sprachen übersetzt. Zum jetzigen Zeitpunkt haben wir insgesamt 324 Handarbeitshefte und 12290 Anleitungen auf Deutsch. 12202
Unser Ziel ist es, Ihnen die besten Angebote zum Stricken und Häkeln, Inspirationen und Ratschläge sowie qualitativ hochstehende Garne zu unglaublichen Preisen zu bieten! Möchten Sie unsere Anleitungen nicht nur für den persönlichen Gebrauch nutzen? Unsere Copyright Bedingungen finden Sie bei allen unseren Anleitungen ganz unten auf der jeweiligen Seite. Viel Spaß beim Handarbeiten!
Kommentieren Sie die Anleitung DROPS 98-7
Wir würden gerne Ihre Meinung zu diesem Modell erfahren!
Wenn Sie eine Frage stellen möchten, prüfen Sie bitte, dass Sie die richtige Kategorie im unten stehenden Formular gewählt haben - so bekommen Sie schneller eine Antwort. Die obligatorischen Felder sind mit einem * gekennzeichnet.