
Popular categories
Looking for a yarn?


Comments / Questions (9)
![]() Sigrid wrote:
Sigrid wrote:
Hvordan får man økingen på vottene til å passe med mønsteret? (er helt nybegynner)
01.11.2021 - 22:07DROPS Design answered:
Hei Sigrid. Du starter økningen når du strikker 2. omgang av diagrammet. Du øker ved å lage et kast. På neste omgang strikker du kastet vridd slik at det ikke blir hull (dette er en omgang i diagrammet der alle maskene strikkes rett). På neste omgang blir det kun 1 vrangmaske (den nye masken), men det lages også et nytt kast, slik at det på neste omgang blir 2 vrangmasker slik diagrammet vises. Altså, du får ikke mønstret med 2 rett, 2 vrang til å gå opp før du har økt med 2 masker. Mvh DROPS Design
08.11.2021 - 11:37
![]() María Fernández wrote:
María Fernández wrote:
Ok, leyendo con calma, ya entendí el patrón Gracias Además los felicito, he realizado muchos tejidos con sus instrucciones, y sin perfectos. Gracias por compartirlas.
22.09.2021 - 19:31
![]() María Fernández wrote:
María Fernández wrote:
En la foto del gorro, no se ven las disminuciones inmediatamente termina el resorte. Después de los 14 cm de resorte Cuantas vueltas para empezar disminuciones? Gracias
22.09.2021 - 19:22
![]() Birgit Christensen wrote:
Birgit Christensen wrote:
Jeg har løst problemet med mærketrådene !!
19.09.2021 - 18:36
![]() Birgit Christensen wrote:
Birgit Christensen wrote:
Hej Jeg kan ikke få det til at passe med mærketrådene på huen!! Den første efter 10 m og derefter 3 med 20 m imellem og i retriller Jeg synes ikke, det passer med 10 m efter den første strikkede. Håber det er til at forstå Mvh Birgit
18.09.2021 - 21:00DROPS Design answered:
Hej Birgit. Så fint att det löste sig. Mvh DROPS Design
24.09.2021 - 09:19
![]() Elin Bertelsen wrote:
Elin Bertelsen wrote:
Jeg kan ikke finde diagrammet A1 - hvor findes det i opskriften ?
15.03.2021 - 21:37DROPS Design answered:
Hej Elin. Du finner det längst ner i opskriften. Mvh DROPS Design
17.03.2021 - 07:29
![]() Danielle Daoust wrote:
Danielle Daoust wrote:
Wow le modèle est très beau bien ajusté et le haut de la tête est bien rond. C'est un modèle a refaire
08.01.2021 - 03:23
![]() Maritha wrote:
Maritha wrote:
See picture on facebook grupp.
29.11.2020 - 11:49
![]() Maritha wrote:
Maritha wrote:
Är det fel i beskrivningen för höger vante. Tycker tummen blir på fel ställe. Tacksam snabbt svar.
28.11.2020 - 23:59DROPS Design answered:
Hej Maritha, jeg så på DROPS Workshop på Facebook at du har løst det og det ser rigtig fint ud. Rigtig god fornøjelse!
02.12.2020 - 11:50
|
|||||||
Winter Powder Set#winterpowderset |
|||||||
 |
 |
||||||
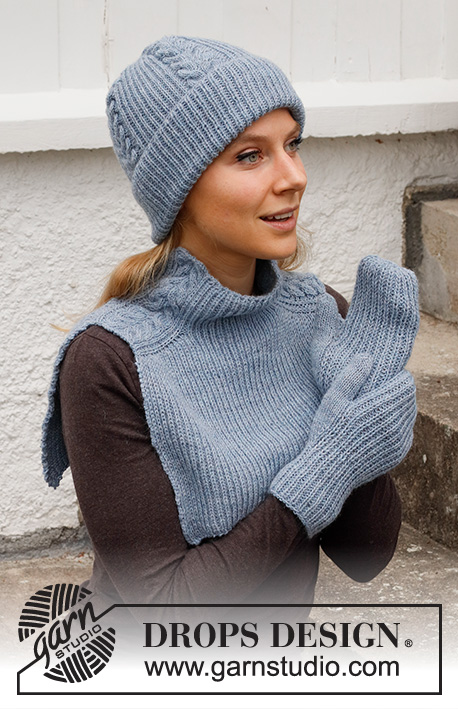
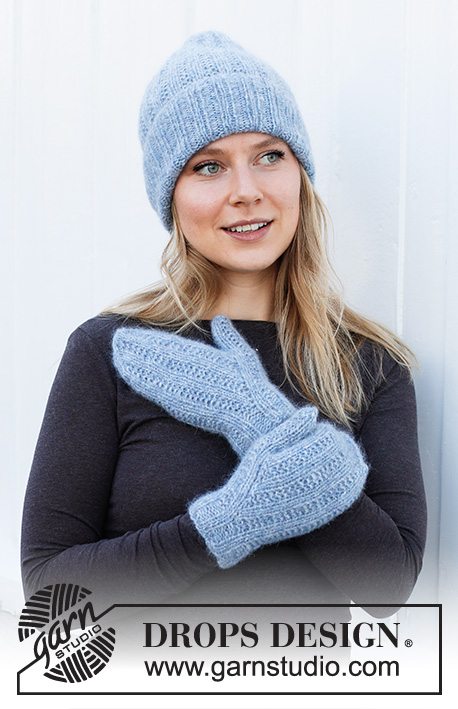
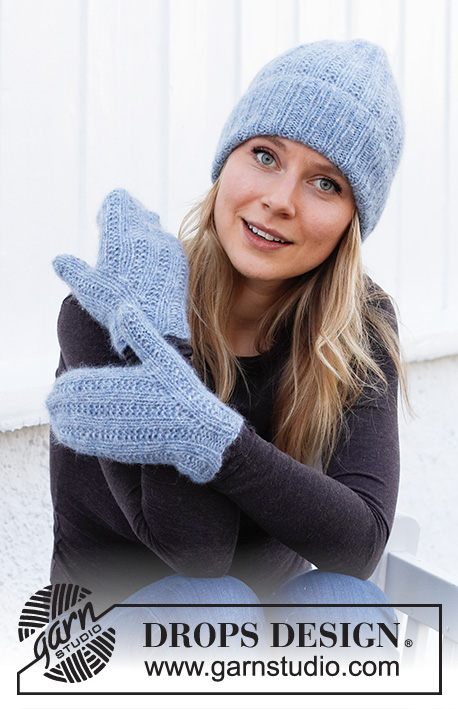
Knitted hat and mittens in DROPS Air and DROPS Kid-Silk. The piece is worked with textured pattern.
DROPS 214-30 |
|||||||
|
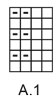
------------------------------------------------------- EXPLANATIONS FOR THE PATTERN: ------------------------------------------------------- PATTERN: See diagram A.1. DECREASE TIP (for hat): Decrease on each side of the marker thread as follows: Work until there are 4 stitches left before the marker thread, knit 2 together, work the next 4 stitches as before (marker thread sits in the middle of these 4 stitches), slip 1 stitch as if to knit, knit 1 and pass the slipped stitch over the knitted stitch. Repeat at the other marker threads (= 8 stitches decreased on the round). INCREASE TIP (for mittens): Right mitten: Make 1 yarn over before the stitch with the marker. Left mitten: Make 1 yarn over after the stitch with the marker. On the next round work the yarn overs twisted to avoid holes. Then work the new stitches into pattern A.1. ------------------------------------------------------- START THE PIECE HERE: ------------------------------------------------------- HAT – SHORT OVERVIEW OF THE PIECE: The piece is worked in the round with short circular needle. Change to double pointed needles when necessary. HAT: Cast on 80 stitches with short circular needle size 4.5 mm and 1 strand Air and 1 strand Kid-Silk (= 2 strands). Work rib (= knit 2, purl 2) in the round for 14 cm. Now work A.1 (= 4 stitches) for the whole round. The 2 knitted stitches in A.1 should match the knitted stitches in the rib. Continue like this until the piece measures 28 cm. REMEMBER THE KNITTING TENSION! Work the first stitch on the round and insert a marker here (= in the middle of 2 knitted stitches). This is now the beginning of the round. Insert 4 marker threads in the piece as follows: Insert the first marker thread after 10 stitches (= in the middle of 2 garter stitches), then the next 3 threads with 20 stitches between each one. All the marker threads are inserted between 2 garter stitches. On the next round begin to decrease – read DECREASE TIP. Decrease like this every 4th round 2 times in total, then every 2nd round 5 times = 24 stitches. Knit 1 round, then knit all stitches together 2 and 2 on the following round = 12 stitches. Cut the strand, thread it through the remaining stitches, tighten and fasten well. The hat measures approx. 36 cm (= approx. 28 cm with 8 cm turn-up). ------------------------------------------------------- MITTENS – SHORT OVERVIEW OF THE PIECE: The piece is worked in the round with double pointed needles. RIGHT MITTEN: Cast on 35 stitches with double pointed needles size 3 mm and 1 strand Air and 1 strand Kid-Silk (= 2 strands). Knit 1 round. Insert a marker thread at the beginning of the round = side. Work rib (= knit 2, purl 3) in the round for 3 cm. The next round is worked as follows: * Knit 2, purl 2 together, purl 1 *, work from *-* the whole round = 28 stitches. Change to double pointed needles size 4 mm and work pattern according to diagram A.1 on the whole round. The 2 knitted stitches in A.1 should match the 2 knitted stitches on the rib. AT THE SAME TIME on the first round, insert a marker in the 5th stitch on the round (= the first of 2 knitted stitches). On the next round begin to increase – read INCREASE TIP. Increase like this every 2nd round 12 times = 40 stitches. REMEMBER THE KNITTING TENSION! The next round is worked as follows: Work the first 16 stitches in the pattern as before, place the next 10 stitches on a thread (= thumb-stitches), cast on 2 new stitches (= behind the thumb), work the last 14 stitches = 32 stitches. Continue in the round with A.1. When the mitten measures 20 cm (there is approx. 4 cm left to finished length), insert a marker in each side; the first marker after the first stitch on the round and the second marker after 16 stitches (both markers between 2 knitted stitches). On the next round decrease in both sides as follows: Work until there are 2 stitches left before the marker, knit 2 together (marker here), slip 1 stitch as if to knit, knit 1 and pass the slipped stitch over (= 4 stitches decreased on the round). Repeat this decrease every 2nd round 2 more times and then every round 3 times = 8 stitches. On the next round knit all stitches together, 2 and 2 = 4 stitches. Cut the strand, thread it through the remaining stitches, tighten and fasten well. THUMB: Place the 10 stitches from the thread on double pointed needles size 4 mm and knit up 1 stitch in each of the 2 stitches cast on behind the thumb = 12 stitches. Work A.1 in the round until the thumb measures 5½ cm (you can try the mitten on and continue to desired length; there is ½ cm left to finished length). Work 2 rounds where all stitches are knitted together 2 and 2 on both rounds = 3 stitches. Cut the strand, thread it through the remaining stitches, tighten and fasten well. LEFT MITTEN: Cast on 35 stitches with double pointed needles size 3 mm and 1 strand Air and 1 strand Kid-Silk (= 2 strands). Knit 1 round. Insert a marker thread at the beginning of the round = side. Work rib (= knit 2, purl 3) in the round for 3 cm. The next round is worked as follows: * Knit 2, purl 2 together, purl 1 *, work from *-* the whole round = 28 stitches. Change to double pointed needles size 4 mm and work pattern according to diagram A.1 on the whole round. The 2 knitted stitches in A.1 should match the 2 knitted stitches on the rib. At the same time on the first round, insert a marker in the 26th stitch on the round (= the last knitted stitch on the round). On the next round begin to increase – remember INCREASE TIP. Increase like this every 2nd round 12 times = 40 stitches The next round is worked as follows: Work the first 16 stitches in the pattern as before, place the next 10 stitches on a thread (= thumb-stitches), cast on 2 new stitches (= behind the thumb), work the last 14 stitches = 32 stitches. Continue in the round with A.1. When the mitten measures 20 cm (there is approx. 4 cm left to finished length), insert a marker in each side; the first marker after the first stitch on the round and the second marker after 16 stitches (both markers between 2 knitted stitches). On the next round decrease in both sides as follows: Work until there are 2 stitches left before the marker, knit 2 together (marker here), slip 1 stitch as if to knit, knit 1 and pass the slipped stitch over (= 4 stitches decreased on the round). Repeat this decrease every 2nd round 2 more times and then every round 3 times = 8 stitches. On the next round knit all stitches together, 2 and 2 = 4 stitches. Cut the strand, thread it through the remaining stitches, tighten and fasten well. THUMB: Work in the same way as on the right mitten. |
|||||||
Diagram explanations |
|||||||
|
|||||||
 |
|||||||
Have you finished this pattern?Tag your pictures with #dropspattern #winterpowderset or submit them to the #dropsfan gallery. Do you need help with this pattern?You'll find 21 tutorial videos, a Comments/Questions area and more by visiting the pattern on garnstudio.com. © 1982-2026 DROPS Design A/S. We reserve all rights. This document, including all its sub-sections, has copyrights. Read more about what you can do with our patterns at the bottom of each pattern on our site. |
|||||||


With over 40 years in knitting and crochet design, DROPS Design offers one of the most extensive collections of free patterns on the internet - translated to 17 languages. As of today we count 324 catalogues and 12290 patterns translated into English (UK/cm).
We work hard to bring you the best knitting and crochet have to offer, inspiration and advice as well as great quality yarns at incredible prices! Would you like to use our patterns for other than personal use? You can read what you are allowed to do in the Copyright text at the bottom of all our patterns. Happy crafting!
Post a comment to pattern DROPS 214-30
We would love to hear what you have to say about this pattern!
If you want to leave a question, please make sure you select the correct category in the form below, to speed up the answering process. Required fields are marked *.