
Popular categories
Looking for a yarn?


Comments / Questions (25)
![]() Birgit Becker wrote:
Birgit Becker wrote:
Guten Tag, ich möchte einen RVO stricken mit einem Wellenmotiv im oberen Abschnitt. Da ich so etwas bisher noch nicht gestrickte habe, weiß ich nicht, wo ich mit der ersten Welle beginnen soll, ob über die Raglan Linie mit dem Motiv und wo man das Motiv am unauffälligsten aufeinander treffen lassen soll, da es ja wahrscheinlich kein vollständiges Motiv ergeben wird. Ich bin Anfänger, ich hoffe, Sie verstehen, was ich meine. Danke für Ihre Hilfe!
11.12.2024 - 12:29DROPS Design answered:
Liebe Frau Becker, hier finden Sie alle unsere Pullover mit Raglan, die von oben nach unten gestrickt sind - bei den Tabs Video/Lektion finden Sie auch mehr Hilfe (für Raglanpasse), vielleicht finden Sie ein Modell, das Ihnen gefallen wird. Viel Spaß beim Stricken!
12.12.2024 - 08:57
![]() Gisela Bongart wrote:
Gisela Bongart wrote:
Für die Flamingo-Parade gibt es leider die Farbe 17, Pink, von DROPS Merino Extra Fine nicht mehr. Was empfehlen Sie als Ersatz?
06.12.2022 - 18:09DROPS Design answered:
Liebe Frau Bongart, gerne wird Ihnen Ihr DROPS Händler damit helfen, die beste passende Farbe zu wählen (und auch per Telefon oder per E-Mail). Viel Spaß beim stricken!
07.12.2022 - 07:58
![]() Audrey Wilson wrote:
Audrey Wilson wrote:
Can you give me the sizes in inches or dress size. Don’t know how big s, m anl etc are.
08.01.2022 - 19:55DROPS Design answered:
Dear Mrs Wilson, you will find all finished measurements for each size in the chart; compare a similar garment you have and like the shape to find out the matching size. Read more here. Happy knitting!
10.01.2022 - 08:16
![]() Julie wrote:
Julie wrote:
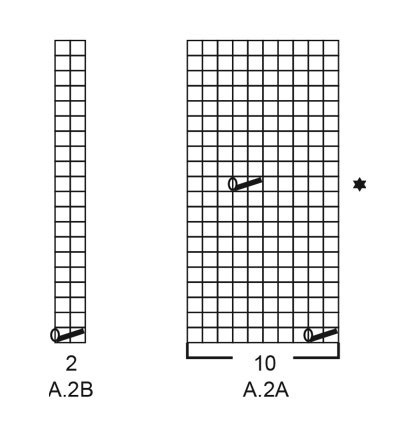
Hi, I am having a little problem with the sleeves when it come to the lace pattern. It said A2:::A2 A or A2B as from there I read it so many times but still very confused. It will be nice if you can post a short video for the instructions from the lace part. Otherwise I just knit a normal sleeves without doing the lace pattern. Thank you
17.10.2021 - 20:13DROPS Design answered:
Dear Julie, A.2A is the main diagram, which is worked in the whole sleeve, while A.2B is worked 2 stitches before the end of the round. All of the videos that can help you make this pattern can be found below the diagrams. If the diagrams still give you trouble, you can knit normal sleeves without the lace pattern perfectly as well. Happy knitting.
17.10.2021 - 20:20
![]() Carolina Scanzani wrote:
Carolina Scanzani wrote:
Buongiono, sono una nonna e vorrei realizzare la maglia del modello Flamingo Parade Drops per la mia nipotina mi occorre la taglia 7/8anni
23.01.2021 - 11:29DROPS Design answered:
Buongiorno Carolina, purtroppo questo modello è disponibile solo per adulti. Guardi questo maglione per bambini che è molto simile. Buon lavoro!
23.01.2021 - 16:07
![]() Arianna Gianneramo wrote:
Arianna Gianneramo wrote:
Buongiorno, chiedo cortesemente lo schema del modello DROPS Flamingo Parade per una bambina di sei anni spero di averlo il prima possibile Grazie
23.01.2021 - 11:21DROPS Design answered:
Buongiorno Arianna, purtroppo questo modello è disponibile solo per adulti. Guardi questo maglione per bambini che è molto simile. Buon lavoro!
23.01.2021 - 16:07
![]() Jill Scheetz wrote:
Jill Scheetz wrote:
I'm enjoying knitting Flamingo Parade but need help with A;2A and A.2B. I cannot find an explanation for the 'tick' symbol on those graphs. The text of the pattern refers to 'the lace pattern on the body'. Your help would be appreciated.
22.11.2020 - 10:31DROPS Design answered:
Dear Jill. it's not a tick, it's a combination of the circle and the diagonal line. You first work the diagonal line, in which you knit 2 together and then the circle, in which you make a yarn over with light grey blue. Happy knitting!
22.11.2020 - 11:37
![]() Orysia wrote:
Orysia wrote:
Thanks for ur reply. I like the dezign of flamingos yoke. I know u have lots of patterns but none like Flamingo one bottom up.. I will study top down down tech, can't be too hard Anyway I have got the wool.
05.10.2020 - 11:47
![]() Orysia wrote:
Orysia wrote:
I have never knitted a top down jumper before, is it very hard to knit it Is there any chance your Designer could reverse jumper? I read the pattern its very complicated. I don’t like a wide neckline, I prefer a snug fit to keep my neck warm. The wool came today but it looks like I have to return it if there is no bottom up version.
03.10.2020 - 16:28DROPS Design answered:
Hi Orysia, You can search for other patterns that use Merino extra fine; there are many patterns available, both with a tighter neck and worked bottom up. Happy knitting!
05.10.2020 - 09:24
![]() Doreen Daniel wrote:
Doreen Daniel wrote:
Will there be a children's version of flamingo parade?
02.01.2020 - 18:06DROPS Design answered:
Dear Mrs Daniel, nothing is planned yet, sorry. Happy knitting!
03.01.2020 - 09:55
|
||||||||||||||||||||||||||||||||||
Flamingo Parade#flamingoparadesweater |
||||||||||||||||||||||||||||||||||
 |
 |
|||||||||||||||||||||||||||||||||
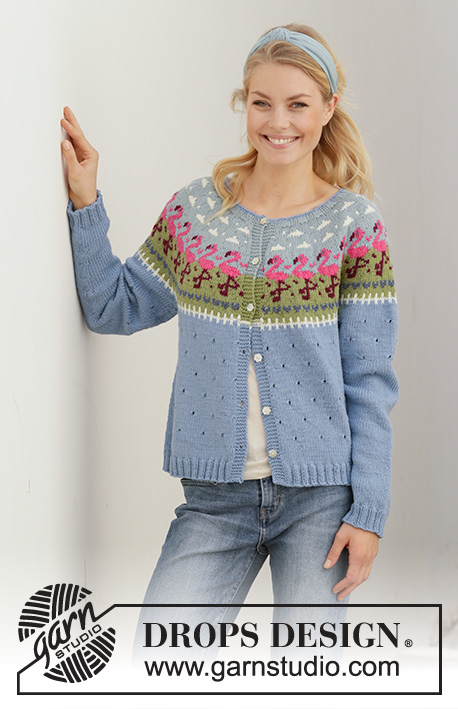
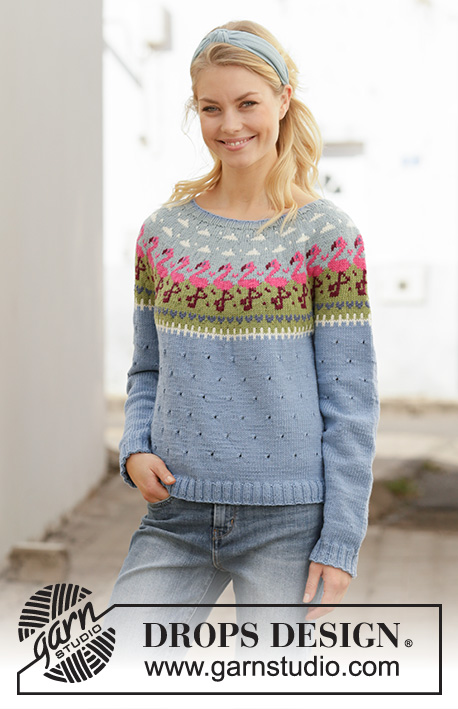
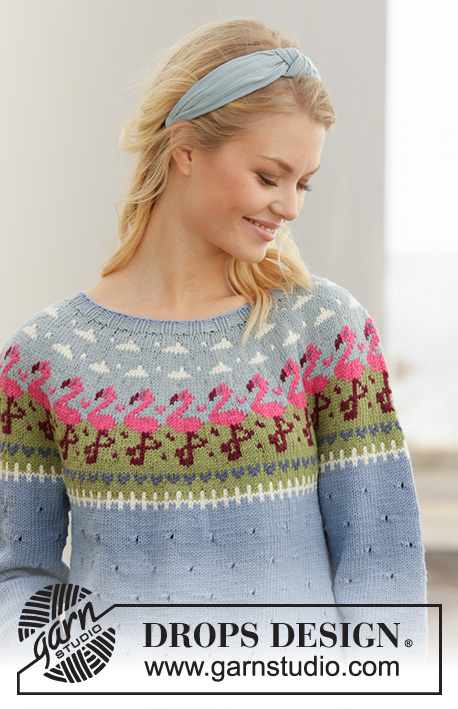
Knitted jumper with flamingos in DROPS Merino Extra Fine. The piece is worked top down with round yoke and Nordic pattern. Sizes S - XXXL.
DROPS 201-11 |
||||||||||||||||||||||||||||||||||
|
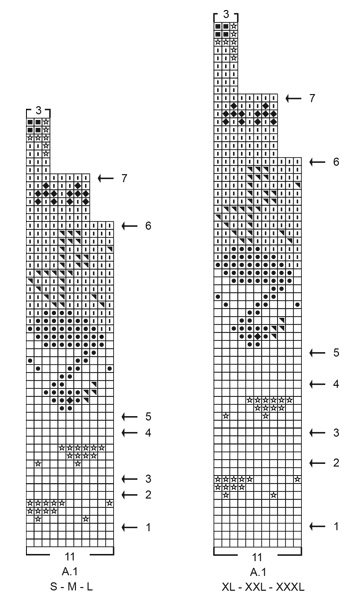
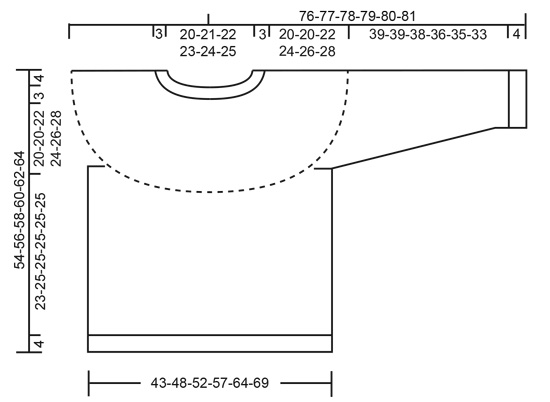
------------------------------------------------------- EXPLANATIONS FOR THE PATTERN: ------------------------------------------------------- ELEVATION (back of neck): To make the jumper slightly higher at the back of the neck when working the yoke, work an elevation as described below. Skip this section if you do not want an elevation. Insert 1 marker at the beginning of the round (= mid back). Start from the right side with light greyish green and knit 15-15-16-16-18-18 stitches, turn, tighten strand and purl 30-30-32-32-36-36 stitches. Turn, tighten strand and knit 45-45-48-48-54-54 stitches, turn, tighten strand and purl 60-60-64-64-72-72 stitches. Turn, tighten strand and knit 75-75-80-80-90-90 stitches, turn, tighten strand and purl to mid back. Then work YOKE as described in text. INCREASE TIP (evenly spaced): To work out how to increase evenly, count the total number of stitches on the needle (e.g. 108 stitches) and divide by the number of increases to be made (e.g. 24) = 4.5. In this example, increase by making 1 yarn over after alternately each 4th and 5th stitch. On the next round knit the yarn overs twisted to avoid holes. PATTERN: See diagrams A.1 and A.2. Choose diagram for your size (applies to A.1). A.1 is worked in stocking stitch. As there are long gaps between colour changes, twist the strands together after approx. each 7th stitch to avoid loose strands at the back. KNITTING TIP: To avoid the knitting tension becoming tighter when working pattern, it is important not to have tight strands at the back. You can increase the needle size when working pattern if this is a problem. DECREASE TIP (for mid under sleeves): Start 3 stitches before the marker thread, knit 2 together, knit 2 (marker thread sits between these 2 stitches), slip 1 stitch as if to knit, knit 1 and pass the slipped stitch over the knitted stitch (= 2 stitches decreased). CASTING-OFF TIP: To avoid the cast-off edge being tight, you can cast off with a larger needle size. Or make 1 yarn over after approx. each 8th stitch at the same time as you cast off (yarn overs cast off as normal stitches). ------------------------------------------------------- START THE PIECE HERE: ------------------------------------------------------- JUMPER - SHORT OVERVIEW OF THE PIECE: Neck and yoke are worked in the round with circular needle, top down. The yoke is divided for body and sleeves. The body is continued in the round with circular needle, top down. The sleeves are worked in the round with short circular needle/double pointed needles, top down. NECK: Cast on 108-112-116-120-124-128 stitches with short circular needle size 3 mm and light grey blue. Start of round = mid back. Knit 1 round. Change to light greyish green and work rib in the round (= knit 2 / purl 2) for approx. 2½-3 cm. Change to short circular needle size 4 mm. Knit 1 round where you increase 24-20-27-23-30-26 stitches evenly spaced – read INCREASE TIP = 132-132-143-143-154-154 stitches. Knit 1 round (yarn overs knitted twisted). Then you can work an ELEVATION in back of neck – read description above. If you do not want an elevation, go straight to YOKE. YOKE: Read KNITTING TIP and work A.1 in the round (= 12-12-13-13-14-14 repeats of 11 stitches). REMEMBER THE KNITTING TENSION! AT THE SAME TIME on each round marked with an arrow in A.1 increase as follows – read INCREASE TIP: Arrow-1: Increase 33-44-44-44-44-44 stitches evenly spaced = 165-176-187-187-198-198 stitches (there is now room for 15-16-17-17-18-18 repeats of 11 stitches). Arrow-2: Increase 33-33-44-44-44-44 stitches evenly spaced = 198-209-231-231-242-242 stitches (there is now room for 18-19-21-21-22-22 repeats of 11 stitches). Arrow-3: Increase 22-22-22-33-44-44 stitches evenly spaced = 220-231-253-264-286-286 stitches (there is now room for 20-21-23-24-26-26 repeats of 11 stitches). Arrow-4: Increase 22-33-33-33-33-44 stitches evenly spaced = 242-264-286-297-319-330 stitches (there is now room for 22-24-26-27-29-30 repeats of 11 stitches). Arrow-5: Increase 11-11-11-22-33-33 stitches evenly spaced = 253-275-297-319-352-363 stitches (there is now room for 23-25-27-29-32-33 repeats of 11 stitches). Arrow-6: Increase 11-21-23-25-24-29 stitches evenly spaced = 264-296-320-344-376-392 stitches (there is now room for 33-37-40-43-47-49 repeats of 8 stitches). Arrow-7: Increase 12-16-19-22-20-25 stitches evenly spaced = 276-312-339-366-396-417 stitches (there is now room for 92-104-113-122-132-139 repeats of 3 stitches). On the last round in A.1, increase 0-0-1-2-2-1 stitches evenly spaced (increase in background colour) = 276-312-340-368-398-418 stitches. When A.1 has been completed the piece measures approx. 23-23-23-27-27-27 cm from the cast-on edge mid front. The rest of the garment is worked in light grey blue. Work stocking stitch onwards until the piece measures 23-23-25-27-29-31 cm from the cast-on edge mid front (i.e. approx. 0-0-2-0-2-4 cm after A.1). The next round is worked as follows: Work 41-46-50-55-61-65 stitches in stocking stitch (= ½ back piece), place the next 56-64-70-74-76-78 stitches on 1 thread for sleeve, cast on 8-8-10-10-12-14 new stitches on needle (= in side under sleeve), work 82-92-100-110-123-131 stitches in stocking stitch (= front piece), place the next 56-64-70-74-76-78 stitches on 1 thread for sleeve, cast on 8-8-10-10-12-14 new stitches on needle (= in side under sleeve) and work the remaining 41-46-50-55-62-66 stitches in stocking stitch (= ½ back piece). Cut the strand. Then continue body and sleeves separately. THE PIECE IS NOW MEASURED FROM HERE! BODY: = 180-200-220-240-270-290 stitches. Insert 1 marker thread in the middle of the 8-8-10-10-12-14 stitches under the sleeve on one side of the piece. Start the round by the marker thread and work stocking stitch in the round. When you have worked a total of 3-3-3-4-4-5 cm with light grey blue after A.1 on the yoke (i.e. after fence), start the lace pattern on the body. Work A.2A in the round (= 18-20-22-24-27-29 repeats of 10 stitches). A.2A is worked a total of 3 times in height in all sizes, but the last repeat finishes after the round marked with a star in A.2A. Then work stocking stitch in the round until the piece measures 23-25-25-25-25-25 cm from the division (or to desired length; there is 4cm left to finished length). On the next round increase 36-40-44-48-54-58 stitches evenly spaced = 216-240-264-288-324-348 stitches. This is done to avoid the rib being tight. Change to circular needle size 3 mm and work rib in the round (= knit 2 / purl 2) for 4 cm. Cast off with knit over knit and purl over purl – read CASTING-OFF TIP! The jumper measures approx. 54-56-58-60-62-64 cm from the shoulder down. SLEEVE: Place the 56-64-70-74-76-78 stitches from the thread on the one side of the piece on circular needle/double pointed needles size 4 mm and knit up 1 stitch in each of the 8-8-10-10-12-14 stitches cast on under the sleeve = 64-72-80-84-88-92 stitches. Insert 1 marker thread in the middle of the 8-8-10-10-12-14 stitches under the sleeve. Allow the marker thread to follow your work onwards; it will be used when decreasing mid under sleeve. Read the rest of the sleeve section before continuing! Start the round by the marker thread and work stocking stitch in the round (with light grey blue). When the piece measures 2-2-3-3-3-3 cm from the division, decrease 2 stitches mid under sleeve – read DECREASE TIP! Decrease like this every 4-3-2-2-1½-1½ cm a total of 10-13-16-17-18-19 times = 44-46-48-50-52-54 stitches. AT THE SAME TIME when you have worked a total of 3-3-3-4-4-5 cm with light grey blue after A.1 on the yoke (i.e. after fence), start the lace pattern on the sleeve. The first round is worked as follows (the first decrease under the sleeve has been done in sizes S, M and XL and there are 62-70-80-82-88-92 stitches on the needle when the lace pattern starts): Work 0-4-4-0-3-0 stitches in stocking stitch, A.2A over the next 60-60-70-80-80-90 stitches (= 6-6-7-8-8-9 repeats of 10 stitches), work A.2B (= 2 stitches) and finish with 0-4-4-0-3-0 stitches in stocking stitch. Continue this pattern, but make sure that the holes in A.2 are positioned over each other when decreasing under sleeve. A.2 is worked a total of 2 times in height in all sizes, but the last repeat finishes after the round marked with a star in A.2A. Then work stocking stitch in the round over all stitches until the piece measures approx. 39-39-38-36-35-33 cm from the division (or to desired length; there is 4cm left to finished length – NOTE: Shorter measurements in larger sizes due to wider neck and longer yoke). Knit 1 round where you increase 4-2-0-2-0-2 stitches evenly spaced = 48-48-48-52-52-56 stitches. Change to double pointed needles size 3 mm. Work rib in the round (= knit 2 / purl 2) for 4 cm. Cast off with knit over knit and purl over purl – read CASTING-OFF TIP! The sleeve measures approx. 43-43-42-40-39-37 cm from the division. Work the other sleeve in the same way. |
||||||||||||||||||||||||||||||||||
Diagram explanations |
||||||||||||||||||||||||||||||||||
|
||||||||||||||||||||||||||||||||||
 |
||||||||||||||||||||||||||||||||||
 |
||||||||||||||||||||||||||||||||||
 |
||||||||||||||||||||||||||||||||||
Have you finished this pattern?Tag your pictures with #dropspattern #flamingoparadesweater or submit them to the #dropsfan gallery. Do you need help with this pattern?You'll find 28 tutorial videos, a Comments/Questions area and more by visiting the pattern on garnstudio.com. © 1982-2026 DROPS Design A/S. We reserve all rights. This document, including all its sub-sections, has copyrights. Read more about what you can do with our patterns at the bottom of each pattern on our site. |
||||||||||||||||||||||||||||||||||


With over 40 years in knitting and crochet design, DROPS Design offers one of the most extensive collections of free patterns on the internet - translated to 17 languages. As of today we count 325 catalogues and 12298 patterns translated into English (UK/cm).
We work hard to bring you the best knitting and crochet have to offer, inspiration and advice as well as great quality yarns at incredible prices! Would you like to use our patterns for other than personal use? You can read what you are allowed to do in the Copyright text at the bottom of all our patterns. Happy crafting!
Post a comment to pattern DROPS 201-11
We would love to hear what you have to say about this pattern!
If you want to leave a question, please make sure you select the correct category in the form below, to speed up the answering process. Required fields are marked *.