
Popular categories
Looking for a yarn?


Comments / Questions (36)
![]() Claudine Charette wrote:
Claudine Charette wrote:
Encore une question, Pour la manche, on fait 1 maille serrée et ensuite 5 brides au dessus des mailles en l'air et ensuite à la fin on fait 6 brides. Ce qui nous donne 11 brides il en manque une au dessus des 12 mailles en l'air. Doit-on faire 3 mailles en l'air après avoir fait la maille serrée ce qui nous ferait la 12e bride? Merci encore!
13.05.2020 - 17:36DROPS Design answered:
Bonjour Mme Chauvette, après vérification, on doit bien crocheter 3 mailles en l'air pour commencer le tour; autrement dit, 1 maille serrée, 3 mailles en l'air, 5 brides au début du tour et 6 brides à la fin du tour. Les corrections de rigueur vont être faite. Bon crochet!
14.05.2020 - 10:04
![]() Claudine Charette wrote:
Claudine Charette wrote:
Bonjour, je suis rendu à l'étape de diviser le dos/les devants et les manches. Quand on monte 12 mailles en l'air sous les manches nous sommes au rang 1 de A1 que fera t'on quand on arrivera au rang 2 (A1) au dessus de ces 12 mailles en l'air il n'y aura pas les petits V du rang 1. dans lequel nous devons faire 4 brides rabattues. Je ne comprend pas la suite...
09.05.2020 - 22:58DROPS Design answered:
Bonjour Mme Charette, quand vous crochetez seulement de dos/les devants, vous continuez A.1 comme avant, autrement dit, également dans les 12 mailles en l'air sous chacune des manches. Le motif doit se suivre exactement comme avant, si vous en êtes au rang 2 de A.1, *sautez 1 ml (au lieu d'1 bride), crochetez 4 brides écoulées ensemble dans la maille en l'air suivante et sautez 1 ml (au lieu d'1 bride)* et répétez de *-*. Bon crochet!
11.05.2020 - 09:43
![]() Sally Payne wrote:
Sally Payne wrote:
Hello, I have just got to the sleeves and the pattern says, "Sleeve is worked in the round", but it doesn't say how to do this. Is it meant to be a spiral, or do you finish off each round with a slip stitch to the first stitch of the round and then start with 3ch and continue in the same direction, or do you change direction after each round? Thank you for your help.
17.04.2020 - 13:34DROPS Design answered:
Dear Mrs Payne, you will start each round with 3 chains - see CROCHET INFO at the very begining of the pattern - and end each row with a slip stitch in the 3rd chain from beg. of round. Pattern do not say to work alternately from RS and from WS but you can do it if you like to. Happy crocheting!
17.04.2020 - 14:06
![]() Josie wrote:
Josie wrote:
Bonjour Je suis arrivée au dernier rang de la première série, j'ai bien 229 B pour la T XL, ensuite, impossible d'aller au delà, je n'y arrive pas. Pouvez vous m'aider s'il vous plait. Merci. J'espère que je vais pouvoir le réaliser. J'ai déjà commandé mon coton pour un autre modèle.
03.02.2020 - 17:55DROPS Design answered:
Bonjour Josie, Quand A.1 et A.3 sont terminés, vous crochetez désormais A.1 sur toutes les mailles sauf les 2 mailles au milieu de chacun des 4 A.2 que vous allez crocheter de nouveau en suivant A.2, autrement dit, les 14 m de A.2 se crochètent ainsi: les 6 premières mailles en A.1 (= 2 x A.1 en largeur), A.2 (= 2 m), et les 6 dernières m en A.1 (= 2 x en largeur). Vous allez ainsi augmenter 4 fois 12 m (4 x A.2) soit 48 m et vous aurez ainsi 277 m quand A.2 aura été crocheté une 2ème fois en hauteur. Bon crochet!
04.02.2020 - 10:41
![]() Gerda wrote:
Gerda wrote:
Beste, Hoewel ik wel ervaring heb met haken snap ik de Drops patronen niet zo goed ! Die A1; A2 en A3 uitleg begrijp ik niet goed, bv A3 over 1 stokje, is dat dan gewoon 1 stokje op het vorig stokje ? En A1 over 24 stokjes ... zijn dit dan gewoon 24 stokjes haken ? Sorry, maar ik zie het niet ! Dank. Gerda
16.01.2020 - 19:32
![]() Gerda wrote:
Gerda wrote:
Beste, Hoewel ik wel ervaring heb met haken snap ik de Drops patronen niet zo goed ! Die A1; A2 en A3 uitleg begrijp ik niet goed, bv A3 over 1 stokje, is dat dan gewoon 1 stokje op het vorig stokje ? En A1 over 24 stokjes ... zijn dit dan gewoon 24 stokjes haken ? Sorry, maar ik zie het niet ! Dank. Gerda
15.01.2020 - 13:53DROPS Design answered:
Dag Gerda,
Klopt, A3 over 1 stokje, betekent dat je boven dat ene stokje A.3 haakt. In het telpatroon A.3 is dat ene stokje ook weergegeven met een sterretje ernaast. Deze toer met het sterretje wordt niet gehaakt, maar staat er bij zodat je kunt zien hoe je in de vorige toer moet haken. Als er staat dat je A.1 over de volgende 24 stokjes haakt, betekent dat in dit geval dat je 8 herhalingen van A.1 in de breedte haakt. (A.1 is 3 stokjes breed; 8 x 3 = 24)
18.01.2020 - 11:47
![]() Claudine Charette wrote:
Claudine Charette wrote:
Grandeur L C'est indiqué après chaque A.4 en hauteur on a suffisamment de mailles pour crocheter 16 fois A.1 Sauf qu'au dernier rang de A.4 on 8 brides donc on fera seulement 1 fois A.1 chaque côté et cela 4 fois sur la totalité du rang ce qui me donne à crocheter 8 fois A1 en plus en largeur et non 16 fois.
01.01.2020 - 22:15
![]() Johanna Dahl wrote:
Johanna Dahl wrote:
Hej! Vad virkar man för maskor när man inte gör diagrammet? På varv 2 i första randen t ex? Är det fasta maskor emellan då eller?
10.04.2019 - 13:40DROPS Design answered:
Hei Johanna. Når du hekler etter diagram er det ingen masker mellom diagrammene. På 2 rad hekler du 1 stav i den første masken, så hekler du A.1 over de neste 21-24-24-27-27-27 stavene. Altså du gjentar A.1 7-8-8-9-9-9 ganger etter hverande. Så hekler du A.2 over de neste 2 maskene (det er ingen masker mellom A.1 og A.2). Videre hekler du A.1 igjen (4 ganger etterhverandre) - igjen, det er ingen masker mellom A.2 og A.1 osv. Om det skal hekles noe annet enn diagram, vil dette stå forklart. Feks: Hekle 1 stav i hver av de første 18-21-21-24-24-24 stavene. God fornøyelse
11.04.2019 - 10:56
![]() Gerrie wrote:
Gerrie wrote:
Ik heb de tweede toer gehaakt. Volgens de uitleg en het patroon A1 tm A3. Nu snap ik niets meer van het vervolg. Hoe moet ik A1 tm A3 haken? Volgens de tweede toer? Patroon vanaf hier: "Meerder op de laatste toer in A.1 tot A.3 0-0-3-3-3-0 stokjes verdeeld over elk van de voorpanden – lees MEERDER/TIP VOOR HET MINDEREN en 0-0-6-0-12-3 stokjes verdeeld over het achterpand". Wellicht kunt u mij helpen...! Alvast bedankt.
19.02.2019 - 20:46DROPS Design answered:
Dag Gerrie,
Je haakt alle toeren van A.1 t/m A.3 waarbij je in de laatste toer van A.1 tot A.3 stokjes meerdert op de voorpanden en de achterpanden. Bij 'TIP VOOR HET MEERDEREN' kun je lezen hoe je dit moet doen. De laatste toer van deze telpatronen is de toer met stokjes in de steek.
21.02.2019 - 11:09
![]() Barbara Ruiz Sanchez wrote:
Barbara Ruiz Sanchez wrote:
Hola, en la información del canesu me es complicado entender, me enreda tanto A1 luego A2 y así sucesivamente siendo que son muy parecida, ya que uno son los aumentos del tejido y el otro no, me podrían enviar un un diagrama algo mas claro o uniendo todo los diagramas y realizar solo uno, mostrando los lugares de aumento y los que no, se que es algo grande lo que pido pero me encantan sus patrones y seria muy satisfactorio recibir alguna ayuda para comprender mejor el patrón, gracias
18.07.2018 - 02:33DROPS Design answered:
Hola Barbara. No enviamos ni patrones ni diagramas. Debido al limitado espacio en la web no se pueden publicar los diagrama en tamaño completo. Puedes acudir a una tienda especializada de Drops para recibir ayuda en la elaboración de la prenda.
18.07.2018 - 22:10
|
||||||||||||||||
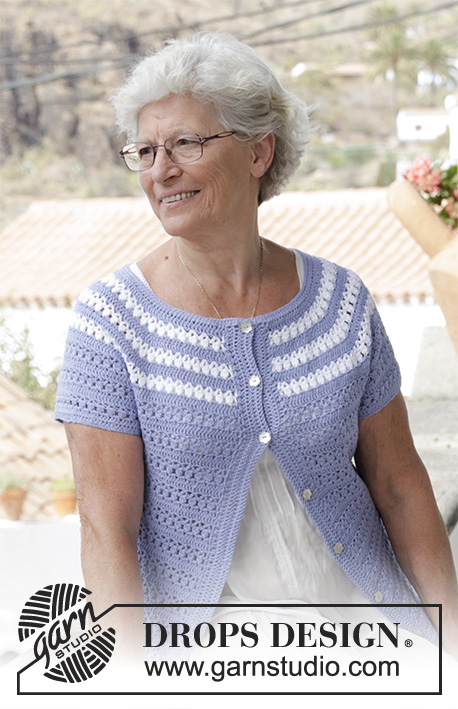
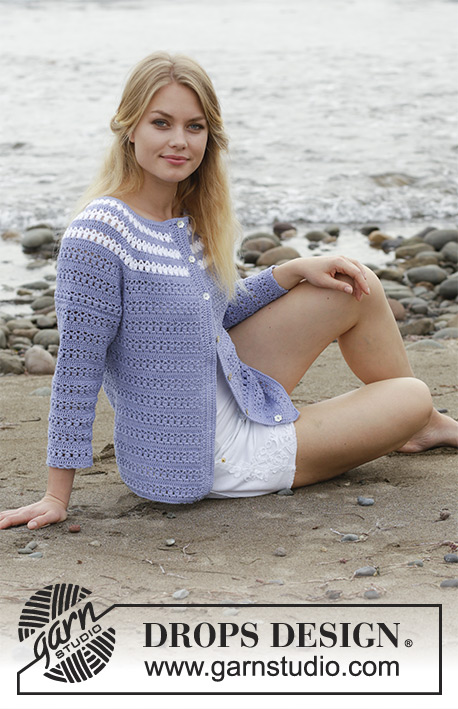
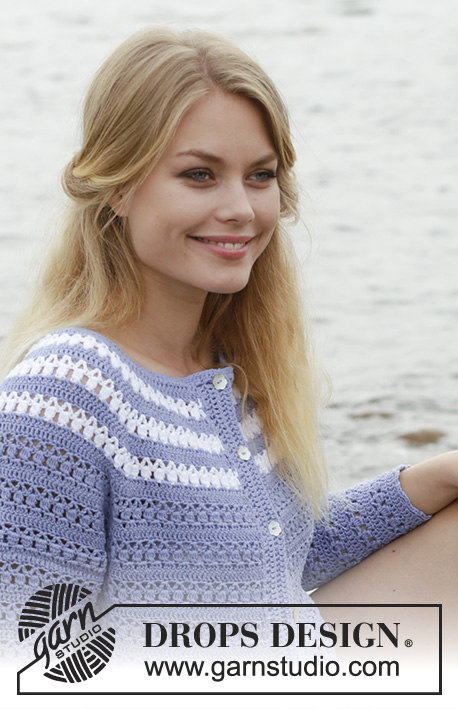
Meet Me in Provence Cardigan#meetmeinprovencecardigan |
||||||||||||||||
 |
 |
|||||||||||||||
Jacket with lace pattern and stripes, crocheted top down. Size: S - XXXL Piece is crocheted in DROPS Safran.
DROPS 186-32 |
||||||||||||||||
|
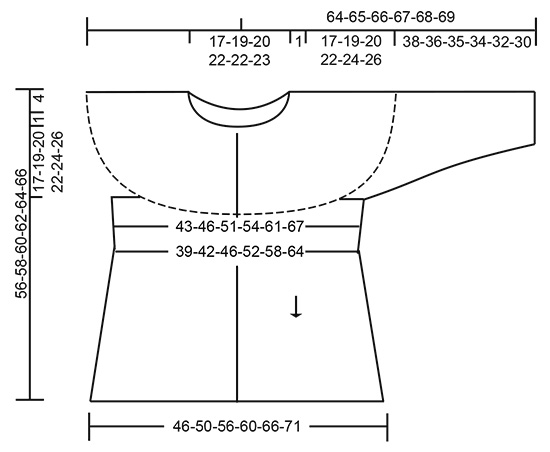
INFORMATION FOR PATTERN: PATTERN: See diagrams A.1 to A.5. CROCHET INFO: Begin every treble crochet row with 3 chain stitches (replaces first treble crochet). When sleeves are worked in the round, begin and end every round in A.1 as follows: Begin 1st and 2nd round in A.1 with 3 chain stitches (do not replace first treble crochet) and finish with 1 slip stitch in 3rd chain stitch at beginning of round Begin 3rd and 4th round in A.1 with 3 chain stitches (replace first treble crochet) and finish with 1 slip stitch in 3rd chain stitch at beginning of round STRIPES: In the first 3 repetitions of the diagrams vertically work 1st and 2nd row with white, work the remaining rows in light blue purple - read COLOUR CHANGE. Then work the remaining repetitions of A.1 in light blue purple. COLOUR CHANGE: When changing colour work as follows: Work last treble crochet with first colour but wait with last pull through, switch to next colour and work last pull through, then continue working. INCREASE/DECREASE TIP: To calculate how to increase/decrease evenly, use the total number of stitches to be increased/decreased over (e.g. 24 stitches) and divide stitches by number of increases/decreases to be done (e.g. 3) = 8. To increase evenly in this example work 2 treble crochets in every 8th treble crochet. To decrease evenly in this example work every 7th and 8th treble crochet together. Decrease 1 treble crochet by working 2 treble crochets together as follows: Work 1 treble crochet in/around first stitch, but wait with last pull through, work 1 treble crochet in/around next treble crochet/stitch, but on last pull through pull yarn through all 3 loops on hook. ---------------------------------------------------------- JACKET: Yoke and body are worked back and forth from mid front, top down. Sleeves are worked in the round. Band and neck edge are worked back and forth at the end. YOKE: Work 144-154-158-168-168-175 chain stitches (including 3 chain stitches to turn with) on hook size 3.5 mm with light blue purple. Work 1 treble crochet in 4th chain stitch from hook (= 2 treble crochets) - read CROCHET INFO, 1 treble crochet in each of the next 0-3-0-3-3-3 chain stitches, * skip 1 chain stitch, 1 treble crochet in each of the next 6 chain stitches *, repeat from *-* = 122-131-134-143-143-149 treble crochets. Work first row from wrong side as follows: Work 1 treble crochet in each of the first 18-21-21-24-24-24 treble crochets, * work 2 treble crochets in next treble crochet, 1 treble crochet in next treble crochet *, repeat from *-* over the next 22 treble crochets (= 11 treble crochets increased), 1 treble crochet in each of the next 42-45-48-51-51-57 treble crochets, repeat from *-* over the next 22 treble crochets (= 11 treble crochets increased), 1 treble crochet in each of the last 18-21-21-24-24-24 treble crochets = 144-153-156-165-165-171 treble crochets. Work next row as follows from right side - read STRIPES: Work 1 treble crochet in first treble crochet, A.1 over 21-24-24-27-27-27 treble crochets (= 7-8-8-9-9-9 repetitions of 3 treble crochets) (= left front piece), A.2 (= 2 treble crochets), A.1 over 12 treble crochets (= 4 repetitions), A.3 over 1 treble crochet, A.1 over 12 treble crochets (= 4 repetitions), A.2 over 2 treble crochets (= left sleeve), A.1 over 42-45-48-51-51-57 treble crochets (= 14-15-16-17-17-19 repetitions) (= back piece), A.2 over 2 treble crochets, A.1 over 12 treble crochets (= 4 repetitions), A.3 over 1 treble crochet, A.1 over 12 treble crochets (= 4 repetitions), A.2 over 2 treble crochets (= right sleeve), finish with A.1 over 21-24-24-27-27-27 treble crochets (= 7-8-8-9-9-9 repetitions) and 1 treble crochet in last treble crochet (= right front piece). REMEMBER THE CROCHET TENSION! On last row in A.1 to A.3 increase 0-0-3-3-3-0 treble crochets evenly over each of the front pieces – read INCREASE/DECREASE TIP and 0-0-6-0-12-3 treble crochets evenly over back piece (= 0-0-12-6-18-3 treble crochets increased in total). When A.1 to A.3 have been worked 1 time vertically, there are 202-211-226-229-241-232 treble crochets on last row. Piece measures approx. 5 cm. Continue to work 1 treble crochet in first and last treble crochet and A.1 as before. Repeat diagram A.2 over the 2 middle treble crochets in each repetition over A.2 0-0-1-1-2-3 more times (i.e. A.2 is worked 1-1-2-2-3-4 times in total vertically), over the remaining stitches work A.1 (i.e. work 2 repetitions of A.1 over every A.3 on sleeves and work 2 repetitions of A.1 on each side of A.2). When A.2 is done there are 202-211-274-277-337-376 treble crochets on last row. Piece measures approx. 5-5-8-8-12-15 cm. Now work A.4 over the middle 2 treble crochets in every repetition of A.2 2-3-2-3-2-2 times in total vertically, work the remaining stitches in A.1. I.e. over every A.2 work as follows: Work 2 repetitions of A.1 (= 6 treble crochets), A.4 (= 2 treble crochets) and 2 repetitions of A.1 (= 6 treble crochets). Every time A.4 is repeated work 16 repetitions more of A.1. When A.4 is done there are 250-283-322-349-385-424 treble crochets on last row. Piece measures approx. 12-15-15-18-19-22 cm. Now work A.5 over the middle 2 treble crochets in every repetition of A.4 1 time in total vertically, work the remaining stitches in A.1. I.e. over every A.4 work as follows: Work 1 repetition of A.1 (= 3 stitches), A.5 (= 2 stitches) and 1 repetition of A.1 (= 3 stitches). When A.5 is done there are 278-311-350-377-413-452 treble crochets on last row. Piece measures approx. 15-18-18-21-22-25 cm. Now work 1 treble crochet in first and last treble crochet and A.1 over the remaining stitches (= 92-103-116-125-137-150 repetitions of A.1) until piece measures 17-19-20-22-24-26 cm. Now work body and sleeves as follows: Work 1 treble crochet in first treble crochet, work pattern as before over the next 39-45-48-54-60-66 stitches (= 13-15-16-18-20-22 repetitions of A.1 = front piece), skip the next 57-66-75-81-84-90 treble crochets (= 19-22-25-27-28-30 repetitions of A.1 = sleeve), work 12 chain stitches under sleeve, work pattern as before over the next 84-87-102-105-123-138 stitches (= 28-29-34-35-41-46 repetitions of A.1 = back piece), skip the next 57-66-75-81-84-90 stitches (= 19-22-25-27-28-30 repetitions A.1 = sleeve), work 12 chain stitches under sleeve, work pattern as before over the next 39-45-48-54-60-66 stitches (= 13-15-16-18-20-22 repetitions of A.1 = front piece), finish with 1 treble crochet in last treble crochet. BODY: = 188-203-224-239-269-296 stitches. Work 1 treble crochet in first treble crochet, work A.1 as before until 1 treble crochet remains (= 62-67-74-79-89-98 repetitions), finish with 1 treble crochet in last treble crochet. When piece measures 1 cm from where body was divided from sleeves, decrease treble crochets evenly every time A.1 is repeated vertically, decrease on 3rd row in A.1 as follows: Decrease 6 treble crochets 3-3-3-2-2-2 times in total and 3 treble crochets 0-0-1-0-1-1 time in total = 170-185-203-227-254-281 stitches. Now repeat A.1 56-61-67-75-84-93 times in width. When piece measures 14 cm from where sleeve was divided from body, increase on every 3rd row in A.1 as follows: Increase 15 treble crochets evenly 0-0-1-1-0-0 times in total, increase 9 treble crochets evenly 3-3-3-2-4-3 times in total, increase 6 treble crochets evenly 1-1-0-1-0-1 time in total = 203-218-245-266-290-314 stitches. Work the increased stitches in A.1. Repeat A.1 67-72-81-88-96-104 times in total in width. Work A.1 until piece measures 34-34-35-35-35-35 cm from where body was divided from sleeves (51-53-55-57-59-61 cm from neck edge), finish after 1 row with treble crochets. Fasten off. SLEEVE: Sleeve is worked in the round, top down. Beg by working mid under sleeve as follows: Work 1 double crochet in the 7th chain stitch of the 12 chain stitches worked under sleeve on yoke, 3 chains (= 1st treble), work 1 treble crochet in each of the next 5 chain stitches, work A.1 as before over the 57-66-75-81-84-90 stitches, finish with 1 treble crochet in each of the last 6 chain stitches under sleeve = 69-78-87-93-96-102 stitches. Continue with A.1 in the round (= 23-26-29-31-32-34 times in width). When sleeve measures 1 cm, decrease treble crochets evenly every time A.1 is repeated vertically, decrease on 3rd round in A.1 as follows: Decrease 6 treble crochets 0-1-3-5-6-6 times in total and 3 treble crochets 5-6-4-2-0-0 times in total = 54-54-57-57-60-66 treble crochets. Repeat A.1 18-18-19-19-20-22 times in total in width. Work A.1 until piece measures 38-36-35-34-32-30 cm from where sleeve was divided from body. Adjust so that last round is 1 round with only treble crochets. Then work an edge around the sleeve as follows: Work 1 chain stitch, * 1 double crochet in first/next treble crochet, 4 chain stitches, skip approx. 1 cm *, work from *-* around the entire sleeve and finish with 1 slip stitch in first double crochet at beginning of round. Fasten off. Work the other sleeve the same way. BAND: Worked back and forth. Work from right side with light blue purple as follows: Work 1 slip stitch around first treble crochet, 1 double crochet around same stitch, * 2 chain stitches, 1 double crochet around next stitch *, repeat from *-* down the entire edge on jacket, finish with 1 double crochet in last treble crochet. Then work approx. 112 to 134 treble crochets around chain spaces evenly (make sure to avoid tightening or widening piece). Continue with 1 treble crochet in every treble crochet until band measures 3 cm (= approx. 4 rows). Fasten off. Work the other band the same way. NECK EDGE: Work back and forth over chain stitch row in neck with light blue purple as follows: ROW 1 (= from right side): Begin on band, fasten yarn to piece with 1 slip stitch in first band stitch, work 2 half treble crochets (first half treble crochet on row is replaced with 2 chain stitches) around every treble crochet row on bands, work 1 half treble crochet in the gap between every treble crochet on chain stitch row in neck = approx. 138-147-150-158-158-165 half treble crochets. ROW 2: Work 1 double crochet in every half treble crochet (first double crochet on row replaced with 1 chain stitch) = approx. 138-147-150-158-158-165 double crochets. Fasten off. ASSEMBLY: Sew the buttons on to left front piece as follows: Sew first button approx. 1½-2 cm down from neck edge, then fasten the remaining 6-6-6-7-7-7 buttons approx. 8-9 cm apart. Button through treble crochets on right band. |
||||||||||||||||
Diagram explanations |
||||||||||||||||
|
||||||||||||||||
 |
||||||||||||||||
 |
||||||||||||||||
Have you finished this pattern?Tag your pictures with #dropspattern #meetmeinprovencecardigan or submit them to the #dropsfan gallery. Do you need help with this pattern?You'll find 9 tutorial videos, a Comments/Questions area and more by visiting the pattern on garnstudio.com. © 1982-2026 DROPS Design A/S. We reserve all rights. This document, including all its sub-sections, has copyrights. Read more about what you can do with our patterns at the bottom of each pattern on our site. |
||||||||||||||||


With over 40 years in knitting and crochet design, DROPS Design offers one of the most extensive collections of free patterns on the internet - translated to 17 languages. As of today we count 324 catalogues and 12290 patterns translated into English (UK/cm).
We work hard to bring you the best knitting and crochet have to offer, inspiration and advice as well as great quality yarns at incredible prices! Would you like to use our patterns for other than personal use? You can read what you are allowed to do in the Copyright text at the bottom of all our patterns. Happy crafting!
Post a comment to pattern DROPS 186-32
We would love to hear what you have to say about this pattern!
If you want to leave a question, please make sure you select the correct category in the form below, to speed up the answering process. Required fields are marked *.