
Popular categories
Looking for a yarn?


Comments / Questions (22)
![]() Sabine wrote:
Sabine wrote:
Guten Tag, ich verstehe nicht wie ich am Halsausschnitt vorgehen soll. Was bedeutet ".... gegen die Mitte vorne .... in Richtung Halsausschnitt stricken" ? Welche 12/ 13 Maschen sind das? Und was ist gemeint mit "am vorderen Rand" ?
07.11.2023 - 20:10DROPS Design answered:
Liebe Sabine, diese Maschen sind die Maschen am Anfang einer Hinreihe beim rechten Schulter, Vorderteil/einer Rückreihe beim linken Schulter Vorderteil. Diese Maschen werden Krausrechts für die Halsblende gestrickt. Viel Spaß beim stricken!
08.11.2023 - 08:00
![]() Kerstin wrote:
Kerstin wrote:
Hej Kan man sticka den i bara Belle? Enkelt eller dubbelt garn isåfall?
28.05.2022 - 12:41DROPS Design answered:
Hei Kerstin. Denne genseren er skrevet med 2 ulike tykkelse av garn. DROPS Bomull-Lin er litt tykkere enn DROPS Belle, slik at strikkes den med bare 1 tråd DROPS Belle vil ikke den oppgitte strikkefastheten stemme. Om du bruker 2 tråder med DROPS Belle, vil det bli for tykt, sammelignet med DROPS Bomull-Lin. mvh DROPS Design
30.05.2022 - 09:14
![]() Mimosa wrote:
Mimosa wrote:
Grazie mille per la gentile risposta
30.04.2020 - 16:35
![]() Mimosa wrote:
Mimosa wrote:
Buongiorno. Nella versione in italiano, alle spiegazioni sul davanti, nel suggerimento per le diminuzioni, parla di 4 buchi. Cosa intende? Non ci sono buchi nella lavorazione. Grazie
30.04.2020 - 12:03DROPS Design answered:
Buongiorno Mimosa. Nel suggerimento per le diminuzioni, viene proposto un metodo che diminuisce le maglie ma al tempo stesso viene fatta 1 maglia gettata. Questa maglia gettata crea un buco prima / dopo le 4 maglie a punto legaccio vicino allo scollo. Se riesce ad ingrandire un po' la fotografia, dovrebbe vedere i buchi. Buon lavoro!
30.04.2020 - 15:47
![]() Pichon wrote:
Pichon wrote:
Un grand merci pour la réponse rapide a mon questionnement sur les diminutions après les 4 mailles Cordialement
03.04.2020 - 08:46
![]() Pichon wrote:
Pichon wrote:
Bonjour , je ne comprends pas très bien les diminutions des emmanchures , Pourriez vous me diriger pour les 4 mailles du bord .Par avance merci
02.04.2020 - 18:02DROPS Design answered:
Bonjour Mme Pichon, à 36-38 cm (cf taille), vous rabattez 4 mailles au début des 2 rangs suivants (= sur l'endroit + sur l'envers), au rang suivant sur l'endroit vous diminuez 1 m après les 4 premières mailles et avant les 4 dernières mailles (= 2 diminutions par rang); tricotez le rang suivant sur l'envers et répétez ces 2 rangs 9-13 fois en diminuant alternativement 1 fois sans jeté, 1 fois avec jeté (cf Diminutions). Bon tricot!
03.04.2020 - 07:32
![]() Uschi wrote:
Uschi wrote:
Hallo, ein wunderschönes Modell. Wäre es möglich, den Pullover komplett aus Bomull-Lin zu stricken, ohne Belle? Danke für die Hilfe
14.12.2019 - 14:12DROPS Design answered:
Liebe Uschi, am besten stricken Sie eine Maschenprobe mit nur Bomull-Lin und eine mit beiden Garne, so können Sie sich entscheiden, ob Ihnen etweder nur Bomull-Lin oder beide gefällt. Viel Spaß beim stricken!
16.12.2019 - 07:58
![]() Karin wrote:
Karin wrote:
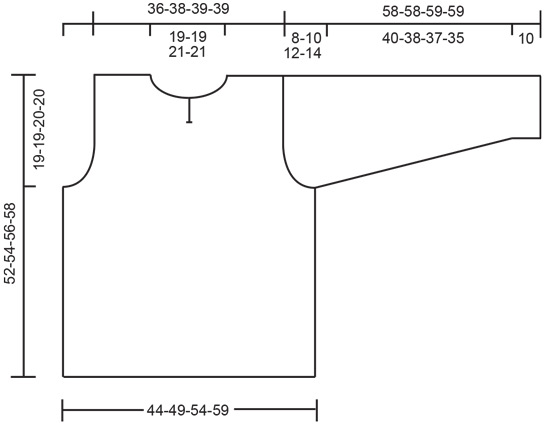
Ich bin jetzt beim Abnehmen der Maschen am Ärmel des Vorderteil. Habe auch schon auf jeder Seite 4 Maschen abgekettelt. Soll ich in den folgenden 13 Reihen jeweils am Reihenanfang 1 Masche zum weiteren Abnehmen zusammen stricken. Doch dann verläuft der Armausschnitt doch schräg und nicht gerade, wie in der Skizze. Erbitte Hilfe
02.08.2019 - 23:14DROPS Design answered:
Liebe Karin, die Anleitung wurde sprachlich umformuliert und ist nun deutlicher. Beachten Sie den Abnahmetipp, dort ist beschrieben, wie Sie die Abnahmen arbeiten - nämlich nach den ersten 4 bzw. vor den letzten 4 M. Abwechselnd arbeiten Sie Abnahmen mit und ohne Loch. Dadurch, dass Sie neben 4 M abnehmen, wird der Armausschnitt etwas gerader. Die Skizze ist im Übrigen eine Schemazeichnung und gibt nicht jede Schrägung exakt wieder. Gutes Gelingen weiterhin!
03.08.2019 - 09:46
![]() Karin wrote:
Karin wrote:
Ich möchte das Modell nur mit Belle stricken Xl. Welche Nadelstärke wird empfohlen? Mit 90 Maschen M1 Muster stricken und erst danach 7 Maschen gleichmäßig verteilt zunehmen? VORDERTEIL
29.07.2019 - 15:16DROPS Design answered:
Liebe Karin, wenn Sie nur Belle verwenden, wird das Maschenbild deutlich luftiger, weil Belle in eine andere Garngruppe gehört. Sie sollten sich daran orientieren, dass Sie die Maschenprobe einhalten und dementsprechend die Nadelstärke wählen. Beachten Sie auch, dass sich die Garnmenge ändert, Sie benötigen weniger Garn, weil Belle eine längere Lauflänge hat. Zur Umrechnung können Sie unseren Garnumrechner verwenden.
29.07.2019 - 15:53
![]() Gisela wrote:
Gisela wrote:
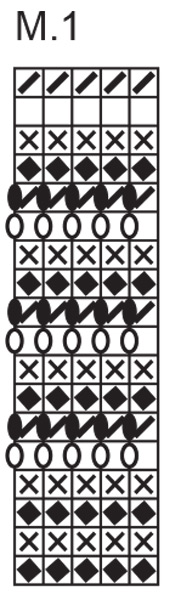
Hallo, nochmal eine Frage zu M.1: wie soll ich das lesen, sind die Zeichen nur die Hinreihen oder sind auch die Rückreihen dargestellt? Freundlichen Gruß aus Bourgas/BG
20.05.2019 - 17:56DROPS Design answered:
Liebe Gisela, das Diagram zeigt alle Reihen, die Hin- sowie die Rück-Reihen, von der Vorderseite gesehen. Hier lesen Sie mehr über Diagramme. Viel Spaß beim stricken!
21.05.2019 - 09:38
|
|||||||||||||||||||
Seasons in the Sand |
|||||||||||||||||||
|
|
|||||||||||||||||||
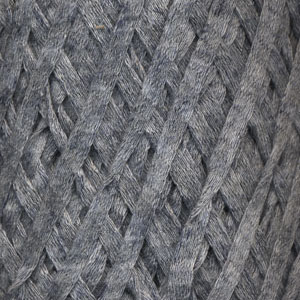
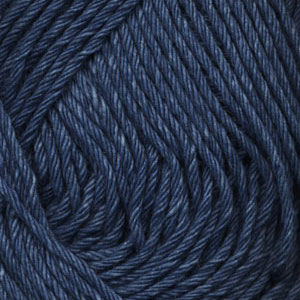
DROPS Sweater in "Ribbon" and "Den-M-nit" or "Bomull-Lin " and "Belle" with wood beads
DROPS 68-1 |
|||||||||||||||||||
|
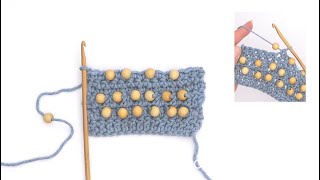
Knitting tip: The ribbon yarn may twist while working, therefore unwind it continually to make the result look as good as possible. Ridge (back and forth on needle): 1 ridge = 2 needles. 1st row: K, 2nd row: K. Pattern: See diagram - M.1. NOTE: The pattern in diagram is seen from RS. Decrease tip (applies to neck + armhole): All dec are made from RS inside 4 sts in stockinette sts at the armhole and in garter sts at the neck. There are 2 different dec, 1 with a hole and 1 without hole. 1st dec = dec with hole.Dec like this before 4 edge sts (7 sts remain on row): 1 YO, K 3 tog. Dec like this after 4 edge sts: Slip 1 st, K 2 tog, lift the slipped st over, 1 YO. 2nd dec = dec without hole: Dec like this before 4 edge sts: K 2 tog. Dec like this after 4 edge sts: Slip 1 st, K 1, lift the slipped st over. Repeat 1st and 2nd dec every other time upwards. Front piece: Read knitting tip! Cast on 66-74-82-90 sts (inkl 1 edge st in each side) on needle size 5,5 mm with Den-M-nit or Belle and work M.1. Continue with stockinette st and Ribbon or Bomull-Lin – At the same time on 2nd row inc 7 sts evenly distributed on row = 73-81-89-97 sts. Remember the tension! When piece measures 33-35-36-38 cm cast off 3-3-4-4 sts in each side for armhole. Then decrease for armhole in each side on every 2nd row - see decrease: 1 st in total 5-7-9-13 times (i.e. 3-4-5-7 holes along armhole). At the same time when piece measures 34-36-38-40 cm work 2 ridges over the 5 sts in the middle, then cast off the mid st for slit. Work each part separately. Continue with stockinette sts with 2 garter sts towards slit. When piece measures 43-45-47-49 cm work 2 ridges over 12-12-13-13 sts towards mid front, then cast off 8-8-9-9 sts towards mid front for neck. Then dec for neck on every 2nd row inside 4 garter sts - see decrease tip: 1 st in total 7 times (i.e. 4 holes along neckline) = 13-15-15-15 sts back on each shoulder. Cast off when piece measures 52-54-56-58 cm. Back piece: Cast on and work like front piece. Cast off for armhole as in front piece and continue until piece measures 49-51-53-55 cm. Work 2 ridges over 37-37-39-39 sts in mid back. Then cast off the mid 29-29-31-31 sts for neck. Then dec inside 4 garter sts: 1 st on next row towards neck = 13-15-15-15 sts back on each shoulder. Cast off when piece measures 52-54-56-58 cm. Sleeve: Cast on 38-38-40-40 sts (inkl 1 edge st in each side) on needle size 5,5 mm with Den-M-nit or Belle and work M.1. Continue with stockinette sts and Ribbon or Bomull-Lin. At the same time when piece measures 10 cm inc in each side: 1 st in total 9-9-10-10 times on every 4,5.-4.-3,5.-3,5 cm = 56-56-60-60 sts. When sleeve measures 50-48-47-45 cm cast off for sleeve cap in each side on every 2nd row: 3 sts 1-1-1-1 time, 2 sts in total 3-3-3-2 times, 1 st in total 1-3-5-8 times, then cast off 2 sts until work measures 58-58-59-59 cm. Cast off. Assembly: Sew shoulder seams. Sew the sleeves into the armhole. Sew sleeve and side seams in one inside 1 edge st. Beads: Thread 32-36-40-44 beads on a strand of Den-M-nit or Bomull-Lin. Work with hook size 3 mm around bottom edges of body as follows: * 3 dc (1 in every st), work next st as follows: Pull 1 bead toward hook, work 1 dc but let your thumb rest on the pearl so that the yarn goes past the thumb – this leaves the yarn that holds the bead approx. 2 cm long *, repeat from *-*. Cord for neck: Cut 1 strand of Den-M-nit or Bomull-Lin of aprrox. 50 cm long. Thread 3 beads onto center of strand, fold yarn double below the bottom bead and thread yarn back through the other two beads. Fasten this strand one side of neck split. Repeat on the other side. |
|||||||||||||||||||
Diagram explanations |
|||||||||||||||||||
|
|||||||||||||||||||
 |
|||||||||||||||||||
 |
|||||||||||||||||||
Have you finished this pattern?Tag your pictures with #dropspattern or submit them to the #dropsfan gallery. Do you need help with this pattern?You'll find 21 tutorial videos, a Comments/Questions area and more by visiting the pattern on garnstudio.com. © 1982-2026 DROPS Design A/S. We reserve all rights. This document, including all its sub-sections, has copyrights. Read more about what you can do with our patterns at the bottom of each pattern on our site. |
|||||||||||||||||||


With over 40 years in knitting and crochet design, DROPS Design offers one of the most extensive collections of free patterns on the internet - translated to 17 languages. As of today we count 324 catalogues and 12290 patterns translated into English (UK/cm).
We work hard to bring you the best knitting and crochet have to offer, inspiration and advice as well as great quality yarns at incredible prices! Would you like to use our patterns for other than personal use? You can read what you are allowed to do in the Copyright text at the bottom of all our patterns. Happy crafting!
Post a comment to pattern DROPS 68-1
We would love to hear what you have to say about this pattern!
If you want to leave a question, please make sure you select the correct category in the form below, to speed up the answering process. Required fields are marked *.