
Popular categories
Looking for a yarn?


Comments / Questions (61)
![]() Maria wrote:
Maria wrote:
Kui enne mustrit tuleb kududa pp silmused, kas siis muster A.1 rida kaks tuleb kududa samuti pp silmused? Skeemis on kirjeldus pr töö PP, ph töö PH.
18.05.2016 - 14:37DROPS Design answered:
Mustrit tuleb kududa nagu näidatud skeemil, st tagasiread kootakse ph silmuseid. Head kudumist!
24.05.2016 - 11:51Kathy wrote:
Regarding the hat: 1. Do the 2 edge sts in garter st continue through the stockinette? 2. I don't understand the decreasing. How do I K2tog after the last marker on the 2nd decreasing row when I only have 1 stitch left? How do I do the last decrease on the 3rd and following decreasing rows?
17.04.2016 - 09:13DROPS Design answered:
Dear Kathy, you can continue working the 2 edge sts in garter st to keep same edge, or work all sts in stocking st as you rather. When there are not enough sts to K2 tog all the row, K the last st. Happy knitting!
18.04.2016 - 10:43
![]() Lea Dralle wrote:
Lea Dralle wrote:
Hallo, ich hätte eine Frage zu der Mütze. In der Anleitung wird ja in Reihen gestrickt, kann man die auch in Runden stricken? Wenn ja, was muss ich dann beachten? Und dann hätte ich noch eine Frage zu den Abnahmen: Da steht ja "2 R glatt re. Nach jeder Markierung 2 M re zusammenstricken" Also wenn ich in Reihen stricke, heißt das dann eine Hin- und eine Rückreihe? Und die Abnahmen dann in beiden Reihen? Dankeschön 0=)
01.03.2016 - 13:31DROPS Design answered:
Liebe Lea, Sie können die Mütze auch in Runden stricken. Zu Ihrer Frage wegen den Abnahmen: die Reihen zwischen den Abnahmereihen sind in der Anleitung beschrieben.
01.03.2016 - 17:41
![]() Perle wrote:
Perle wrote:
Hallo, ich möchte gern den Schal in Runden stricken Sind zwischen den Musterreihen immer 2 Reihen rechte Machen ? Und die "Rückreihe" rechts ? Dann würde der MS A. 2 aus insgesamt 16 Reihen bestehen. Habe ich das so richtig verstanden? Vielen Dank
21.02.2016 - 16:35DROPS Design answered:
Lesen Sie doch einmal den Kommentar vom 25.11. samt Antwort. Zwischen den gemusterten Rd ist immer 1 Rd glatt re, nicht 2 Rd. A.2 zeigt ja ALLE R, also auch alle Rd, besteht also aus 8 Rd.
24.02.2016 - 20:08
![]() Marlies Gösse wrote:
Marlies Gösse wrote:
Hallo, ich komme mit der Anletung nicht ganz klar. Nach 4 Mustersätzen sollen die Abnahmen markiert werden. Warum hier, wenn doch noch ein paar cm weitergestrickt werden soll? Und heißt das, dass einfach gleichmäßig die Abnehmpunkte eingeteilt werden sollen? Nach einem ganzen oder halben Rapport das Muster beenden, egal wo in der Reihe? Vieln Dank für Ihre Hilfe. LG Marlies
07.02.2016 - 12:22DROPS Design answered:
Die Markierer werden bereits hier angebracht, da damit deutlicher zu beschreiben ist, nach welcher Masche die Markierungen anzubringen sind, Sie stricken ja das Muster bis zu einer bestimmten Höhe. Sie beenden es nach dem halben Rapport oder dem ganzen Rapport in der Höhe, d.h. nach der 4. R von A.2 oder der 8. R von A.2. Sie können die Markierer auch dann anbringen, wenn Sie die 7. R von A.2 das letzte Mal stricken, wichtig ist, dass Sie die Markierer an der M anbringen, die durch die 3 zusgestrickten Maschen auf der Nadel ist. Die Abnahmen erfolgen dann jeweils immer nach dieser markierten Masche.
07.02.2016 - 13:07Zee wrote:
Salut, j'ai commencé le bonnet et tout va très bien, mais j'ai pas compris comment mettre les marqueurs je suis arrivé à presque 15 cm de haut de l'ouvrage et pas de marqueurs, qu'est ce que je fais? Dois-je tout recommencer et s'il vous plait veuillez m'expliquer comment les mettre en détail s'il vous-plaît Merci d'avance
14.01.2016 - 23:28DROPS Design answered:
Bonjour Zee, les marqueurs servent aux diminutions, placez un marqueur dans chaque m qui reste après la diminution sur un rang 5 ou 7 des diagrammes, et commencez à diminuer à 19-20 cm (cf taille). Bon tricot!
15.01.2016 - 09:16PATRICIA SMITH wrote:
Do you have a picture of the back of the hat?
01.12.2015 - 04:09DROPS Design answered:
Dear Mrs Smith, there is no picture showing the back of hat, you only work stocking st while dec. Happy knitting!
01.12.2015 - 08:51
![]() Christiane wrote:
Christiane wrote:
Könnten Sie bitte erläutern, was ich anpassen bzw. beachten muss, wenn ich den Schal in Runden stricken möchte? Vielen Dank.
25.11.2015 - 22:07DROPS Design answered:
Wenn Sie in Runden stricken möchten, können Sie 132 M anschlagen und alle M nur im Muster A.2 stricken (= 22 Rapporte von A.2 in der Runde). Die Randmaschen und die "Randmuster" A.1 und A.3 entfallen dann.
29.11.2015 - 22:18
![]() PATRICIA SMITH wrote:
PATRICIA SMITH wrote:
I have many questions to get started in the pattern portion after the banding, once started I'll be fine. I've never worked one of patterns and fine it difficult to follow my first time.
24.11.2015 - 14:11
![]() Madeleine Beaumier wrote:
Madeleine Beaumier wrote:
Il semble y avoir un problème dans les diminutions. On a un marqueur à la fin qui ne donne pas assez de mailles pour les autres diminutions. Vous dites de tricoter 2 mailles ensemble après le marqueur mais à la fin, le marqueur est trop proche des dernières mailles et ne me donne pas suffisament de mailles pour faire les diminutions.
24.11.2015 - 07:16DROPS Design answered:
Cf réponse ci-dessous. Bon tricot!
24.11.2015 - 09:26
|
||||||||||||||||
Autumn Mist#autumnmistset |
||||||||||||||||
|
|
||||||||||||||||
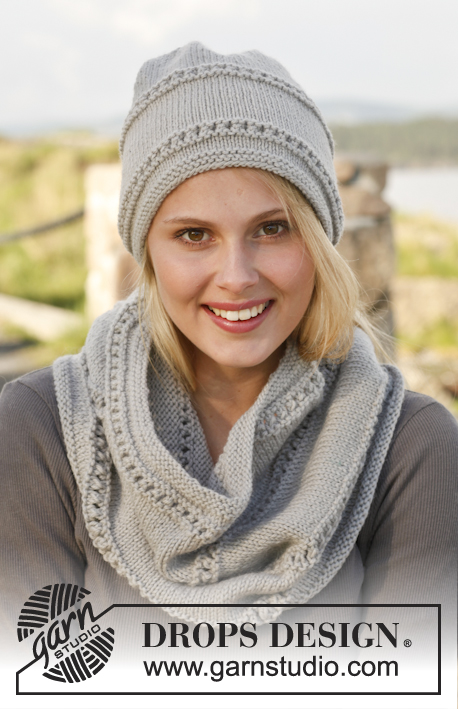
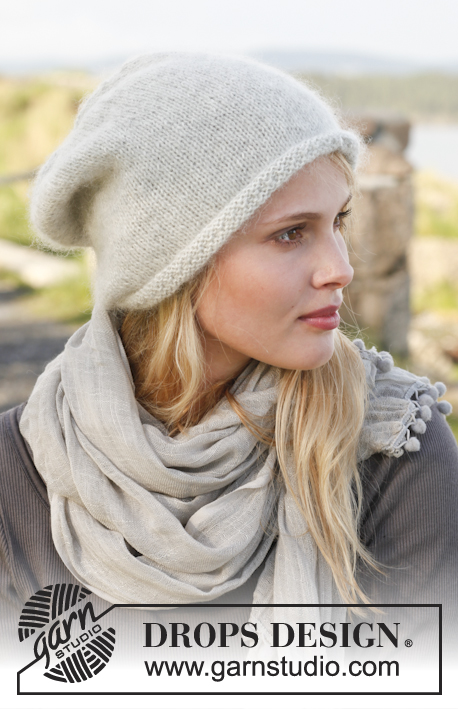
Knitted DROPS neck warmer and hat with lace pattern in ”Lima”.
DROPS 150-42 |
||||||||||||||||
|
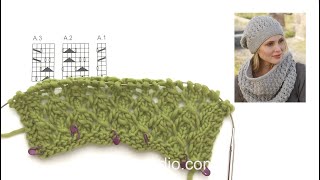
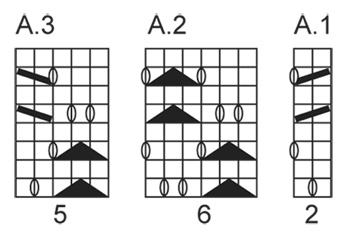
GARTER ST (back and forth on needle): K all rows. 1 ridge = 2 rows K. PATTERN: See diagrams A.1, A.2 and A.3, diagrams show all rows in pattern seen from RS. ---------------------------------------------------------- HAT: Worked back and forth on needle. Cast on 95-101 sts on needle size 4 mm with Lima. Work RIDGES in garter st – see explanation above – until piece measures 5-6 cm. On next row from RS switch to needle size 5 mm and work as follows: 2 edge sts in garter st (worked in garter st until finished measurements), PATTERN A.1 (= 2 sts) – see explanation above – A.2 (= 6 sts) until 7 sts remain (= 14-15 repetitions in width), A.3 (= 5 sts), finish with 2 edge sts in garter st (worked in garter st until finished measurements). Work 4 repetitions with pattern vertically AT THE SAME TIME insert a marker in the one st that remains after every dec on next to last row in pattern = 16-17 markers. Continue pattern until piece measures 19-20 cm. Adjust to finish after one whole or half repetition of A.2. Now continue piece in stocking st as follows: * Work 2 rows in stocking st. Then dec by K 2 tog after every marker = 16-17 sts dec. Work 3 rows in stocking st. Then dec by K 2 tog after every marker = 16-17 sts dec, K 1 row *, repeat from *-* 1 more time (= 2 times in total). Then work 2 rows in stocking st, on next row dec after every marker by K 2 tog = 16-17 sts dec = 15-16 sts remain on needle. Cut the yarn and pull it through the remaining sts. Tighten tog and fasten. ASSEMBLY: Sew side tog in front loop of outermost st. NECK WARMER: Worked back and forth on circular needle. Cast on 131 sts on circular needle size 5 mm with Lima. Work 2 RIDGES in garter st - see explanation above. On next row from RS work 2 edge sts in garter st, PATTERN A.1 (= 2 sts) - see explanation above - diagram A.2 (= 6 sts) until 7 sts remain (= A.2 has been worked 20 times in total), diagram A.3 (= 5 sts), 2 edge sts in garter st. When piece measures approx. 40 cm (and 12 repetitions have been worked vertically), work 2 ridges in garter st. Piece measures approx. 42 cm. Loosely cast off. ASSEMBLY: Sew neck warmer tog in front loop of edge sts. Cut and fasten the yarn. |
||||||||||||||||
Diagram explanations |
||||||||||||||||
|
||||||||||||||||
 |
||||||||||||||||
Have you finished this pattern?Tag your pictures with #dropspattern #autumnmistset or submit them to the #dropsfan gallery. Do you need help with this pattern?You'll find 16 tutorial videos, a Comments/Questions area and more by visiting the pattern on garnstudio.com. © 1982-2026 DROPS Design A/S. We reserve all rights. This document, including all its sub-sections, has copyrights. Read more about what you can do with our patterns at the bottom of each pattern on our site. |
||||||||||||||||


With over 40 years in knitting and crochet design, DROPS Design offers one of the most extensive collections of free patterns on the internet - translated to 17 languages. As of today we count 325 catalogues and 12298 patterns translated into English (UK/cm).
We work hard to bring you the best knitting and crochet have to offer, inspiration and advice as well as great quality yarns at incredible prices! Would you like to use our patterns for other than personal use? You can read what you are allowed to do in the Copyright text at the bottom of all our patterns. Happy crafting!
Post a comment to pattern DROPS 150-42
We would love to hear what you have to say about this pattern!
If you want to leave a question, please make sure you select the correct category in the form below, to speed up the answering process. Required fields are marked *.