
Popular categories
Looking for a yarn?


Comments / Questions (22)
![]() Kirsten wrote:
Kirsten wrote:
Jeg har ikke helt forstået hvor de nr som står i strikke tips1 samt nr 2 ikke stå rigtigt da de er helt forkert de skulle nok ændres da mange ikke er klar over hvad der menes
06.06.2016 - 18:28DROPS Design answered:
Hej Kirsten. De henviser til diagrammerne nederst i mönstret. Laes ogsaa i opskriften og kig nederst paa mönstret.
07.06.2016 - 18:00
![]() Kathi wrote:
Kathi wrote:
Ich komme nicht weiter. Habe jetzt 1x A1 gestrickt und 67M auf der Nadel. Ich wollte jetzt mit A2-4 weiter machen, aber ich verstehe den Satz nicht: Wenn A1 1x in der Höhe gestrickt wurde... und das Muster geht in einem zusätzlichen Mustersatz auf. Was bedeutet das? Irgendwie müssen die Diagramme doch mehrfach gestrickt werden, ansonsten wird das Tuch doch zu klein?
03.04.2016 - 19:18DROPS Design answered:
Liebe Kathi, über A.1 stricken Sie dann A.2/A.3/A.4. In A.2 und A.4 sind auch Aufnahmen integriert, so wächst das Tuch weiterhin. Beachten Sie auch den Satz im Stricktipp: " A.3, A.6 und A.9 zeigen 1 Mustersatz, der so oft wie möglich nach A.2, A.5 oder A.8 wiederholt wird, bevor noch genug M für A.4, A.7 oder A.10 übrig sind."
04.04.2016 - 10:15
![]() Lene wrote:
Lene wrote:
Jeg kan ikke gennemskue hvordan jeg skal fortsætte , når jeg har strikket A2,A3 og A4 1 gang og jeg skal høre brug af strikketipsene. Håber I kan forklare det på en anden måde,så jeg kan komme videre. På forhånd tak
22.09.2015 - 17:50DROPS Design answered:
Hej lene, Jo du starter med A.5 i kanten, gentager A.6 til du har det antal masker tilbage du skal bruge til A.7. Således strikker du på hver side af midtermasken. God fornøjelse!
23.09.2015 - 15:36
![]() Marjo wrote:
Marjo wrote:
Tijdens het breien moet ik de lengte van het breiwerk meten,het is dus de bedoeling dat ik dat doe terwijl het werk nog niet is opgespannen. Aan de naald is het werk een stuk korter dan platliggend. Hoe meet ik dan voor de juiste lengte??
05.01.2015 - 14:51DROPS Design answered:
Hoi Marjo. Ja, je meet tijdens het breien. Leg het werk plat en rek een beetje voor het meten. Je kan het werk ook ophouden en meten.
06.01.2015 - 16:44
![]() Antje Schupp wrote:
Antje Schupp wrote:
Ist das hübsch!
10.09.2014 - 19:10
![]() Marja Nordin wrote:
Marja Nordin wrote:
Hej! Nånting stämmer inte med rapport A10, antalet maskor blir för få vartannat varv. Mönstret stämmer i övrigt fram till sista hoptagning före mittenmaskan och andra änden, men sedan fattas det en maska på båda ställen, har gått genom hela varvet, inga andra fel. Fattas det en ökning i beskrivningen?
10.06.2014 - 19:04DROPS Design answered:
Hej Marja. Diagrammet er korrekt. Du skal strikke det som fölger: A.8 har 1 ökning per gentagelse (du strikker 2e omslag med i A.8, i A.9 forbliver maskeantallet konstant (2 m strikkes vaek + 2 omslag) og i A.10 strikker du som A.8 kun 2 omslag og strikker 1 sammen (= +1 maske).
11.06.2014 - 17:03
![]() Virginie wrote:
Virginie wrote:
Après la maille centrale, dans quel sens faut-il répéter les diagrammes, de droite à gauche ou en miroir de gauche à droite ?
13.04.2014 - 16:45DROPS Design answered:
Bonjour Virginie, après la m centrale, recommencez les diagrammes comme pour avant la m centrale: de droite à gauche sur l'end et de gauche à droite sur l'env. Bon tricot!
14.04.2014 - 09:16
![]() Albane wrote:
Albane wrote:
J'ai remplace les nopes de 7 mailles sur deux rangs par 5 mailles sur 5 rangs et le rendu est tres beau.
20.03.2014 - 11:52
![]() Mayaarifi wrote:
Mayaarifi wrote:
Donner moi le diagramme du point s il vous plait pour faire un essaie merci
02.01.2013 - 15:34Tejersiempre wrote:
Lo realize segun el patron pero no me quedo el borde que muestra la foto del modelo
27.08.2012 - 03:11
|
|||||||||||||||||||
Winter Breeze#winterbreezeshawl |
|||||||||||||||||||
|
|
|||||||||||||||||||
Knitted DROPS shawl in "Lace".
DROPS 141-39 |
|||||||||||||||||||
|
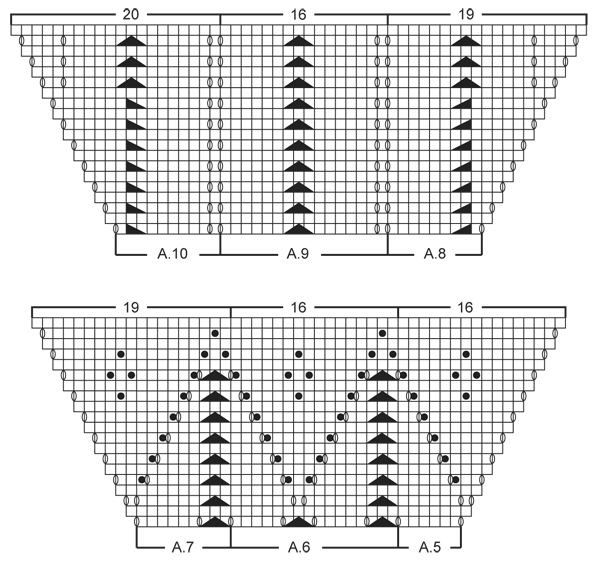
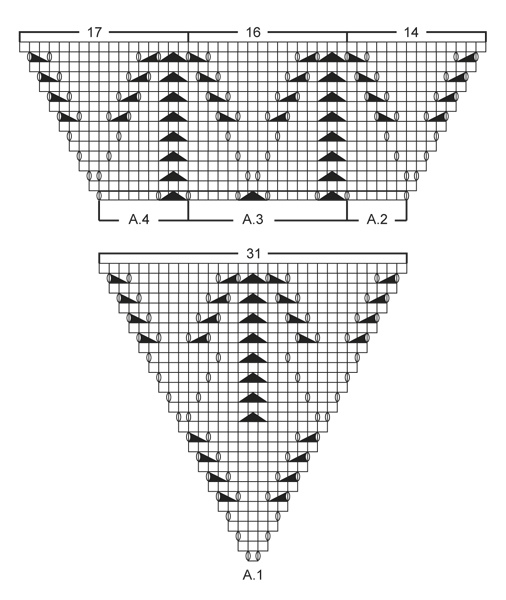
PATTERN: See diagrams A.1 to A.10. Diagrams show all rows in pattern seen from RS. Repeat diagrams after mid st. KNITTING TIP 1: A.2, A.5 and A.8 in diagram always show the sts the way they are worked directly after edge st at beg of row or directly after mid st (seen from RS). A.3, A.6 and A.9 show 1 repetition that is repeated as many times as possible after A.2, A.5 or A.8 before enough sts remain for A.4, A.7 or A.10. A.4, A.7 and A.10 always show the sts the way they are worked directly before mid st or directly before edge st at end of row (seen from RS). KNITTING TIP 2: A.3, A.6 and A.9 show 1 repetition in breadth – make sure to make the same no of YOs as sts dec in one repetition so that no of sts in every repetition is constant. The same applies to the other diagrams but here inc 1 st in one side so that the repetition inc with 1 st every other row. BOBBLE: The bobble is worked over 2 rows. ROW 1 (= RS): Work 7 sts in 1 st as follows: * K 1, 1 YO *, repeat from *-* a total of 3 times and finish with K 1 = 7 sts. It is important to work the sts loosely (approx. 1 cm long). ROW 2 (= WS): P these 7 sts tog. It will be difficult to work the sts from 1st row tog if they are too short and too tight. --------------------------------------------------------- SHAWL: The piece is worked back and forth on circular needle because of no of sts. The piece is worked top down. Cast on 7 sts on circular needle size 3.5 mm with Lace and work as follows: ROW 1 (= RS): K 2, work 1st row in A.1, K 1 (= mid st), 1st row in A.1 and K 2. ROW 2 (= WS): K 2, P 7 (= 3 sts from 2nd row in A.1, mid st and 3 sts from 2nd row in A.1) and K 2. ROW 3 (= RS): K 2, work 3rd row in A.1, K 1 (= mid st), 3rd row in A.1 and K 2. ROW 4 (= WS): K 2, P 11 (= 5 sts from 4th row in A.1, mid st and 5 sts from 4th row in A.1) and K 2. Continue like this with lace pattern according to diagram. I.e. work every row from RS as follows: K 2 edge sts, lace pattern according to diagram A.1 (with inc), K 1 (= mid st), lace pattern according to diagram A.1 (with inc) and K 2 edge sts. Work every row from WS as follows: K 2 edge sts, P until 2 sts remain and finish with K 2 edge sts. When A.1 has been worked 1 time vertically, a total of 60 sts have been inc (= 67 sts on row) and pattern fits one extra repetition – this will happen automatically when working according to diagram. When A.1 has been worked 1 time vertically, continue lace pattern as follows - Read KNITTING TIP 1 and 2: 1ST ROW (= RS), K 2, work A.2, A.3 and then A.4, K 1 (= mid st), work A.2, A.3 and then A.4 and finish with K 2. ROW 2 (= WS): K 2, P until 2 sts remain and finish with K 2. Continue the pattern like this according to diagram A.2 – A.4 until piece measures approx. 50 cm in the middle of mid st – adjust after one whole repetition vertically (i.e. after one whole leaf). Now work lace pattern according to diagram A.5, A.6 and A.7 the same way until 1 repetition has been worked vertically, then work lace pattern according to diagram A.8, A.9 and A.10 the same way until 1 repetition has been worked vertically. Then loosely cast off as follows – NOTE: It is very important to cast off very LOOSELY otherwise the edge cannot be shaped into tips: * Cast off 2 sts (pull sts somewhat when working them and cast off so that they are loose), make 1 loose YO on right needle, cast off YO *, repeat from *-* the entire row. BLOCKING: Place the shawl in lukewarm water until it is soaking wet. Carefully squeeze the water out of the shawl - do not twist the shawl - then roll the shawl in a towel and squeeze to remove more water - the shawl will now only be moist. Place the shawl on a carpet or mattress - carefully stretch it out to size and fasten it with pins. NOTE: Along the shawl's 2 diagonal sides insert 1 pin in every repetition in sts between 2 YOs and 1 pin in mid st (= at the bottom tip on shawl), lightly pull at every pin so that the edge is shaped with small tips. Leave to dry. Repeat the process when the shawl has been washed. |
|||||||||||||||||||
Diagram explanations |
|||||||||||||||||||
|
|||||||||||||||||||
 |
|||||||||||||||||||
 |
|||||||||||||||||||
Have you finished this pattern?Tag your pictures with #dropspattern #winterbreezeshawl or submit them to the #dropsfan gallery. Do you need help with this pattern?You'll find 6 tutorial videos, a Comments/Questions area and more by visiting the pattern on garnstudio.com. © 1982-2026 DROPS Design A/S. We reserve all rights. This document, including all its sub-sections, has copyrights. Read more about what you can do with our patterns at the bottom of each pattern on our site. |
|||||||||||||||||||


With over 40 years in knitting and crochet design, DROPS Design offers one of the most extensive collections of free patterns on the internet - translated to 17 languages. As of today we count 324 catalogues and 12290 patterns translated into English (UK/cm).
We work hard to bring you the best knitting and crochet have to offer, inspiration and advice as well as great quality yarns at incredible prices! Would you like to use our patterns for other than personal use? You can read what you are allowed to do in the Copyright text at the bottom of all our patterns. Happy crafting!
Post a comment to pattern DROPS 141-39
We would love to hear what you have to say about this pattern!
If you want to leave a question, please make sure you select the correct category in the form below, to speed up the answering process. Required fields are marked *.