
Popular categories
Looking for a yarn?


Comments / Questions (69)
![]() Caro wrote:
Caro wrote:
çà c'est sur je le porterai cet hiver...
16.06.2012 - 14:42Joelle wrote:
Magnifique!!!
14.06.2012 - 16:53
![]() Monica wrote:
Monica wrote:
Oj,vad snyggt. Jag gillar alla era modeller
11.06.2012 - 19:40
![]() Maie Tint wrote:
Maie Tint wrote:
Huvitav!
10.06.2012 - 20:32
![]() Agnes wrote:
Agnes wrote:
Vackert set i ett underbart garn, detta vill jag sticka!
09.06.2012 - 09:23
![]() Cajito wrote:
Cajito wrote:
Nádherná souprava
08.06.2012 - 17:30
![]() Nadine wrote:
Nadine wrote:
Je vote oui, oui et re-oui pour ce superbe ensemble
06.06.2012 - 18:14
![]() Michelle wrote:
Michelle wrote:
Timeless...All-around perfect set, in every way.
04.06.2012 - 09:17
![]() Jodi wrote:
Jodi wrote:
Love it!
03.06.2012 - 13:40
![]() ÜLLE KANEP wrote:
ÜLLE KANEP wrote:
Ilus,hoopis erinev tavalisest
02.06.2012 - 23:45
|
|||||||||||||||||||
Emily#emilyset |
|||||||||||||||||||
 |
 |
||||||||||||||||||
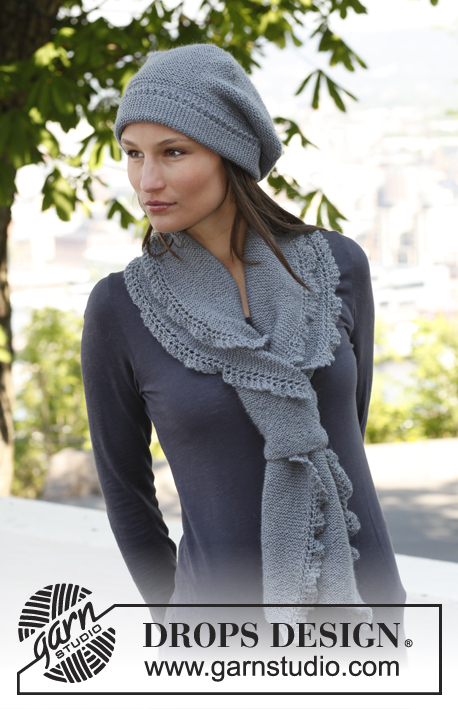
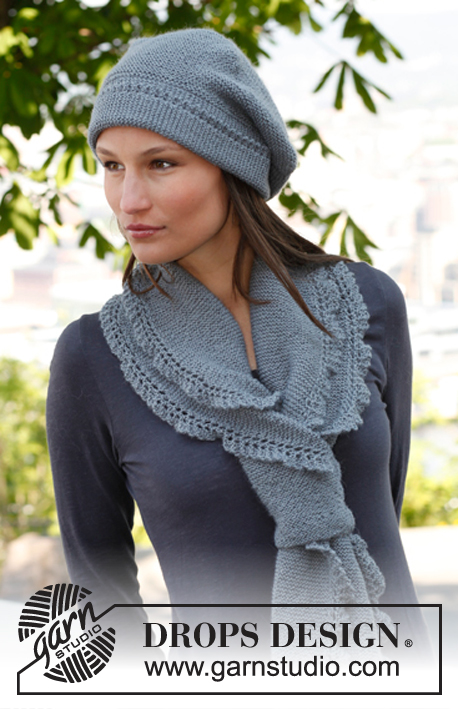
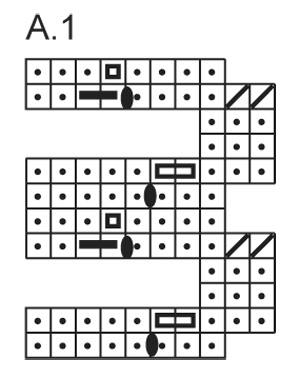
Knitted DROPS beret and scarf in garter st with lace edges in ”BabyAlpaca Silk”.
DROPS 140-38 |
|||||||||||||||||||
|
GARTER ST (back and forth on needle): K all rows. 1 ridge = 2 rows K. GARTER ST WITH PICOT EDGE (back and forth on needle). ROW 1: K all sts. ROW 2: K all sts. ROW 3: K until 4 sts remain, work these sts as follows: K 2 tog, 1 YO, work 2 sts in the last 2 sts = 2 new sts on the row. ROW 4: Slip 1st st as if to K, K 1, psso, K 1 and slip the last st on right needle over the foremost st, now 2 sts are dec - then K the remaining sts. Repeat rows 1 to 4. PATTERN: See diagram A.1. Diagram shows all rows in pattern from RS. No of sts in A.1 will vary from 8 to 10 depending on where you are in the diagram. On 3rd and 4th row in diagram work short rows as follows: K 3, turn piece, tighten thread and work rest of row. Do the same on 9th and 10th row in diagram. ---------------------------------------------------------- HAT: Worked back and forth on needle. Beg with a folding edge at the bottom of hat. Then knit up new sts along one long side on edge and work the hat before sewing it tog mid back. Cast on 30-30 sts on needles size 2.5 mm with BabyAlpaca Silk. Work GARTER ST WITH PICOT EDGE - see explanation above. When 122-132 ridges have been worked (piece measures approx. 47-51 cm), cast off. Knit up 1 st at the edge in every ridge along the side without picot edge = 122-132 sts (incl 1 edge st in each side). Insert 5 markers in the piece as follows: Insert first after 1 st, insert the next 4 24-26 sts apart, after last marker there are 25-27 sts. Then work in GARTER ST back and forth on needle AT THE SAME TIME inc 1 st on the left side of all markers as follows: Inc every other row (i.e. on every row from RS) a total of 4 times and then every 4th row a total of 7 times = 177-187 sts – NOTE: Inc 1 st by making 1 YO, on next row K YO twisted to avoid holes. When piece measures 9-10 cm from where sts were knitted up, dec 1 st on the left side of all markers as follows: Dec every other row (i.e. on every row from RS) a total of 31-33 times = 22-22 sts remain on needle – NOTE: Dec 1 st by K 2 tog. On next row K all sts tog 2 by 2. Cut the thread and pull it through the remaining sts and tighten tog. Sew the hat tog mid back inside 1 edge st. Fold the edge at the bottom of hat. SCARF: Loosely cast on 48 sts on needle size 3 mm with BabyAlpaca Silk. Work in GARTER ST - see explanation above. When piece measures 9 cm, cast on 8 new sts at end of the next 2 rows = 64 sts. Insert 1 marker on the inside of the 8 new sts in each side (= 48 sts between markers). Then work in garter st with pattern according to diagram A.1 over the outermost sts in each side as follows: Work 1st row in A.1 (= 8 sts – see explanation above), K the rest of row and turn piece. On next row beg with 1st row in A.1 over the first 8 sts, K until next marker and work 2nd row in A.1. Continue the pattern like this - NOTE: Read explanation on PATTERN above. When piece measures approx. 110 cm (measure when flat) - finish after 1 whole repetition vertically - P 1 row over all sts before loosely casting off. ASSEMBLY: Place scarf double alongside and sew bottom section on scarf (the 9 cm long section in garter st without lace edge in each side) tog along the side – sew edge to edge in front loop of outermost st to avoid a chunky seam. When wearing the scarf, insert opposite end of scarf down through opening that was made and pull end of scarf through opening. |
|||||||||||||||||||
Diagram explanations |
|||||||||||||||||||
|
|||||||||||||||||||
 |
|||||||||||||||||||
Have you finished this pattern?Tag your pictures with #dropspattern #emilyset or submit them to the #dropsfan gallery. Do you need help with this pattern?You'll find 13 tutorial videos, a Comments/Questions area and more by visiting the pattern on garnstudio.com. © 1982-2026 DROPS Design A/S. We reserve all rights. This document, including all its sub-sections, has copyrights. Read more about what you can do with our patterns at the bottom of each pattern on our site. |
|||||||||||||||||||


With over 40 years in knitting and crochet design, DROPS Design offers one of the most extensive collections of free patterns on the internet - translated to 17 languages. As of today we count 324 catalogues and 12290 patterns translated into English (UK/cm).
We work hard to bring you the best knitting and crochet have to offer, inspiration and advice as well as great quality yarns at incredible prices! Would you like to use our patterns for other than personal use? You can read what you are allowed to do in the Copyright text at the bottom of all our patterns. Happy crafting!
Post a comment to pattern DROPS 140-38
We would love to hear what you have to say about this pattern!
If you want to leave a question, please make sure you select the correct category in the form below, to speed up the answering process. Required fields are marked *.