
Popular categories
Looking for a yarn?


Comments / Questions (69)
![]() Gitte wrote:
Gitte wrote:
Sorry. Fejl på 5. pind, ikke 6.
31.01.2026 - 20:52
![]() Gitte wrote:
Gitte wrote:
Tak for svar (længere nede). Men nu viser mønstret jo ikke de masker, der er på pinden, men hvilke man skal strikke. 6. pind viser en retmaske, som man ikke skal strikke efter de to indtagninger. Der er jo altid en løkke på pinden, så det er ikke første retmaske, så jeg fastholder, at der er fejl i diagrammet på 6. pind. Der bør kun være 3 retmasker efter de to indtagninger. Men jeg takker for det gratis mønster på det smukke tørklæde. Vil dog håbe, I retter det til.
31.01.2026 - 20:49
![]() Gitte wrote:
Gitte wrote:
Der er en fejl i mønstret. I femte pind efter de to indtagninger, skal der kun strikkes 3 ret, ikke 4, så går det op. Jeg tror, I har glemt at tænke på, at der er en maske på pinden efter de to indtagninger og på den måde passer det med antallet af masker i mønstret på sjette pind.
24.01.2026 - 12:29
![]() Gitte wrote:
Gitte wrote:
Jeg håber det lykkes mig at strikke dette tørklæde, jeg er igang, lige startet på mønstret. Har nu valgt at starte på en prøve med mønstret om og om igen og hver gang jeg kommer til pind 6, er jeg ikke over det, jeg skulle være over på pinden før. Håber I kan hjælpe mig
22.01.2026 - 07:34DROPS Design answered:
Hei Gitte. Når du strikker 5. pinne og feller 2 masker, husk at masken som da er på høyre pinne er 1. rettmaske i diagrammet, og så strikker du 3 rettmasker til før dobbeltkastet. Eller har du strikket 4 rettmasker etter de 2 felt maskene, slik at du har 5 masker på pinnen når du skal gjøre dobbeltkastet? For da blir det feil på 6. pinne. Lykke til med tørklæde. mvh DROPS Design
30.01.2026 - 11:51
![]() Bernadette wrote:
Bernadette wrote:
Sehr schöner Schal
11.11.2025 - 17:51
![]() Anja wrote:
Anja wrote:
Ik snap het breipatroon qua steken en omslagen, maar niet wanneer ik aan welke kant wat moet doen. Het leek me logisch om de 1e toer tegelijk aan beide kanten uit te voeren, maar bij de uitleg lees ik iets anders. Maar dan kom je na de 2e toer in de knel. Dus: 1e toer telpatroon, rest van de naald recht. Keren, 1e toer telpatroon , recht tot aan de markeerder, 2e toer telpatroon. Keren, en dan hele toer recht of gelijk 3e en 4e toer? Dan klopt de rest toch niet meer?
05.10.2025 - 14:40DROPS Design answered:
Dag Anja,
Als je de steken aan beide kanten hebt opgezet begin je met A.1 over alleen de 8 steken aan beide kanten, de rest blijf je in tricotsteek breien. Je begint aan de kant waar je bent met de eerste naald in A.1 over de eerste 8 steken. Dan brei je de naald helemaal uit, je keert het werk en begin je aan de andere kant met de eerste naald van A.1. Aan het eind van deze tweede naald ben je weer bij de 8 steken waarvan je de eerste naald al hebt gebreid, hier brei je nu de tweede naald van A.1. Het ene uiteinde loopt dus altijd 1 naald voor op het andere uiteinde.
22.10.2025 - 20:02
![]() Gisèle DAVID wrote:
Gisèle DAVID wrote:
Bonjour, Par quelle qualité peut on remplacer le fil BabyAlpaca Silk car il semblerait qu'il soit supprimé? Merci
26.12.2022 - 17:10DROPS Design answered:
Bonjour Mme David, vous pouvez le remplacer par une autre laine du groupe de fils A - utilisez notre convertisseur pour voir les alternatives et les nouvelles quantités correspondantes. Bon tricot!
02.01.2023 - 09:24
![]() Rokky wrote:
Rokky wrote:
Sorry in the scarf pattern how many cast off is it one or two //
11.06.2020 - 16:14DROPS Design answered:
Dear Rokky, you cast off 2 sts at the beg of row 5 and 11. Happy knitting!
12.06.2020 - 07:21
![]() Lelletta wrote:
Lelletta wrote:
Buonasera! Non riesco a capire come lavorare il ferro n. 4, nel punto in cui dite di "accavallare l’ultima m. sul f. destro sulla prima m" . Devo accavallare sulla maglia appena lavorata? Cioè quella appena lavorata a diritto? ? Spero abbiate capito il mio problema! Grazie mille!
04.01.2020 - 15:19DROPS Design answered:
Buongiorno Lelletta, deve accavallare l'ultima maglia sulla prima maglia lavorata. Buon lavoro!
05.01.2020 - 14:39
![]() Susanne Wenngren wrote:
Susanne Wenngren wrote:
I vanliga fall brukar man ju sticka enbart efter diagram, så jag förstår inte de 4 varven man ska upprepa, vilka varv är det o när ska man sticka efter diagrammet. Vill gärna ha svar för vill väldigt gärna göra denna sjal för den är jättesnygg. Med vänlig hälsning Susanne
17.09.2019 - 11:53DROPS Design answered:
Hej Susanne, A.1 stickas ytterst på varje varv. På varv 3 och 4 stickar du bara de 3 maskor fram och tillbaka, varv 5-8 stickar du hela varvet (men yttersta m enligt diagrammet), sedan var 9 och 10 igen bara över de 3 maskor i kanten. Se mer förklaring under MÖNSTER. Lycka till !
17.09.2019 - 15:37
|
|||||||||||||||||||
Emily#emilyset |
|||||||||||||||||||
 |
 |
||||||||||||||||||
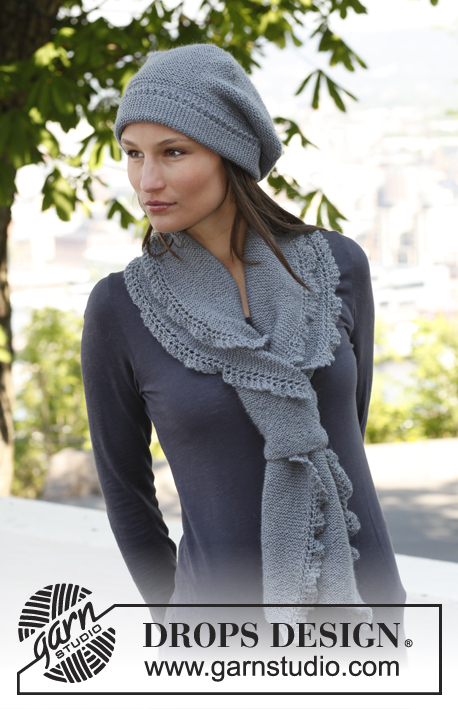
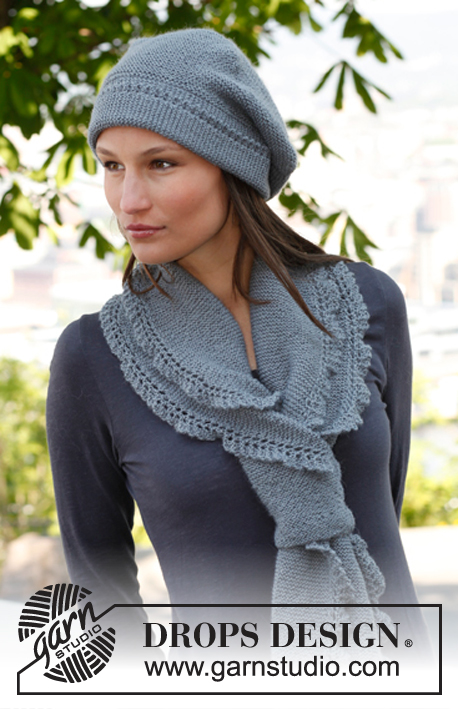
Knitted DROPS beret and scarf in garter st with lace edges in ”BabyAlpaca Silk”.
DROPS 140-38 |
|||||||||||||||||||
|
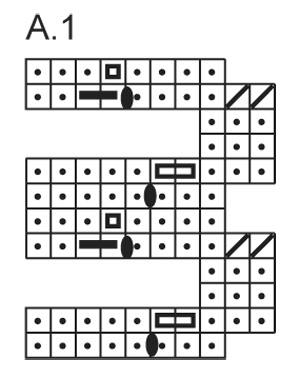
GARTER ST (back and forth on needle): K all rows. 1 ridge = 2 rows K. GARTER ST WITH PICOT EDGE (back and forth on needle). ROW 1: K all sts. ROW 2: K all sts. ROW 3: K until 4 sts remain, work these sts as follows: K 2 tog, 1 YO, work 2 sts in the last 2 sts = 2 new sts on the row. ROW 4: Slip 1st st as if to K, K 1, psso, K 1 and slip the last st on right needle over the foremost st, now 2 sts are dec - then K the remaining sts. Repeat rows 1 to 4. PATTERN: See diagram A.1. Diagram shows all rows in pattern from RS. No of sts in A.1 will vary from 8 to 10 depending on where you are in the diagram. On 3rd and 4th row in diagram work short rows as follows: K 3, turn piece, tighten thread and work rest of row. Do the same on 9th and 10th row in diagram. ---------------------------------------------------------- HAT: Worked back and forth on needle. Beg with a folding edge at the bottom of hat. Then knit up new sts along one long side on edge and work the hat before sewing it tog mid back. Cast on 30-30 sts on needles size 2.5 mm with BabyAlpaca Silk. Work GARTER ST WITH PICOT EDGE - see explanation above. When 122-132 ridges have been worked (piece measures approx. 47-51 cm), cast off. Knit up 1 st at the edge in every ridge along the side without picot edge = 122-132 sts (incl 1 edge st in each side). Insert 5 markers in the piece as follows: Insert first after 1 st, insert the next 4 24-26 sts apart, after last marker there are 25-27 sts. Then work in GARTER ST back and forth on needle AT THE SAME TIME inc 1 st on the left side of all markers as follows: Inc every other row (i.e. on every row from RS) a total of 4 times and then every 4th row a total of 7 times = 177-187 sts – NOTE: Inc 1 st by making 1 YO, on next row K YO twisted to avoid holes. When piece measures 9-10 cm from where sts were knitted up, dec 1 st on the left side of all markers as follows: Dec every other row (i.e. on every row from RS) a total of 31-33 times = 22-22 sts remain on needle – NOTE: Dec 1 st by K 2 tog. On next row K all sts tog 2 by 2. Cut the thread and pull it through the remaining sts and tighten tog. Sew the hat tog mid back inside 1 edge st. Fold the edge at the bottom of hat. SCARF: Loosely cast on 48 sts on needle size 3 mm with BabyAlpaca Silk. Work in GARTER ST - see explanation above. When piece measures 9 cm, cast on 8 new sts at end of the next 2 rows = 64 sts. Insert 1 marker on the inside of the 8 new sts in each side (= 48 sts between markers). Then work in garter st with pattern according to diagram A.1 over the outermost sts in each side as follows: Work 1st row in A.1 (= 8 sts – see explanation above), K the rest of row and turn piece. On next row beg with 1st row in A.1 over the first 8 sts, K until next marker and work 2nd row in A.1. Continue the pattern like this - NOTE: Read explanation on PATTERN above. When piece measures approx. 110 cm (measure when flat) - finish after 1 whole repetition vertically - P 1 row over all sts before loosely casting off. ASSEMBLY: Place scarf double alongside and sew bottom section on scarf (the 9 cm long section in garter st without lace edge in each side) tog along the side – sew edge to edge in front loop of outermost st to avoid a chunky seam. When wearing the scarf, insert opposite end of scarf down through opening that was made and pull end of scarf through opening. |
|||||||||||||||||||
Diagram explanations |
|||||||||||||||||||
|
|||||||||||||||||||
 |
|||||||||||||||||||
Have you finished this pattern?Tag your pictures with #dropspattern #emilyset or submit them to the #dropsfan gallery. Do you need help with this pattern?You'll find 13 tutorial videos, a Comments/Questions area and more by visiting the pattern on garnstudio.com. © 1982-2026 DROPS Design A/S. We reserve all rights. This document, including all its sub-sections, has copyrights. Read more about what you can do with our patterns at the bottom of each pattern on our site. |
|||||||||||||||||||


With over 40 years in knitting and crochet design, DROPS Design offers one of the most extensive collections of free patterns on the internet - translated to 17 languages. As of today we count 324 catalogues and 12290 patterns translated into English (UK/cm).
We work hard to bring you the best knitting and crochet have to offer, inspiration and advice as well as great quality yarns at incredible prices! Would you like to use our patterns for other than personal use? You can read what you are allowed to do in the Copyright text at the bottom of all our patterns. Happy crafting!
Post a comment to pattern DROPS 140-38
We would love to hear what you have to say about this pattern!
If you want to leave a question, please make sure you select the correct category in the form below, to speed up the answering process. Required fields are marked *.