
Popular categories
Looking for a yarn?


Comments / Questions (72)
![]() Mamé wrote:
Mamé wrote:
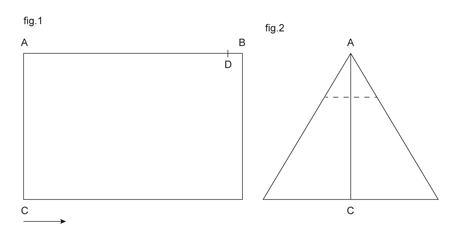
Super modèle mais n'y a t il pas une erreur de positionnement de D sur la figure 1? Je le vois plus près de A que de B ! merci de votre réponse, il est presque terminé vite vite cordialement
02.11.2014 - 18:30DROPS Design answered:
Bonjour Mamé, le point B correspond au milieu devant, le point D se situe à environ 2 cm du point B, il reste donc 4 cm "ouvert" (non cousu) au niveau du point D, au milieu devant. Bon assemblage!
03.11.2014 - 09:28
![]() Leonor wrote:
Leonor wrote:
Es muy complicado la explicacion de la costura es posible que lo expliquen un poco mas claro?
04.09.2013 - 04:17DROPS Design answered:
Hola Leonor. He pasado tu sugerencia al departamento de tutoriales para una posible explicación por video.
09.09.2013 - 11:02
![]() Marta wrote:
Marta wrote:
Ich liebe das Edith Piaf Muster und würde sehr gerne es stricken.. leider verstehe ich nicht wie es genäht wird
30.01.2013 - 15:15
![]() Ulrike Klumb wrote:
Ulrike Klumb wrote:
Hallo Wollte mal Fragen gibt es kein Video von der Mütze? LG Ulrike
27.01.2013 - 15:29DROPS Design answered:
Hallo Ulrike, ich habe Ihren Input an das Video-Team weitergegeben.
27.01.2013 - 16:39Oana wrote:
Hi. Can you please make a tutorial for this pattern? I would love to knit it but I don't understand the folding part. Thank you.
25.01.2013 - 13:57
![]() Flo wrote:
Flo wrote:
I love the pattern, is there anyway this pattern can be simplified, so it is easier to understand
11.01.2013 - 02:02DROPS Design answered:
Dear Flo, for any indiviual assistance, please contact the store where you bought the yarn. If you buy DROPS yarn you are guaranteed to receive assistance from our retailers. Happy Knitting!
11.01.2013 - 09:01
![]() Irene Zahnd wrote:
Irene Zahnd wrote:
Hallo,probierte nochmals mütze zu machen hier steht die erste r vorderseite 1 rand bis zur fertigen länge glatt stricken, dann aber 2 re, 2 li, wiederholen, und bis zur fertigen länge krstricken, verstehe das nicht, was nun, rechts stricken, kraus stricken etc. strickerin, aber hier ist es wirklich nicht ganz optimal erkärt, bitte nochmals um ihre hilfe zu beschreiben, herzlichen dank und grüsse irene
11.09.2012 - 09:58DROPS Design answered:
Wie das Muster mit der Randmasche gestrickt wird, lassen Sie sich bitte von dem Laden erklären, in dem Sie die Wolle gekauft haben.
12.09.2012 - 07:53
![]() Irene wrote:
Irene wrote:
Hallo, möchte so gerne die edith piaf mütze stricken, verstehe aber einfach die anleitung nicht ganz, strickt man auf zwei nadeln, und näht sie dann zusammen, oder auf 1 nadel, etc, könnten sie mir die anleitung nicht genauer machen? im voraus herlichen dank und bis bald, ganz liebe grüsse irene
01.09.2012 - 15:26DROPS Design answered:
Es wird in Hin- und Rück-R (auf 2 Nadeln) ein Rechteck (fig 1) gestrickt und die speziellen Form kommt beim Zusammennähen. Dies ist eins der Modelle, bei denen man das Fertigstellen besser versteht, wenn man da Strickstück vor sich hat. Sonst probieren Sie es an einem Stück Stoff oder stricken erst die Mütze. Wenn es weiter Verständnisschwierigkeiten gibt können Sie dann gerne nochmals fragen.
03.09.2012 - 14:32
![]() Roberta wrote:
Roberta wrote:
Il berretto Edith Piaf 134-54 è bellissimo. L'esecuzione è ben spiegata ma la confezione è incomprensibile. Come si arriva a formare il triangolo. Potete aiutarmi con delle spiegazioni più chiare? Grazie mille per l'aiuto. Roberta
31.08.2012 - 22:39DROPS Design answered:
Ora ho modificato il testo leggermente. Spero sia più chiaro. Se no, mi scirvi ancora!
04.09.2012 - 12:52
![]() DROPS Design wrote:
DROPS Design wrote:
Hej, du stickar hela mössan enligt beskrivning, sedan viker du den dubbel Obs: fig.1 visar mössan när den har vikts dubbel. Sy sedan från C till A och sedan till D - Se fig.1 = det återstår ca 2 cm från B (mitt fram). Vänd arb och sy en söm tvärs över spetsen mitt bak, ca 4 cm från A - Se fig 2, vik spetsen ned mot C och sy fast den i sömmen mitt bak. Fig 2 visar när du har vikt spetsen. Lycka till!
14.11.2011 - 12:18
|
|||||||
Edith Piaf#edithpiafhat |
|||||||
 |
 |
||||||
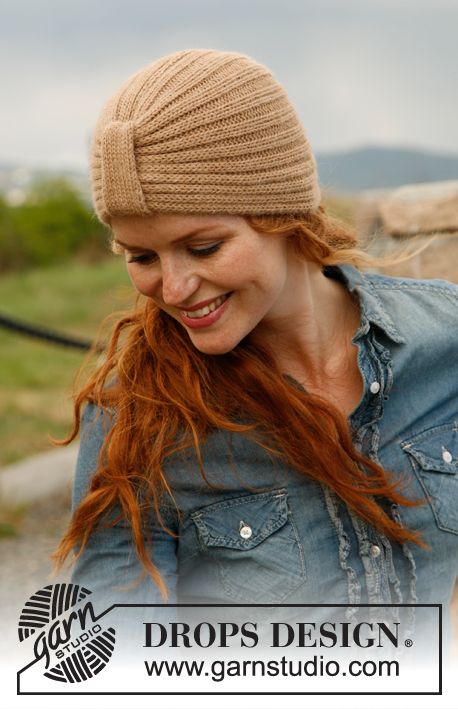
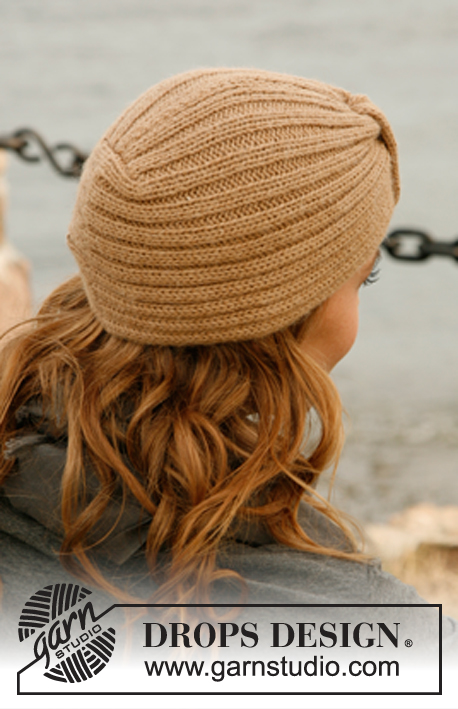
Knitted DROPS hat with ribbon in "Alpaca".
DROPS 134-54 |
|||||||
|
HAT: The hat is worked sideways from mid back. Cast on 50-58 sts (includes 1 edge st in each side) with 2 threads Alpaca on needle size 3 mm. On first row (= RS) work rib as follows: 1 edge st (worked in stocking st until finished measurements), * K 2, P 2 *, repeat from *-*, finish with 1 edge st (worked in garter st until finished measurements). Insert a marker at the end of 1st row = top of hat - See A in fig. 1 (bottom edge of hat = C in fig. 1 = at beg of 1st row). Note: fig. 1 shows then hat when it's been folded. Continue in rib with 1 edge st in each side like this until piece measures 26-27 cm. Now insert another marker at the end of row from RS (= mid front - See B in fig. 1). Continue until piece measures 52-54 cm, finish with 1 row from RS. On next row (= WS) loosely cast off all sts with K over K and P over P, cut the thread and keep 50-60 cm for assembly. ASSEMBLY: Fold the piece double, sew tog edges from RS mid back and on top of hat with stitches as follows: Sew from C to A and continue to D - See fig. 1 = approx. 2 cm remain from B (mid front). Turn the piece inside out and sew a seam across the tip mid back, approx. 4 cm from A - See fig. 2, fold the tip down towards C and sew it to the seam mid back. RIBBON: Cast on 12 sts with 2 threads Alpaca on needle size 3 mm. Work in stocking st for 17-18 cm, cast off. Pull the ribbon from WS through the opening mid front (between B and D in fig. 1), tighten tog rib mid front and fold the ribbon over the bottom edge of hat, sew ends on ribbon tog on the inside of hat. |
|||||||
Diagram explanations |
|||||||
|
|||||||
 |
|||||||
Have you finished this pattern?Tag your pictures with #dropspattern #edithpiafhat or submit them to the #dropsfan gallery. Do you need help with this pattern?You'll find 8 tutorial videos, a Comments/Questions area and more by visiting the pattern on garnstudio.com. © 1982-2026 DROPS Design A/S. We reserve all rights. This document, including all its sub-sections, has copyrights. Read more about what you can do with our patterns at the bottom of each pattern on our site. |
|||||||


With over 40 years in knitting and crochet design, DROPS Design offers one of the most extensive collections of free patterns on the internet - translated to 17 languages. As of today we count 325 catalogues and 12291 patterns translated into English (UK/cm).
We work hard to bring you the best knitting and crochet have to offer, inspiration and advice as well as great quality yarns at incredible prices! Would you like to use our patterns for other than personal use? You can read what you are allowed to do in the Copyright text at the bottom of all our patterns. Happy crafting!
Post a comment to pattern DROPS 134-54
We would love to hear what you have to say about this pattern!
If you want to leave a question, please make sure you select the correct category in the form below, to speed up the answering process. Required fields are marked *.