
Popular categories
Looking for a yarn?


Comments / Questions (110)
![]() Karin Henningsen wrote:
Karin Henningsen wrote:
Super flot bluse. Jeg har strikket venstre forstykke og er nu kommet til det stykke der skal være i siden under ærmet. Der står i opskriften at man skal fortsætte i retstrik og forkortede pinde. Jeg er lidt i tvivl om man skal strikke retmasker over alle 84 masker eller om det kun er de første 5 og så mønster over resten?
13.08.2016 - 22:07DROPS Design answered:
Hej Karin. De skal strikkes i retstrik: Strik retstrik og forkortede p således:
13.09.2016 - 14:46Catherine wrote:
Love the pouf of "bodice" and sleeves. The type of stitches used are very pretty on the lower part of jacket, too.
02.07.2016 - 20:38
![]() Sophie wrote:
Sophie wrote:
Bonjour, Merci pour ce modèle magnifique je viens juste de le démarrer et je m'interroge. Comment dois je tricoter les rangs envers lorsque l'on tricote les diagrammes? En effet il est indiqué que les diagrammes montrent l'endroit. Merci pour votre aide.
08.03.2016 - 21:44DROPS Design answered:
Bonjour Sophie, les diagrammes montrent tous les rangs des motifs, vu sur l'endroit, c'est-à-dire 1 case = 1 m x 1 rang, tricotez le rangs retour comme indiqué dans le diagramme - voir également ici. Bon tricot!
09.03.2016 - 08:50
![]() Bonneton wrote:
Bonneton wrote:
Bonjour, j'ai déjà réalisé le devant gauche du gilet. J'arrive maintenant aux rangs raccourcis situés sur le côté. Vous écrivez : "continuez au point mousse et rangs raccourcis"". Faut-il arrêter le point fantaisie et continuer tout en maille mousse pour le dessous de bras ? Merci pour votre réponse. Chantal
27.06.2014 - 13:31DROPS Design answered:
Bonjour Mme Bonneton, on tricote les rangs raccourcis sur le côté (sous les manches) au point mousse. On reprendra ensuite le point fantaisie pour le dos. Bon tricot!
27.06.2014 - 14:04
![]() Bonneton wrote:
Bonneton wrote:
Bonjour, j'ai déjà réalisé le devant gauche du gilet. J'arrive maintenant aux rangs raccourcis situés sur le côté. Vous écrivez : "continuez au point mousse et rangs raccourcis"". Faut-il arrêter le point fantaisie et continuer tout en maille mousse pour le dessous de bras ? Merci pour votre réponse. Chantal
27.06.2014 - 09:53DROPS Design answered:
Bonjour Mme Bonneton, effectivement, on continue au point mousse pour faire les rangs raccourcis sur les côtés, et on reprendra le point fantaisie après. Bon tricot!
27.06.2014 - 10:05
![]() Lena wrote:
Lena wrote:
Hei, holder på å strikke denne jakken nå. Et nydelig mønster, men jeg sliter med oppskriften synes det står litt dårlig forklart.... skal begynne på venstre erme. Stemmer det at jeg da skal avslutte ved 3. Vending uavhengig av hvor jeg er i mønster rapport M3? Og at mønsteret ikke blir likt på hver side?
05.11.2013 - 09:57DROPS Design answered:
Ja strik vendingerne ifølge opskriften, du fortsætter bare mønsteret når du næste gang strikker over de sidste masker.
05.11.2013 - 14:37
![]() Anna wrote:
Anna wrote:
I have just finished this item. Thank you very much, your description how to make it is so clear. But now I have a problem, I washed it by hand in cold water and now I have too big jacket, it is still a little bit wet, but it does not look I will get the size I was knitting. Before I washed, it had a perfect size. I was drying it on the floor, on the towel. Please advice me what I did wrong and can I do something as I do not want to reknit it. Anna
29.04.2013 - 11:49DROPS Design answered:
Dear Anna, Please take in consideration that Baby Merino is superswash, so that you can wash it in the washmachine following instructions on the label, and do not forget to let dry flat to the correct measurements (check with a measurement tape if required). Happy knitting!
30.04.2013 - 14:04
![]() Marianne Dunk wrote:
Marianne Dunk wrote:
Jeg kan ikke få opskriften til at passe med vendinger og snoninger. snoningerne ved halsen bliver ikke rigtige.
09.04.2012 - 17:28DROPS Design answered:
Jo du er nødt til at strikke samme antal pinde imellem hver snoning, på den måde bliver alle snoningerne ens. God fornøjelse!
11.04.2012 - 15:30
![]() Birte.knudsen wrote:
Birte.knudsen wrote:
Jeg kan ikke få det til at passe med at venstrestykke skal laves først men nu prøver jeg at strikke højer side først
27.07.2011 - 15:36
![]() Drops Design wrote:
Drops Design wrote:
Jo det stemmer, nederst i siden under ærmet (ikke på ærmet) strikker du en "kile" i retstrik. Når du fortsætter med mønster så starter det der hvor det sluttede inden kilen.
27.04.2010 - 11:15
|
|||||||||||||||||||
Vanilla Dream#vanilladreamcardigan |
|||||||||||||||||||
 |
 |
||||||||||||||||||
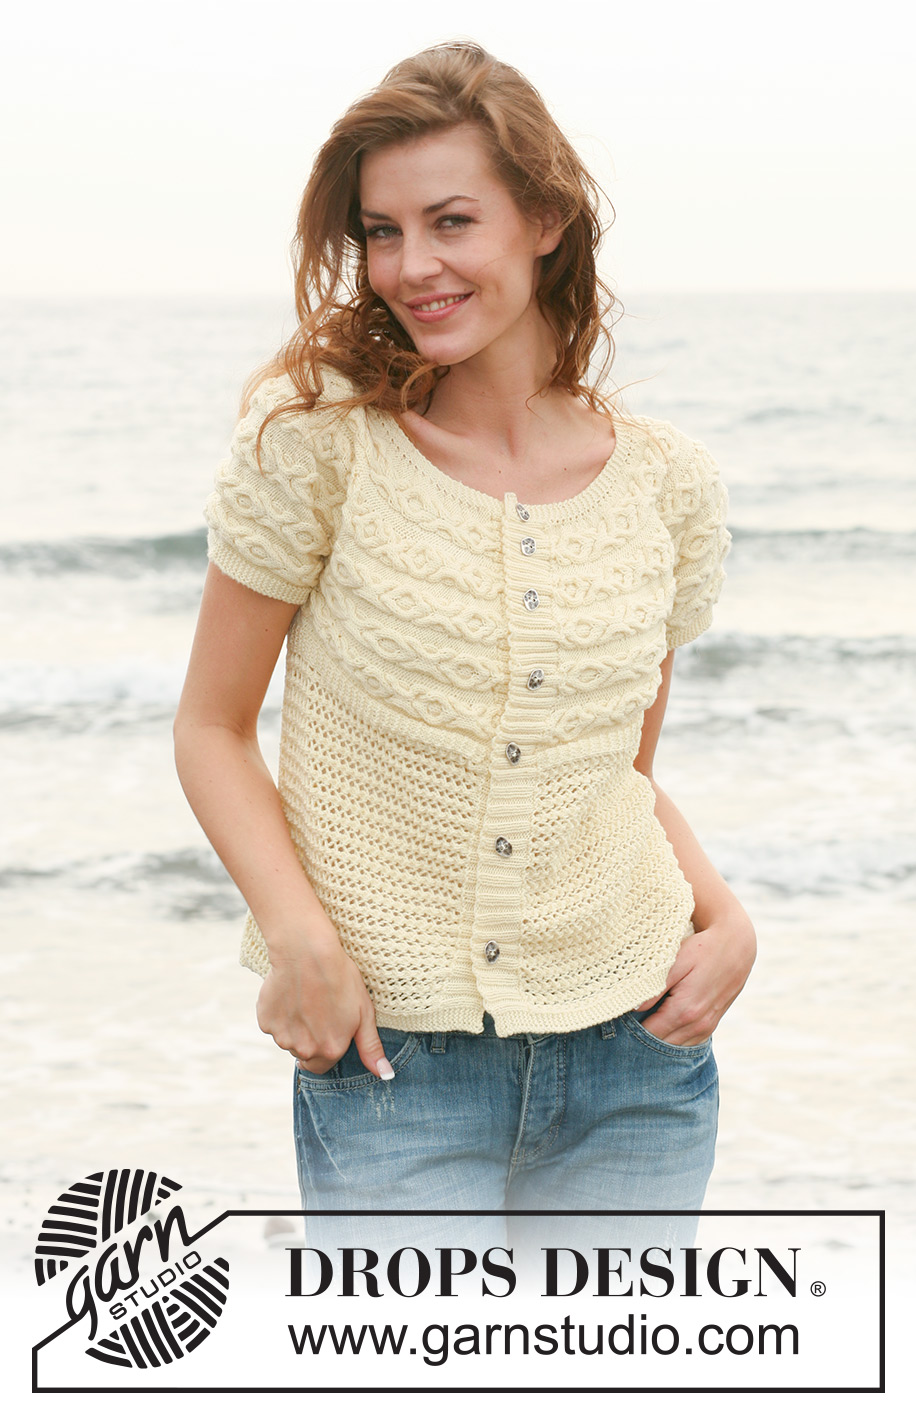
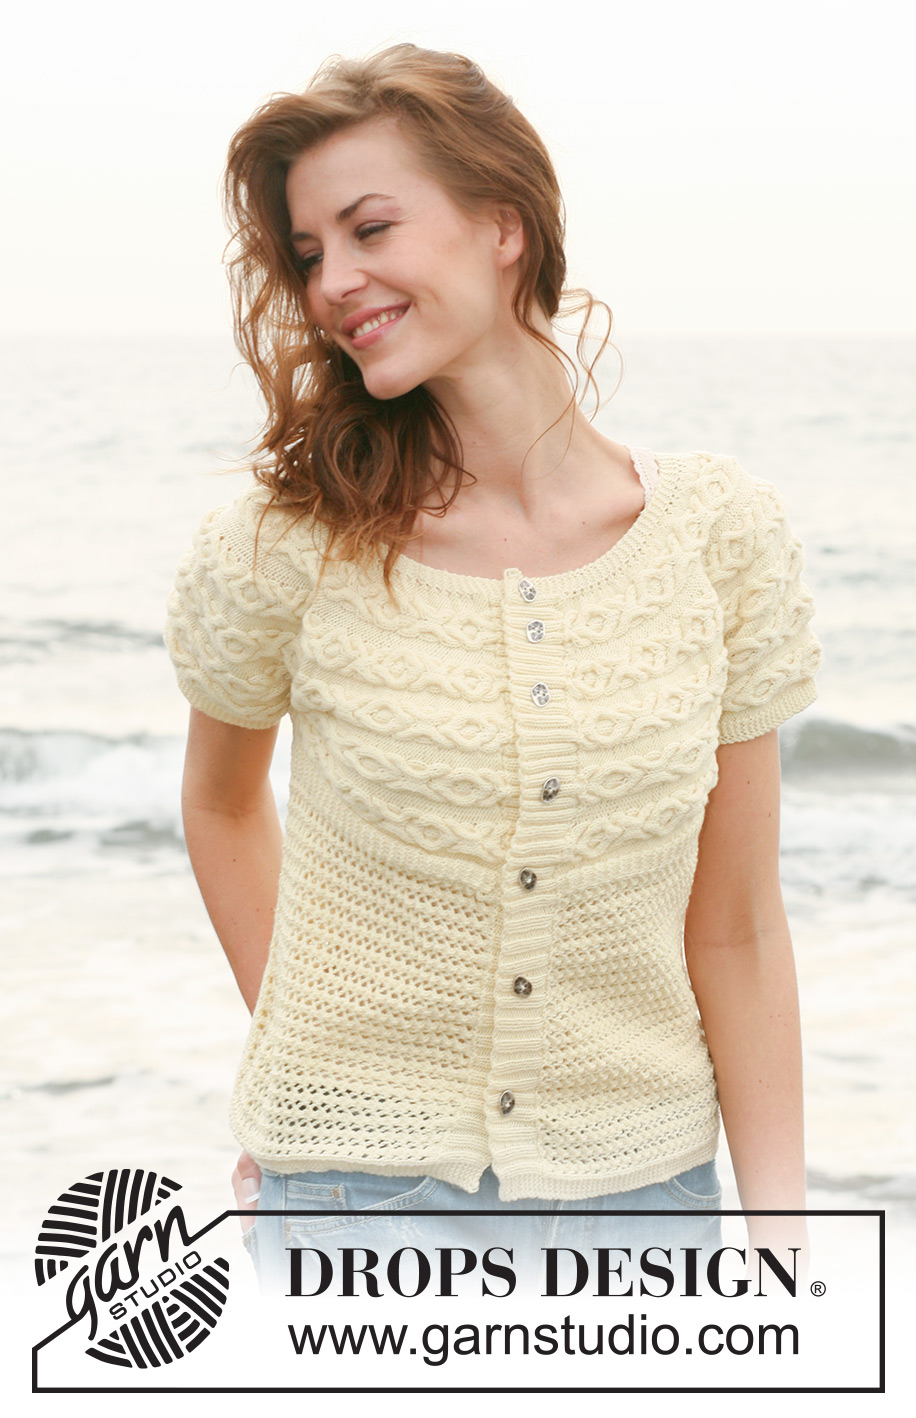
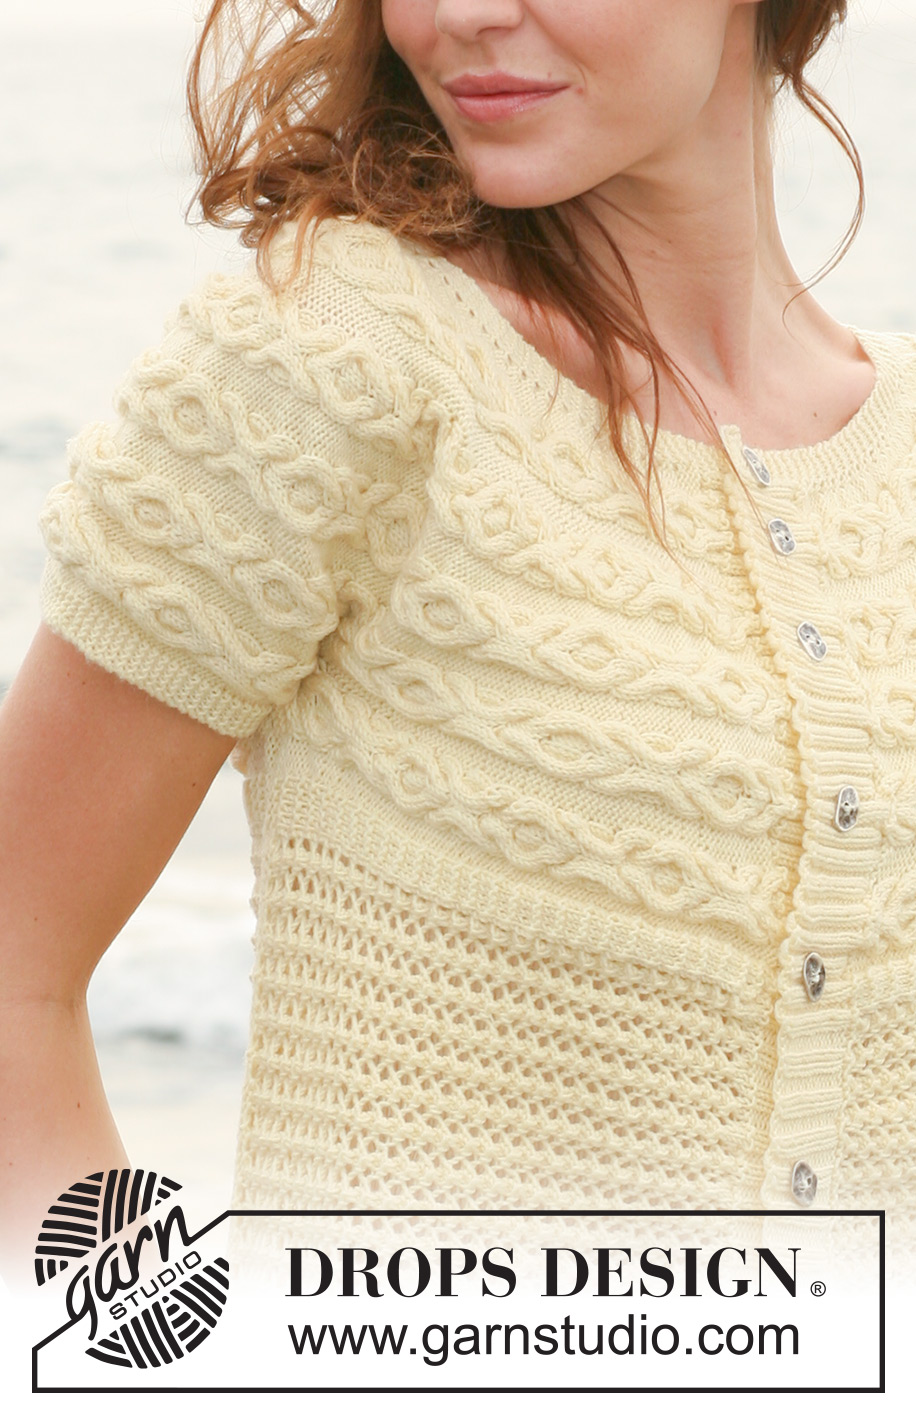
DROPS jacket knitted from side to side with cables and pattern in ”BabyMerino” or "Safran". Size S - XXXL.
DROPS 119-35 |
|||||||||||||||||||
|
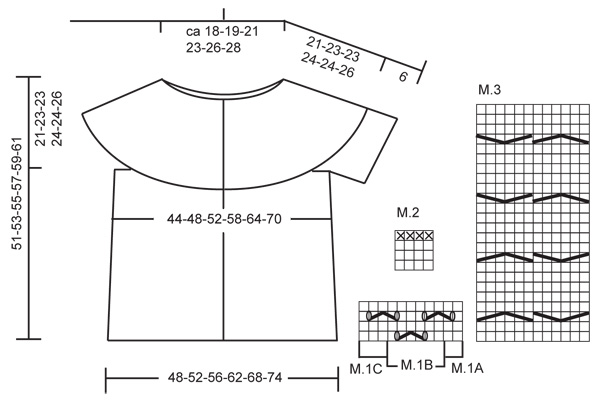
GARTER ST (back and forth on needle): K all rows. PATTERN: See diagrams M.1, M.2 and M.3. Diagrams show the pattern from RS. TURNS: Work turns as follows: * Work all sts from bottom edge to neck, turn and work return row. Work row from bottom edge to marker-1, turn and work return row. Work row from bottom edge to marker-2, turn and work return row. Work row from bottom edge to marker-3, turn and work return row. Work all sts, turn and work return row * repeat from *-*. 1 repeat = 4 rows at the top and 10 rows at bottom edge. -------------------------------------------------------- JACKET: Worked from side to side. Rows from RS beg at bottom edge. Piece is knitted from mid front on left front piece, then sleeve, back piece, the other sleeve and right front piece. LEFT FRONT PIECE: Worked back and forth on circular needle. LOOSELY cast on 152-156-160-164-172-176 sts on circular needle size 3 mm with Baby Merino or Safran. Continue as follows – from RS: 5 GARTER STS – SEE ABOVE, * K2/P2 *, repeat from *-* on the next 140-144-148-152-160-164 sts, and finish with K2 and 5 garter sts. Work 4 cm rib like this. Now work 2 rows garter st, AT THE SAME TIME on first row inc 0-0-2-2-0-0 sts evenly = 152-156-162-166-172-176 sts. Insert 3 markers in piece from RS as follows: Marker-1 = after 78-78-84-84-90-90 sts. Marker-2 = after 110-112-118-120-126-128 sts. Marker-3 = after 147-151-157-161-167-171 sts. Leave markers in the same place until finished measurements in order to have the turns in the same place throughout. Continue as follows - from RS: 5 garter sts, M.1A (= 2 sts), M.1B on the next 48-48-54-54-60-60 sts, M.1 C (= 3 sts), M.2 (= 4 sts), P4, * M.3 (= 12 sts), P 4-5-5-6-6-7 *, repeat from *-* a total of 4 times, and finish with M.3, P5 and 5 garter sts. Continue in pattern like this until finished measurements. REMEMBER THE KNITTING TENSION! AT THE SAME TIME work turns - SEE ABOVE! Continue with turns until piece measures 26-28-30-33-36-39 cm from cast on row – measured along bottom edge. Now slip the 74-78-78-82-82-86 sts towards neck on a stitch holder and continue on the bottom 78-78-84-84-90-90 sts only. Continue in garter st and shortened rows as follows: 2 rows on the bottom 16 sts, 2 rows on the bottom 32 sts, 2 rows on the bottom 48 sts, 2 rows on the bottom 64 sts, 2 rows on all 78-78-84-84-90-90 sts. Insert a marker in piece (= the side). Work 2 rows on the bottom 16 sts, 2 rows on the bottom 32 sts, 2 rows on the bottom 48 sts, 2 rows on the bottom 64 sts, 2 rows on all 78-78-84-84-90-90 sts = 4 K rows at the top and 20 K rows at bottom. Now slip the 78-78-84-84-90-90 sts on a stitch holder (sts to be used for back piece). Now knit the sleeve. LEFT SLEEVE: Cast on 21 new sts and slip the top 74-78-78-82-82-86 sts back on needle = 95-99-99-103-103-107 sts for sleeve. Continue as follows - from RS: 5 garter sts, P4, * M.3, P 4-5-5-6-6-7 *, repeat from *-* a total of 4 times and finish with M.3, P5 and 5 garter sts (continue in M.3 from left front piece). Now work the turns as follows: * Work all sts from bottom edge to the neck, turn and work return row. Work row to marker-2, turn and work return row. Work row to marker-3, turn and work return row. Work all sts, turn and work return *, repeat from *-*. Continue like this until sleeve measures 30-31-32-33-34-35 cm. Cast off the bottom 21 sts, cut the thread. BACK PIECE: Slip the 78-78-84-84-90-90 sts from stitch holder back on needle = 152-156-162-166-172-176 sts. Continue with turns and pattern as on front piece (first row = from RS, continue in M.3 from left sleeve). Continue until piece measures 46-50-54-60-66-72 cm from marker at the side. Slip the top 74-78-78-82-82-86 sts on a stitch holder and continue on the bottom 78-78-84-84-90-90 sts only. Work garter st and shortened rows as described for left front piece. Slip the bottom 78-78-84-84-90-90 sts on a stitch holder (sts to be used for right front piece). Now knit right sleeve. RIGHT SLEEVE: Like left sleeve. RIGHT FRONT PIECE: Slip the 74-78-78-82-82-86 sts from stitch holder back on needle = 152-156-162-166-172-176 sts. Continue with pattern and turns as on back piece (continue in M.3 from right sleeve). When right front piece measures 24-26-28-31-34-37 cm (adjust to the same no of rows as on left front piece) work 2 rows garter st, AT THE SAME TIME on first row dec 0-0-2-2-0-0 sts evenly = 152-156-160-164-172-176 sts. Continue as follows - from RS: 5 garter sts, * K2/P2 *, repeat from *-* on the next 140-144-148-152-160-164 sts and finish with K2 and 5 garter sts. When rib measures 2 cm make buttonholes as follows - from RS (continue with garter st and rib): Work 21-25-23-27-29-33 sts, K2 tog, * work 19-19-20-20-21-21 sts, K2 tog *, repeat from *-* a total of 6 times, work the last 3 sts. On next row cast on 1 new st over cast off sts. Continue until rib measures a total of 4 cm, cast off with K over K and P over P. Sew on buttons. |
|||||||||||||||||||
Diagram explanations |
|||||||||||||||||||
|
|||||||||||||||||||
 |
|||||||||||||||||||
Have you finished this pattern?Tag your pictures with #dropspattern #vanilladreamcardigan or submit them to the #dropsfan gallery. Do you need help with this pattern?You'll find 14 tutorial videos, a Comments/Questions area and more by visiting the pattern on garnstudio.com. © 1982-2026 DROPS Design A/S. We reserve all rights. This document, including all its sub-sections, has copyrights. Read more about what you can do with our patterns at the bottom of each pattern on our site. |
|||||||||||||||||||


With over 40 years in knitting and crochet design, DROPS Design offers one of the most extensive collections of free patterns on the internet - translated to 17 languages. As of today we count 324 catalogues and 12290 patterns translated into English (UK/cm).
We work hard to bring you the best knitting and crochet have to offer, inspiration and advice as well as great quality yarns at incredible prices! Would you like to use our patterns for other than personal use? You can read what you are allowed to do in the Copyright text at the bottom of all our patterns. Happy crafting!
Post a comment to pattern DROPS 119-35
We would love to hear what you have to say about this pattern!
If you want to leave a question, please make sure you select the correct category in the form below, to speed up the answering process. Required fields are marked *.