DROPS Merino Extra Fine
100% Wool
from 3.50 £ /50g
Get the yarn to make this pattern from 31.50£.

The yarn cost is calculated from the pattern’s smallest size and the yarn’s cheapest product type. Looking for an even better price? You might find it on the DROPS Deals!

DROPS Super Sale

Sea Bird

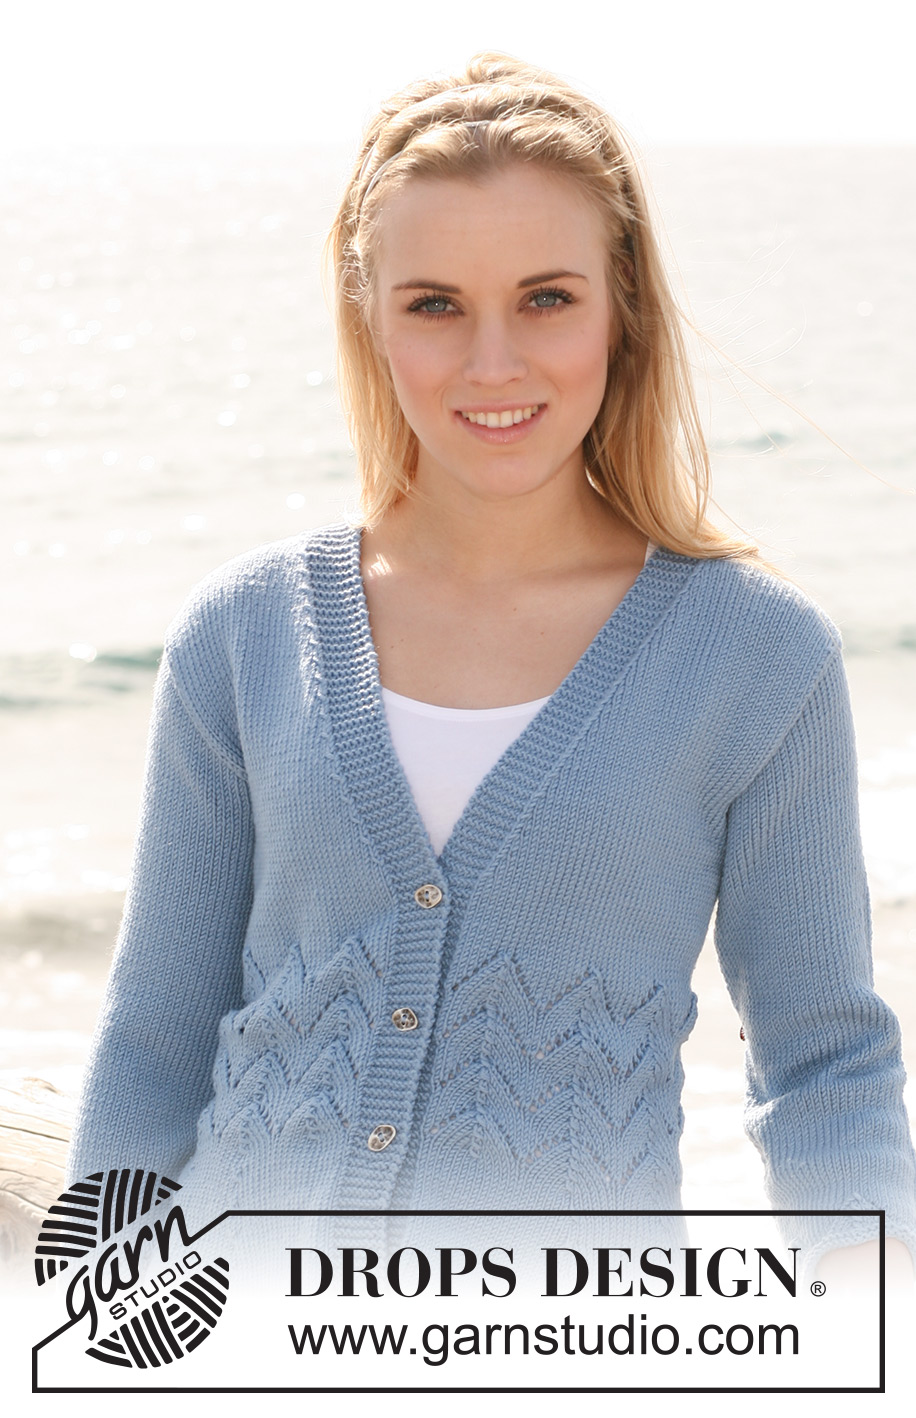
Knitted DROPS jacket with darts at the front, lace pattern and ¾ sleeves in ”Merino Extra Fine”. Size XS/S - XXXL.

DROPS 119-34
DROPS design: Pattern no ME-022

Size: XS/S - M - L - XL - XXL - XXXL
Materials: DROPS MERINO EXTRA FINE from Garnstudio
450-500-550-600-650-700 g colour no 19, light blue

DROPS CIRCULAR NEEDLE (80 cm) size 4 mm - or size needed to get 21 sts x 28 rows in stocking st = 10 x 10 cm.
DROPS SILVER BUTTON, no 534: 3-3-3-3-4-4 pcs.

-------------------------------------------------------

Alternative Yarn – See how to change yarns here
Yarn Groups A to F – Use the same pattern and change the yarn here
Yarn usage using an alternative yarn – Use our yarn converter here

-------------------------------------------------------

DROPS Merino Extra Fine
100% Wool
from 3.50 £ /50g
Get the yarn to make this pattern from 31.50£.

The yarn cost is calculated from the pattern’s smallest size and the yarn’s cheapest product type. Looking for an even better price? You might find it on the DROPS Deals!

DROPS Super Sale

SAVE 30% on 6 cotton favourites!
Valid until 12.04.2024

Pattern instructions

NOTE: This pattern is written in British English. All measurements in charts are in cm. For conversion from cm to inches - click here. There are different terms for crocheting in British and American English. If this pattern includes crochet, click for "crochet terms" here. For this pattern in American English, please click here.
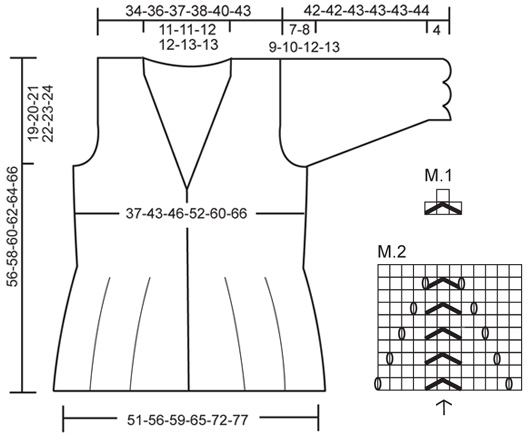
PATTERN:
See diagram M.1 and M.2. Diagram shows the pattern from RS. First row = RS.
GARTER ST (back and forth on needle): K all rows.
DECREASING TIP (applies to neck):
Make all dec from RS inside front band sts in garter st.
Dec as follows after 8 front band sts: slip 1 st as if to K, K1, psso.
Dec as follows before 8 front band sts: K2 tog.
BUTTONHOLES: Make buttonholes on right front band. 1 buttonhole = cast off 4th front band st from mid front and cast on 1 new st on next row.
Make buttonholes when piece measures:
SIZE XS/S: 17, 24 and 31 cm.
SIZE M: 16, 24 and 32 cm.
SIZE L: 17, 25 and 33 cm.
SIZE XL: 16, 25 and 34 cm.
SIZE XXL: 14, 21, 28 and 35 cm.
SIZE XXXL: 13, 21, 28 and 36 cm.
--------------------------------------------------------
--------------------------------------------------------
JACKET:

BODY PIECE:
Worked back and forth on circular needle from mid front. Cast on 229-253-265-289-317-341 sts (includes 8 front band sts each side towards mid front) on circular needle size 4 mm with Merino Extra Fine. Work 4 rows GARTER ST - see above, and continue in stocking st with 8 front band sts each side in garter st. When piece measures 4-4-4-4-3-3 cm work next row as follows from RS: 8 garter sts (= front band), 24-24-24-24-23-23 stocking sts, M.1 (= 3 sts), 23-23-23-35-33-45 stocking sts, M.1, 106-130-142-142-176-176 stocking sts, M.1, 23-23-23-35-33-45 stocking sts, M.1, 25-25-25-25-24-24 stocking sts and 8 garter sts (= front band). Repeat the 4 dec in M.1 (= 8 dec sts) in the same place on every 2 cm a total of 7-7-7-7-6-6 times = 173-197-209-233-269-293 sts – NOTE: For every row with dec there will be 1 less stocking st each side of M.1. After the last row with M.1 work next row as follows from RS (piece measures approx 16-16-16-16-13-13 cm): 8 front band sts in garter st, M.2 on the next 156-180-192-216-252-276 sts, 1 stocking st, 8 front band sts in garter st. REMEMBER BUTTONHOLES ON RIGHT FRONT BAND - see above - NOTE: Make sure st marked with arrow in M.2 sits mid over M.1. Work 4-4-4-4-5-5 vertical repeats of M.2. After M.2 continue in stocking st with front bands in garter st as before. Insert a marker 48-53-56-62-71-77 sts in from each side (= 77-91-97-109-127-139 sts between markers on back piece) – let the markers follow the piece as you go along. When piece measures 32-33-34-35-36-37 cm - adjust so that next row is from WS – work 2 rows garter st on the 8 front band sts only (do not work remaining sts) work 1 row stocking st from WS on all sts, and then work 2 rows garter st on the 8 front band sts only the other side. Now continue on all sts again. AT THE SAME TIME on first row from RS dec 1 st for neck each side towards mid front – see DECREASING TIP! Repeat the dec on every other row a total of 13-8-8-7-7-6 times and then on every 4th row a total of 8-11-12-13-14-15 times. AT THE SAME TIME when piece measures 37-38-39-40-41-42 cm cast off 6 sts each side for armhole (= 3 sts each side of marker) and complete front and back pieces separately.

LEFT FRONT PIECE:
Continue dec for neck. AT THE SAME TIME cast off for armhole at beg of every row from the side: 3 sts 0-0-0-0-1-1 time, 2 sts 0-1-2-3-5-7 times and 1 st 0-3-3-6-5-4 times. When all dec are complete there are 24-26-26-27-29-32 sts left on needle. Cast off when piece measures 56-58-60-62-64-66 cm.

RIGHT FRONT PIECE:
Like left front piece, but mirrored.

BACK PIECE
= 71-85-91-103-121-133 sts. Cast off for armhole each side as described for front piece = 71-75-77-79-85-91 sts. When piece measures 52-54-56-58-60-62 cm work garter st on the middle 37-37-39-39-41-41 sts (remaining sts in stocking st as before). When piece measures 54-56-58-60-62-64 cm cast off the middle 21-21-23-23-25-25 sts for neck and complete each shoulder separately. Continue in stocking st with 8 garter sts towards neckline. AT THE SAME TIME cast off 1 st on neckline on next row – see DECREASING TIP = 24-26-26-27-29-32 sts. Cast off when piece measures 56-58-60-62-64-66 cm.

SLEEVE:
Worked back and forth on circular needle. LOOSELY cast on 62-62-62-74-74-74 sts on circular needle size 4 mm with Merino Extra Fine. Work 2 rows garter st and continue in M.2 with 1 edge st each side. After 1 vertical repeat of M.2 complete piece in stocking st. AT THE SAME TIME when piece measures 6 cm inc 1 st each side, and repeat the inc on every 6.5-4-3-4-2.5-2 cm a total of 5-7-10-7-10-12 times = 72-76-82-88-94-98 sts. When piece measures 35-34-34-33-31-31 cm - NOTE! Less for the larger sizes because of longer sleeve cap and wider shoulder - cast off for sleeve cap each side at the beg of every row: 3 sts 1 time, 2 sts 3-3-4-4-5-5 times and 1 st 2-2-3-4-5-7 times, then 2 sts each side until piece measures 41-41-42-42-42-43 cm, now cast off 3 sts each side 1 time and cast off remaining sts. Piece measures approx 42-42-43-43-43-44 cm.

ASSEMBLY:
Sew shoulder seams. Sew sleeve seams inside 1 edge st and set in sleeves. Sew on buttons.

Diagram

symbols = K from RS, P from WS
symbols = 1 YO between 2 sts
symbols = slip 1 st as if to K, K2 tog, psso
diagram
Do you have a question? See a list of frequently asked questions (FAQ)

Knitting tension is what determines the final measurements of your work, and is usually measured per 10 x 10 cm. It is provided like so: number of stitches in width x number of rows in height - eg: 19 stitches x 26 rows = 10 x 10 cm.

The knitting tension is very individual; some people knit/crochet loosely while others work tightly. You adjust the knitting tension with the needle size, which is why the suggested needle size is only meant as a guide! You need to adjust this (up or down) to ensure that YOUR knitting tension matches the knitting tension provided in the pattern. If you work with a different knitting tension than provided you will have a different yarn consumption, and your work will have different measurements than what the pattern suggests.

The knitting tension also determines which yarns can replace each other. As long as you achieve the same knitting tension you can replace one yarn with another.

See DROPS lesson: How to measure your tension/gauge

See DROPS video: How to make a gauge tension swatch

The required amount of yarn is provided in grams, eg: 450 g. To calculate how many balls you’ll need you first need to know how many grams are in 1 ball (25g, 50g or 100g). This information is available if you click on the individual yarn quality on our pages. Divide the amount required with the amount of each ball. For example, if each ball is 50g (the most common amount), the calculation will be as follows: 450 / 50 = 9 balls.

The important thing when changing from one yarn to another is that the knitting/crochet tension remains the same. This is so that the measurements of the finished piece will be the same as on the sketch provided. It is easier to achieve the same knitting tension using yarns from the same yarn group. It is also possible to work with multiple strands of a thinner yarn to achieve the knitting tension of a thicker one. Please try our yarn converter. We recommend you to always work a test swatch.

Please NOTE: when changing yarn the garment might have a different look and feel to the garment in the photo, due to individual properties and qualities of each yarn.

See DROPS lesson: Can I use a different yarn than the one mentioned in the pattern?

All our yarns are categorised into yarn groups (from A to F) according to thickness and knitting tension – group A contains the thinnest yarns and group F the thickest. This makes it easier for you to find alternative yarns to our patterns, should you wish to switch yarn. All yarns within the same group have a similar knitting tension and can easily replace each other. However, different yarn qualities have different structures and properties which will give the finished work a unique look and feel.

Click here for an overview of the yarns in each yarn group

At the top of all our patterns you’ll find a link to our yarn calculator, which is a helpful tool should you wish to use a different yarn than suggested. By filling in the yarn quality you wish to replace, the amount (in your size) and number of strands, the calculator will present good alternative yarns with the same knitting tension. Additionally it will tell you how much you’ll require in the new qualities and whether you’ll need to work with multiple strands. Most skeins are 50g (some are 25g or 100g).

If the pattern is worked with multiple colours, every colour will have to be calculated separately. Similarly, if the pattern is worked with several strands of different yarns (for example 1 strand Alpaca and 1 strand Kid-Silk) you will have to find alternatives for each, individually.

Click here to see our yarn calculator

Since different yarns have different qualities and textures we have chosen to keep the original yarn in our patterns. However, you can easily find options among our available qualities by using our yarn calculator, or simply pick a yarn from the same yarn group.

It is possible that some retailers still have discontinued yarns in stock, or that someone has a few skeins at home that they would like to find patterns for.

The yarn calculator will provide both alternative yarn as well as required amount in the new quality.

If you think it's hard to decide what size to make, it can be a good idea to measure a garment you own already and like the size of. Then you can pick the size by comparing those measures with the ones available in the pattern's size chart.

You'll find the size chart at the bottom of the pattern.

See DROPS lesson: How to read size chart

The needle size provided in the pattern serves only as a guide, the important thing is to follow the knitting tension. And since knitting tension is very individual, you will have to adjust the needle size to ensure that YOUR tension is the same as in the pattern – maybe you’ll have to adjust 1, or even 2 needle sizes, up or down to achieve the correct tension. For this, we recommend that you work test swatches.

Should you work with a different knitting tension than the one provided, the measurements of the finished garment might deviate from the measurement sketch.

See DROPS lesson: How to measure your tension/gauge

See DROPS video: How to make a tension/gauge swatch

Working a garment top-down provides more flexibility and room for personal adjustment. For example it is easier to try the garment on while working, as well as making adjustments to length of yoke and shoulder caps.

The instructions are carefully explaining every step, in the correct order. Diagrams are adjusted to the knitting direction and are worked as usual.

The diagram depicts all rows/rounds, and every stitch seen from the right side. It is read from bottom to top, from right to left. 1 square = 1 stitch.

When working back and forth, every other row is worked from the right side and every other row is worked from the wrong side. When working from the wrong side, the diagram will have to be worked reversed: from left to right, knit stitches are purled, purl stitches are knit etc.

When working in the round every round is worked from the right side and the diagram are worked from right to left on all rounds.

See DROPS lesson: How to read knitting diagrams

The diagram depicts all rows/rounds, and every stitch seen from the right side. It is worked from bottom to top, from right to left.

When working back and forth every other row is worked from the right side: from right to left and every other row is worked from the wrong side: from left to right.

When working in the round, every row in the diagram are worked from the right side, from right to left.

When working a circular diagram you start in the middle and work your way outwards, counter clockwise, row by row.

The rows usually start with a given number of chain stitches (equivalent to the height of the following stitch), this will either be depicted in the diagram or explained in the pattern.

See DROPS lesson: How to read crochet diagrams

Instructions for working several diagrams after each other on the same row/round, will often be written like so: “work A.1, A.2, A.3 a total of 0-0-2-3-4 times". This means you work A.1 once, then A.2 is worked once, and A.3 is repeated (in width) the number of times provided for your size – in this case like so: S = 0 times, M = 0 times, L=2 times, XL= 3 times and XXL = 4 times.

The diagrams are worked as usual: begin with the first row in A.1, then work the first row in A.2 etc.

See DROPS lesson: How to read knitting diagrams

See DROPS lesson: How to read crochet diagrams

The total width of the garment (from wrist-to-wrist) will be larger in the larger sizes, despite the actual sleeves being shorter. The larger sizes have longer sleeve caps and wider shoulders, so there will be a good fit in all sizes.

The measurement sketch/schematic drawing provides information regarding the full length of the garment. If it’s a jumper or a jacket the length is measured from the highest point on the shoulder closest to the neckline, and straight down to the bottom of the garment. It is NOT measured from the tip of shoulder. Similarly, the length of yoke is measured from the highest point on the shoulder and down to where yoke is split into body and sleeves.

On a jacket measures are never taken along bands, unless specifically stated. Always measure inside band stitches when measuring the length.

See DROPS lesson: How to read a schematic drawing

Diagrams are often repeated on the round or in height. 1 repeat is the diagram the way it appears in the pattern. If it says to work 5 repeats of A.1 in the round, then you work A.1 a total of 5 times after/next to each other in the round. If it says to work 2 repeats of A.1 vertically/in height you work the entire diagram once, then begin again at the start and work the entire diagram one more time.

Chain stitches are slightly narrower than other stitches and to avoid working the cast-on edge too tight, we simply chain more stitches to begin with. The stitch count will be adjusted on the following row to fit the pattern and measurement sketch.

The rib edge is more elastic and will contract slightly compared to, for example, stocking stitch. By increasing before the rib edge, you avoid a visible difference in width between the rib edge and the rest of the body.

It’s very easy to cast off too tightly, and by making yarn overs while casting off (and simultaneously casting these off) you avoid a too tight cast off edge.

See DROPS video: How to bind off with yarn overs (yo)

To achieve an even increase (or decrease) you can increase on, for example: every 3rd and 4th row alternately, like so: work 2 rows and increase on the 3rd row, work 3 rows and increase on the 4th. Repeat this until the increase is complete.

See DROPS lesson: Increase or decrease 1 st on every 3rd and 4th row alternately

Should you prefer to work in the round instead of back and forth, you may of course adjust the pattern. You’ll need to add steeks mid-front (usually 5 stitches), and follow the instructions. When you would normally turn and work from the wrong side, simply work across the steek and continue in the round. At the end you’ll cut the piece open, pick up stitches to work bands, and cover the cut edges.

See DROPS video: How to knit steeks and cut open

Should you prefer to work back and forth instead of in the round, you may of course adjust the pattern so you work the pieces separately and then assemble them at the end. Divide the stitches for the body in 2, add 1 edge stitch in each side (for sewing) and work the front and back pieces separately.

See DROPS lesson: Can I adapt a pattern for circular needles into straight needles?

Pattern repeats can vary slightly in the different sizes, in order to get the correct proportions. If you’re not working the exact same size as the garment in the photo, yours might deviate slightly. This has been carefully developed and adjusted so that the complete impression of the garment is the same in all sizes.

Make sure to follow instructions and diagrams for your size!

If you have found a pattern you like which is available in women’s size it’s not very difficult to convert it to men’s size. The biggest difference will be the length of sleeves and body. Start working on the women size that you think would fit across the chest. The additional length will be worked right before you cast off for the armhole/sleeve cap. If the pattern is worked top-down you can add the length right after the armhole or before the first decrease on sleeve.

Regarding additional yarn amount, this will depend on how much length you add, but it is better with a skein too many than too few.

All yarns will have excess fibres (from production) that might come off as lint or shedding. Brushed yarns (ie hairier yarns) have more of these loose, excess fibres, causing more shedding.

Shedding also depends on what is worn under or over the garment, and whether this pulls at the yarn fibres. It’s therefore not possible to guarantee that there will be no shedding

Below are some tips on how to get the best result when working with hairier yarns:

1. When the garment is finished (before you wash it) shake it vigorously so the looser hairs come off. NOTE: do NOT use a lint roller, brush or any method that pulls at the yarn.

2. Place the garment in a plastic bag and put it in your freezer - the temperature will cause the fibres to become less attached to each other, and excess fibres will come off easier.

3. Leave in the freezer for a few hours before taking it out and shaking it again.

4. Wash the garment according to the instructions on the yarn label.

Pilling is a natural process that happens to even the most exclusive of fibers. It's a natural sign of wear and tear that is hard to avoid, and that is most visible in high friction areas of your garment like a sweater's arms and cuffs.

You can make your garment look as new by removing the pilling, using a fabric comb or a pill/lint remover.

Still can't find the answer you need? Then scroll down and leave your question so one of our experts can try to help you. This will be done normally within 5 to 10 working days.
In the meantime, you can read the questions and answers that others have left to this pattern or join the DROPS Workshop on Facebook to get help from fellow knitters/crocheters!

You might also like...

Post a comment to pattern DROPS 119-34

We would love to hear what you have to say about this pattern!

If you want to leave a question, please make sure you select the correct category in the form below, to speed up the answering process. Required fields are marked *.

Comments / Questions (33)

country flag Birgit Hainzlmayr wrote:

Ich bin über die vielen Abnahmen irritiert. Die Jacke hat bei Größe S dann in der Mitte ja nur noch 37 cm Breite. Das kann doch nicht passen, oder? Verstehe ich ds etwas falsch an dem Schnitt?

14.05.2021 - 09:36

DROPS Design answered:

Liebe Frau Hainzlmayr, 37 cm ist die Breite vom Rückenteil nachdem alle Abnahmen gestrickt werden , dh wenn 77 Maschen sind für den Rückenteil übrig. Viel Spaß beim stricken!

17.05.2021 - 08:12

country flag Karen Gissell Martinez Guerrero wrote:

Quisiera saber cuál es la puntada y como es, del detalle del frente del suéter... Lo que parece un abanico

04.06.2019 - 07:49

DROPS Design answered:

Hola Karen. El cuerpo está trabajado con dos diagramas : M.1 (el detalle pequeño) y M.2 ( el dibujo grande). Ambos se encuentran debajo del patrón.

13.06.2019 - 23:14

country flag Paule wrote:

Bonjour, je ne trouve pas les diagrammes pour réaliser ce modèle. Ou se trouve t'il? Merci.

03.05.2018 - 07:40

DROPS Design answered:

Bonjour Paule, les diagrammes se trouvent en bas de page. Bon tricot!

03.05.2018 - 07:44

country flag Antonella wrote:

Questo modello mi piace molto, ma purtroppo non riesco proprio ad abituarmi a lavorare con i ferri circolari. C'è un modo per adattare il modello ai ferri dritti? Grazie

09.10.2017 - 13:25

DROPS Design answered:

Buongiorno Antonella. Il cardiagan è lavorato avanti e indietro sui ferri. Può quindi sostituire i ferri circolari con quelli dritti e lavorare come indicato nelle spiegazioni. Buon lavoro!

09.10.2017 - 14:18

Andrea wrote:

In der R. 14 der Anleitung steht: Nach 32-33-34-35-36-37 cm – die nächste R. wird von der Rückseite gestrickt – nur über die 8 Blendenm hin und zurück stricken, über alle M. stricken und danach auf der anderen Seite nur über die 8 Blendenm hin und zurück stricken (damit der Kragen schön fällt). Danach wieder über alle M. stricken. Soll das nur ein einziges mal gestrickt werden? Herzlichen Dank & viele Grüße

01.05.2017 - 05:31

DROPS Design answered:

Lebe Andrea, diese verkürzte Reihen über die 8 Blendem sollen auf beiden Seiten nur einmal gestrickt. Viel Spaß beim stricken!

02.05.2017 - 11:22

country flag Karolien wrote:

Hallo, Ben al begonnen met dit patroon en hij wordt prachtig maar wat doe ik aan die omgekrulde zoom? Ben er bang voor dat hij na het liggend drogen weer omkrult! Alvast bedankt voor het antwoord.

09.03.2016 - 21:23

DROPS Design answered:

Hoi Karolien. Meestal wordt de rand recht na de eerste keer wassen/drogen. Maar je kan de rand ook na afloop licht persen met een strijkijzer (leg eventueel een vochtige theedoek ertussen).

10.03.2016 - 13:42

country flag Agnes Con Der Goltz wrote:

Hall Zusammen Bei diesem Model sollen nach dem Maschenanschlag sollen 2 Krausrippen gestrickt werden. Diese drehen sich bei mir nach oben. Wie kann ich dies verhindern? Vielen Dank

26.08.2015 - 15:30

DROPS Design answered:

Sie können nach dem Stricken die Jacke bzw. den unteren Rand unter ein feuchtes Tuch legen und das Ganze dann trocknen lassen. Oder Sie feuchten den Rand an und stecken die Jacke mit Nadeln auf einer geeigneten Unterlage fest. Damit lässt sich der Rand in Form bringen und man kann einem Umklappen entgegenwirken.

01.09.2015 - 15:46

country flag Simona wrote:

Buongiorno. Sono interessata a realizzare questo modello in taglia XS/S ma vorrei maniche lunghe regolari e non a 3/4. Come posso fare? Grazie

22.05.2015 - 14:17

DROPS Design answered:

Buongiorno Simona. Per avere maniche più lunghe, è sufficiente che, terminati gli aumenti sulle maniche, lavori per qualche cm in più rispetto a quanto indicato, prima di intrecciare le m per gli scalfi. Può esserle utile confrontare il suo lavoro con la manica di un indumento analogo della lunghezza giusta. Buon lavoro!

22.05.2015 - 14:29

country flag Mariann Kvinge wrote:

Hei. På slutten av bolen skal man strikke 1 rille over kun de 8 stolpemarkene i hver ende og felle til hals oppover. Skal man gjenta rillestrikkingen over de 8 maskene til man deler arbeidet, eller skal dét bare gjøres 1 gang? Takk for hjelp. Vh Mariann

21.12.2014 - 15:56

DROPS Design answered:

Hej Mariann, du gør det kun én gang i hver side.

09.02.2015 - 11:56

country flag Rita wrote:

Heb dit ook gebreid maar geen fouten ontdekt,hoor

14.12.2014 - 12:17