
Popular categories
Looking for a yarn?


Comments / Questions (61)
![]() Monique Henin wrote:
Monique Henin wrote:
Ik kan er kop nog staart aan krijgen! Spijtig want ik wou de sjaal maken voor mijn dochter die ze zo mooi vond. Ik kan echt niet aan de uitleg aan uit en ik ben geen beginneling in haken.
27.01.2014 - 14:24DROPS Design answered:
Hoi Monique. Het patroon is correct - maar ook wel een uitdaging ;-) Ik weet niet precies waar je tegen problemen loopt, maar ik heb gevraag voor een video van de eerste 4-5 toeren om duidelijk te maken hoe je begint. Ik kan niet zeggen wanneer deze klaar is, maar houd de site in de gaten.
07.02.2014 - 11:01
![]() Mariola wrote:
Mariola wrote:
Pattern is very well explained but still complicated and very difficult to make. Im stuck on row 5 and figuring it out takes too much time and it's just not fun any more.
24.11.2013 - 03:20
![]() Marie Söderström wrote:
Marie Söderström wrote:
Får inte till det på 3:de vavet efter 4:de blommans förstablad och vid virktips-1
20.05.2013 - 16:45
![]() Marie Söderström wrote:
Marie Söderström wrote:
Kan ni göra en video så man kan se hur ni gör? Blir bara fel vid v.3-4!
19.05.2013 - 18:03
![]() Marie Söderström wrote:
Marie Söderström wrote:
Marie Vivaldikan sjalen heta! Fråga: Hur man virkar när man gjort 2 hela blommor och 2 halva? får inte till det 2-3varvet.
19.05.2013 - 17:38
![]() Birgit Klingenfeld wrote:
Birgit Klingenfeld wrote:
Hallo, ich bitte Angelique ( Kommentar 17.02.2011 um die Fotos. Das Muster ist doch recht kompliziert. Danke Birgit
08.04.2013 - 22:15DROPS Design answered:
Liebe Birgit, bitte senden Sie uns Ihre emailadresse (an deutschland(at)garnstudio.com)und wir lassen Ihnen den link zukommen.
10.04.2013 - 08:27
![]() Angelique wrote:
Angelique wrote:
Beste Willemien, het patroon is correct, maar een lastig patroon voor gevorderden. Een collega van ons heeft foto's gemaakt van alle 6 toeren, wellicht helpen die. Stuur je ons je emailadres aan de email die bij alle patronen staat, dan sturen we je de pagina met de foto's. In dit veld kunnen we helaas geen emailadressen of links plaatsen.
17.02.2011 - 10:49
![]() Willemien wrote:
Willemien wrote:
In toer 5 van dit patroon kom ik niet verder.Bij:Zie tip voor het haken 2. Doe ik iets verkeerd of zit er in de beschrijving een foutje.
16.02.2011 - 20:52
![]() Trineline wrote:
Trineline wrote:
Jeg har heklet denne med Extra Fine Merino og jeg er skikkelig fornøyd. Det kan både brukes over skuldrene og rundt halsen, genialt. Må nok lage meg en til!
01.08.2010 - 15:55
![]() DROPS Design wrote:
DROPS Design wrote:
Det hekles nedenfra og opp og man starter med 4 lm.
01.03.2010 - 11:23
|
|||||||||||||||||||
Granada#granadashawl |
|||||||||||||||||||
|
|
|||||||||||||||||||
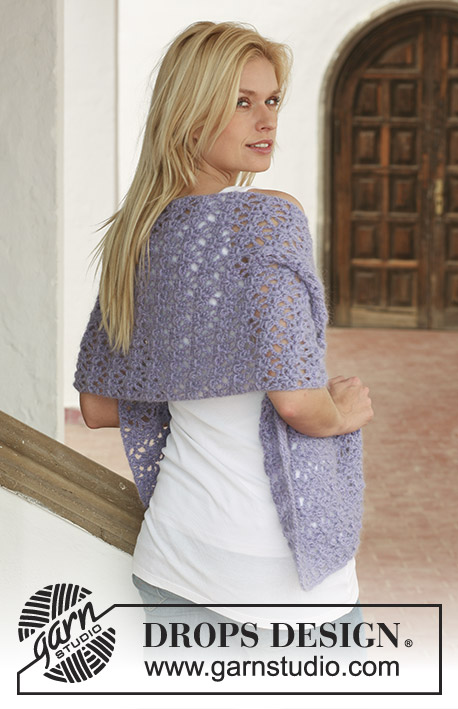
Crochet DROPS shawl with intricate flower pattern in ”Alpaca” or #BabyAlpaca Silk" and ”Vivaldi”.
DROPS 113-26 |
|||||||||||||||||||
|
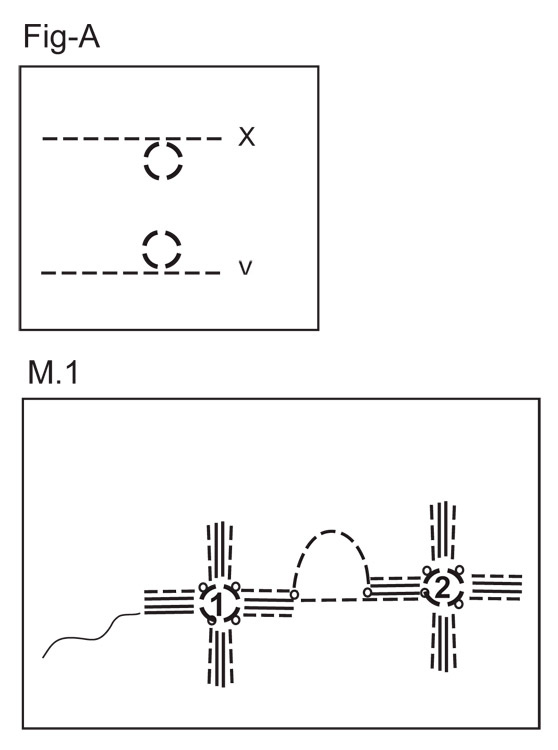
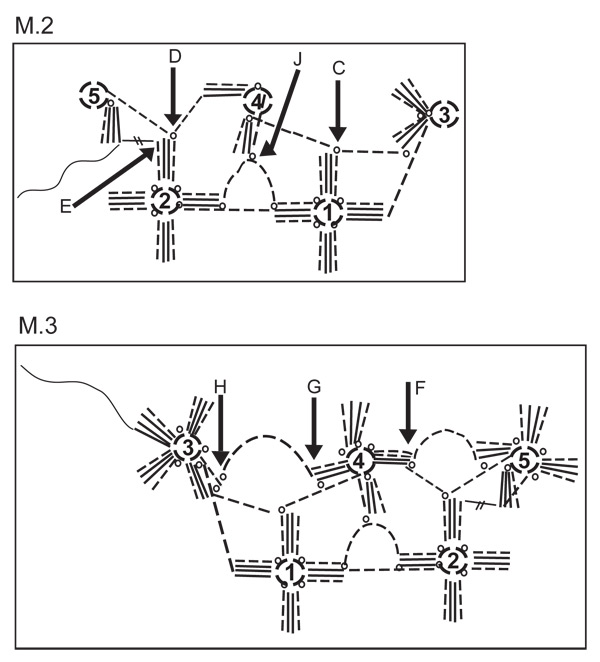
PATTERN: See diagram M.1 to M.3. M.1 shows the piece from the RS after the first 2 rows are crochet. M.2 shows the piece from the WS after the 3rd row. M.3 shows the piece from the RS after the 4th row. Fig-A shows how to turn the ch-ring. CROCHET TIP-1: Placed the ch-loop under the petal and crochet the next sl st from the front of piece again. CROCHET TIP-2: Place the ch-loop at a slant over the petal. The ch-loop will be visible but will line up with the pattern as you continue. ---------------------------------------------------------- ---------------------------------------------------------- SHAWL: Worked from the bottom up with 1 thread of each quality and crochet hook size 4.5 mm. Beg from the WS. ROW 1 (= WS): Work 4 ch, 1 sl st in first ch (= ch-ring), 3 ch, in ch-ring crochet: 2 tr, 3 ch, 1 sl st, 3 ch and 2 tr (= half of first flower), work 10 ch (= flower stalk), 1 sl st in 4th ch from hook (= ch-ring), 3 ch – before continuing turn ch-ring so that it faces away from you instead of towards you without turning the rest of piece (see fig A) - in ch-ring crochet: 2 tr, 3 ch, 1 sl st, 3 ch, 2 tr, 3 ch and 1 sl st (= half of 2nd flower). ROW 2 (= RS): Continue as follows in the same ch-ring: 3 ch, 2 tr, 3 ch, 1 sl st, 3 ch and 2 tr, then 1 sl st round flower stalk from the row below - 2nd flower is now finished. 7 ch (= flower stalk), 1 sl st in the first ch on flower stalk from the row below (i.e. in the ch closest to first flower), 3 ch, in ch-ring on the first flower crochet: 1 sl st, 3 ch, 2 tr, 3 ch, 1 sl st, 3 ch and 3 tr - first flower is now finished. See M.1 to see how the piece now looks from the RS. Turn piece. ROW 3: (= WS): Work 10 ch (= flower stalk), 1 sl st in 4th ch from hook (= ch-ring), 3 ch, round sl st crochet: 2 tr, 3 ch, 1 sl st, 3 ch and 2 tr, then 1 sl st round flower stalk from the row below (= half of 3rd flower), 4 ch, then 1 sl st (see C in M.2) at the top of the right side of 2nd petal on first flower. 10 ch (= flower stalk), 1 sl st in the 4th ch from hook (= ch-ring), 3 ch, 2 tr round sl st (centre of 4th flower). 1 sl st round flower stalk from the row below (see J in M.2), 4 ch – SEE CROCHET TIP-1! - 1 sl st in ch-ring on 4th flower, 3 ch and 2 tr in the same ch-ring (= half of 4th flower). 4 ch, 1 sl st at the top of the right side of the top petal on 2nd flower – see D in M.2. 10 ch (= flower stalk), 1 sl st in the 4th ch from hook (= ch-ring), 3 ch, 3 tr round ch-ring, 1 dbl-tr at the top of the left side of the top petal on 2nd flower – see E in M.2. Turn piece. ROW 4 (= RS): 4 ch, 1 sl st in ch-ring on 5th flower, 3 ch, in the same ch-ring crochet: 2 tr, 3 ch, 1 sl st, 3 ch, 2 tr, 3 ch, 1 sl st, 3 ch and 2 tr, 1 sl st round flower stalk from the row below, 7 ch (= flower stalk), 1 sl st at the top of the right side of 4th flower (i.e. where the 4-ch-chain from previous row begins) – see F in M.3. 3 ch – SEE CROCHET TIP -2! - 1 sl st round ch-ring in centre of 4th flower, 3 ch, in the same ch-ring crochet: 2 tr, 3 ch, 1 sl st, 3 ch and 2 tr, 1 sl st round flower stalk from the row below – see G in M.3. 7 ch, turn 3rd flower to make the ch-ring in the centre of flower point inwards towards the piece, work 1 sl st at the bottom on the right side of the bottom petal (i.e. where the ch-chain from previous row beg) – see H in M.3 - 3 ch, round ch-ring in the centre of flower crochet: 1 sl st, 3 ch, 2 tr, 3 ch, 1 sl st, 3 ch and 3 tr. There are now 5 whole flowers. Turn piece. ROW 5 (= WS): Work 10 ch (= flower stalk), 1 sl st in 4th ch from hook (= ch-ring), 3 ch, round sl st crochet: 2 tr, 3 ch, 1 sl st, 3 ch and 2 tr, then 1 sl st round flower stalk from the row below. * 4 ch, 1 sl st at the top of the right side of the top petal on the flower below (like C in M.2), 10 ch (= flower stalk), 1 sl st in 4th ch from hook (= ch-ring), 3 ch, 2 tr round sl st, 1 sl st round flower stalk from the row below (like J in M.2) 4 ch – SEE CROCHET TIP-1! - 1 sl st in ch-ring in the centre of flower you are about to crochet, 3 ch, 2 tr in the same ch-ring *, repeat from *-* until 1 flower remain on the row below, 4 ch, 1 sl st at the top of the right side of the top petal on the last flower from previous row (like D in M.2). 10 ch (= flower stalk), 1 sl st in 4th ch from hook (= ch-ring), 3 ch, 3 tr in ch-ring, 1 dtr at the top on the left side of the top petal on 5th flower (like E in M.2). Turn piece. ROW 6 (= RS): 3 ch, 1 sl st in ch-ring in the centre of flower, 3 ch, in the same ch-ring crochet: 2 tr, 3 ch, 1 sl st, 3 ch, 2 tr, 3 ch, 1 sl st, 3 ch and 2 tr, 1 sl st round flower stalk from the row below, * 7 ch (= flower stalk), 1 sl st at the top of the right side of next half flower (i.e. where the 4-ch-chain from previous row begins – like F in M.3), 3 ch, 1 sl st in ch-ring in the centre of flower, 3 ch, in the same ch-ring crochet: 2 tr, 3 ch, 1 sl st, 3 ch and 2 tr, 1 sl st round flower stalk from the row below *, repeat from *-* until 1 half flower remain. 7 ch (= flower stalk), turn the last half flower so that the ch-ring in the centre of flower points inwards towards piece, work 1 sl st at the bottom of the right side of the bottom petal (i.e. where ch-chain from previous row begins, like H in M.3), 3 ch, in ch-ring in the centre of flower crochet: 1sl st, 3 ch, 2 tr, 3 ch, 1 sl st, 3 ch and 3 tr. Turn piece. Repeat row 5 and 6 until shawl measures approx 140 cm across = approx 24 flowers on top row. |
|||||||||||||||||||
Diagram explanations |
|||||||||||||||||||
|
|||||||||||||||||||
 |
|||||||||||||||||||
 |
|||||||||||||||||||
Have you finished this pattern?Tag your pictures with #dropspattern #granadashawl or submit them to the #dropsfan gallery. Do you need help with this pattern?You'll find 6 tutorial videos, a Comments/Questions area and more by visiting the pattern on garnstudio.com. © 1982-2026 DROPS Design A/S. We reserve all rights. This document, including all its sub-sections, has copyrights. Read more about what you can do with our patterns at the bottom of each pattern on our site. |
|||||||||||||||||||


With over 40 years in knitting and crochet design, DROPS Design offers one of the most extensive collections of free patterns on the internet - translated to 17 languages. As of today we count 325 catalogues and 12298 patterns translated into English (UK/cm).
We work hard to bring you the best knitting and crochet have to offer, inspiration and advice as well as great quality yarns at incredible prices! Would you like to use our patterns for other than personal use? You can read what you are allowed to do in the Copyright text at the bottom of all our patterns. Happy crafting!
Post a comment to pattern DROPS 113-26
We would love to hear what you have to say about this pattern!
If you want to leave a question, please make sure you select the correct category in the form below, to speed up the answering process. Required fields are marked *.