
Popular categories
Looking for a yarn?


Comments / Questions (75)
![]() Theresa wrote:
Theresa wrote:
I have having some trouble with understanding the concept of the beginning of this pattern. Don't know how to get the twist and add the stitches as well. HELP!
08.08.2006 - 21:43
![]() Theresa wrote:
Theresa wrote:
I love the item. I am having trouble understanding the beginning. I got around the first half section, and my understanding is to knit back around til I get to the second half. Is this correct. Also, in the picture I noticed the stitches are in the round on the needle. When I get to the finishing part are these stitches still on the needle? I really want to make this item. HELP!
07.08.2006 - 23:03
![]() Drops Design wrote:
Drops Design wrote:
Som vi skriver i texten under förkl på moss-st: Maskantalet runt sjalen blir ett ojämnt tal på varvet då det plockas upp nya m i nederkanten på m på st, och pga sjalens vridning kommer maskorna automatiskt förskjuta sig till moss-st. Därför upprepas varv 1 runt hela sjalen.
13.03.2006 - 12:23
![]() kathe Sköldborg wrote:
kathe Sköldborg wrote:
Hej! mosstickning? det blir inte räta över räta aviga över avgiga varv 2 etc
13.03.2006 - 12:03
![]() Sari wrote:
Sari wrote:
Looks exciting, I`m itching to start knitting, I´ve already bought the alpaca-yarn, could I also get instructions, please!
11.02.2006 - 19:39annalena wrote:
en möbiussjal, perfekt. Jag har precis avslutat en. Det ser konstigt ut men resultatet blir bra. Kul med en ny i vår.
11.01.2006 - 20:32Lene wrote:
Den er sjov fundet på!
11.01.2006 - 17:00mette wrote:
love this 2
09.01.2006 - 13:55Mailinglisten wrote:
En gøyal ny modell
15.12.2005 - 01:00Mailinglisten wrote:
Underbar. Perfekt i alpaca!
14.12.2005 - 09:14
|
|
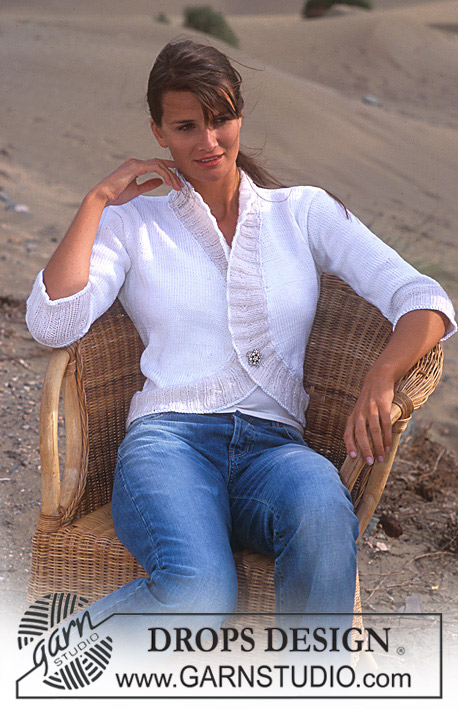
Sweet Siren |
|
|
|
|
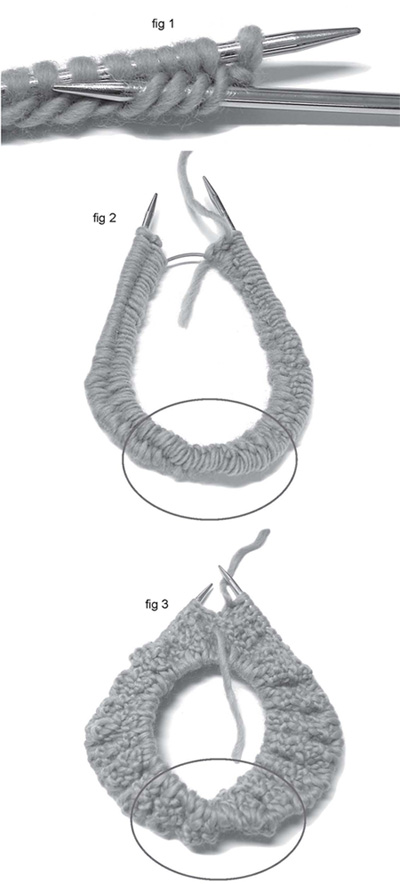
DROPS Moebius shawl in 1 thread Alpaca and 1 thread Vivaldi or 1 thread Alpaca and 2 threads Kid-Silk. Moebius was a German mathematician from the beginning of the 18th century. He developed and gave the name to the turned circle ring on which this design is based.
DROPS 94-16 |
|
|
Moss sts: 1st round: *K1, P1*, repeat from *-* until finished measurements. NB: The number of sts round the shawl will become odd on the round where new sts are picked up under the sts on row, and because of the twist in the shawl the sts will automatically shift and create the moss pattern. Therefore repeat round 1 througout. Knitting info: Knit on a circular needle 80 cm long. It is important that the needle is long as it has to twist as a spiral. Picking up tips (fig 1): (The wool used in fig. 1-3 is different to the one used in the pattern). It is the long loose end under the sts you need to use to pick up- see fig. 1. When picked up the sts tighten a bit. Shawl: The shawl is knitted in a twisted circle from the centre of the piece towards the outer edges – this means you knit upwards and down at the same time. All measurements are for the total piece (not from the centre and out). Bend the circular needle in the middle and cast on 160-176-192-208-224 sts (divisible by 4) using 2 needles size 5.5 with 1 thread of Alpaca and 1 thread of Vivaldi (= 2 threads)or with 1 thread Alpaca and 2 threads Kid-Silk (3 threads)- use to needle to make the cast on edge loose. Pull out one needle, the sts on pin are now very loose. Pick up new sts under all sts on round without knitting the sts on round (see fig. 1 and read picking up tips above – do not pick up under the 1st st on round). When finished picking up the circular needles are now like a twisted circle – fig. 2 = 319-351-383-415-447 sts. Now continue to knit in moss sts, (it is the sts on the needle tip which have to be knitted). The sts picked up will automatically come around to the needle tip later. After a few rounds the twist will become visible - see fig. 3. Knit in moss sts until the work measures 28-29-30-31-32 cm. Knit 2 sts in the 1st st on round = 320-352-384-416-448 sts. Continue in Rib, K2/P2 until the rib measures approx. 3 cm – at the same time on the last round knit a new st into every 4th sts = 400-440-480-520-560 sts. Bind off loosely with K over K and P over P. The work measures approx 35-36-37-38-39 cm. |
|
 |
|
Have you finished this pattern?Tag your pictures with #dropspattern or submit them to the #dropsfan gallery. Do you need help with this pattern?You'll find 10 tutorial videos, a Comments/Questions area and more by visiting the pattern on garnstudio.com. © 1982-2026 DROPS Design A/S. We reserve all rights. This document, including all its sub-sections, has copyrights. Read more about what you can do with our patterns at the bottom of each pattern on our site. |


With over 40 years in knitting and crochet design, DROPS Design offers one of the most extensive collections of free patterns on the internet - translated to 17 languages. As of today we count 325 catalogues and 12298 patterns translated into English (UK/cm).
We work hard to bring you the best knitting and crochet have to offer, inspiration and advice as well as great quality yarns at incredible prices! Would you like to use our patterns for other than personal use? You can read what you are allowed to do in the Copyright text at the bottom of all our patterns. Happy crafting!
Post a comment to pattern DROPS 94-16
We would love to hear what you have to say about this pattern!
If you want to leave a question, please make sure you select the correct category in the form below, to speed up the answering process. Required fields are marked *.