
Popular categories
Looking for a yarn?


Comments / Questions (168)
![]() Hilde wrote:
Hilde wrote:
Kommer denne som jakke?
28.07.2024 - 18:08DROPS Design answered:
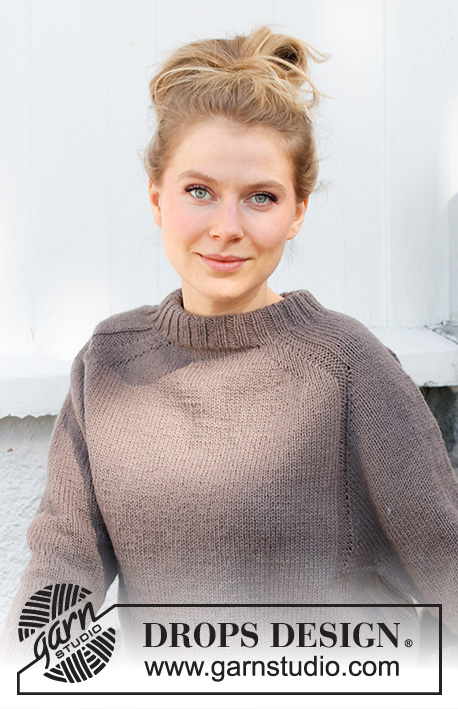
Hei Hilde, Oppskriften er ikke helt lik genseren, men den nærmeste vi har foreløpig til "ks-168" er "as-167". God fornøyelse!
29.07.2024 - 06:42
![]() Ronja wrote:
Ronja wrote:
Denne skulle jeg gjerne strikket som jakke. Kommer det en slik oppskrift?
26.07.2024 - 07:49
![]() Tenna Skjoldan wrote:
Tenna Skjoldan wrote:
Deter nok den dårligst beskrevet opskrift jeg har prøvet hos drops. Et rod af diagrammer, med en meget ringe beskrivelse til håndteringen af raglan fortsat. Og billederne er ikke til meget hjælp. Noget passer ikke sammen. Og slet ikke diagram og tekst. Nu piller jeg op igen, og så strikker jeg så forsat som fra start a1 og a2.
25.07.2024 - 01:04
![]() Rara wrote:
Rara wrote:
Bonjour, Merci de votre réponse mais je bloque toujours pour commencer A3 . Avec A3 il n'y a plus qu'un motif de triangle rectangle qui se forme pour commencer après les raglans alors qu'avec A1 ou A2 c'était un triangle équilatéral qui se forme juste après et avant le raglan. C'est bien ça ? Du coup le raglan va changer d'orientation et ne sera plus une ligne droite, c'est bien ça ? Merci
10.02.2024 - 20:25DROPS Design answered:
Bonjour Rara, vous devez continuer à augmenter exactement comme avant et tricoter les nouvelles mailles avant A.3A comme au début de A.1 et les nouvelles mailles après A.3C comme à la fin de A.1, autrement dit, vous les tricotez en jersey endroit, et à l'envers au dernier tour de A.3, lorsque vous avez tricoté 1 fois A.3 en hauteur, tricotez de nouveau A.3A, répétez A.3B et terminez par A.3C en augmentant de chaque côté comme avant; les raglans doivent toujours être en diagonale car on augmente au début + à la fin de chaque séquence du point ajouré. Bon tricot!
12.02.2024 - 07:32
![]() Rara wrote:
Rara wrote:
Bonjour, le motif A3 remplace les motifs a1 et a2? Qu'est ce qui change avec A3 par rapport à l'alternance des motifs a1/a2 ? Merci Merci
08.02.2024 - 23:01DROPS Design answered:
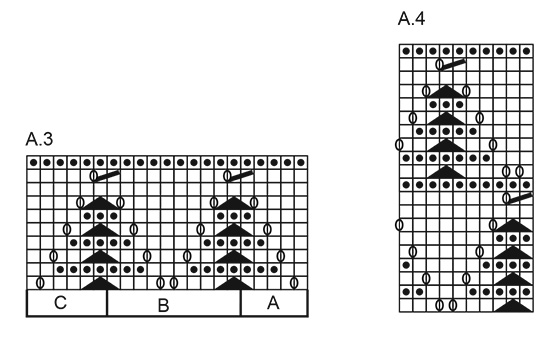
Bonjour Rara, A.3A montre comment commencer le point ajouré (mais continuez à augmenter comme avant au début de A.1), A.3B correspond au motif à répéter, A.3C montre comment terminer le point ajouré avant le raglan suivant (mais continuez à augmenter comme à la fin de A.1). Bon tricot!
09.02.2024 - 08:17
![]() Rara wrote:
Rara wrote:
En taille s, combien de fois faut il tricoter A3 en hauteur ? Merci
08.02.2024 - 22:51DROPS Design answered:
Bonjour Rara, vous tricotez le point fantaisie sur l'empiècement (en augmentant pour le raglan) jusqu'à ce qu'il mesure 23 cm (si vous n'avez pas la bonne hauteur, continuez le point fantaisie sans augmenter). Bon tricot!
09.02.2024 - 08:13
![]() Rara wrote:
Rara wrote:
En taille s, combien de fois faut il tricoter A3 en hauteur ?
08.02.2024 - 22:50
![]() Alicja wrote:
Alicja wrote:
Po przeliczeniu oczek na karczku okazało się, że źle robiłam A3 bo nie dodawałam oczek na początku i końcu tego schematu. Opis wykonania karczku wymaga korekty, bo wprowadza w błąd. Nie pisze o narzucaniu dodatkowych oczek. Skąd się wzięło te 332 oczka dla rozmiaru L?
08.01.2024 - 21:30DROPS Design answered:
Witaj Alicjo, we wzorze jest napisane, aby W TYM SAMYM CZASIE co jest przerabiany schemat A.3, dalej były przerabiane schematy A.1 i A.2 i dodawane oczka. Spróbujemy to skorygować, aby było jaśniej. Skąd 332 oczka – skoro co 2 okrążenia 8 oczek, a w rozmiarze L powtarzamy to 30 razy to: 92 oczka początkowe+(30x8)= 92+240=332 oczka. Pozdrawiamy!
09.01.2024 - 17:09
![]() Anne HEOUAIRI wrote:
Anne HEOUAIRI wrote:
Bonjour et merci pour votre réponse précédente. J’ai commencé à tricoter A3 comme indiqué mais les 2 mailles jersey qui forment le raglan disparaissent si on enchaîne A3B jusqu’au 6 dernières mailles. Comment faire pour conserver des 4 ranglans en enchaînant A3B sans tricoter les deux mailles jersey nécessaires et les jetés nécessaires à la formation du raglan ? Merci de votre aide Anne
05.01.2024 - 18:18DROPS Design answered:
Bonjour Mme Heouairi, en tricotant A.1 vous continuez à augmenter avant A.3A et après A.3B, autrement dit, vous allez tricoter les nouvelles mailles à l'endroit (ou à l'envers selon les rangs), exactement comme vous l'aviez fait au début et à la fin de A.1 juste avant. Les jetés des raglan doivent toujours être au même niveau: de chaque côté des 2 mailes jersey. Bon tricot!
08.01.2024 - 09:33
![]() Anne Heouairi wrote:
Anne Heouairi wrote:
Bonjour, je tricote le modèle en taille L. J’ai commencé la grille A1 au milieu et la A2 au début. Du coup j’ai fini la A1 avant la A2. Dois je continuer avec la A3 alors que la A2 n’est pas terminée ou dois-je continuer jusqu’au bout de la A2 en continuant le même motif sur la partie A1? Merci
29.12.2023 - 00:43DROPS Design answered:
Bonjour Mme Heouairi, vous devez continuer à augmenter comme avant, tricotez A.3 tout en augmentant comme avant dans A.1, le motif va continuer progressivement comme avant. Bon tricot!
02.01.2024 - 10:11
|
||||||||||||||||
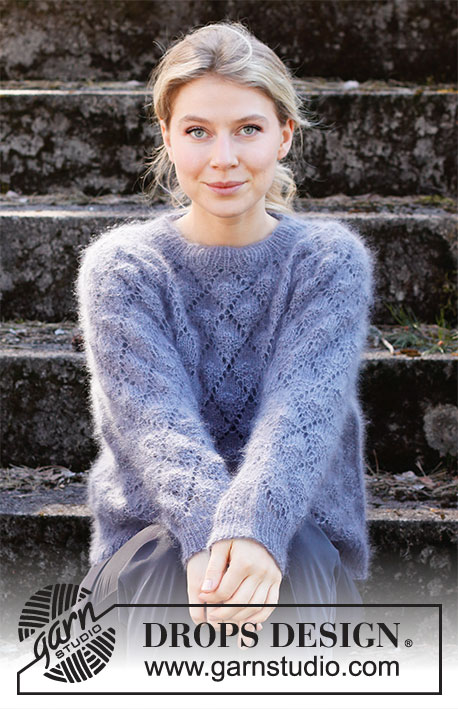
Frosted Leaves#frostedleavessweater |
||||||||||||||||
 |
 |
|||||||||||||||
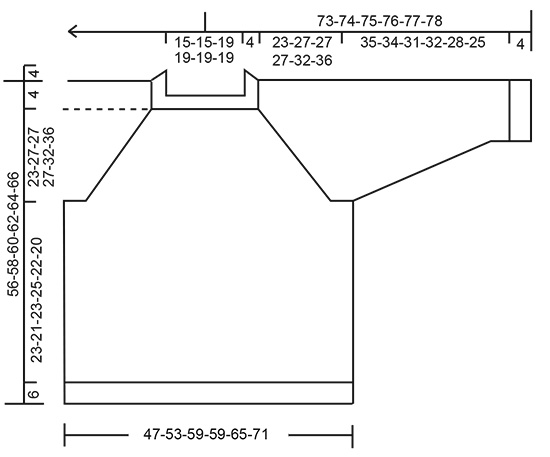
Knitted jumper in 1 strand DROPS Brushed Alpaca Silk or 2 strands DROPS Kid-Silk. The piece is worked top down with raglan and lace pattern. Sizes S - XXXL.
DROPS 216-3 |
||||||||||||||||
|
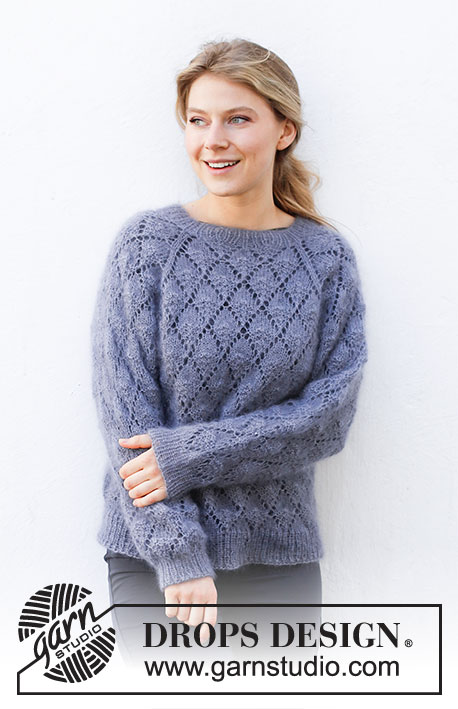
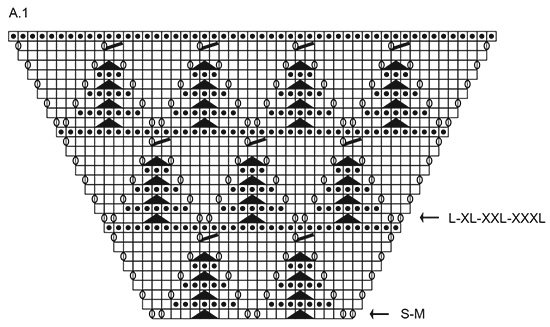
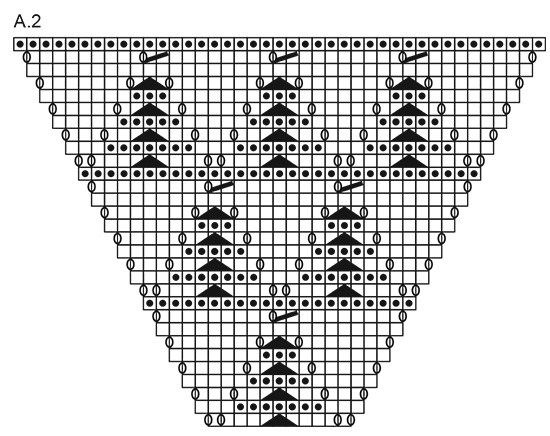
------------------------------------------------------- EXPLANATIONS FOR THE PATTERN: ------------------------------------------------------- PATTERN: See diagrams A.1 to A.4 DECREASE TIP-1 (evenly spaced): To work out how to decrease evenly, count the total number of stitches on needle (e.g. 48 stitches) and divide by number of decreases to be made (e.g. 8) = 6. In this example decrease by knitting each 5th and 6th stitch together. DECREASE TIP-2 (for sleeves): Decrease 1 stitch on either side of the marker thread as follows: Work until there are 3 stitches left before the marker thread, knit 2 together, knit 2 (marker thread sits between these 2 stitches), slip 1 stitch as if to knit, knit 1 and pass the slipped stitch over the knitted stitch (= 2 stitches decreased). CASTING-OFF TIP: To avoid the cast-off edge being tight you can cast off with a larger size needle. If the edge is still tight, make 1 yarn over after approx. each 4th stitch at the same time as casting off; the yarn overs are cast off as normal stitches. ------------------------------------------------------- START THE PIECE HERE: ------------------------------------------------------- JUMPER – SHORT OVERVIEW OF THE PIECE: The neck and yoke are worked in the round with circular needle, top down. The yoke is divided for body and sleeves and the body continued in the round with circular needle. The rounds start at the transition between sleeve and back piece. The sleeves are worked in the round with short circular needle/double pointed needles, top down. The piece is worked with 1 strand Brushed Alpaca Silk or 2 strands Kid-Silk. NECK: Cast on 72-72-92-92-92-92 stitches with circular needle size 4 mm and 1 strand Bruched Alpaca Silk or 2 strands Kid-Silk. Knit 1 round. Then work rib (knit 1, purl 1) for 4 cm. Insert 1 marker at the beginning of the round. The yoke will be measured from this marker. Change to circular needle size 5 mm and work the yoke as described below. REMEMBER THE KNITTING TENSION! YOKE: On the next round work pattern as follows: Work 1 stitch in stocking stitch, A.1 (= 21-21-31-31-31-31 stitches, see start-arrow for your size), 2 stitches in stocking stitch, A.2 (= 11 stitches), 2 stitches in stocking stitch, A.1 (= 21-21-31-31-31-31 stitches, see start-arrow for your size), 2 stitches in stocking stitch, A.2 (= 11 stitches) and 1 stitch in stocking stitch. Continue this pattern; all increases are drawn into the diagrams. 8 stitches are increased every 2nd round. When A.1 and A.2 have been worked 1 time in height, continue with A.3. Work A.3 A over the first 5 stitches, repeat A.3 B until there are 6 stitches left on the row and work A.3 C over the last 6 stitches. Each time A.3 has been worked 1 time in height there is room for 1 more repeat of A.3 B in width. Continue the increases as shown in A.1 and A.2. Increase every 2nd round a total of 25-30-30-30-35-40 times = 272-312-332-332-372-412 stitches. The piece measures approx. 23-27-27-27-32-36 cm from the marker thread. Now divide the yoke for body and sleeves as follows (continue the pattern as before; you should be on the last round in a repeat of A.3, where all stitches are purled): Work 73-83-93-93-103-113 stitches (= back piece), place the next 63-73-73-73-83-93 stitches on 1 thread for the sleeve, cast on 7 new stitches on the needle (= in side under sleeve), work 73-83-93-93-103-113 stitches as before (= front piece), place the next 63-73-73-73-83-93 stitches on 1 thread for the sleeve and cast on 7 new stitches on the needle (= in side under sleeve). Body and sleeves are finished separately. Cut the strand. BODY: = 160-180-200-200-220-240 stitches. Start 3 stitches before the 7 new stitches cast on in the side and work A.4 over all stitches; make sure the pattern matches the pattern on the yoke. Continue working until the piece measures 23-21-23-25-22-20 cm from the division (there is approx. 6 cm left to finished length; you can try the jumper on and work to desired length). Change to circular needle size 4 mm and work rib (knit 1, purl 1) for 6 cm. Cast off with knit over knit and purl over purl – read CASTING-OFF TIP! The jumper measures approx. 56-58-60-62-64-66 cm from the shoulder down. SLEEVES: Place the 63-73-73-73-83-93 stitches from the thread on the one side of the piece on short circular needle/double pointed needles size 5 mm and knit up 1 stitch in each of the 7 stitches cast on under the sleeve = 70-80-80-80-90-100 stitches. Insert a marker thread in the middle of the 7 stitches under the sleeve. Allow the thread to follow your work onwards; it will be used when decreasing under the sleeve. Cut the strand and start working 3 stitches before the new stitches under the sleeve and continue the pattern in the round according to A.4; make sure the pattern matches the pattern on the yoke. When the sleeve measures 3 cm from the division in all sizes, decrease 2 stitches mid under the sleeve – read DECREASE TIP-2. Decrease like this every 3-2-1½-2-1-1 cm a total of 11-15-15-13-17-21 times = 48-50-50-54-56-58 stitches. The stitches which do not fit into the pattern when decreasing are worked in stocking stitch. Continue working until the sleeve measures 35-34-31-32-28-25 cm from the division (there is approx. 4 cm left to finished length; you can try the jumper on and work to desired length). NOTE: Shorter measurements in larger sizes due to wider neck and longer yoke. Knit 1 round where you decrease 8 stitches evenly spaced – read DECREASE TIP-1 = 40-42-42-46-48-50 stitches. Change to double pointed needles size 4 mm and work rib (knit 1, purl 1) for 4 cm. Cast off with knit over knit and purl over purl – remember CASTING-OFF TIP! The sleeve measures approx. 39-38-35-36-32-29 cm from the division. Work the other sleeve in the same way. |
||||||||||||||||
Diagram explanations |
||||||||||||||||
|
||||||||||||||||
 |
||||||||||||||||
 |
||||||||||||||||
 |
||||||||||||||||
 |
||||||||||||||||
Have you finished this pattern?Tag your pictures with #dropspattern #frostedleavessweater or submit them to the #dropsfan gallery. Do you need help with this pattern?You'll find 26 tutorial videos, a Comments/Questions area and more by visiting the pattern on garnstudio.com. © 1982-2026 DROPS Design A/S. We reserve all rights. This document, including all its sub-sections, has copyrights. Read more about what you can do with our patterns at the bottom of each pattern on our site. |
||||||||||||||||


With over 40 years in knitting and crochet design, DROPS Design offers one of the most extensive collections of free patterns on the internet - translated to 17 languages. As of today we count 325 catalogues and 12298 patterns translated into English (UK/cm). 12298
We work hard to bring you the best knitting and crochet have to offer, inspiration and advice as well as great quality yarns at incredible prices! Would you like to use our patterns for other than personal use? You can read what you are allowed to do in the Copyright text at the bottom of all our patterns. Happy crafting!
Post a comment to pattern DROPS 216-3
We would love to hear what you have to say about this pattern!
If you want to leave a question, please make sure you select the correct category in the form below, to speed up the answering process. Required fields are marked *.