
Popular categories
Looking for a yarn?


Comments / Questions (71)
![]() Miriam wrote:
Miriam wrote:
Hallo, ich bin gerade an der Stelle, wo am Ärmel das erste Mal abgenommen werden soll. Nur leider ist bei mir die rechte Masche mit dem Markierer genau da, wo die Runde anfängt. Habe ich da etwas falsch gemacht? Ich habe noch mal alles überprüft und glaube eigentlich, dass es so richtig sein müsste. Aber dann kommt es mit dem Muster nicht hin, weil die Maschen vor dem Markierer ja noch anders (mit Umschlägen) gestrickt werden... Viele Grüße, Miriam
21.02.2024 - 10:14DROPS Design answered:
Liebe Miriam, die Abnahmenrunde so anpassen, damit die rechten Maschen zusammen mit ihrem Umschlag gestrickt werden, aber die Abnahmen beginnen 3 Maschen davor, dh die 2 letzten Maschen der Runde (die Runde wo man die Umschläge machen soll) + die erste Masche (= die mit der Markierung) abheben, dann die 2 nächsten Maschen rechts zusammen stricken und die abgehobenen Maschen über die gestrickte Masche ziehen, die Markierung in dieser Masche einsetzten. Viel Spaß beim stricken!
21.02.2024 - 14:59
![]() Germana wrote:
Germana wrote:
Salve, ho avviato i 108 punti iniziali con i ferri circolari da 80, ma risultano troppo lunghi, quelli da 40 sono troppo corti, siete sicuri che le indicazioni siano corrette?
04.02.2024 - 20:48DROPS Design answered:
Buonasera Germana, può lavorare con i ferri da 40 cm fino a raggiungere il numero di maglie necessario per lavorare con gli 80 cm. Buon lavoro!
25.02.2024 - 16:35
![]() Berbett wrote:
Berbett wrote:
Bonjour, Ma question porte sur les diminutions. Comment glisser les jetées ? Comment passer les 3 mailles glissées ainsi que les jetés par-dessus les mailles tricotées ensemble ? Merci d'avance.
28.01.2024 - 10:37
![]() Berbett wrote:
Berbett wrote:
Bonjour, Ma question porte sur les diminutions. Comment glisser les jetées ? Comment passer les 3 mailles glissées ainsi que les jetés par-dessus les mailles tricotées ensemble ? Merci d'avance.
28.01.2024 - 10:32DROPS Design answered:
Bonjour Berbett, glissez les jetés en même temps que la maille à laquelle ils appartiennent, autrement dit, quand vous devez glisser 1 maille mais que c'est une maille avec jeté, glissez cette maille et son jeté (qui ne comptent que pour une maille). Pour passer les 3 mailles glissées par-dessus, vous pouvez insérer l'aiguille gauche de gauche à droite dans ces 3 mailles glissées et les passer par-dessus les mailles tricotées ensemble , ou bien les passer une par une, si c'est plus simple pour vous. Bon tricot!
29.01.2024 - 12:11
![]() Paulette KRENTNER wrote:
Paulette KRENTNER wrote:
Bonsoir, je ne vois pas les explications concernant les fausses côtes anglaises. Je vous est adressé également un message concernant les aiguilles circulaires doit-on mesurer entièrement les aiguilles plus le câble pour avoir par exemple des aiguilles 80 cm pour faire ce joli pull. Merci de me répondre.🌺🧚♀️
17.01.2024 - 17:37DROPS Design answered:
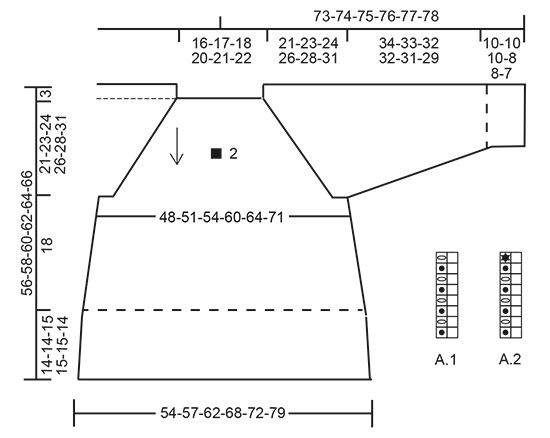
Bonjour Mme Krentner, le point fantaisie est expliqué ici sous forme de diagramme, vous retrouvez les diagrammes A.1 et A.2 à droite du schéma des mesures, sous la manche. La longueur d'une aiguille circulaire se mesure en général d'une pointe à l'autre. Bon tricot!
18.01.2024 - 08:36
![]() Germana wrote:
Germana wrote:
SAlve, i ferri a doppia punta di quale lunghezza devono essere? grazie
05.01.2024 - 22:37DROPS Design answered:
Buongiorno Germana, deve utilizzare la misura con cui lavora più comodamente. Buon lavoro!
07.01.2024 - 12:57
![]() Susanna wrote:
Susanna wrote:
Vorrei sapere se avete un video che spiega come fare le diminuzioni per le maniche. Come si fa a calare sul giro dove la maglia gettata e la maglia diritto vengono lavorate insieme . Se devo calare ai lati del segnapunti significa che ne calo due a fine ferro e gli altri due all’inizio del successivo ? Grazie
19.02.2022 - 16:57DROPS Design answered:
Buonasera Susanna, si, deve diminuire le maglie all'inizio di un ferro e all'inizio dell'altro. Buon lavoro!
05.03.2022 - 22:15
![]() Caroline wrote:
Caroline wrote:
Bij de meerderingen voor het lijf onder de mouw doen je een markeerdraad in de middelste steek te plaatsen. Vermits ik 10 steken moest opzetten, is er geen middelste steek. Kies ik dan best steek 5 of steek 6 als middelste steek? Dankjewel
26.01.2022 - 21:29DROPS Design answered:
Dag Caroline,
De markeerdraad moet je in een rechte steek plaatsen, dus in een steek die steeds recht gebreid wordt in het patroon. Dat zal inderdaad de 5e of 6e steek zijn dan, maar het moet dus wel een rechte steek zijn en geen averechte.
30.01.2022 - 14:06
![]() Pia Larsen wrote:
Pia Larsen wrote:
Hej. Jeg kan ikke finde ud af om denne bluse er strikket i patent, eller om det bare er det øverste stykke. Jeg syntes at det er svært at forstå opskriften. Mvh Pia Larsen
13.01.2022 - 12:33DROPS Design answered:
Hej Pia, den er strikket i falsk patent, som du kan se på et af billederne er det nederste stykke strikket i glatstrik. God fornøjelse!
17.01.2022 - 13:47
![]() Sigrid wrote:
Sigrid wrote:
Hei, jeg skjønner ikke hvordan man skal felle på ermene. Finnes det en video for dette?
12.07.2021 - 23:15DROPS Design answered:
Hej Sigrid, den her kan hjælpe dig: Hvordan felle 4 masker i patent
14.07.2021 - 10:00
|
|||||||||||||||||||
Last Days of Autumn#lastdaysofautumnsweater |
|||||||||||||||||||
 |
 |
||||||||||||||||||
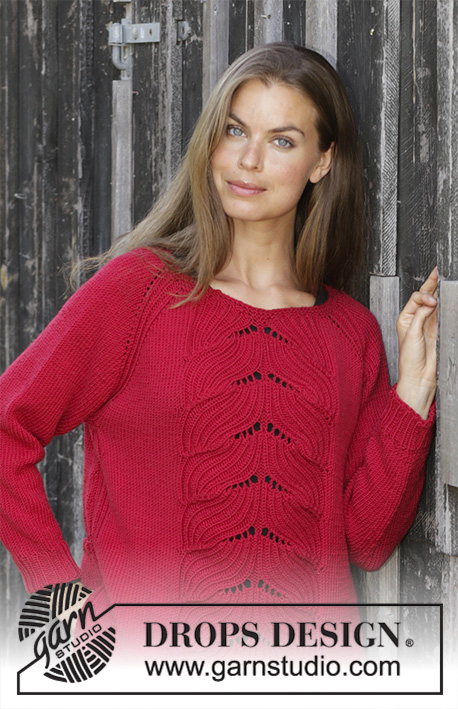
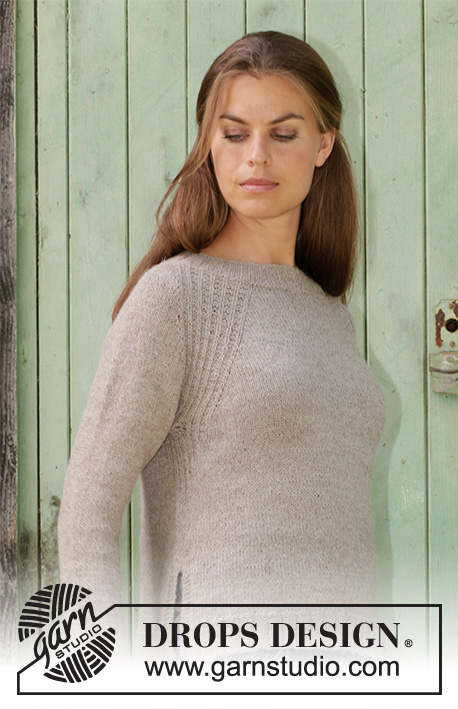
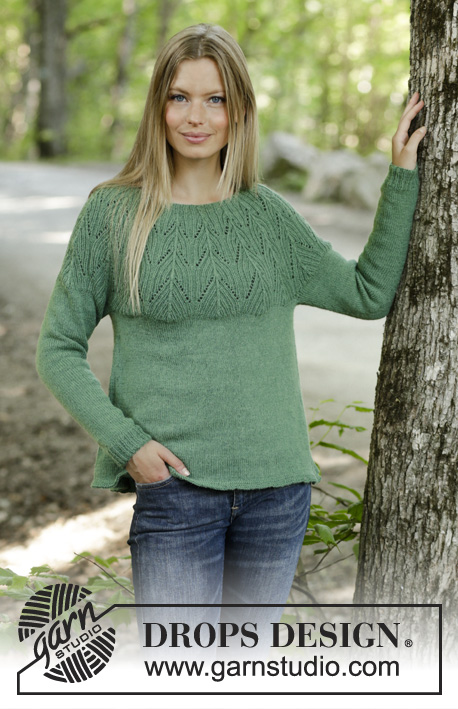
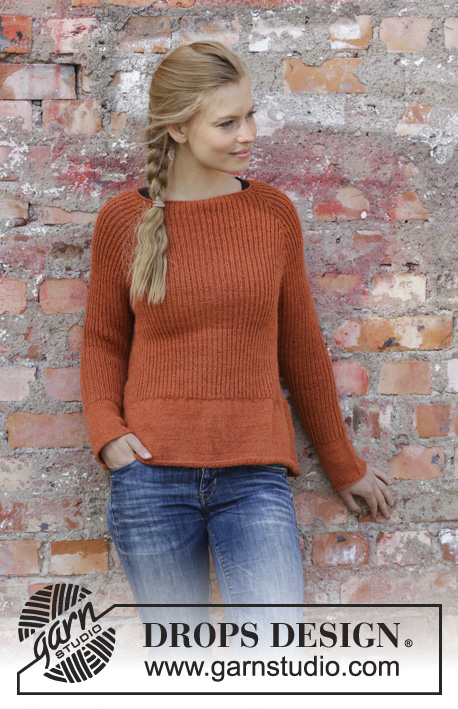
Knitted jumper with raglan in DROPS Alpaca. The piece is worked top down in false English rib and with rolled edge. Sizes S - XXXL.
DROPS 197-2 |
|||||||||||||||||||
|
------------------------------------------------------- EXPLANATIONS FOR THE PATTERN: ------------------------------------------------------- PATTERN: See diagrams A.1 and A.2. KNITTING TENSIONS: The texture of the garment will stretch when worn; we have therefore given 2 knitting tensions and 2 sketches. Knitting tension 1 and sketch 1 apply when the garment is worked and lies flat. It is this/these knitting tensions/measurements the piece should have when worked. Knitting tension 2 and sketch 2 are for when the garment is worn. The knitting tension in height is given after the knitted stitch, which is worked over 1 row less than the purled stitch, because the knitted stitch is slipped onto the right needle every 2nd round. In other words, 24 rows in height measured in the knitted stitch on 10 cm are equivalent to 48 rows measured in the purled stitch on 10 cm in height. INCREASE TIP-1 (for sides of body): All increases are made on a round where the yarn over and knitted stitch are knitted together! Work 5 stitches in the stitch and yarn over as follows: Knit the yarn over and stitch together, but wait to slip the yarn over and worked stitch off the needle, * make 1 yarn over the right needle and knit 1 more stitch in the stitch and yarn over worked *, work from *-* a total of 2 times = 5 stitches (= 4 stitches increased). Increase like this by both markers (= a total of 8 stitches increased). The increased stitches are worked into the pattern. INCREASE TIP-2 (evenly spaced): To work out how to increase evenly, count the total number of stitches on the needle (e.g. 216 stitches) and divide these stitches by the number of increases to be made (e.g. 44) = 4.9. In this example, increase by making 1 yarn over after approx. each 5th stitch. On the next round, knit the yarn overs twisted to avoid holes. DECREASE TIP (for sleeves): All decreases are made on a round where the yarn over and knitted stitch are knitted together! Decrease as follows: Work until there are 3 stitches left before the marker thread (without the yarn overs, the yarn overs between the stitches are also slipped), slip the next 3 stitches to right needle as if to knit together: Slip 1 knit stitch + 1 purl stitch + 1 knit stitch (= stitch with marker) = 3 stitches without the yarn overs. Then knit together: 1 purl stitch and 1 knit stitch (= 2 stitches). Now pass the 3 slipped stitches over the stitches that was knitted together (= 4 stitches decreased – not counting the yarn overs). ------------------------------------------------------- START THE PIECE HERE: ------------------------------------------------------- JUMPER - SHORT OVERVIEW OF THE PIECE: The piece is worked in the round with circular needle, top down. The yoke is worked first in false English rib, then the yoke is divided for body and sleeves. The body is continued in the round. The sleeves are worked in the round with double pointed needles. As the garment is worked with a texture which will stretch when worn, we have given 2 KNITTING TENSIONS – read description above. YOKE: Cast on 108-112-116-124-132-136 stitches with circular needle size 3 mm and Alpaca. Work 4 rounds stocking stitch (= rolled edge). Then work pattern as follows: The round starts approx. mid back. Half back piece: Work A.1 (= 2 stitches) over the first 20-20-22-24-26-26 stitches. Right sleeve: Work A.2 (= 2 stitches), A.1 over the next 12 stitches, A.2 over the next 2 stitches. Front piece: Work A.1 over the next 38-40-42-46-50-52 stitches. Left sleeve: Work A.2 over the next 2 stitches, A.1 over the next 12 stitches, A.2 over the next 2 stitches. Half back piece: Work A.1 over the last 18-20-20-22-24-26 stitches. On round 8 (i.e. every 4th round in the knitted stitch) in A.2 increase 4 stitches in each A.2 (= a total of 16 stitches, the increase is drawn in the diagram), the increased stitches are worked into pattern A.1. Continue the pattern like this in height. I.e. you increase a total of 16 stitches every 8th round. REMEMBER THE KNITTING TENSION! Work A.1 and A.2 a total of 12-13-14-15-16-18 times in height. In other words, you have now increased 12-13-14-15-16-18 times = 300-320-340-364-388-424 stitches. Continue working A.1 over all stitches until the piece measures 21-23-24-26-28-31 cm from the cast-on edge. Now divide the piece for body and sleeves as follows: Half back piece: Work pattern as before over the first 44-46-50-54-58-64 stitches. Right sleeve: Place the next 64-68-72-76-80-84 stitches on a thread for sleeve and cast on 10-10-10-14-14-14 stitches under the sleeve. Front piece: Work pattern as before over the next 86-92-98-106-114-128 stitches. Left sleeve: Place the next 64-68-72-76-80-84 stitches on a thread for sleeve and cast on 10-10-10-14-14-14 stitches under the sleeve. Half back piece: Work pattern as before over the last 42-46-48-52-56-64 stitches. BODY: = 192-204-216-240-256-284 stitches. Continue in the round with pattern. When the piece measures 3 cm from where the body and sleeves were divided, insert 1 marker in the middle knitted stitch under each sleeve (= in sides). On the next round (adjust so that the next round is a round where the yarn over and knitted stitch are knitted together), increase in the stitch with the marker under each sleeve – read INCREASE TIP-1. Increase like this every 5-5-4-4-4-4 cm a total of 3-3-4-4-4-4 times = 216-228-248-272-288-316 stitches. When the piece measures 18 cm from where the body and sleeves were divided (adjust so that the last round is a round without yarn overs) continue working in stocking stitch. On first round in stocking stitch increase 44-44-48-56-56-64 stitches evenly on round – read INCREASE TIP-2 = 260-272-296-328-344-380 stitches. When the piece measures 31-31-32-32-32-31 cm from where the body and sleeves were divided, work rib in the round (= knit 3, purl 1). Work a total of 3 rounds. Then knit 1 round before casting off with knit. SLEEVE: Knit up 1 stitch in each of the last 5-5-5-7-7-7 stitches that where cast on under the sleeve, work the 64-68-72-76-80-84 stitches from the thread on one side of the piece and knit up 1 stitch in each of the first 5-5-5-7-7-7 stitches that where cast on under the sleeve = 74-78-82-90-94-98 stitches. Work pattern in the round. When the piece measures 3 cm from where the sleeve was divided from the body, insert 1 marker in the middle knitted stitch under the sleeve. On the next round (adjust so that the next round is 1 round where the yarn over and knitted stitch are knitted together), decrease 2 stitches on each side of the stitch with the marker - read DECREASE TIP. Decrease like this every 5-4-3½-3-2½-2½ cm a total of 7-8-9-10-11-11 times = 46-46-46-50-50-54 stitches. When the sleeve measures 34-33-32-32-31-29 cm from where the sleeve was divided from the body (adjust so that the last round is a round without yarn overs) continue working stocking stitch. On the first round with stocking stitch increase 10 stitches evenly on round = 56-56-56-60-60-64 stitches. Work stocking stitch until the piece measures 43-42-41-39-38-35 cm from where the sleeve was divided from the body. On the next round work rib in the round (= knit 3, purl 1). Work a total of 3 rounds of rib. Knit 1 round and cast off with knit. The sleeve measures approx. 65-66-66-66-67-67 cm from the cast-on edge. Work the other sleeve in the same way. |
|||||||||||||||||||
Diagram explanations |
|||||||||||||||||||
|
|||||||||||||||||||
 |
|||||||||||||||||||
 |
|||||||||||||||||||
Have you finished this pattern?Tag your pictures with #dropspattern #lastdaysofautumnsweater or submit them to the #dropsfan gallery. Do you need help with this pattern?You'll find 20 tutorial videos, a Comments/Questions area and more by visiting the pattern on garnstudio.com. © 1982-2026 DROPS Design A/S. We reserve all rights. This document, including all its sub-sections, has copyrights. Read more about what you can do with our patterns at the bottom of each pattern on our site. |
|||||||||||||||||||


With over 40 years in knitting and crochet design, DROPS Design offers one of the most extensive collections of free patterns on the internet - translated to 17 languages. As of today we count 324 catalogues and 12290 patterns translated into English (UK/cm). 12290
We work hard to bring you the best knitting and crochet have to offer, inspiration and advice as well as great quality yarns at incredible prices! Would you like to use our patterns for other than personal use? You can read what you are allowed to do in the Copyright text at the bottom of all our patterns. Happy crafting!
Post a comment to pattern DROPS 197-2
We would love to hear what you have to say about this pattern!
If you want to leave a question, please make sure you select the correct category in the form below, to speed up the answering process. Required fields are marked *.