
Popular categories
Looking for a yarn?


Comments / Questions (52)
![]() Else Marie Lund wrote:
Else Marie Lund wrote:
Venstre forstykke:Strik fra siden til midt foran----hvad er midt foran???er det 20 masker fra kant(flæsekant)eller er det midten af antal masker af valgte str??.Ellers TAK for gode opskrifter
12.02.2012 - 11:19DROPS Design answered:
Det er en forklaring om at du strikker første pind fra retsiden, det bliver da fra siden (under armen) mod midt foran og du strikker 1.p hele vejen ud. God fornøjelse!
29.02.2012 - 11:56
![]() DROPS Design NL wrote:
DROPS Design NL wrote:
Hoi Margriet. Wij schrijven standaard het aantal nld in onze patronen. Dus 2 nld zijn altijd 2 nld en geen ribbels - tenzij - anders wordt vermeld in het patroon.
18.11.2011 - 10:13
![]() Margriet wrote:
Margriet wrote:
Aan het eind van de beschrijving van het linkervoorpand staat: Brei 2 nld heen en weer over alle st. Ik heb dit opgevat als 2 ribbels. Pas toen ik de Engelse tekst las begreep ik dat het de bedoeling was om 1 keer heen en terug te breien over alle steken. Maar toen was mijn voorpand al af, veel minder gegolfd dan op de foto...
17.11.2011 - 16:59
![]() Drops Design wrote:
Drops Design wrote:
Bonjour et merci Catherine, l'inversion a été corrigée.
08.02.2010 - 09:54
![]() Catherine wrote:
Catherine wrote:
J'aime bcp votre site et vos modèles. Cependant, dans celui-ci, il y a une erreur : Dans le devant gauche, les 2 derniers rangs entiers entre les * sont inversés...
06.02.2010 - 18:36Tammy Chen wrote:
What is the armohome last sentance 20 sts left on collor .
03.08.2008 - 15:22
![]() Drops Design NL wrote:
Drops Design NL wrote:
Beste Joke. Bedankt. De steekverhouding zou moeten kloppen. Design raadt hier breinaald 4,5 mm aan. Iedereen breit verschillend. Heeft u breinaald 3,5 mm nodig om de juiste steekverhouding te krijgen (dwz 18 st x 38 nld ribbelst) dan is dat ook goed ;o) Een andere gebruiker heeft misschien breinld 5 mm nodig. Er zijn nog geen andere foutmeldingen op dit patroon ontvangen, maar ik zal het wel in de gaten houden! Succes verder. Gr. Tine
16.03.2008 - 14:24
![]() Joke Dietvorst wrote:
Joke Dietvorst wrote:
Ik heb dit patroon gemaakt. De beschrijving klopt niet. Moet zijn: Breien op naald 3,5 (anders klopt de stekenverhouding niet. Ik heb het aantal steken van maat s aangehouden en de lengtemaat van maat m. Patroon komt dan goed uit. Is uiteindelijke een prima passend en erg leuk vest geworden.
16.03.2008 - 13:54
![]() Ulrike wrote:
Ulrike wrote:
Ich hatte neulich das gleiche Problem, bei einem Modell, das ich schon mal angeklickt hatte, als die Modellnummern noch provisorisch vergeben waren. Damals hatte ein anderes Modell diese Nummer. Ich habe dann - nach einem Mailverkehr mit meiner Kollegin ;-) – den refresh button angeklickt und dann kam das richtige Modell. Versuche doch das auch einmal, sonst schauen wir weiter. Lieber Gruss Ulrike
10.03.2008 - 10:40
![]() Petra wrote:
Petra wrote:
Wenn ic die Strickanleitung von diesem Modell anklicke, erscheint ein anderes Modell. Ist denn trotzdem die Anleitung die richtige?
08.03.2008 - 20:34
|
|
DROPS 106-7 |
|
|
|
|
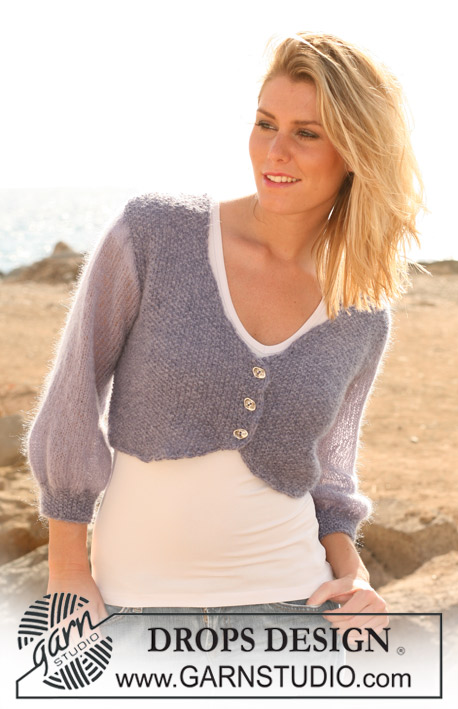
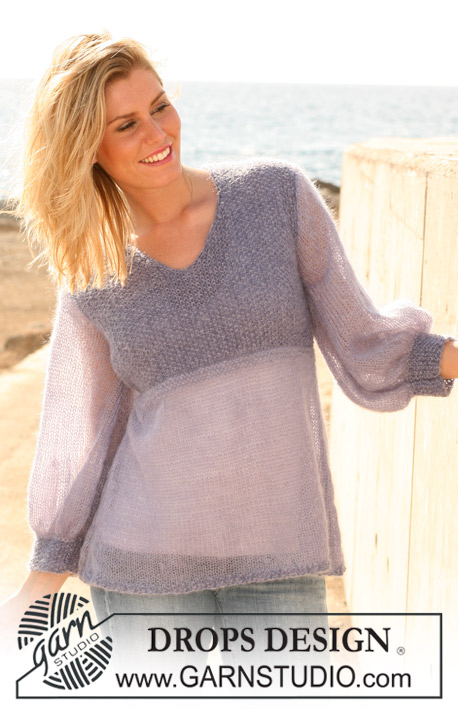
DROPS jacket in “Vivaldi” with wide lace collar and front bands. Size S – XXXL
DROPS 106-7 |
|
|
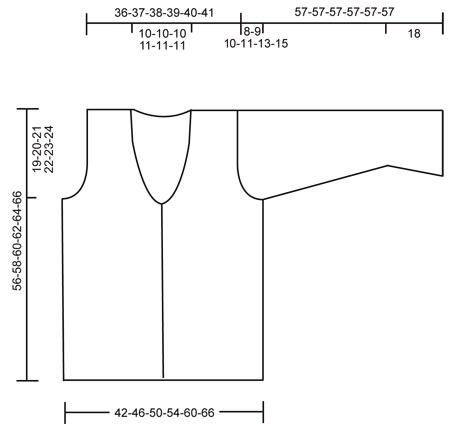
Knitting tip: When turning mid piece, slip 1 st as if to knit, tighten thread and work return row. This is to avoid a hole in transition. Decreasing tip (applies to neckline): Dec inside 20 front band sts by K 2 tog. Back piece: Cast on 78-84-92-100-110-120 sts (incl 1 edge st each side) on needle size 4.5 mm and work garter st until finished measurements. Remember the knitting tension! When piece measures 37-38-39-40-41-42 cm cast off for armhole each side on every other row: 3 sts 1-1-1-2-2-3 times, 2 sts 1-1-3-3-5-5 times and 1 st 2-4-3-3-3-4 times = 64-66-68-70-72-74 sts. When piece measures 54-56-58-60-62-64 cm cast off the middle 16-16-16-18-18-18 sts for neck and dec 1 st on neckline on next row = 23-24-25-25-26-27 sts left on each shoulder. Cast off when piece measures 56-58-60-62-64-66 cm. Left front piece: Cast on 54-57-61-65-70-75 sts (incl 1 edge st at side and 20 front band sts towards mid front) on needle size 4.5 mm. Work the entire piece in garter st. Continue as follows (first row = RS): Work from side towards mid front on all sts, turn the piece - see Knitting tip! *work 14 sts, turn piece and work return row. Work 17 sts, turn piece and work return row, work 20 sts, turn piece and work return row, work all sts from mid front to side, turn piece and work return row to mid front*, repeat from *-* until finished measurements. Neckline: When piece measures 36-37-38-39-40-41 cm dec to shape the neckline inside 20 front band sts – see Decreasing tip: 1 st on every 8th row 4-4-4-5-5-5 times. Armhole: At the same time when piece measures 37-38-39-40-41-42 cm cast off for armhole at side as described for back piece. After all dec for neckline and armhole are complete = 43-44-45-45-46-47 sts left on shoulder. Continue as before until piece measures 56-58-60-62-64-66 cm and now cast off 23-24-25-25-26-27 sts from side towards mid front for shoulder = 20 sts left on collar. Collar: Continue with turns on collar as follows: *work 14 sts from mid front, turn piece and work return row, work 17 sts, turn piece and work return row, work all sts, turn piece and work return row.*. Repeat from *-* until collar measures 5-5-5-5.5-5.5-5.5 cm where narrowest (i.e. towards shoulder). Cast off. Right front piece: Cast on and work like left front piece, but mirrored. Sleeve: Loosely cast on 62-64-66-68-70-72 sts (incl 1 edge st each side) on needle size 4.5 mm. Work the entire sleeve in garter st back and forth on needle. When piece measures 6 cm dec 6 sts evenly distributed on row, repeat this dec when piece measures 12 and 18 cm = 44-46-48-50-52-54 cm. When piece measures 19-19-19-20-20-20 cm inc 1 st each side on every 3-3-2.5-2-1.5-1.5 cm a total of 10-10-11-13-14-15 times = 64-66-70-76-80-84 sts. When piece measures 49-48-47-46-44-42 cm (less on the larger sizes because of larger sleeve cap) dec to shape the sleeve cap each side on every other row: 3 sts 1 time, 1 st until piece measures 56 cm, then dec 3 sts each side 1 time and cast off remaining sts. Sleeve measures approx 57 cm. Assembly: Sew shoulder seams. Sew tog collar mid back and sew collar to neckline. Set in sleeves. Sew sleeve and side seams inside 1 edge st. |
|
 |
|
Have you finished this pattern?Tag your pictures with #dropspattern or submit them to the #dropsfan gallery. Do you need help with this pattern?You'll find 8 tutorial videos, a Comments/Questions area and more by visiting the pattern on garnstudio.com. © 1982-2026 DROPS Design A/S. We reserve all rights. This document, including all its sub-sections, has copyrights. Read more about what you can do with our patterns at the bottom of each pattern on our site. |


With over 40 years in knitting and crochet design, DROPS Design offers one of the most extensive collections of free patterns on the internet - translated to 17 languages. As of today we count 324 catalogues and 12291 patterns translated into English (UK/cm). 12291
We work hard to bring you the best knitting and crochet have to offer, inspiration and advice as well as great quality yarns at incredible prices! Would you like to use our patterns for other than personal use? You can read what you are allowed to do in the Copyright text at the bottom of all our patterns. Happy crafting!
Post a comment to pattern DROPS 106-7
We would love to hear what you have to say about this pattern!
If you want to leave a question, please make sure you select the correct category in the form below, to speed up the answering process. Required fields are marked *.