
Popular categories
Looking for a yarn?


|
|
DROPS 106-7 |
|
|
|
|
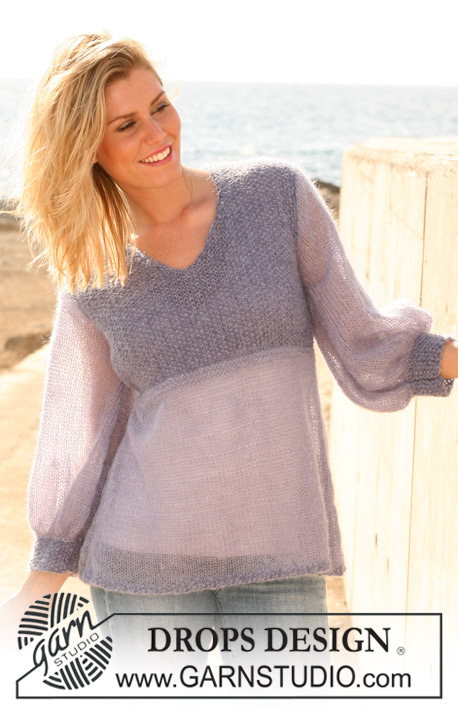
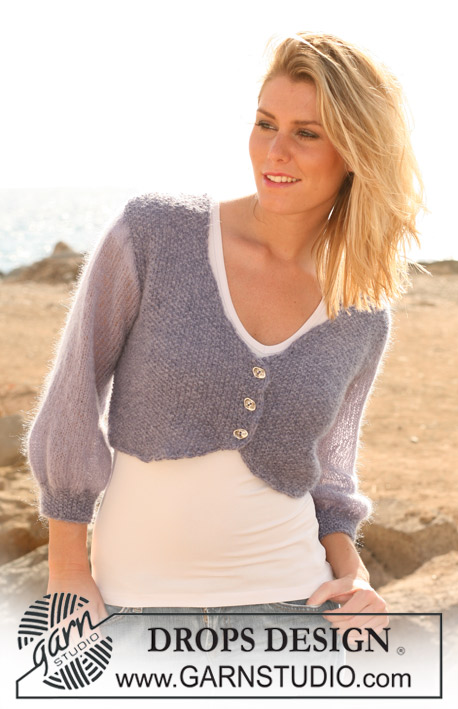
DROPS jacket in “Vivaldi” with wide lace collar and front bands. Size S – XXXL
DROPS 106-7 |
|
|
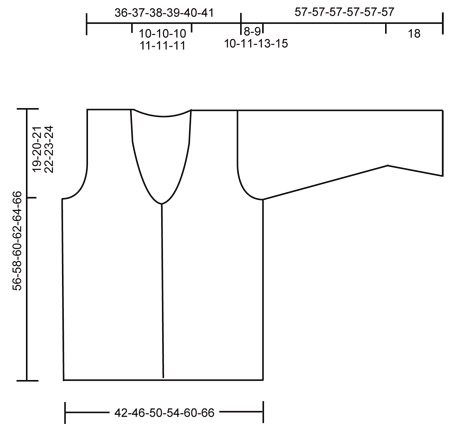
Knitting tip: When turning mid piece, slip 1 st as if to knit, tighten thread and work return row. This is to avoid a hole in transition. Decreasing tip (applies to neckline): Dec inside 20 front band sts by K 2 tog. Back piece: Cast on 78-84-92-100-110-120 sts (includes 1 edge st each side) on needle size 4.5 mm [US 7] and work garter st until finished measurements. Remember the knitting gauge! When piece measures 37-38-39-40-41-42 cm [14½"-15"-15¼"-15¾"-16⅛"-16½"] bind off for armhole each side on every other row: 3 sts 1-1-1-2-2-3 times, 2 sts 1-1-3-3-5-5 times and 1 st 2-4-3-3-3-4 times = 64-66-68-70-72-74 sts. When piece measures 54-56-58-60-62-64 cm [21¼"-22"-22¾"-23⅝"-24⅜"-25¼"] bind off the middle 16-16-16-18-18-18 sts for neck and dec 1 st on neckline on next row = 23-24-25-25-26-27 sts left on each shoulder. Bind off when piece measures 56-58-60-62-64-66 cm [22"-22,7"-23,6"-24,4"-25,2"-26"]. Left front piece: Cast on 54-57-61-65-70-75 sts (includes 1 edge st at side and 20 front band sts towards mid front) on needle size 4.5 mm [US 7]. Work the entire piece in garter st. Continue as follows (first row = RS): Work from side towards mid front on all sts, turn the piece - see Knitting tip! *work 14 sts, turn piece and work return row. Work 17 sts, turn piece and work return row, work 20 sts, turn piece and work return row, work all sts from mid front to side, turn piece and work return row to mid front*, repeat from *-* until finished measurements. Neckline: When piece measures 36-37-38-39-40-41 cm [14¼"-14½"-15"-15¼"-15¾"-16⅛"] dec to shape the neckline inside 20 front band sts – see Decreasing tip: 1 st on every 8th row 4-4-4-5-5-5 times. Armhole: At the same time when piece measures 37-38-39-40-41-42 cm [14½"-15"-15¼"-15¾"-16⅛"- 16½"] bind off for armhole at side as described for back piece. After all dec for neckline and armhole are complete = 43-44-45-45-46-47 sts left on shoulder. Continue as before until piece measures 56-58-60-62-64-66 cm [22"-22,7"-23,6"-24,4"-25,2"-26"] and now bind off 23-24-25-25-26-27 sts from side towards mid front for shoulder = 20 sts left on collar. Collar: Continue with turns on collar as follows: *work 14 sts from mid front, turn piece and work return row, work 17 sts, turn piece and work return row, work all sts, turn piece and work return row.*. Repeat from *-* until collar measures 5-5-5-5.5-5.5-5.5 cm [2" -2"-2"-2¼"-2¼"-2¼" where narrowest (i.e. towards shoulder). Bind off. Right front piece: Cast on and work like left front piece, but mirrored. Sleeve: Loosely cast on 62-64-66-68-70-72 sts (includes 1 edge st each side) on needle size 4.5 mm [US 7]. Work the entire sleeve in garter st back and forth on needle. When piece measures 6 cm [2⅜"] dec 6 sts evenly distributed on row, repeat this dec when piece measures first 12 cm [4¾"] and then again at 18 cm [7"] = 44-46-48-50-52-54 m. When piece measures 19-19-19-20-20-20 cm [7½"-7½"-7½"-8"-8"-8"] inc 1 st each side on every 3-3-2.5-2-1.5-1.5 cm [1⅛"-1⅛"-⅞"-¾"-½"-½"] a total of 10-10-11-13-14-15 times = 64-66-70-76-80-84 sts. When piece measures 49-48-47-46-44-42 cm [19¼"-19"-18½"-18"-17¼"-16½"] (less on the larger sizes because of larger sleeve cap) dec to shape the sleeve cap each side on every other row: 3 sts 1 time, 1 st until piece measures 56 cm [22"], then dec 3 sts each side 1 time and bind off remaining sts. Sleeve measures approx 57 cm [22½"]. Assembly: Sew shoulder seams. Sew tog collar mid back and sew collar to neckline. Set in sleeves. Sew sleeve and side seams inside 1 edge st. |
|
|
|
|
Have you made this or any other of our designs? Tag your pictures in social media with #dropsdesign so we can see them! Do you need help with this pattern?You'll find tutorial videos, a Comments/Questions area and more by visiting the pattern on garnstudio.com. © 1982-2024 DROPS Design A/S. We reserve all rights. This document, including all its sub-sections, has copyrights. Read more about what you can do with our patterns at the bottom of each pattern on our site. |


With over 40 years in knitting and crochet design, DROPS Design offers one of the most extensive collections of free patterns on the internet - translated to 17 languages. As of today we count 304 catalogs and 11422 patterns - 11417 of which are translated into English (US/in).
We work hard to bring you the best knitting and crochet have to offer, inspiration and advice as well as great quality yarns at incredible prices! Would you like to use our patterns for other than personal use? You can read what you are allowed to do in the Copyright text at the bottom of all our patterns. Happy crafting!
Comments / Questions (52)
Forstykket strikkes således: strik 14 masker, vend og strik tilbage, strik 17masker vend og strik tilbage, strik 20masker vend og strik tilbage, strik nu hele pindens masker vend og strik tilbage. sådan forsætter man.. det er sådan opskriften skal forståes :-)
15.03.2023 - 02:04Forklaringen på å strikke forstykket med volang synes jeg var uklar: Denne forklaringen kan kanskje hjelpe? 1.pinne er retten, Strikk hele p, alle maskene. Snu. Strikk 14 m, snu strikk ut p, snu strikk 17m, snu strikk ut p, snu strikk 20m, snu strikk ut p. Snu strikk alle m snu strikk alle m, snu strikk 14 m snu osv. Da strikker du kanten større og vil få en volang.
24.06.2022 - 18:39Hi Would this pattern work in Alpaca Boucle?
22.07.2020 - 09:19DROPS Design answered:
Dear Linda, DROPS Vivaldi could be replaced here by 2 strands Kid-Silk or 1 strand Brushed Alpaca Silk. Try our yarn converter to check out the new amount of yarn. Happy knitting!
29.07.2020 - 08:58Jeg er startet på det ene sidestykke. Men jeg er i tvivl om, hvorvidt jeg har forstået opskriften rigtigt. Når jeg gør som beskrevet, får jeg et smalt lige stykke i begge sider på en 13 masker og en slags "pose" eller lomme i midten. Det giver ikke mening? Har prøvet at starte forfra 3 gange, og det sker hver gang. Hvad gør jeg forkert? Mvh Zenia
10.12.2019 - 16:57DROPS Design answered:
Hej Zenia, Du skal strikke alle forkortede pinde i den side som vender mod midt foran. Det vil sige du starter i den side som vender mod midt foran og strikker: 14 m, vender og strikker tilbage, så 17 masker, vender og strikker tilbage, så 20 m, vender og strikker tilbage, og først nu strikker du over alle masker, vender og strikker tilbage. Således gentager du til færdigt mål. God fornøjelse!
11.12.2019 - 09:45Sorry, nog een klein vraagje. Is ook mogelijk om dit patroon te maken in jullie nieuwe garen Melody?
26.09.2015 - 09:08DROPS Design answered:
Hoi Estha. Nee, daar is Melody te dik voor. Maar je zou kunnen breien met Brushed Alpaca Silk.
28.09.2015 - 12:07Hallo, is het ook mogelijk om dit patroon in tricot te breien met de voorbies in recht?
18.09.2015 - 07:46DROPS Design answered:
Hoi Estha. Niet zonder de het patroon aan te passen met aantal steken. Brei je in tricotsteken heb je minder naalden per 10 cm, dus brei eerst een proeflapje in tricotsteken en vergelijk met de vermelde stekenverhouding in ribbelst en maak je calculaties.
18.09.2015 - 10:25Buonasera,ho capito i vari passaggi e non ci sono più' problemi.grazie per il vs aiuto,come sempre
29.11.2013 - 21:34Buonasera,vorrei capire come si lavora il davanti:lavorare 20 m,girare e lavorare un ferro di ritorno,lavorare tutte le m.dal centro davanti(?)al lato,girare e lav.il ferro di ritorno fino al centro davanti"ripetere fino alla fine del lavoro.spero di riuscire a capire.Grazie per la vs collaborazione.
26.11.2013 - 20:37DROPS Design answered:
Buonasera Benedetta. Il primo ferro lo lavora su tutte le m, iniziando dal lato che verrà cucito al dietro e procedendo verso il bordo centrale della giacca. Giri il lavoro e prosegua a ferri accorciati iniziando dal bordo centrale : lavori 14 m, giri il lavoro e torni indietro su queste 14 m, giri e lavori 17 m, torni indietro, giri e lavori 20 m, torni indietro e adesso lavori due ferri su tutte le m. Riprenda poi a lavorare 14 m e così via. Ci riscriva se non è chiaro. Buon lavoro!
26.11.2013 - 23:05(je l'avais commencé en 2008 Vivaldi: dos réalisé mais au demi-devant je ne comprenais pas les explications des rangs raccourcis. Je l'avais rangé soigneusement et aujourd'hui je le ressors je relis les explications et je comprends?? par miracle! alors il va me démanger les doigts pour le reprendre ..avec plaisir ! (en vivaldi "spécial"en brun et beige gris qui n'existe plus!
09.10.2013 - 18:49Bonjour j ai un probleme avec les explications du devant droit je n y arrive pas pouvais vous me le decrire plus en profondeur merci beaucoup
23.03.2012 - 13:46DROPS Design answered:
Bonjour Camus, je vous recommande de vous adresser directement à votre magasin Drops ou à vous inscrire sur le forum DROPS pour y décrire votre question, ce sera plus facile ainsi de vous aider. Merci.
26.03.2012 - 09:20