
Popular categories
Looking for a yarn?


Comments / Questions (54)
![]() Eva wrote:
Eva wrote:
Zitat:"gleichzeitig bei der ersten Reihe auf beiden Seiten des Vorder- und Rückenteils 6 M abketten." 164 M vor dem Abketten 156 Maschen nach dem Abketten? Das sind nur 8 M Unterschied! Meinen Sie wirklich abketten oder abnehmen? Wird das weiter in Rdn.gestrickt? LG
13.09.2016 - 08:59DROPS Design answered:
Liebe Eva, Sie müssen 2 li M in den jeden 6 li M abnehmen, dh man hat 4 x 6 li M - 2 M werden in diesem M. abgenommen, es bleiben hier jetzt 4 li M (anstatt 6 li M) und Sie haben 8 M abgenommen. Anleitung war hier neu geschrieben.
13.09.2016 - 09:49
![]() Jenny wrote:
Jenny wrote:
Ich habe eine Frage zum Oberteil: "gleichzeitig bei der 1. R. auf beide Seiten des Vord- und Rückenteils 6 M. abk. = 156-180-192-216 M." => wo genau wird abgekettet? wie komme ich dann auf 180 M? (Größe S/M) 188m - 6 abketten = 182M ich danke im voraus
01.02.2016 - 19:46DROPS Design answered:
Sie ketten jeweils 6 M an den Seiten des Oberteils ab, also insgesamt 12 M. Die Seiten befinden sich dort, wo Sie zuvor die Zunahmen gemacht haben, also ketten Sie die beiden Rechtsmaschen ab, neben denen Sie zugenommen haben, sowie jeweils 2 M rechts und links davon. Die abgeketteten M sind für die Armausschnitte.
03.02.2016 - 20:46
![]() Kim wrote:
Kim wrote:
Ik heb een vraag, het patroon zegt "Brei het Rib, zet 1 merkdraad tussen de 2 ribbelst aan de weersz (de kantst). " Wat wordt hiermee bedoeld? Ik brei met een rondbreinaald, dit betekent dan toch dat ik geen kantsteek heb?
26.04.2015 - 19:50DROPS Design answered:
Hoi Kim. Je moet 1 markeerder plaatsen van 2 r aan de zijkanten - dus heb je 108 st op de nld, heb je 18 herhalingen van de boordsteek (2 r, 4 av), dus je moet de markeerder tussen de eerste 2 r en tussen de 2 r van de 10e herhaling plaatsen (9 herhalingen op het voor- en achterpand). Dit patroon is één van onze eerste vertalingen en niet up-to-date. Wij maken zsm een "moderne" en wat duidelijker versie van - ik heb inmiddels al een paar aanpassingen gemaakt.
28.04.2015 - 16:23
![]() Lefebvre wrote:
Lefebvre wrote:
J'ai bien compris, merci pour votre rapidité dans la réponse et franchement tricoter en rond est vraiment agréable !!
05.02.2015 - 18:07
![]() Lefebvre wrote:
Lefebvre wrote:
Bonjour, je suis novice en tricot et je souhaite comprendre les augmentations : 1 maille entre les 2 mailles endroit à chaque rang ou 4 mailles d'un coup ? Merci
05.02.2015 - 16:22DROPS Design answered:
Bonjour Mme Lefebvre, vous avez 2 m end sur les côtés de l'ouvrage, à 10 cm, vous augmentez 1 m avant + 1 m après ces 2 m end (= dans la section env juste avant et celle juste après), de chaque côté = vous augmentez 2 m de chaque côté, soit 4 m sur 1 tour. Répétez ces augmentations encore 3 fois (= 4 fois au total) tous les 5 cm. Les augmentations se tricotent à l'envers. Bon tricot!
05.02.2015 - 17:12
![]() Gonet Yvette wrote:
Gonet Yvette wrote:
Bravo pour ce modèle, les explications sont parfaites et il me va super bien !
05.08.2014 - 08:24
![]() Mandy wrote:
Mandy wrote:
Wird das Oberteil hin und rück gestrickt oder rund
06.09.2013 - 14:35DROPS Design answered:
Liebe Mandy, es wurd rund gestrickt und ab Armloch geteilt.
07.09.2013 - 14:16
![]() Annette wrote:
Annette wrote:
Je tricote le bas du modèle avec des aiguilles droites. 1) les 2 mailles lisière de chaque c^^oté sont-elles comprises dans les 74 mailles préconisées au départ? 2) Que deviennent les mailles lisière après les 4 rangs de c^otes? 3) Quelle est l'utilité de ces 4 rangs de c^^otes? 4) N'y aurait-il pas une erreur dans les 74 mailles à monter au départ (pour garder l'alternance du point jusqu'au bout )? Merci pour votre aide, suis paumée....
02.07.2013 - 12:11DROPS Design answered:
Bonjour Annette, ce modèle est indiqué tricoté en rond, donc sans m lis, 1)quand on sépare l'ouvrage, les 2 m au point mousse de chaque côté sont comprises dans les 74 m (dernière taille).2)Après les 4 rangs de côtes, on met en attente pour tricoter l'empiècement en rond, en côtes comme avant.3)ces rangs de côtes vont former l'emmanchure.4)effectivement, on doit avoir 224 m et non 244 (correction faite, merci). Bon tricot!
02.07.2013 - 14:17Eva wrote:
Nevermind. I get it now. I feel a little dumb ^-^ Good knitting&crocheting to ya'll.
26.05.2012 - 11:48Eva wrote:
It's me again. I tried to translate the other languages of this pattern and, correct me if I'm wrong, I need to place 2 markers on each and every side of 2k sts of the first row. I'll be using many markers, is that right? Thanks. Eva- Italy.
25.05.2012 - 23:09
|
|
Sirenetta |
|
 |
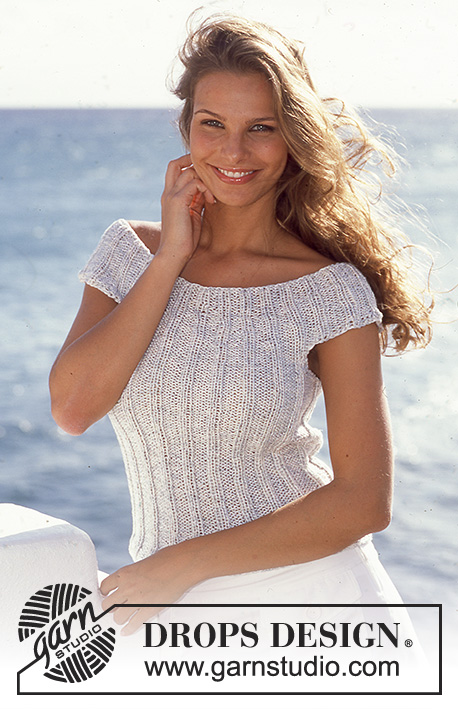 |
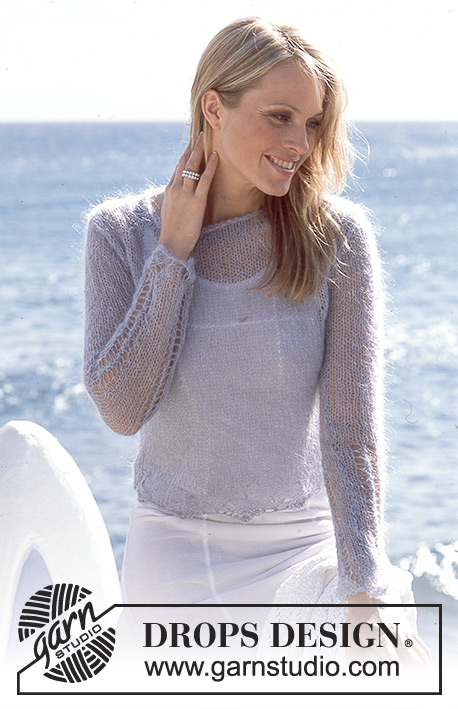
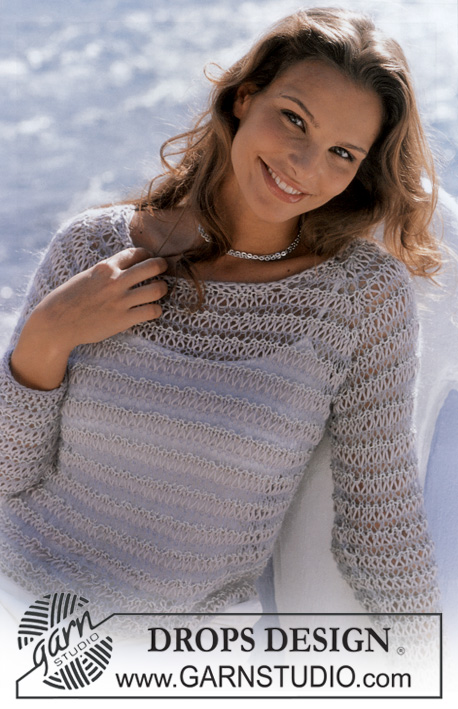
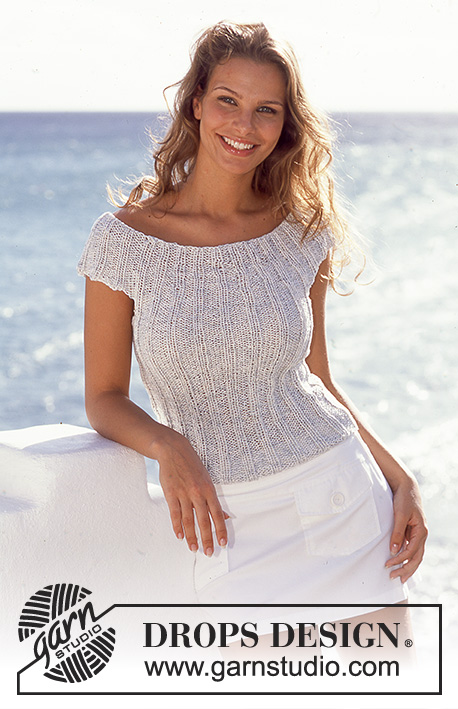
DROPS Top in Safran and Cotton-Viscose
DROPS 81-1 |
|
|
Gauge: 16 sts x 20 rows in stockinette st with 1 strand of each yarn (2 strands) = 10 x 10 cm Rib: Row 1: * K 2, P 4 *, repeat from * - *. Body: Cast on 108-120-132-144 sts with 1 strand each Safran + Cotton Viscose. Join and knit rib – place a marker between 2 K sts at each side. When the piece measures 10 cm inc 1 st at each side of the K 2 at each side every 5 cm a total of 4 times – purl the increased sts = 124-136-148-160 sts. When the piece measures 30-31-32-33 cm bind off 6 sts at each side for armhole (= P 2, K 2, P 2, 3 sts each side of each marker). Put back sts on a st holder. Front: = 56-62-68-74 sts. Knit 2-2-4-4 rows rib, keeping the 2 outermost sts at each side in garter st. Put sts on a st holder. Back: Knit the same as the front, leave sts on needle and knit yoke. Yoke: 56-62-68-74 back sts on needle, loosely cast on 26-32-32-38 new sts for shoulder, put in front sts on needle and loosely cast on 26-32-32-38 new sts for shoulder = 164-188-200-224 sts; join. Measure the work from here. Put markers in each transition between Body and sleeves. Continue with rib as established over all sts, decreasing the P 6 at each side on Body (where sts were increased) to P 4 = 156-180-192-216 sts. When the piece measures 4 cm dec every other P 4 to P 3 = 143-165-176-198 sts, continue the rib. When the piece measures 6-6-7-7 cm dec the remaining P 4 to P 3 = 130-150-160-180 sts, continue the rib. When the piece measures 8-9-10-11 cm dec all P 3 on Body to P 2 (the P 3 on sleeves continues as P 3) = 112-130-138-156 sts. Continue the rib until yoke measures approx. 10-11-12-13 cm, bind off in rib. |
|
 |
|
Have you finished this pattern?Tag your pictures with #dropspattern or submit them to the #dropsfan gallery. Do you need help with this pattern?You'll find 15 tutorial videos, a Comments/Questions area and more by visiting the pattern on garnstudio.com. © 1982-2026 DROPS Design A/S. We reserve all rights. This document, including all its sub-sections, has copyrights. Read more about what you can do with our patterns at the bottom of each pattern on our site. |
|


With over 40 years in knitting and crochet design, DROPS Design offers one of the most extensive collections of free patterns on the internet - translated to 17 languages. As of today we count 324 catalogues and 12290 patterns translated into English (UK/cm). 12290
We work hard to bring you the best knitting and crochet have to offer, inspiration and advice as well as great quality yarns at incredible prices! Would you like to use our patterns for other than personal use? You can read what you are allowed to do in the Copyright text at the bottom of all our patterns. Happy crafting!
Post a comment to pattern DROPS 81-1
We would love to hear what you have to say about this pattern!
If you want to leave a question, please make sure you select the correct category in the form below, to speed up the answering process. Required fields are marked *.