
Popular categories
Looking for a yarn?


|
|||||||||||||||||||||||||||||||||||||||||||||||||||||||
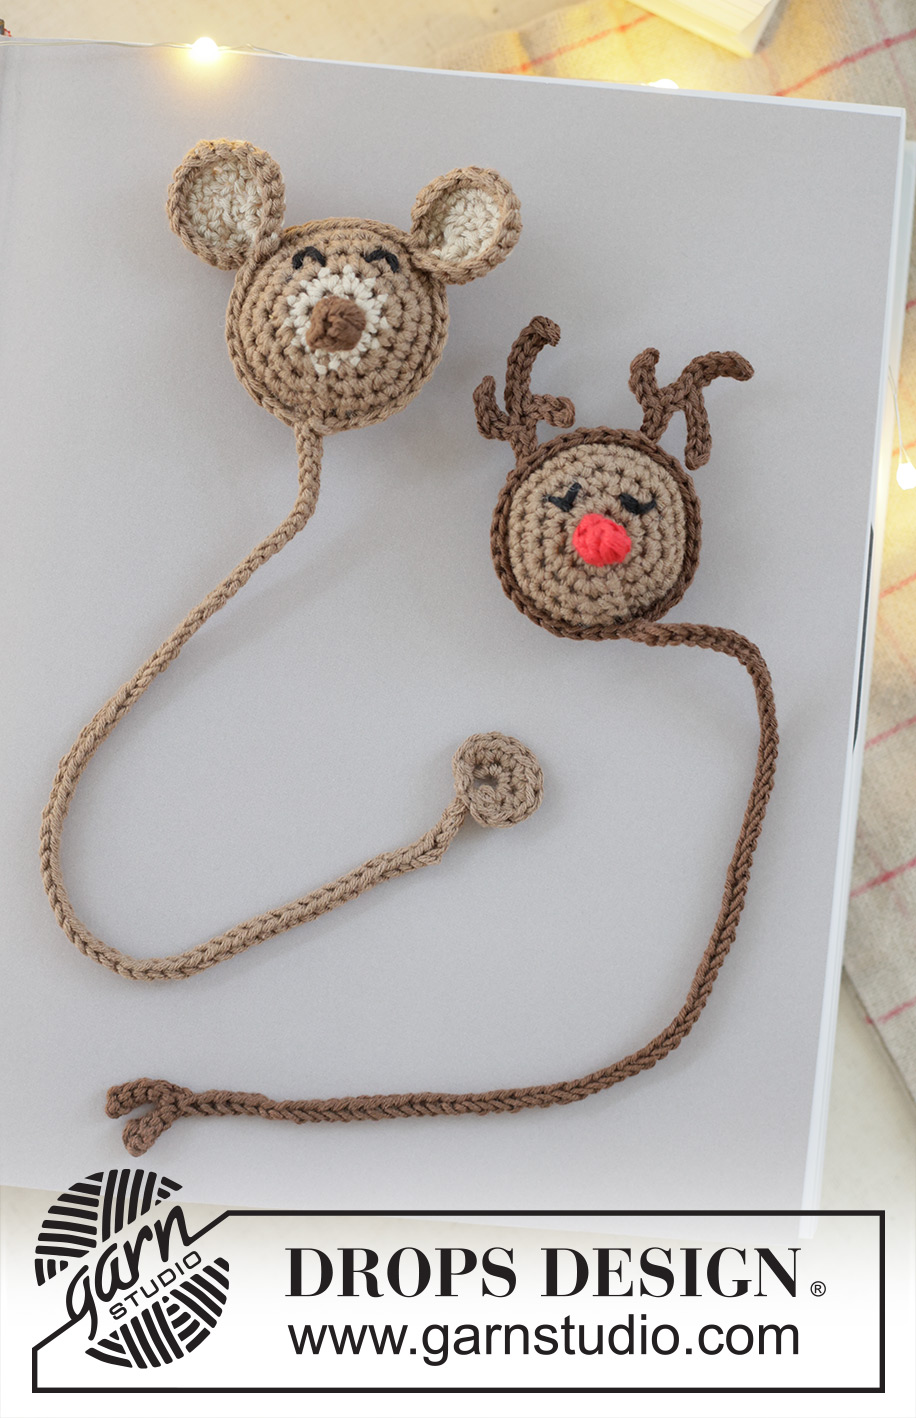
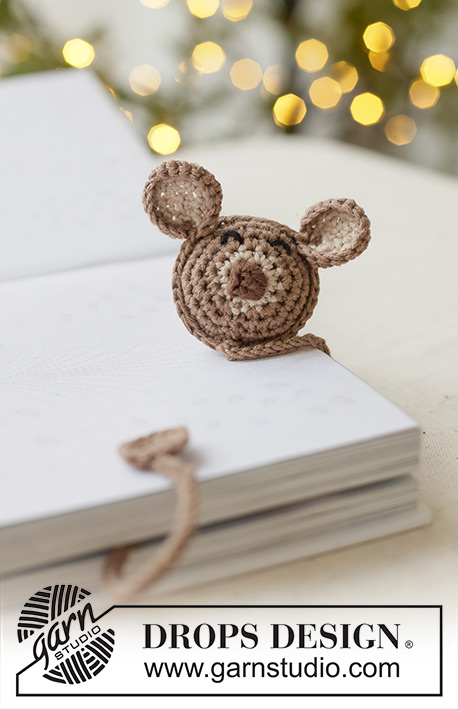
Forest Friends Bookmark#forestfriendsbookmark |
|||||||||||||||||||||||||||||||||||||||||||||||||||||||
 |
 |
||||||||||||||||||||||||||||||||||||||||||||||||||||||
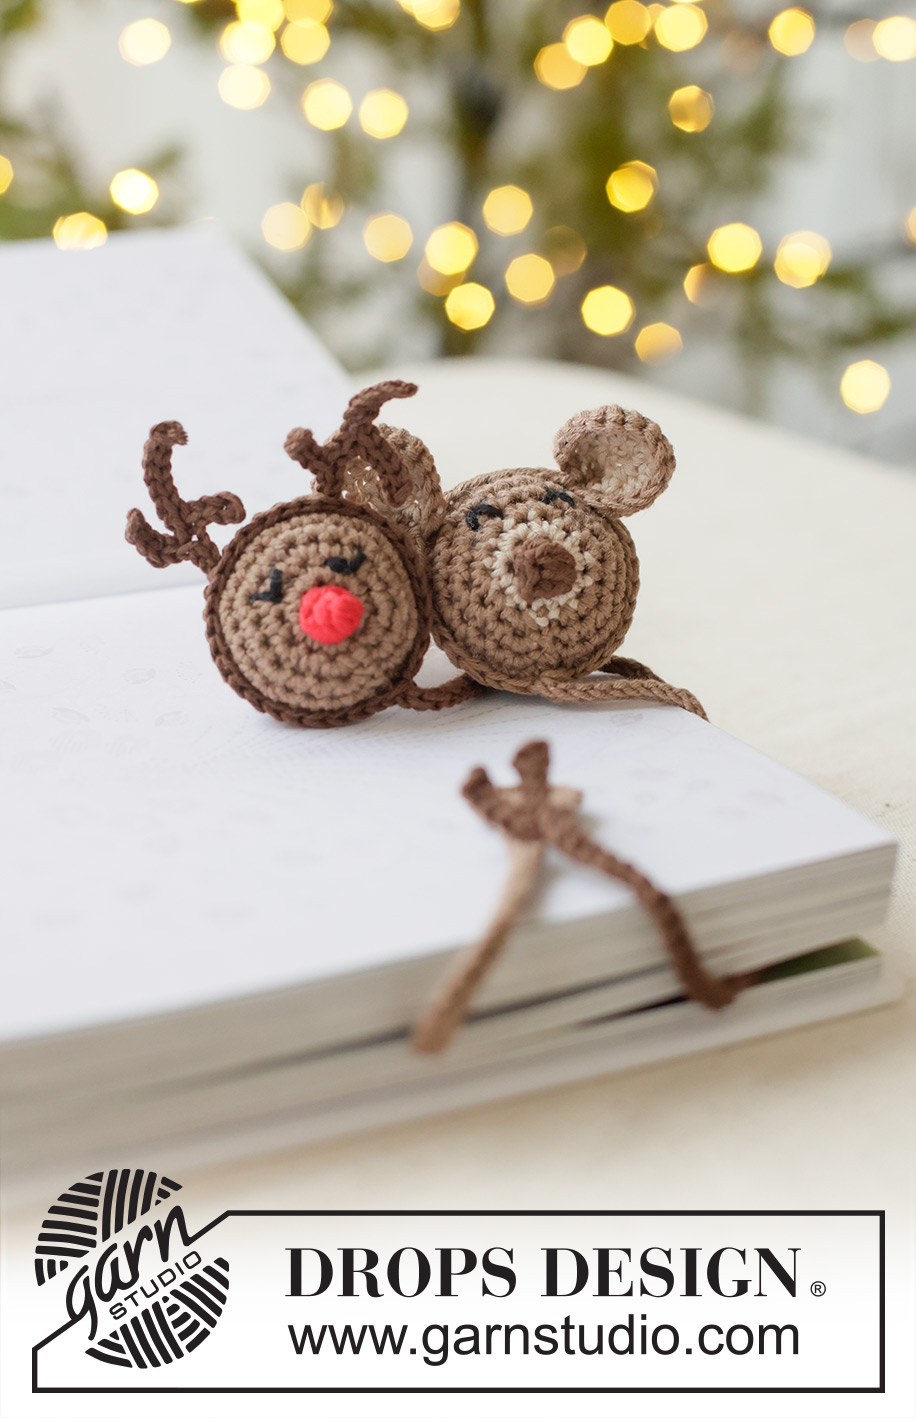
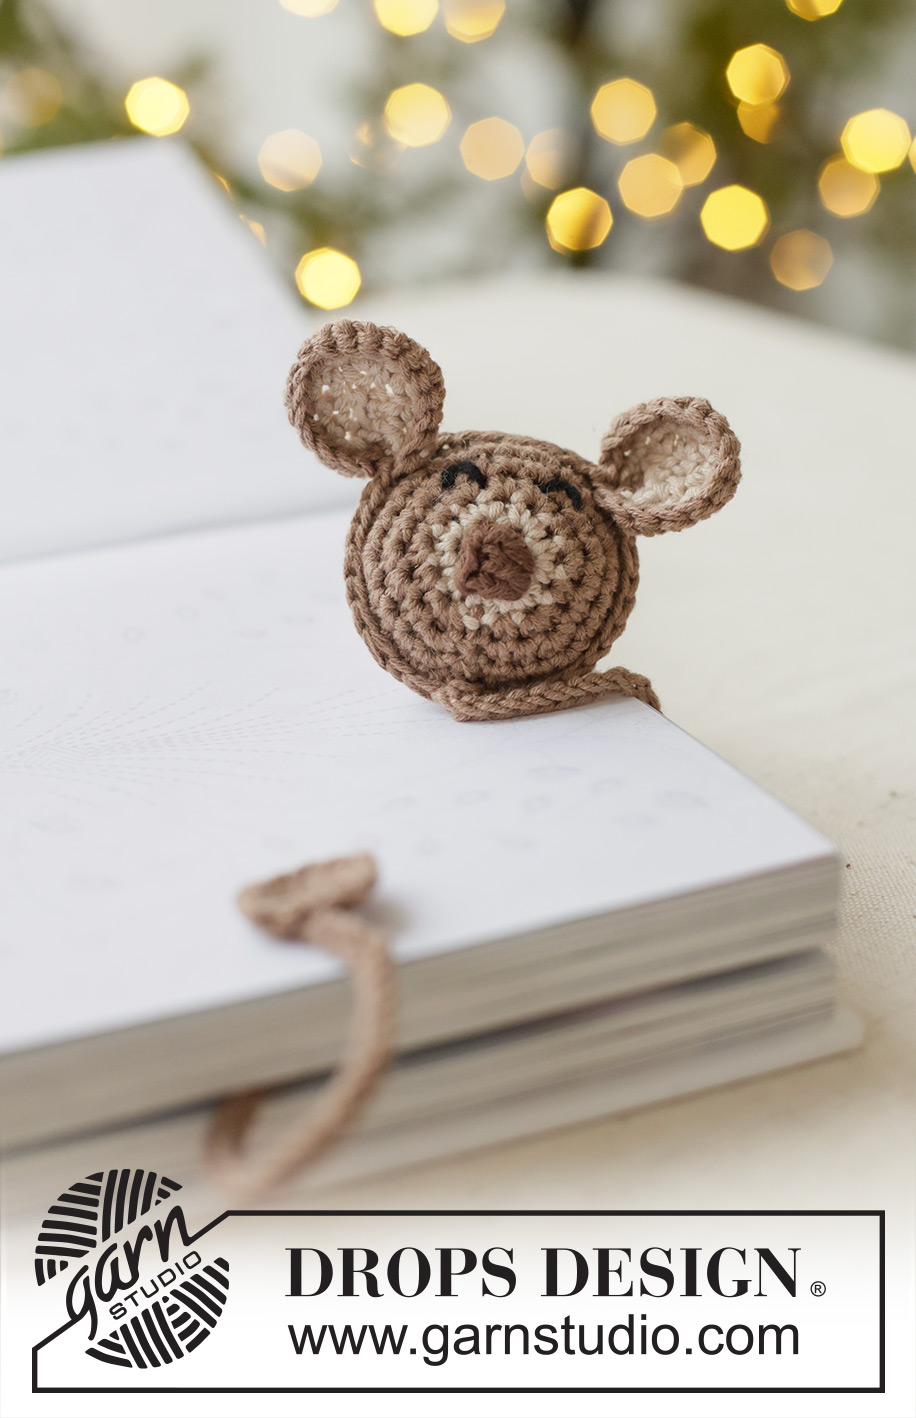
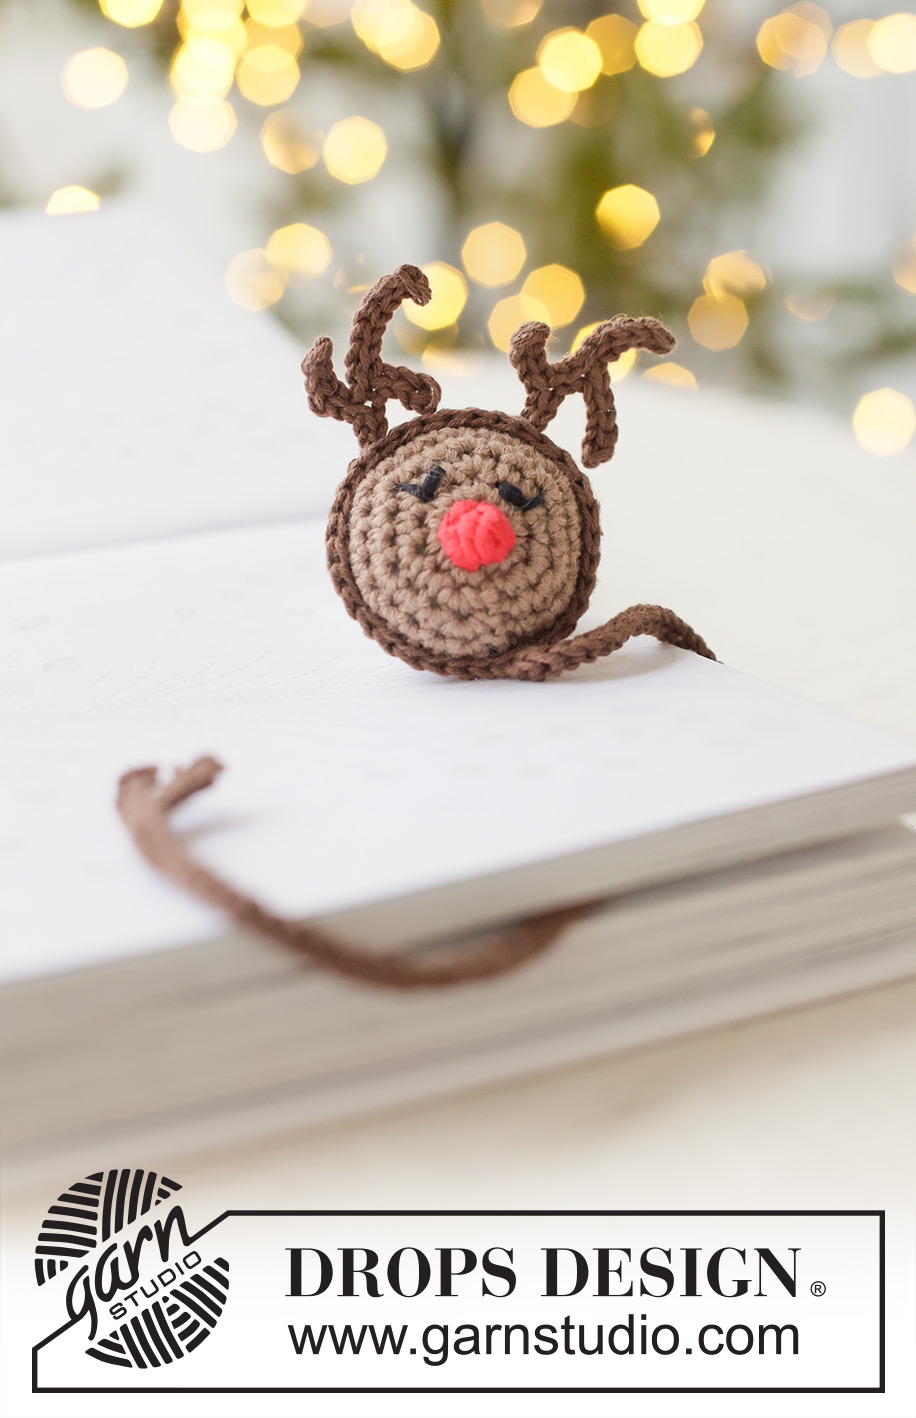
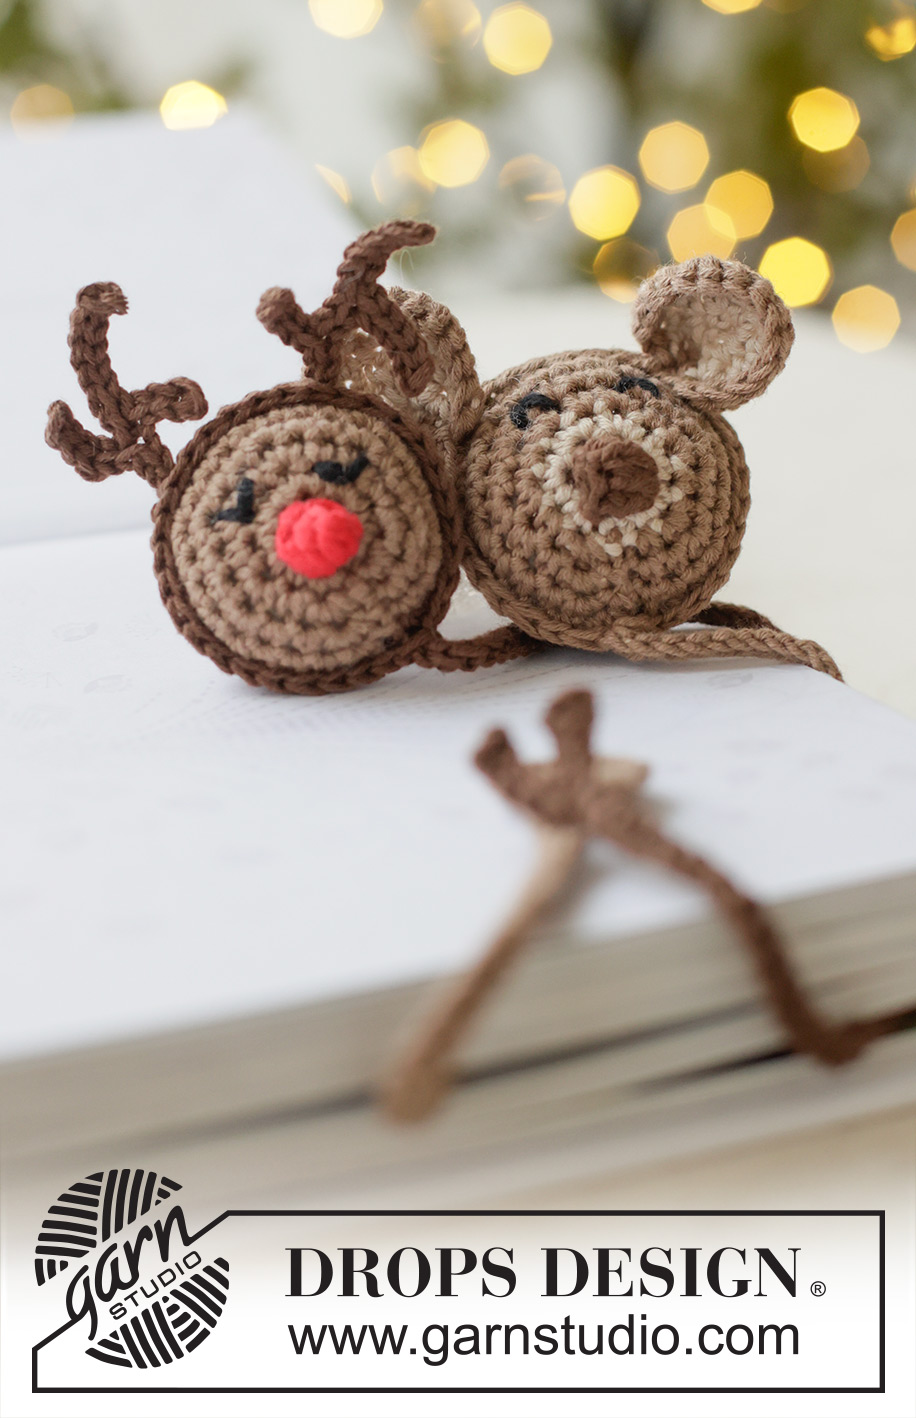
Crocheted bookmarks in DROPS Safran. Piece is worked in the round from the middle and outwards as reindeer and teddy bear. Theme: Christmas.
DROPS Extra 0-1626 |
|||||||||||||||||||||||||||||||||||||||||||||||||||||||
|
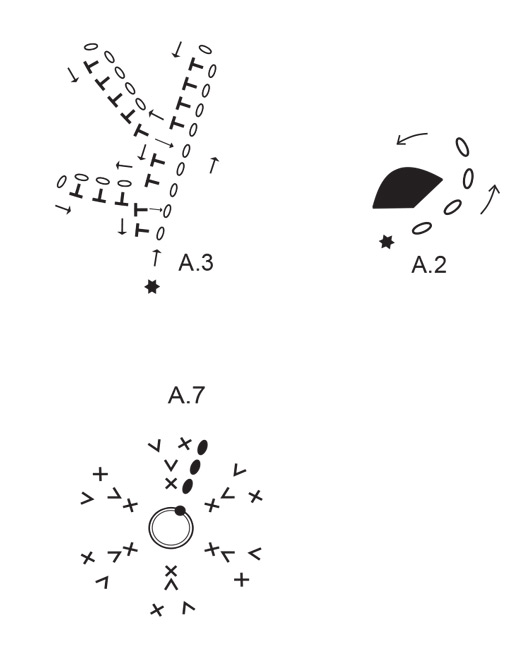
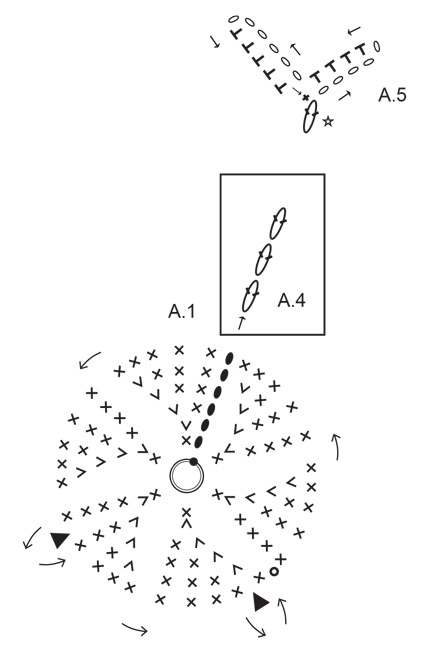
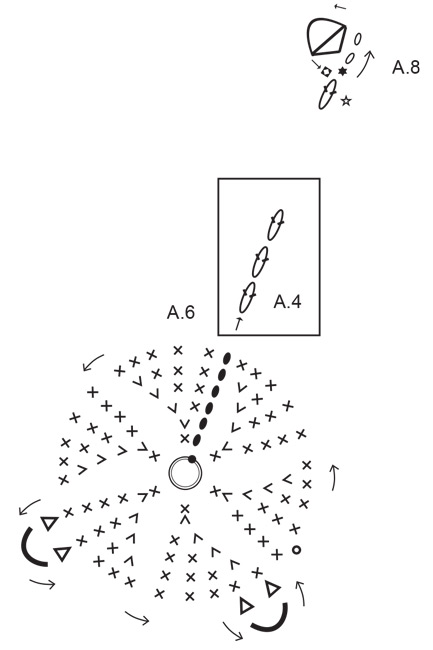
---------------------------------------------------------- EXPLANATION FOR THE PATTERN: ---------------------------------------------------------- PATTERN: See diagrams A.1 to A.8. ---------------------------------------------------------- START THE PIECE HERE: ---------------------------------------------------------- BOOKMARKS – SHORT OVERVIEW OF THE PIECE: The piece is worked first in the round from the middle and outwards in two parts. Then work a loose nose that is sewn in the middle of one part. Work in addition 2 loose ears on the teddy bear. The two round head parts are worked together while at the same time working antlers on the reindeer/ears on teddy bear is fastened. Fill the head with some cotton wool before the last opening is crocheted together. When the round is finished, work a long double string that finishes with a small tail. REINDEER HEAD - PART-1: Use hook size 3 mm and colour light brown in DROPS Safran. Crochet diagram A.1 in the round, but cut and fasten yarn when last round remains (5 rounds worked and there are 30 double crochets + 1 chain stitch on the round. 6th round = assembly). REINDEER HEAD - PART-2: Work the same way as part-1. Put piece aside. REINDEER SNOUT: Use colour red and work diagram A.2. Cut the yarn (long enough to sew with) and pull yarn through the stitch. Pouf up the stitches to form a nice, round bobble for nose. Fasten nose in the middle of one head part. REINDEER EYES: Use colour black and embroider 2 eyes with flat stitches over snout on head - see photo. REINDEER ASSEMBLY AND ANTLERS: Use colour coffee, place the 2 head parts together (with snout up) and crochet the last round in A.1 through both layers. Do not cut the yarn when this round is done, and crochet now a string as explained below. REINDEER STRING: Use 2 strands in colour coffee (get the yarn end inside the ball and use it together with strand already begin used). Place strands together but use left index finger to hold the strands together (let the one strand lie over the index finger and let the other strand lie under the index finger) and make sure at strands worked with always lie in the same order when working. Crochet string after diagram A.4 until string measures 25 cm – or desired length. Keep the loop on the hook, cut one strand from string then crochet a small tail after diagram A.5 with the other strand. Cut and fasten the strands. TEDDY BEAR HEAD - PART-1: Use hook size 3 mm and colour light beige in DROPS Safran. Crochet diagram A.6 in the round. When 2 rounds have been worked, switch to colour light brown. Continue with colour light brown but cut and fasten strands when the last round remains (5 rounds worked and there are 30 double crochets + 1 chain stitch on the round. 6th round = assembly). TEDDY BEAR HEAD - PART-2: Use colour light brown and crochet the same way as teddy bear head - part-1 (without changing colour). TEDDY BEAR SNOUT: Use colour coffee and crochet diagram A.2. Cut the yarn (long enough to sew with) and pull yarn through the stitch. Pouf up the stitches to form a nice, round bobble for nose. Fasten the nose in the middle of the teddy bear’s head part-1. TEDDY BEAR EYES: Use colour black and embroider 2 eyes with flat stitches over snout on head - see photo. TEDDY BEAR EARS: Use colour light beige, and crochet diagram A.7. When diagram is done, there are 18 double crochets + 1 chain stitch at the beginning of the round. Cut and fasten the thread. Work 2 ears. TEDDY BEAR ASSEMBLY: Use colour light brown, place the 2 head parts together (with snout up) and crochet the last round in A.6 through both layers. Don’t cut the yarn after last round is done, but crochet the string as explained below. TEDDY BEAR STRING: Use 2 strands in colour light brown (get the yarn end inside the ball and use it together with strand already begin used). Place strands together but use left index finger to hold the strands together (let the one strand lie over the index finger and let the other strand li under the index finger) and make sure at strands worked with always lie in the same order when working. Crochet string after diagram A.4 until string measures 25 cm – or desired length. Keep the loop on the hook, cut one strand from string then crochet a small tail after diagram A.8 with the other strand. Cut and fasten the strands. |
|||||||||||||||||||||||||||||||||||||||||||||||||||||||
Diagram explanations |
|||||||||||||||||||||||||||||||||||||||||||||||||||||||
|
|||||||||||||||||||||||||||||||||||||||||||||||||||||||
 |
|||||||||||||||||||||||||||||||||||||||||||||||||||||||
 |
|||||||||||||||||||||||||||||||||||||||||||||||||||||||
 |
|||||||||||||||||||||||||||||||||||||||||||||||||||||||
 |
|||||||||||||||||||||||||||||||||||||||||||||||||||||||
Have you finished this pattern?Tag your pictures with #dropspattern #forestfriendsbookmark or submit them to the #dropsfan gallery. Do you need help with this pattern?You'll find 12 tutorial videos, a Comments/Questions area and more by visiting the pattern on garnstudio.com. © 1982-2026 DROPS Design A/S. We reserve all rights. This document, including all its sub-sections, has copyrights. Read more about what you can do with our patterns at the bottom of each pattern on our site. |
|||||||||||||||||||||||||||||||||||||||||||||||||||||||


With over 40 years in knitting and crochet design, DROPS Design offers one of the most extensive collections of free patterns on the internet - translated to 17 languages. As of today we count 324 catalogues and 12290 patterns translated into English (UK/cm). 12290
We work hard to bring you the best knitting and crochet have to offer, inspiration and advice as well as great quality yarns at incredible prices! Would you like to use our patterns for other than personal use? You can read what you are allowed to do in the Copyright text at the bottom of all our patterns. Happy crafting!
Post a comment to pattern DROPS Extra 0-1626
We would love to hear what you have to say about this pattern!
If you want to leave a question, please make sure you select the correct category in the form below, to speed up the answering process. Required fields are marked *.