
Popular categories
Looking for a yarn?


Comments / Questions (108)
![]() Christien wrote:
Christien wrote:
Super patroon, super garen, heb nu 1 bolletje op heb al 22 vierkantjes. dus meer dan genoeg garen.
01.04.2016 - 13:28
![]() Piper Knutson wrote:
Piper Knutson wrote:
How many yards of yarn do I need for the xxxl size. Skeins?
02.03.2016 - 16:05DROPS Design answered:
Dear Mrs Knutson, in size XL/XXXL, you need 350 g Safran / 50 g a ball Safran = 7 balls Safran x 175 yds = 1225 yds - Happy crocheting!
02.03.2016 - 18:08
![]() Monique Janssens wrote:
Monique Janssens wrote:
Wat wordt bedoeld met 'bobbel aan het begin'? Het staat los van het verdere patroon, is een beetje verwarrend.
18.10.2015 - 15:53DROPS Design answered:
Hoi Monique. Dat is het uitleg van de BOBBEL AAN HET BEGIN. Lees je het patroon dan zie je in bijvoorbeeld TOER 3: Hv tot het midden van de 1e l-lus, haak in dezelfde lus [1 BOBBEL AAN HET BEGIN - Lees uitleg boven, 4 l, 1 BOBBEL - Lees uitleg boven] = 1e hoek,.... Enzovoort. Dus je volgt het patroon en gebruikt de uitleg boven als het wordt vermeld.
19.10.2015 - 16:01
![]() Nelly wrote:
Nelly wrote:
Bonjour, Je ne devais pas être concentrée quand j'ai lu les explications la première fois mais en les reprenant, je me suis aperçue de ma méprise. Trop tard, mon message était déjà parti. Merci quand même pour votre réponse et désolée pour ce dérangement. Bon WE
22.05.2015 - 13:59
![]() Nelly wrote:
Nelly wrote:
Bonjour, Pour réaliser la taille S/M, il faut 4 carrés pour la largeur et 7 carrés pour la hauteur soit 11 carrés pour 1 partie donc 22 carrés au total. Or, il est indiqué de réaliser 28 carrés. Je fais sans doute une erreur, mais je ne vois pas laquelle ? Merci d'avance pour votre réponse. Nelly
21.05.2015 - 11:33DROPS Design answered:
Bonjour Nelly, quand vos 28 carrés sont faits pour la 1ère partie, assemblez-les en une longue bande de 4 carrés en largeur x 7 carrés en hauteur = 28 carrés au total. Réalisez la 2ème partie de la même façon et assemblez les 2 pièces entre elles comme indiqué. Bon crochet!
21.05.2015 - 13:40
![]() Gonny Le Sage wrote:
Gonny Le Sage wrote:
Hallo,ik zie dat er meer onduidelijkheid is over het patroon. Gelukkig, ik dacht dat het aan mij lag. Ik lees dat ik 28 vierkantjes moet haken,ben ik mee bezig. Ik heb 250 gr katoen op haakpen 4. Ik haak 9 vierkantjes uit een bolletje. Nu lees ik dat er ook een deel 2 is, dat wil zeggen dat ik nog 28 vierkantjes moet haken? Nu snap ik dr niks meer van, want dan heb ik dus 56 vierkantjes nodig,en dus meer dan 250 gram katoen. Help Help Help. Groetjes Gonny
22.03.2015 - 12:27DROPS Design answered:
Hoi Gonny. 250 gr DROPS Safran is genoeg voor deze poncho, vervang je door een andere merk garen (zoals de dame hieronder), dan moet je de hoeveelheid opnieuw berekenen omdat de looplengte kunnen verschillen. Je kan hier zien hoe dat moet Vergeet ook niet om de haakstekenverhouding te controleren: 1 vierkantje moet 8,5x8,5 cm zijn. Het staat in het patroon dat je twee delen haakt van beide 28 vierkantjes (voor de kleinste maat).
24.03.2015 - 14:59
![]() Annelies Van Balen wrote:
Annelies Van Balen wrote:
Er staat in het patroon vermeld dat deel 2 op dezelfde manier wordt gehaakt als deel 1. daarvan staat wel vermeld hoeveel vierkantjes die telt maar bij deel twee totaal niets. alleen een tekening... hoeveel vierkantjes hoog en breed is deel twee?
10.03.2015 - 15:13DROPS Design answered:
Hoi Annelies. Deel 2 moet gelijk aan deel 1 zijn - dus net zo veel vierkantjes en dezelfde breedte/hoogte.
10.03.2015 - 16:03
![]() Carol wrote:
Carol wrote:
When you say place the squares with 4-4-5. What exactly do you mean? Is it a rectangle 4 squares high and 5 squares wide?
10.01.2015 - 14:40DROPS Design answered:
Dear Carol, you should place the squares with 4 squares (in first 2 sizes) or 5 squares (in larger size) in width and 7 squares (in first size) or 8 squares (in 2 largest sizes) in height. Happy crocheting!
10.01.2015 - 17:47
![]() Potisk Sonja wrote:
Potisk Sonja wrote:
Liebes Team ! Ich würde mir eine Anleitung in Häkelschrift wünschen. Anstatt langem Herumprobieren könnte man anhand der Häkelzeichnung leicht ablesen , denn die Anleitung ist auch verwirrend. Mit Grüßen aus Österreich, Sonja
25.12.2014 - 15:07
![]() Maya wrote:
Maya wrote:
Bij de kleinste en de grootste maat is de opening voor het hoofd 3x3 vierkantjes! Bij de middelste maat is deze echter 4x4 vierkantjes! Dit kan toch niet de bedoeling zijn?
10.07.2014 - 11:18DROPS Design answered:
Hoi Maya. Het patroon is correct. De opening is ook met 3x3 groot genoeg, het gaat om de breedte/hoogte voor de grootste maat.
15.07.2014 - 16:30
|
|
Lily of the Valley#lilyofthevalleyponcho |
|
 |
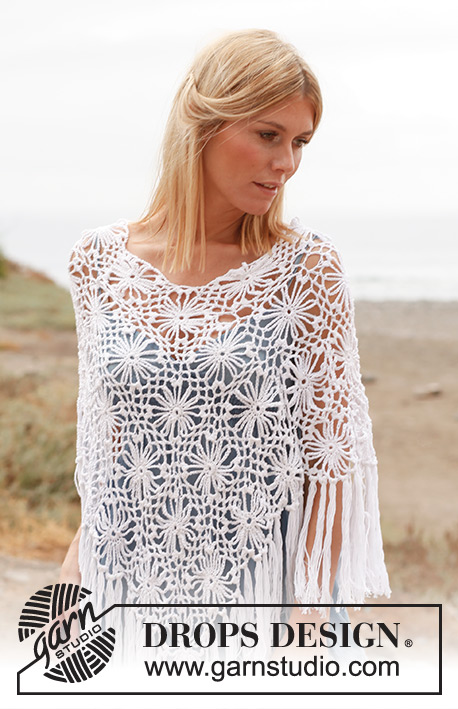 |
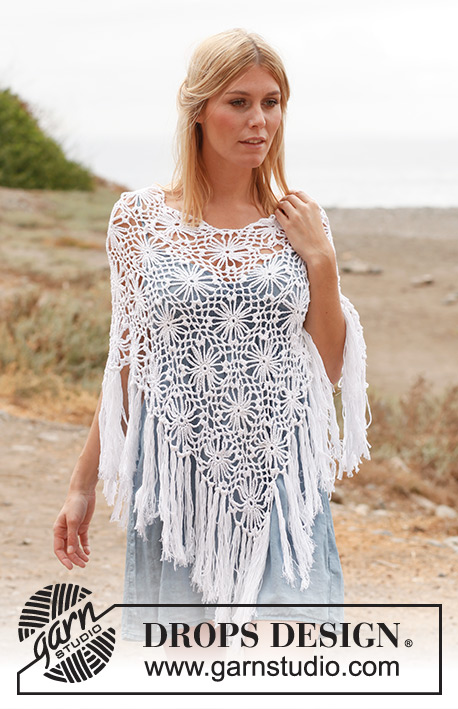
Crochet DROPS poncho with squares in ”Safran”. Size: S - XXXL.
DROPS 137-16 |
|
|
BOBBLE START: Ch 3, work 1 dc – but wait with last pull through (= 2 sts on hook), work 1 dc the same way in the same st, pull thread through all 3 sts on hook = 1st bobble on round. BOBBLE: Work 1 dc – but wait with last pull through (= 2 sts on hook), work 2 dc the same way in the same st, pull thread through all 4 sts on hook. ---------------------------------------------------------- PONCHO: The poncho is worked in two parts and sew tog when finished. SQUARE: Ch 5 on hook size 4 mm / G/6 with Safran and form a ring with 1 sl st in first ch. ROUND 1: ch 1, 12 sc in ch-ring. ROUND 2: * ch 15, 1 sl st in next sc *, repeat from *-* the entire round, finish with ch 10 and 1 tr in 1st sc from beg of 1ST ROUND, turn = 12 ch-spaces. ROUND 3: Sl st until the middle of 1st ch-space, in the same space work [1 BOBBLE START - Read explanation above, ch 4, 1 BOBBLE - Read explanation above] = 1st corner, * [ch 4, 1 sc in next ch-space] 2 times, ch 4, in next ch-space work [1 bobble, ch 4, 1 bobble] = corner *. Repeat from *-* the entire round. When repeating from *-* the last time do not work [1 bobble, ch 4, 1 bobble] but finish with 1 sl st in 1st bobble. Fasten off. PART 1: Work 28-32-40 squares in total. Sew squares tog alongside and then across. Place the squares with 4-4-5 squares in width and 7-8-8 squares in height. Place 2 and 2 squares on top of each other and crochet them tog as follows: Work 1 sc in ch-space in the corner on 1st square, ch 2, 1 sc in ch-space in the corner on 2nd square, * ch 2, 1 sc in next ch-space on 1st square, ch 2, 1 sc in next ch-space on 2nd square *, repeat from *-*, finish with ch 2, 1 sc in ch-space in the corner on 1st square, ch 2, 1 sc in ch-space in the corner on 2nd square. NOTE: Make sure that the transitions between every square are pretty when the squares are worked tog alongside. Piece measures approx. 36-36-45 cm / 14¼"-14¼"-17¾" in width and 63-72-72 cm / 24¾"-28½"-28½" vertically. PART 2: Work the same way as on PART 1. ASSEMBLY: Crochet the parts tog as follows: Place the short side on part 1 against right long side on part 2 (36-36-45 cm / 14¼"-14¼"-17¾" up on the bottom edge). Work the 2 parts tog the same way as before (1 sc in the corner, ch 2 and 1 sc in next ch-space etc.). Then work the short side on part 2 against part 1 the same way but against the left long side on part 1. FRINGES: 1 fringe = 6 threads of approx. 40 cm / 15¾". Fold the threads double, pull the loop through 1 ch-space and pull the thread ends through the loop (so that 12 threads hang down in every fringe). Put fringes on the diagonal sides on the poncho as follows: put 1 fringe in the ch 3-spaces between the corners on every square and 1 fringe in the ch-space between the squares. |
|
 |
|
Have you finished this pattern?Tag your pictures with #dropspattern #lilyofthevalleyponcho or submit them to the #dropsfan gallery. Do you need help with this pattern?You'll find 7 tutorial videos, a Comments/Questions area and more by visiting the pattern on garnstudio.com. © 1982-2026 DROPS Design A/S. We reserve all rights. This document, including all its sub-sections, has copyrights. Read more about what you can do with our patterns at the bottom of each pattern on our site. |
|


With over 40 years in knitting and crochet design, DROPS Design offers one of the most extensive collections of free patterns on the internet - translated to 17 languages. As of today we count 324 catalogs and 12290 patterns - 12280 of which are translated into English (US/in).
We work hard to bring you the best knitting and crochet have to offer, inspiration and advice as well as great quality yarns at incredible prices! Would you like to use our patterns for other than personal use? You can read what you are allowed to do in the Copyright text at the bottom of all our patterns. Happy crafting!
Post a comment to pattern DROPS 137-16
We would love to hear what you have to say about this pattern!
If you want to leave a question, please make sure you select the correct category in the form below, to speed up the answering process. Required fields are marked *.