
Popular categories
Looking for a yarn?


Comments / Questions (26)
![]() Sanne wrote:
Sanne wrote:
Nu virker det. Og jeg laver picotmasken som i beskriver. Så nu glæder jeg mig til at se det færdige resultat.
13.02.2011 - 15:35
![]() Sanne wrote:
Sanne wrote:
Jeg tror jeg har fundet fejlen. Under beskrivelsen af picotmasken, står der at der at man skal springe 2 m over. Når jeg kigger andre steder, står der at, man kun skal springe 1 m over. Så måske der bare er sneget sig en tastefejl ind?
12.02.2011 - 17:31
![]() Drops Design wrote:
Drops Design wrote:
Kan det have noget med udtagningerne i siden af gøre?
11.02.2011 - 11:12
![]() Sanne wrote:
Sanne wrote:
Jeg har lidt problemer med den første del af opskriften. Jeg hækler en str. s. Så der er 39m til den ene side, den passer også fint til mønsteret, men mit problem er så de 4 fm/st i siden. Dem er der ikke plads til. Håber i kan hjælpe med en løsning.
10.02.2011 - 09:42
![]() Janni Landgren wrote:
Janni Landgren wrote:
En utrolig rodet og indviklet opskrift. Diagrammet er totalt uoverskueligt og jeg måtte opgive mønstret, trods det, at jeg er en habil hækler
27.10.2010 - 17:10
![]() Camilla wrote:
Camilla wrote:
Mycket fin! Vill ha!
15.07.2010 - 18:11
![]() Kerstin wrote:
Kerstin wrote:
Ich freue mich schon auf die Anleitung (hoffentlich mit Häkelschrift - dadurch wird das Ganze einfacher zu verstehen)! Diese schöne Jacke kann man auch an warmen Frühjahrs-/Herbsttagen oder kühlen Sommertagen tragen, wenn man sie einfach nur bis zur Ärmelblende häkelt (sozusagen als Kurzarm-Modell). Wirklich klasse!
15.07.2010 - 10:40
![]() Heideman wrote:
Heideman wrote:
MOOI VEST! hOOP DAT HET PATROON NOG WORDT GEPLAATST. Wil het dan zeker wel gaan maken.
03.07.2010 - 20:07
![]() Malou wrote:
Malou wrote:
Snygg roligt med lite virkat!
01.07.2010 - 18:48Cynthia wrote:
I really like this crochet cardigan. It's very trendy and original. My favourite!
25.06.2010 - 14:40
|
|||||||||||||
Field of Fans#fieldoffanscardigan |
|||||||||||||
|
|
|||||||||||||
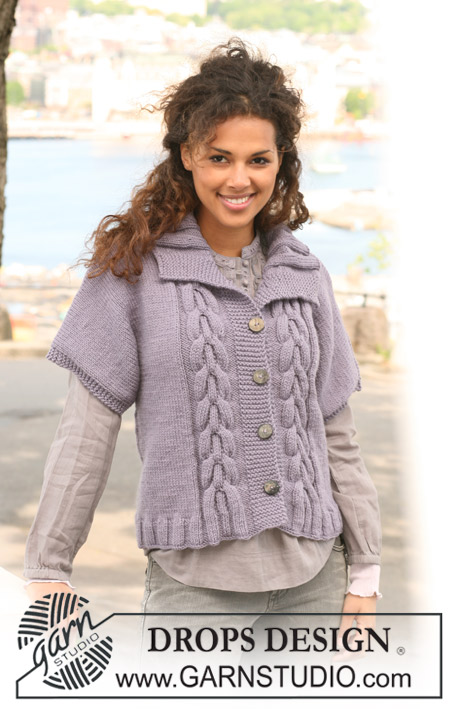
Crochet DROPS jacket in ”Merino Extra Fine”. Size S to XXXL.
DROPS 126-17 |
|||||||||||||
|
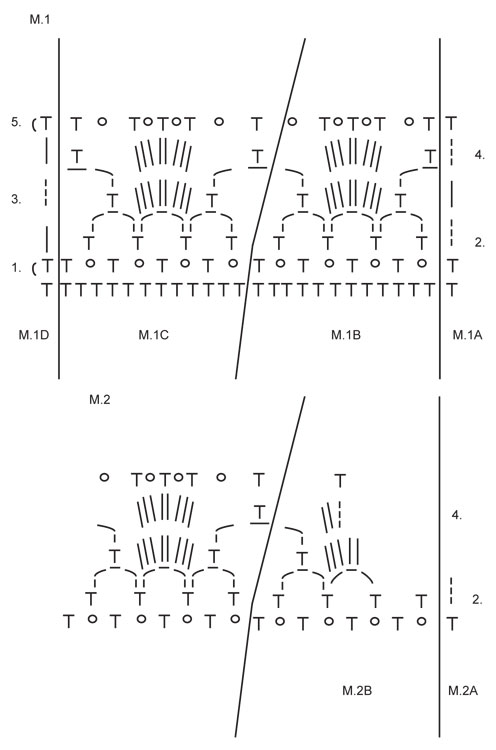
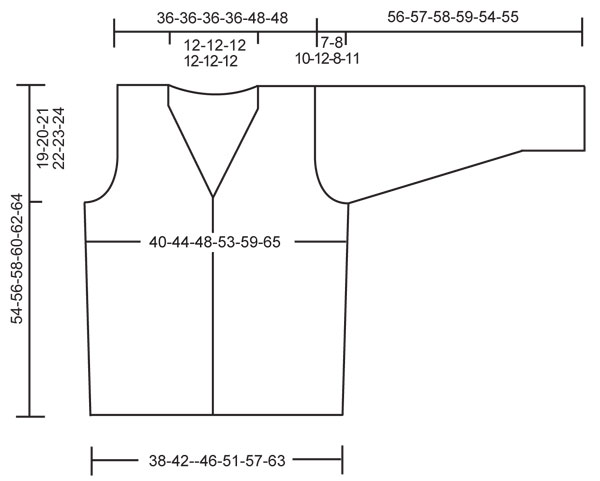
PATTERN: See diagram M.1 and M.2. In M.1 beg on row marked with 1 in diagram, then repeat row 2 to 5. In M.2 beg on row marked with 2 in diagram. THE SIDE: At the side work dc/sc as shown in diagram M.1A and M.1D, i.e. on row 1 and 5 in diagram work sc, on row 2, 3, and 4 work dc. Marker sits in st mid each side. DECREASING TIP: Work 1 dc, but wait with last pull-through (= 2 sts on hook), work next dc, but when doing the last pull through pull thread through all sts on hook – 1 dec dc. -------------------------------------------------------- -------------------------------------------------------- JACKET: Ch 155-167-183-199-227-247 LOOSELY with hook size 4 mm / G/6 with Merino. Turn piece. Skip first ch, then work 1 sc in each ch to end = 154-166-182-198-226-246 sc. Insert a marker 39-42-46-50-57-62 sc in from each side (back piece = 76-82-90-98-112-122 sc). Continue as follows (beg on row 1 in diagram): M.1A, repeat M.1B 2-2-2-2-3-3 times, M.1C, 4-10-18-26-16-26 sc/dc at the side - see above -, repeat M.1B 5-5-5-5-7-7 times, M.1C, 4-10-18-26-16-26 sc/dc at the side, repeat M.1B 2-2-2-2-3-3 times, M.1C and M.1D. Continue like this until piece measures approx 15-15-16-16-17-17 cm / 6"-6"-6¼"-6¼"-6¾"-6¾". Now inc 1 sc/dc each side of both markers 1 time. Inc by working 2 sc/dc in 1 sc/dc each side of both markers (= a total of 4 inc sc/dc). Now continue as before until piece measures approx 35-36-37-38-39-40 cm / 13¾"-14¼"-14½"-15"-15¼"-15¾" (adjust to after a full repeat). Cut the thread. Now divide piece and complete each piece separately. BACK PIECE: = 3-6-10-14-9-14 sc/dc each side. Beg inside 2-3-7-11-6-11 sc/dc. Work 1-3-3-3-3-3 sc/dc, repeat M.1B 5-5-5-5-7-7 times, M.1C and 1-3-3-3-3-3 sc/dc (3-4-8-12-7-12 sc/dc remain), turn piece. Continue in pattern as before until 0-1-1-1-1-1 sc/dc remain, turn piece. Continue in pattern as before until 0-1-1-1-1-1 sc/dc remain, turn piece. Continue in pattern as before until 0-1-1-1-1-1 sc/dc remain, turn piece. Continue in pattern as before until 0-1-1-1-1-1 sc/dc remain. There is now 1 sc/dc each side. Continue back and forth in pattern as before and 1 sc/dc each side. When piece measures approx 50-52-54-56-58-60 cm / 19¾"-20½"-21¼"-22"-22¾"-23⅝" (adjust to after a full repeat) divide piece for neck and complete each shoulder separately. RIGHT SHOULDER: Beg at the side. Work the 1 sc/dc at the side, repeat M.1B 1-1-1-1-2-2 times, M.1C and 1 sc/dc. Continue like this until repeat is completed. Piece now measures approx 54-56-58-60-62-64 cm / 21¼"-22"-22¾"-23⅝"-24⅜"-25¼". LEFT SHOULDER: Like right shoulder but mirrored, (i.e. 2 repeats mid back = neck). RIGHT FRONT PIECE: = 3-6-10-14-9-14 sc/dc at the side. Beg mid front and crochet as follows: M.1A, repeat M.1B 2-2-2-2-3-3 times, M.1C and 1-3-3-3-3-3 sc/dc (2-3-7-11-6-11 sc sc/dc remain at the side). Turn piece. Continue in pattern as before. Turn piece. Continue in pattern as before until 0-1-1-1-1-1 sc/dc remain at the side, turn piece. Continue in pattern as before, turn piece. Continue in pattern as before until 0-1-1-1-1-1 sc/dc remain at the side, turn piece. Continue in pattern as before. There is now 1 sc/dc at the side. Continue back and forth in pattern as before. AT THE SAME TIME after 1 vertical repeat after dividing the piece dec for neck. Continue from RS as follows: M.2 A, M.2 B, M.1B 1-1-1-1-2-2 times, M.1C, M.1D. When all dec for armhole and neck are complete continue as follows – from mid front: M.1A, M.1B 1-1-1-1-2-2 times, M.1C and M.1D. Continue like this until piece measures approx 54-56-58-60-62-64 cm / 21¼"-22"-22¾"-23⅝"-24⅜"-25¼" (adjust to number of repeats on back piece). Cut and fasten thread. LEFT FRONT PIECE: Like right front piece but mirrored. ASSEMBLY: Sew shoulder seams. Sew edge to edge to avoid a chunky seam. SLEEVE EDGES: Crochet an edge round armhole with hook size 4 mm / G/6 and Merino as follows: ROW 1: Beg mid under sleeve. Work sc all the way round and finish with 1 sl st in sc from beg of round. ROW 2: ch 3, then 1 dc in each sc to end and finish with 1 sl st in 3rd ch from beg of round (adjust so that no of sts is divisible by 3). ROW 3: 1 sc, * ch 3, 1 dc in the first of the ch 3, skip 2 dc, 1 sc in next dc *, repeat from *-* and finish with 1 sl st in sc from beg of round. Cut and fasten thread. Repeat round the other armhole. BORDER ROUND BODY PIECE: Crochet a border round body piece with hook size 4 mm / G/6 with Merino. Beg at the bottom on right front piece, continue up along front piece, round neck, down along left front piece and along bottom edge. Work ROW 1 and 2 as described for armhole. On ROW 3 finish with 1 sl st at the bottom on right front piece. Cut and fasten thread. SLEEVES: Worked back and forth. Ch 48-48-50-52-54-56 LOOSELY with hook size 4 mm / G/6 and Merino. Turn piece. Work 1 dc in 4th ch, and then 1 dc in each ch to end = 46-46-48-50-52-54 dc. Continue back and forth with 1 dc in each dc (replace first dc on each row with 3 ch). When piece measures approx 6 cm / 2⅜" inc 1 dc each side by working 2 dc in outermost dc each side. Repeat the inc on every 6-5-4-3.5-3-2.5 cm / 2⅜"-2"-1½"-1¼"-1⅛"-⅞" a total of 7-9-10-11-13-14 times = 60-64-68-72-78-82 dc. Continue back and forth until piece measures 49-49-48-47-46-44 cm / 19¼"-19¼"-19"-18½"-18"-17¼". Cut the thread. Now skip the first 6-6-6-6-8-8 dc on next row. Work 1 dc in each of the next 48-52-56-60-62-66 dc, turn piece (i.e. 6-6-6-6-8-8 dc remain the other side). Now dec 1 dc each side on every row by working the 2 outermost dc each side tog – See DECREASING TIP! Repeat on every row a total of 4-5-7-9-6-8 times = 40-42-42-42-50-50 dc. Cut the thread. Skip the first 6-6-6-6-8-8 dc, work 1 dc in each of the next 28-30-30-30-34-34 dc (i.e. 6-6-6-6-8-8 dc remain the other side). Cut and fasten thread. ASSEMBLY: Sew under arm seams. Sew edge to edge with neat sts to avoid a chunky seam. Set in sleeves under sleeve edge. Sew 3 buttons on left front piece, the top one just under neck and the remaining with approx 8 cm / 3⅛" between each. Use the dc on right front piece as buttonholes. |
|||||||||||||
Diagram explanations |
|||||||||||||
|
|||||||||||||
 |
|||||||||||||
 |
|||||||||||||
Have you finished this pattern?Tag your pictures with #dropspattern #fieldoffanscardigan or submit them to the #dropsfan gallery. Do you need help with this pattern?You'll find 6 tutorial videos, a Comments/Questions area and more by visiting the pattern on garnstudio.com. © 1982-2026 DROPS Design A/S. We reserve all rights. This document, including all its sub-sections, has copyrights. Read more about what you can do with our patterns at the bottom of each pattern on our site. |
|||||||||||||


With over 40 years in knitting and crochet design, DROPS Design offers one of the most extensive collections of free patterns on the internet - translated to 17 languages. As of today we count 324 catalogs and 12290 patterns - 12280 of which are translated into English (US/in).
We work hard to bring you the best knitting and crochet have to offer, inspiration and advice as well as great quality yarns at incredible prices! Would you like to use our patterns for other than personal use? You can read what you are allowed to do in the Copyright text at the bottom of all our patterns. Happy crafting!
Post a comment to pattern DROPS 126-17
We would love to hear what you have to say about this pattern!
If you want to leave a question, please make sure you select the correct category in the form below, to speed up the answering process. Required fields are marked *.