
Popular categories
Looking for a yarn?


Comments / Questions (123)
![]() Carola wrote:
Carola wrote:
Hola. Dice 7 cadenas y 1 punto bajo. Este punto bajo vasuelto dentro del bucle, o va pinchado dentro de un punto del bucle? Gracias.
17.10.2014 - 06:53DROPS Design answered:
Hola Carola. El p.b.se trabaja dentro del bucle.
17.10.2014 - 20:18
![]() Katleen wrote:
Katleen wrote:
Hoeveel garen heb je hiervoor nodig, ik vind dat nergens terug in het patroon? alvast bedankt
24.09.2014 - 14:15DROPS Design answered:
Hoi Katleen. Dit staat vermeld bovenaan het patroon: Materiaal: DROPS COTTON VISCOSE van Garnstudio 250-250-300-300-350-350 gr. kleur nr. 22, jeansblauw
24.09.2014 - 16:42
![]() Zahide wrote:
Zahide wrote:
Beste Roos-Anne en Drops design. Ik heb deze top ook gehaakt. Ik heb het zelfs met lange mouw gehaakt. Het klop dat hij breder wordt. Dit ligt aan het feit dat je het opzetten in zeer losse ketting moet haken. Dan de 1ste toe vast ook zeer los moet breien. Ik ben ook namelijk met de vermelde nummer haaknaald, maar je moet met name voor het haken van de vasten in de 1ste rij zeer los haken.
04.08.2014 - 23:26
![]() Roos-anne wrote:
Roos-anne wrote:
Ben bezig met topje "Florette", het aantal boogjes is nog hetzelfe als de vorige toeren,maar het werk wordt steeds wijder. Ik doe nu aan het begin van een nieuwe toer 8 lossen , dan verder met "7 l", moet ik soms elke toer met 7 lossen beginnen ipvb 8 ?
02.08.2014 - 18:11DROPS Design answered:
Wij kunnen helaas niet aangeven waarom uw werk wijder wordt, maar u moet beginnen met 8 l zoals in het patroon staat.
03.08.2014 - 21:40
![]() Monique wrote:
Monique wrote:
Ik begin met 124 losse, maar dat is geen 65 cm. Het is 53 cm. Wat doe ik verkeerd???
12.07.2014 - 13:03DROPS Design answered:
Hoi Monique. Haak je misschien een beetje te strak? Maak een proeflapje en controleer de haakstekenverhouding.
14.07.2014 - 16:58
![]() Rita wrote:
Rita wrote:
Gewoon vasten haken,die 6-4 enz staat voor de maat. KLeinste maat is 6,dan iets groter is vier enz
23.06.2014 - 10:21
![]() Jo wrote:
Jo wrote:
De eerste toer snap ik niet hoe dat beschreven is... Ik begrijp vasten maken. Maar in welke steken( lossen)? 6-4-....enz wat betekent dit?
22.06.2014 - 19:22
![]() Thurid wrote:
Thurid wrote:
After finishing the first part of the neck I am lost wehre exactly to re-join the yarn and how to start the second half of the neck. Tried different possibilities which did not work out quite right. Can you help? Thanks in andvance. I really like the pattern. :o)
09.06.2014 - 12:24DROPS Design answered:
Dear Thurid, for 1st shoulder, you have worked over the 7-11 large ch-loops (see size) on one side leaving all remaining ch-loops unworked for neckline and other shoulder. For other shoulder, work over the 7-11 ch-loops on the other side, leaving the middle 6-8 ch-loops unworked for neck). Happy crocheting!
10.06.2014 - 09:39
![]() Kateřina wrote:
Kateřina wrote:
V českém návodu je chyba. Opakovat se má pouze třetí řada.
07.06.2014 - 23:21DROPS Design answered:
Milá Kateřino, děkujeme za upozornění - návod je opraven!
23.08.2014 - 12:44
![]() Hannie wrote:
Hannie wrote:
Ik wil dit truitje heel erg graag haken en ik ben geen onervaren haakster maar van deze 3 eerste toeren snap ik niets. ik kom er echt niet uit er moeten mijn inziens lossen tussen de vasten worden gehaakt om lussen te krijgen ik zie het niet en ik wil zo graag beginnen mag ik aub de eerste 3 toeren steek voor steek uitgeschreven dan zie ik vast hoe het moet alvast bedankt
02.06.2014 - 21:53DROPS Design answered:
Hoi Hannie. Het patroon is correct. In toer 1 haak je alleen v over de ketting van l om de onderrand te maken. In toer 2 en 3 haak je lussen van 7 l en 3 l met v ertussen
03.06.2014 - 14:48
|
|
Florette#florettetop |
|
 |
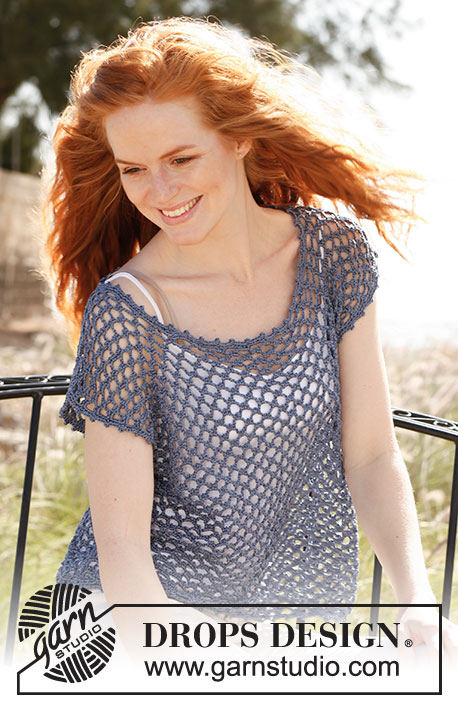 |
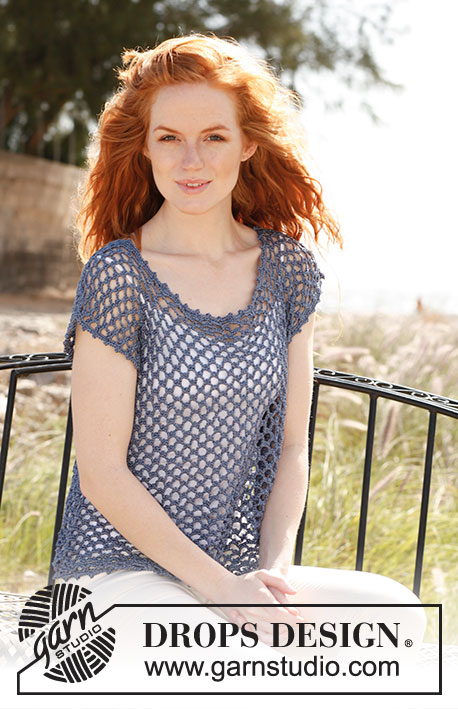
Crochet DROPS top in ”Cotton Viscose”. Size: S - XXXL.
DROPS 136-24 |
|
|
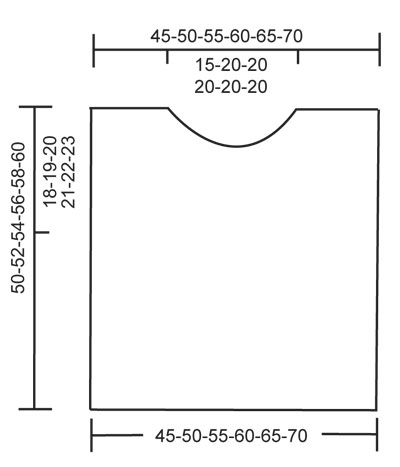
MEASURE TIPS: All length measures are taken holding the piece up. FRONT PIECE: Ch 86-96-106-115-125-134 loosely on hook size 3.5 mm/E/4 with Cotton Viscose. ROW 1: Work 1 sc in 2nd ch from hook, 1 sc in each of the next 6-4-2-5-3-6 ch, * skip ch 1, 1 sc in each of the next 5 ch *, repeat from *-* the rest of the ch-row = 72-80-88-96-104-112 sc. ROW 2: Turn piece with 8 ch, skip the first 3 sc, 1 sc in next sc (= 4th sc), ch 3, 1 sc in same sc, * ch 7, skip 3 sc, 1 sc in next sc, ch 3, 1 sc in same sc *, repeat from *-* = 18-20-22-24-26-28 large ch spaces. ROW 3: Turn piece with 8 ch, 1 sc in first large ch space, ch 3, 1 sc in same ch space, * ch 7, 1 sc in next large ch space, ch 3, 1 sc in same ch space *, repeat from *-*. Repeat 3rd row upwards. When piece measures approx. 40-42-43-45-46-48 cm / 15¾"-16½"-17"-17¾"-18"-19", beg dec for neck. Work next row as follows: Work as before over the first 7-7-8-9-10-11 large ch spaces, turn piece. Work back, turn piece, work as before over the first 6-6-7-8-9-10 large ch spaces, turn piece. Then work back and forth over these 6-6-7-8-9-10 ch spaces until piece measures approx. 50-52-54-56-58-60 cm / 19¾"-20½"-21¼"-22"-22¾"-23⅝", cut the yarn. Repeat the same way in the other side (the middle 6-8-8-8-8-8 ch spaces = neck). BACK PIECE: Work as front piece but do not dec for neck, just continue to work straight up until the same no of ch spaces have been worked vertically as on front piece. Cut the yarn. ASSEMBLY: Crochet the shoulder seams tog as follows: 1 sc in first large ch space on front piece, ch 2, 1 sc in first large ch space on back piece, * ch 2, 1 sc in next large ch space on front piece, ch 2, 1 sc in next large ch space on back piece *, repeat from *-* along the entire shoulder. Crochet the side seams tog the same way up to armhole (armhole = 18-19-20-21-22-23 cm / 7"-7½"-8"-8¼"-8¾"-9"). NECK EDGE: Work 1 round with sc around the neck, there should be approx. 1 sc in every small ch space and 5 sc in every large ch space, adjust so that the edge is not too tight (adjust so that no of sts is divisible by 4). Work next round as follows: 1 sc in each of the first 4 sc, * 1 picot (= ch 3, 1 sc in first ch), 1 sc in each of the next 4 sc *, repeat from *-* the entire round, finish with 1 picot and 1 sl st in first sc. SLEEVE EDGE: Work 2 rounds around the armholes the same way as around the neck. BOTTOM EDGE: Work 1 round with picots around the cast on edge at the bottom, the same way as last round around the neck and armholes. |
|
 |
|
Have you finished this pattern?Tag your pictures with #dropspattern #florettetop or submit them to the #dropsfan gallery. Do you need help with this pattern?You'll find 3 tutorial videos, a Comments/Questions area and more by visiting the pattern on garnstudio.com. © 1982-2026 DROPS Design A/S. We reserve all rights. This document, including all its sub-sections, has copyrights. Read more about what you can do with our patterns at the bottom of each pattern on our site. |
|


With over 40 years in knitting and crochet design, DROPS Design offers one of the most extensive collections of free patterns on the internet - translated to 17 languages. As of today we count 324 catalogs and 12290 patterns - 12280 of which are translated into English (US/in).
We work hard to bring you the best knitting and crochet have to offer, inspiration and advice as well as great quality yarns at incredible prices! Would you like to use our patterns for other than personal use? You can read what you are allowed to do in the Copyright text at the bottom of all our patterns. Happy crafting!
Post a comment to pattern DROPS 136-24
We would love to hear what you have to say about this pattern!
If you want to leave a question, please make sure you select the correct category in the form below, to speed up the answering process. Required fields are marked *.