
Popular categories
Looking for a yarn?


Comments / Questions (151)
![]() Sofie Madsen wrote:
Sofie Madsen wrote:
Hej, jeg har problemer med at få mønstret til at blive pænt, når jeg skal tage ind langs ærmet. Der står i opskriften at "De masker som ikke går op i mønsteret når der tages ind, strikkes i glatstrik.", men når jeg gør dette, får jeg store områder med glatstrik, som ses tydeligt, når trøjen prøves på. Er det korrekt? Eller gør jeg noget forkert? Mvh Sofie
16.05.2021 - 19:24DROPS Design answered:
Hej Sofie, det stemmer at du strikker de masker i glatstrik som ikke går op i mønsteret, og ja der bliver ret mange masker glatstrik under ærmet :)
17.05.2021 - 11:20
![]() Alicja wrote:
Alicja wrote:
W jaki sposób wykonywać wzór jednocześnie ujmując oczka w rekawie? Liczba oczek w rekawie zmniejsza się przecież , więc nie sposób zachować zgodność ze schematem...
05.05.2021 - 23:25DROPS Design answered:
Witaj Alicjo, liczba oczek na rękawie będzie się zmniejszała. Musisz przerabiać dżersejem oczka, które w wyniku zamknięcia oczek nie mogą być już przerabiane ściegiem fantazyjnym. To będzie pod spodem rękawa więc jak założysz sweterek nie będzie widoczne. Pozdrawiamy!
06.05.2021 - 15:55
![]() Sanna wrote:
Sanna wrote:
Hei! Mitä tarkoittaa seuraava ohje? KAARROKE: Aina kun olet neulonut piirroksen A.3 loppuun, kerrokselle tulee 1 piirroksen A.3 B mallikerta enemmän. Jatka lisäyksiä piirrosten A.1 ja A.2 mukaisesti. Eli mitä tarkoittaa jatka lisäyksiä piirrosten A1 ja A2 mukaisesti. Tarkoittaako se sitä että A3 kuvion jälkeen siirrytään jälleen neulomaan A1 ja A2 kuviota uudelleen? Jos näin niin miltä riviltä näiden kuvioiden neulominen aloitetaan?
21.04.2021 - 18:41DROPS Design answered:
Hei, piirroksen A.3 mallineuletta jatketaan, kunnes työ on jaettu miehustaa ja hihoja varten. Samalla jatketaan kutenkin lisäyksiä samalla tavalla, jolla ne tehtiin piirroksissa A.1 ja A.2.
05.05.2021 - 17:03
![]() Sanna wrote:
Sanna wrote:
Hei! Mitä tarkoittaa ohjeen seuraava kohta: KAARROKE: Kun olet neulonut piirrokset A.1 ja A.2 loppuun, neulo mallineuletta piirroksen A.3 mukaisesti. Tarkoittaako se, että kun tekee koon L paitaa niin kun on tehnyt mallin A1 loppuun niin seuraavalla kierroksella siirrytään kuvioon A3 vaikka kuviosta A2 jää neulomatta viimeiset 10 riviä ja A1 kuviosta alimmat 10 riviä?
21.04.2021 - 18:37DROPS Design answered:
Kyllä, työhön tulee kuitenkin kokonainen pitsikuvio, ennen kuin siirrytään piirroksen A.3 mallineuleeseen.
05.05.2021 - 17:08
![]() Grethe wrote:
Grethe wrote:
Hej Jeg kan ikke få overgangen fra A1/A2 til A3 til at stemme. Hvis jeg fortsætter med 1 retmaske start og slut som på A1/A3 (raglan) og derefter fortsætter efter A3, så mangler nederste højre eller venstre del af “romben”/“bladet” da, hvis man skal strikke efter A3 til man lukker af til ærmer? Hulmønstret/omslaget mangler da også langs raglan, hvis man skal følge A3. Mvh Grethe
11.04.2021 - 11:40DROPS Design answered:
Hej Grethe, Se nærbilledet med mønsteret som ligger tæt på raglanovergangen, så kan det være at det er lettere at forstå :)
28.04.2021 - 14:42
![]() Anja wrote:
Anja wrote:
Guten Tag, ich habe mich jetzt einige Tage schon durch diverse Fragen in verschiedenen Sprachen gewühlt, dank geht hierbei an Google Übersetzer, leider habe ich noch immer nicht auf alle Fragen eine Antwort gefunden. Werden häufig gestellte Fragen auch in den Text übernommen?
08.04.2021 - 10:49
![]() Anja wrote:
Anja wrote:
Guten Tag, in der Anleitung finde ich leider keine Antwort auf die Fragen: Wie häufig wird A3 in der Höhe gestrickt? Und wie passt die Länge von 27cm zu den 30 Zunahmen? Sind die 30 Zunahmen auf alle Wiederholungen von A3 bezogen oder nur auf eine?
08.04.2021 - 10:49DROPS Design answered:
Liebe Anja, A.3 wird bei der Passe in der Höhe wiederholt bis alle Zunahmmen fertig sind. Bei A.1/A.2 nehmen Sie 15 Mal zu, Sie brauchen noch 15 Mal=30 Reihen A.3= 3Mal A.3 in der Höhe.Die Zunahmen stricken Sie wie zuvor am Angang und am Ende in A.1-A.2. Es sind insg. 60 Reihen = ca 27 cm(mit 22 Reihen = 22cm). Viel Spaß beim stricken!
08.04.2021 - 15:56
![]() Maria wrote:
Maria wrote:
Buongiorno! Sono arrivata al punto di dividere lo sprone dalle maniche e iniziare con A4. Non mi è molto chiaro, però, perché sia necessario tagliare il filo per iniziare in un altro punto del giro. Se continuassi senza tagliare, stando attenta a far combaciare i pattern, non sarebbe la stessa cosa? Vi ringrazio in anticipo per l'aiuto!
25.03.2021 - 17:30DROPS Design answered:
Buonasera Maria, il filo va tagliato perchè si inizia in un altro punto del giro. Buon lavoro!
27.03.2021 - 19:05
![]() Lone Martensen wrote:
Lone Martensen wrote:
Hej har nu delt arbejdet og skal strikke ryg og forstykke. Forstår godt at jeg skal strikke A4 men sksl jeg fortsætte med de 2 retmasker imellem mønstrene. Der står jeg skal starte 3 masker før de nyoplåede masker men det passer ikke med mønstret ihvertfald ikke hvis jeg skal starte med række 1? Hvis mønstret skal passe henover bærestykket hvad så med de 2 retmasker som man gar skullet strikke imellem alle mønstrene på hver omgang 🤔 Mvh Lone
24.03.2021 - 21:27DROPS Design answered:
Hej Lone, de 2 retmasker de var i raglanovergangen, så dem skal du ikke strikke mere. Mønsteret fortsætter nu rundt over alle masker og mønsteret skal stemme over det du allerede har strikket. God fornøjelse!
25.03.2021 - 09:08
![]() Lone Martensen wrote:
Lone Martensen wrote:
Forstår ikke teksten omkring A3 diagrammet Skal jeg fortsætte med at lave de 2 masker glatstrik imellem mønstrene som jeg har gjort ved A1 og A2, når jeg starter med at strikke A3 ? Udtagningerne som jeg skal fortsætte med når jeg strikker A3 er det alle dem der ligger i diagrammerne A1 og A2 i kanterne ? Der står her på siden at der er rettelser til A3 men kan ikke finde de rettelser ? Med venlig hilsen Lone
10.03.2021 - 08:12DROPS Design answered:
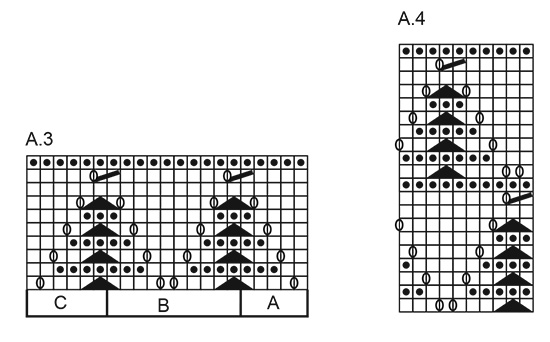
Hej Lone, ja du fortsætter med at tage ud på hver 2.omgang som du har gjort tidligere (sæt evt er mærke der hvor du skal tage ud). De 2 masker er i selve raglanovergangen, du ser dem på det 4.billede. Rettelserne er tegnet ind i diagrammerne, så det behøver du ikke tænke på. Start med de 5 første masker i A.3A som beskrevet og så fortsætter du med A.3B til du har 6 masker tilbage. Husk udtagningerne i hver raglan overgang :)
11.03.2021 - 10:47
|
||||||||||||||||
Frosted Leaves#frostedleavessweater |
||||||||||||||||
 |
 |
|||||||||||||||
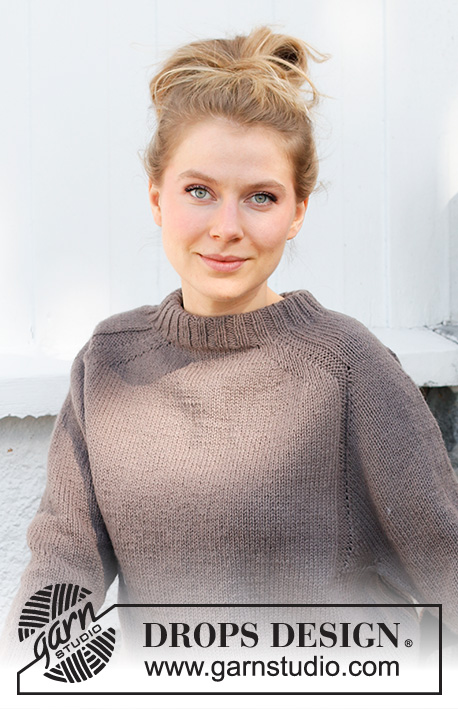
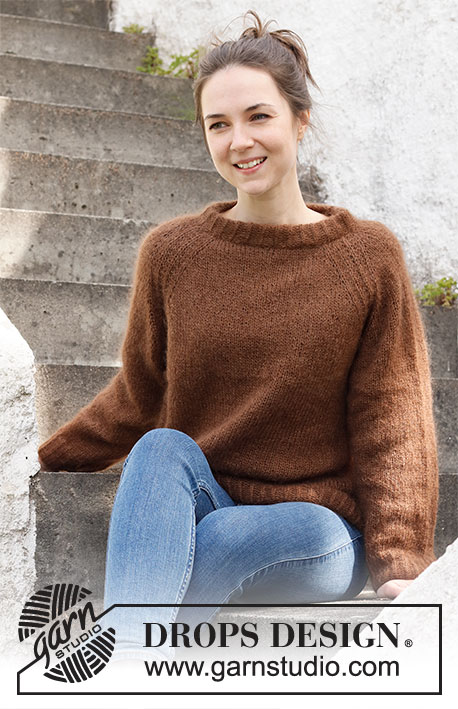
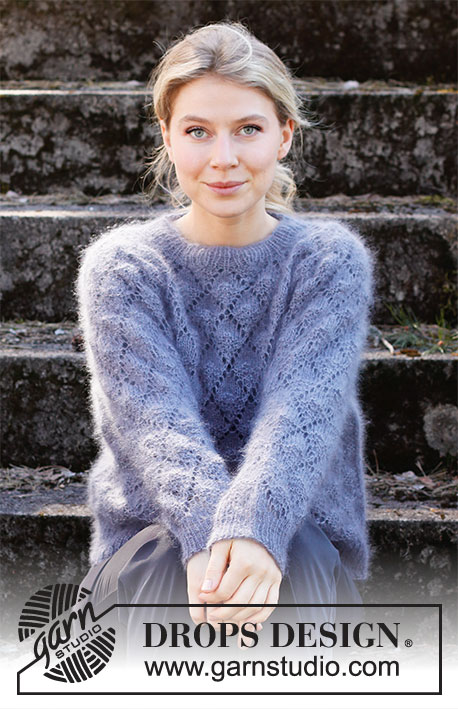
Knitted jumper in 1 strand DROPS Brushed Alpaca Silk or 2 strands DROPS Kid-Silk. The piece is worked top down with raglan and lace pattern. Sizes S - XXXL.
DROPS 216-3 |
||||||||||||||||
|
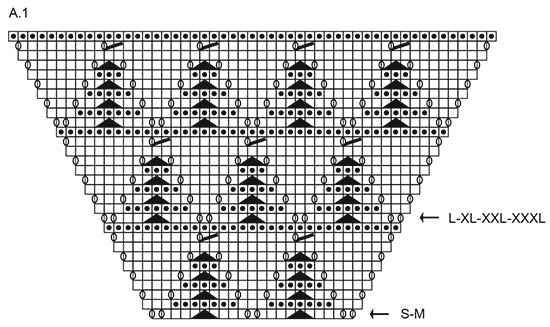
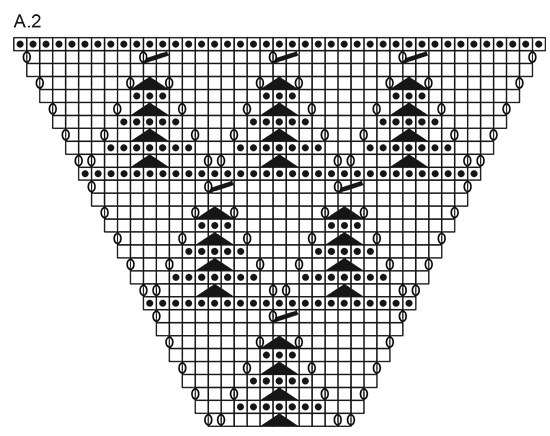
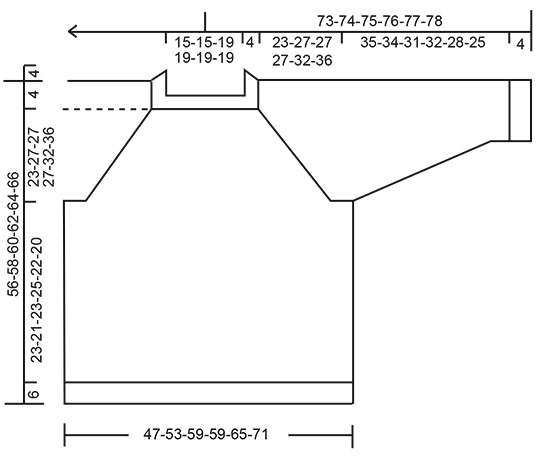
------------------------------------------------------- EXPLANATIONS FOR THE PATTERN: ------------------------------------------------------- PATTERN: See diagrams A.1 to A.4 DECREASE TIP-1 (evenly spaced): To work out how to decrease evenly, count the total number of stitches on needle (e.g. 48 stitches) and divide by number of decreases to be made (e.g. 8) = 6. In this example decrease by knitting each 5th and 6th stitch together. DECREASE TIP-2 (for sleeves): Decrease 1 stitch on either side of the marker thread as follows: Work until there are 3 stitches left before the marker thread, knit 2 together, knit 2 (marker thread sits between these 2 stitches), slip 1 stitch as if to knit, knit 1 and pass the slipped stitch over the knitted stitch (= 2 stitches decreased). CASTING-OFF TIP: To avoid the cast-off edge being tight you can cast off with a larger size needle. If the edge is still tight, make 1 yarn over after approx. each 4th stitch at the same time as casting off; the yarn overs are cast off as normal stitches. ------------------------------------------------------- START THE PIECE HERE: ------------------------------------------------------- JUMPER – SHORT OVERVIEW OF THE PIECE: The neck and yoke are worked in the round with circular needle, top down. The yoke is divided for body and sleeves and the body continued in the round with circular needle. The sleeves are worked in the round with short circular needle/double pointed needles, top down. The piece is worked with 1 strand Brushed Alpaca Silk or 2 strands Kid-Silk. NECK: Cast on 72-72-92-92-92-92 stitches with circular needle size 4 mm and 1 strand Bruched Alpaca Silk or 2 strands Kid-Silk. Knit 1 round. Then work rib (knit 1, purl 1) for 4 cm. Insert 1 marker at the beginning of the round. The yoke will be measured from this marker. Change to circular needle size 5 mm and work the yoke as described below. REMEMBER THE KNITTING TENSION! YOKE: On the next round work pattern as follows: Work 1 stitch in stocking stitch, A.1 (= 21-21-31-31-31-31 stitches, see start-arrow for your size), 2 stitches in stocking stitch, A.2 (= 11 stitches), 2 stitches in stocking stitch, A.1 (= 21-21-31-31-31-31 stitches, see start-arrow for your size), 2 stitches in stocking stitch, A.2 (= 11 stitches) and 1 stitch in stocking stitch. Continue this pattern; all increases are drawn into the diagrams. 8 stitches are increased every 2nd round. When A.1 and A.2 have been worked 1 time in height, continue with A.3. Work A.3 A over the first 5 stitches, repeat A.3 B until there are 6 stitches left on the row and work A.3 C over the last 6 stitches. Each time A.3 has been worked 1 time in height there is room for 1 more repeat of A.3 B in width. Continue the increases as shown in A.1 and A.2. Increase every 2nd round a total of 25-30-30-30-35-40 times = 272-312-332-332-372-412 stitches. The piece measures approx. 23-27-27-27-32-36 cm from the marker thread. Now divide the yoke for body and sleeves as follows (continue the pattern as before; you should be on the last round in a repeat of A.3, where all stitches are purled): Work 73-83-93-93-103-113 stitches (= back piece), place the next 63-73-73-73-83-93 stitches on 1 thread for the sleeve, cast on 7 new stitches on the needle (= in side under sleeve), work 73-83-93-93-103-113 stitches as before (= front piece), place the next 63-73-73-73-83-93 stitches on 1 thread for the sleeve and cast on 7 new stitches on the needle (= in side under sleeve). Body and sleeves are finished separately. Cut the strand. BODY: = 160-180-200-200-220-240 stitches. Start 3 stitches before the 7 new stitches cast on in the side and work A.4 over all stitches; make sure the pattern matches the pattern on the yoke. Continue working until the piece measures 23-21-23-25-22-20 cm from the division (there is approx. 6 cm left to finished length; you can try the jumper on and work to desired length). Change to circular needle size 4 mm and work rib (knit 1, purl 1) for 6 cm. Cast off with knit over knit and purl over purl – read CASTING-OFF TIP! The jumper measures approx. 56-58-60-62-64-66 cm from the shoulder down. SLEEVES: Place the 63-73-73-73-83-93 stitches from the thread on the one side of the piece on short circular needle/double pointed needles size 5 mm and knit up 1 stitch in each of the 7 stitches cast on under the sleeve = 70-80-80-80-90-100 stitches. Insert a marker thread in the middle of the 7 stitches under the sleeve. Allow the thread to follow your work onwards; it will be used when decreasing under the sleeve. Cut the strand and start working 3 stitches before the new stitches under the sleeve and continue the pattern in the round according to A.4; make sure the pattern matches the pattern on the yoke. When the sleeve measures 3 cm from the division in all sizes, decrease 2 stitches mid under the sleeve – read DECREASE TIP-2. Decrease like this every 3-2-1½-2-1-1 cm a total of 11-15-15-13-17-21 times = 48-50-50-54-56-58 stitches. The stitches which do not fit into the pattern when decreasing are worked in stocking stitch. Continue working until the sleeve measures 35-34-31-32-28-25 cm from the division (there is approx. 4 cm left to finished length; you can try the jumper on and work to desired length). NOTE: Shorter measurements in larger sizes due to wider neck and longer yoke. Knit 1 round where you decrease 8 stitches evenly spaced – read DECREASE TIP-1 = 40-42-42-46-48-50 stitches. Change to double pointed needles size 4 mm and work rib (knit 1, purl 1) for 4 cm. Cast off with knit over knit and purl over purl – remember CASTING-OFF TIP! The sleeve measures approx. 39-38-35-36-32-29 cm from the division. Work the other sleeve in the same way. |
||||||||||||||||
Diagram explanations |
||||||||||||||||
|
||||||||||||||||
|
||||||||||||||||
|
||||||||||||||||
|
||||||||||||||||
|
||||||||||||||||
Have you finished this pattern?Tag your pictures with #dropspattern #frostedleavessweater or submit them to the #dropsfan gallery. Do you need help with this pattern?You'll find 25 tutorial videos, a Comments/Questions area and more by visiting the pattern on garnstudio.com. © 1982-2025 DROPS Design A/S. We reserve all rights. This document, including all its sub-sections, has copyrights. Read more about what you can do with our patterns at the bottom of each pattern on our site. |
||||||||||||||||


With over 40 years in knitting and crochet design, DROPS Design offers one of the most extensive collections of free patterns on the internet - translated to 17 languages. As of today we count 314 catalogues and 11821 patterns translated into English (UK/cm). 11821
We work hard to bring you the best knitting and crochet have to offer, inspiration and advice as well as great quality yarns at incredible prices! Would you like to use our patterns for other than personal use? You can read what you are allowed to do in the Copyright text at the bottom of all our patterns. Happy crafting!
Post a comment to pattern DROPS 216-3
We would love to hear what you have to say about this pattern!
If you want to leave a question, please make sure you select the correct category in the form below, to speed up the answering process. Required fields are marked *.