
Popular categories
Looking for a yarn?


Comments / Questions (151)
![]() Cornelia wrote:
Cornelia wrote:
Ich habe eine Frage zur Passe. Ich stricke Größe L. .A1 ist nach 20 R. beendet, A2 aber erst nach 30 R. Wie führe ich A1 weiter, mit A3? Dann wird aber in der 21. Reihe am Anfang nur 1 Umschlag (1. u. 11. R. zu Beginn. und am Ende 2 Umschläge) gearbeitet. Ist das so richtig?
06.03.2022 - 22:20DROPS Design answered:
Liebe Cornelia, über A.1 stricken Sie: die Zunahme wie in A.1, dann stricken Sie: A.3A, A.3B bis 6 M übrig sind, dann stricken Sie A.3C und nehmen wie in A.1 zu. Viel Spaß beim stricken!
07.03.2022 - 09:38
![]() Rikke wrote:
Rikke wrote:
Forstår ikke helt dette med A3. Har skjønt at jeg skal beholde grattstrikk og raglanøkningene (?), men skal A3a-c strikkes mellom hver raglanøkning? Altså mellom hver økning strikkes a-c strikkes = x4 på en omg? Eller skal man begynne med a og strikke b over hele, helt til man avslutter selve omgangen med c?
24.02.2022 - 08:20DROPS Design answered:
Hei Rikke. Når A.1 og A.2 er strikket 1 gang i høyden, strikkes det videre med A.3. Du starter omgangen med A.3a (over 5 masker), så strikker du A.3b til det gjenstår 6 masker på omgangen, strikk A.3c. Du fortsetter også med økningene som før (som vist i A.1 og A.2). mvh DROPS Design
28.02.2022 - 12:59
![]() Unni Solli wrote:
Unni Solli wrote:
Jeg strikker Frosted Leaves Drops 216-3, og synes oppskriften er veldig vanskelig å skjønne. I andre avsnitt på s 3 står det at A1 og A2 skal strikkes 1 gang i høyden. Hva betyr det? Er det hele diagrammet på 30 omg? Det står også at det skal økes p hver 2. omg totalt 25 ganger (strikker S). Er det da 25 ganger fra jeg starter med A1 og A2??
10.02.2022 - 17:27DROPS Design answered:
Hei Unni. Ja, du strikker diagram A.1 og A.2 1 gang i høyden (= 30 omganger/15 omganger der du har økt). Deretter strikker du videre med A.3, men du fortsetter å øke som vist i A.1/A.2 på hver 2. omgang 10 ganger til, totalt 25 ganger. I str. S vil du da ha 272 masker og arbeidet måler ca 23-cm fra merketråden. mvh DROPS Design
14.02.2022 - 10:01
![]() Angie M wrote:
Angie M wrote:
Sorry, verlesen mit den Zahlen, es sind "nur" 73 an den Ärmeln, aber ich komme trotzdem nicht nach 26 cm ab Bund ( das ist 5 x das Muster gestrickt) auf 332 M. Muss ich noch einmal das Muster stricken? dann wird er aber ziemlich groß ... LG
05.02.2022 - 22:03DROPS Design answered:
Liebe Angie, wenn A.1 und A.2 fertig gestrickt ist, dann stricken Sie A.3 (mit A am Anfang, B wird wiederholt und C zum Schluß) und gleichzeitig nehmen Sie weiter wie zuvor wie in A.1/A.2 gezeigt. Es wird insgesamt 30 Mal zugenommen (= 60 Runde). So haben Sie 332 Maschen. Viel Spaß beim stricken!
07.02.2022 - 11:34
![]() Angie M wrote:
Angie M wrote:
Ich stricke den Pulli in Größe L und bin bei der Teilung nach der Passe. Da ich Muster A 2 für de Ärmel und A3 für das Vorder- bzw. Rückenteil stricke, kann ich bei der Teilung nicht auf jeweils 93 M kommen, was ist denn hier falsch?
05.02.2022 - 21:58
![]() Elizabeth Di Chiara wrote:
Elizabeth Di Chiara wrote:
The instructions are very poorly written and confusing especially at the beginning for the yoke. I don’t understand how to go from A1 after 1 height which is 20 rows to then using A3 and continue with A2. Your instructions for A3 are not clear at all and neither are the responses to the same questions raised by others here. I can only understand the English responses. I don’t understand how you use A3 A, B and C at all. Very confusing and frustrating!
13.01.2022 - 06:37DROPS Design answered:
Dear Mrs Di Chiara, when A.1 is done, (increase as before on every other round), then work A.3A over the first 5 sts previous A.1, then repeat A.3B until 6 sts remain, work now A.3C (and increase as before on ever other round). Pattern will be repeated in wicth the same way as in A.1 , A.3 just shows the beg (A.) + the end (C) of the pattern with 1 repeat (B) between both. Happy knitting!
13.01.2022 - 08:57
![]() Vanessa wrote:
Vanessa wrote:
I’m knitting the sleeves right now. But when I decrease 2, the pattern gets all messed up, how can I fix this?
25.10.2021 - 20:54DROPS Design answered:
Dear Vanessa, if the problem is at the mid sleeve (under the sleeve), then if you do not have enough stitches for a whole repeat, knit those stitches with stockinett. Happy Stitching!
26.10.2021 - 00:45
![]() Barbara Rainbird wrote:
Barbara Rainbird wrote:
Knitting pattern 216-3 size L. Pattern says to knit until chart A and chart A" have been knitted once in height. Chart A1 is only 20 rows ( starting on row 11 for size L) and chart A2 is 30 rows in height . How do I continue?
08.07.2021 - 11:50DROPS Design answered:
Dear Mrs Rainbird, A.2 shows more row, ie it shows how to increase when working A.2 and then work A.3 as explained (increasing as before in A.1 at the beg and at the end of this section). When A.2 will be finished, you will increase the same way as before, work A.3 (= pattern) and increasing as shown at the beg and end of A.2 in this section. Happy knitting!
08.07.2021 - 13:41
![]() Linda Marit Bjørke wrote:
Linda Marit Bjørke wrote:
Hei. Det står at bolen strikkes rundt på rundpinne fra midt bak, ovenfra og ned, men mønsteret starter ikke midt bak. Starter ikke omgangen på venstre siden bak der overgang mellom ermet og bakstykket er?
14.06.2021 - 11:57DROPS Design answered:
Hei Linda Marit, Du har rett i at bolen er strikket fra den ene siden og begynner i midten av de nye maskene lagt opp under ermet. God fornøyelse!
18.06.2021 - 08:37
![]() Sanna wrote:
Sanna wrote:
Hei! Mitä tarkoittaa kaarrokkeessa: Jatka lisäyksiä piirrosten A.1 ja A.2 mukaisesti (samalla kun neulotaan A3 kuviota)?
22.05.2021 - 11:02DROPS Design answered:
Hei, neulot muuten mallineuletta piirroksen A.3 mukaisesti, mutta jatkat samalla lisäyksiä kuten aiemmin.
25.08.2021 - 17:22
|
||||||||||||||||
Frosted Leaves#frostedleavessweater |
||||||||||||||||
 |
 |
|||||||||||||||
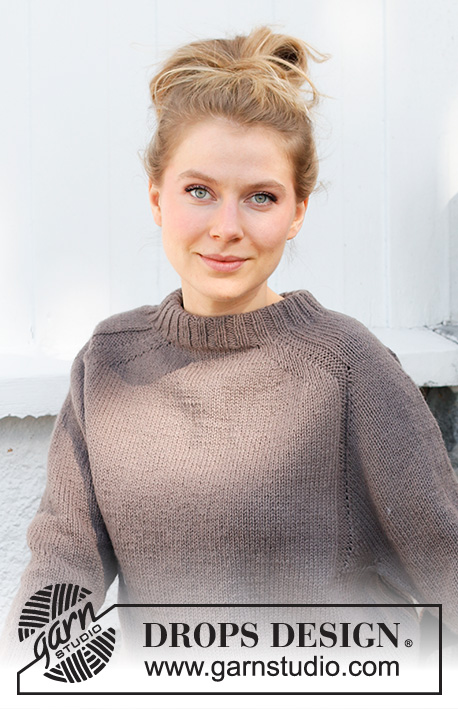
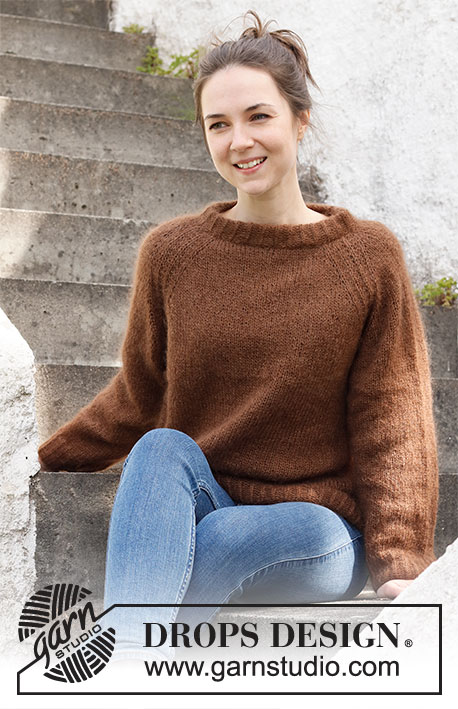
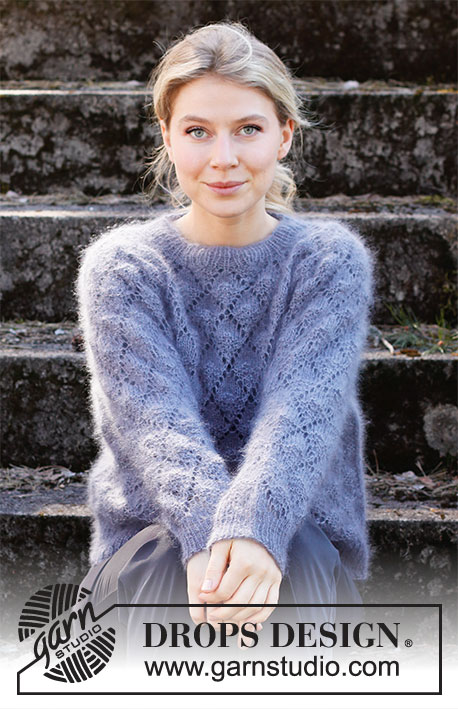
Knitted jumper in 1 strand DROPS Brushed Alpaca Silk or 2 strands DROPS Kid-Silk. The piece is worked top down with raglan and lace pattern. Sizes S - XXXL.
DROPS 216-3 |
||||||||||||||||
|
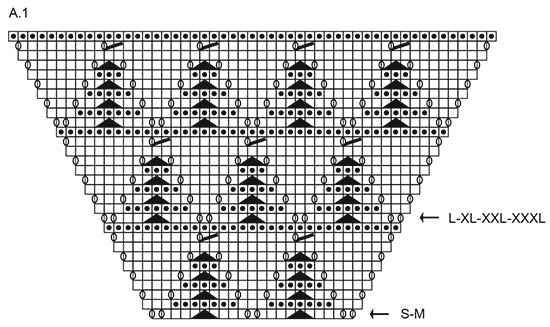
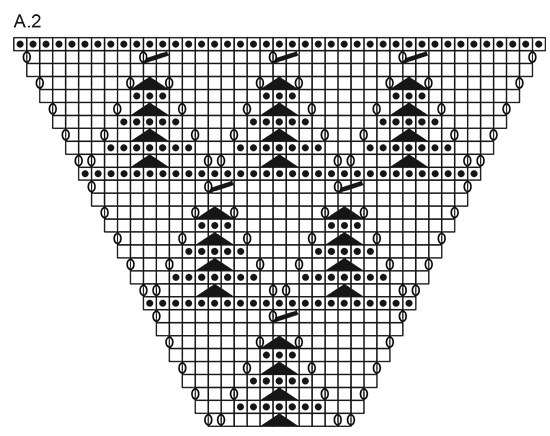
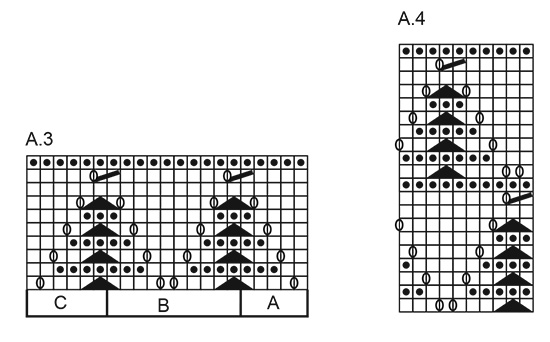
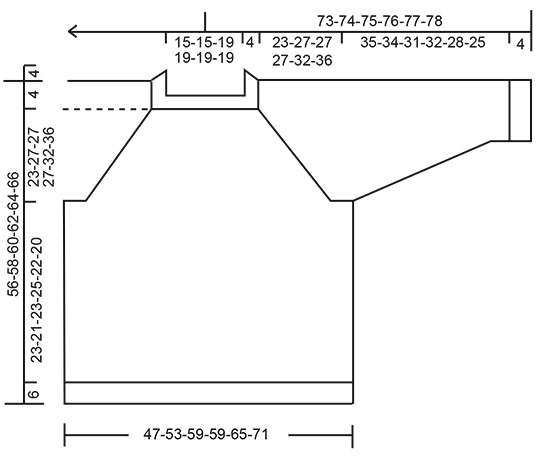
------------------------------------------------------- EXPLANATIONS FOR THE PATTERN: ------------------------------------------------------- PATTERN: See diagrams A.1 to A.4 DECREASE TIP-1 (evenly spaced): To work out how to decrease evenly, count the total number of stitches on needle (e.g. 48 stitches) and divide by number of decreases to be made (e.g. 8) = 6. In this example decrease by knitting each 5th and 6th stitch together. DECREASE TIP-2 (for sleeves): Decrease 1 stitch on either side of the marker thread as follows: Work until there are 3 stitches left before the marker thread, knit 2 together, knit 2 (marker thread sits between these 2 stitches), slip 1 stitch as if to knit, knit 1 and pass the slipped stitch over the knitted stitch (= 2 stitches decreased). CASTING-OFF TIP: To avoid the cast-off edge being tight you can cast off with a larger size needle. If the edge is still tight, make 1 yarn over after approx. each 4th stitch at the same time as casting off; the yarn overs are cast off as normal stitches. ------------------------------------------------------- START THE PIECE HERE: ------------------------------------------------------- JUMPER – SHORT OVERVIEW OF THE PIECE: The neck and yoke are worked in the round with circular needle, top down. The yoke is divided for body and sleeves and the body continued in the round with circular needle. The sleeves are worked in the round with short circular needle/double pointed needles, top down. The piece is worked with 1 strand Brushed Alpaca Silk or 2 strands Kid-Silk. NECK: Cast on 72-72-92-92-92-92 stitches with circular needle size 4 mm and 1 strand Bruched Alpaca Silk or 2 strands Kid-Silk. Knit 1 round. Then work rib (knit 1, purl 1) for 4 cm. Insert 1 marker at the beginning of the round. The yoke will be measured from this marker. Change to circular needle size 5 mm and work the yoke as described below. REMEMBER THE KNITTING TENSION! YOKE: On the next round work pattern as follows: Work 1 stitch in stocking stitch, A.1 (= 21-21-31-31-31-31 stitches, see start-arrow for your size), 2 stitches in stocking stitch, A.2 (= 11 stitches), 2 stitches in stocking stitch, A.1 (= 21-21-31-31-31-31 stitches, see start-arrow for your size), 2 stitches in stocking stitch, A.2 (= 11 stitches) and 1 stitch in stocking stitch. Continue this pattern; all increases are drawn into the diagrams. 8 stitches are increased every 2nd round. When A.1 and A.2 have been worked 1 time in height, continue with A.3. Work A.3 A over the first 5 stitches, repeat A.3 B until there are 6 stitches left on the row and work A.3 C over the last 6 stitches. Each time A.3 has been worked 1 time in height there is room for 1 more repeat of A.3 B in width. Continue the increases as shown in A.1 and A.2. Increase every 2nd round a total of 25-30-30-30-35-40 times = 272-312-332-332-372-412 stitches. The piece measures approx. 23-27-27-27-32-36 cm from the marker thread. Now divide the yoke for body and sleeves as follows (continue the pattern as before; you should be on the last round in a repeat of A.3, where all stitches are purled): Work 73-83-93-93-103-113 stitches (= back piece), place the next 63-73-73-73-83-93 stitches on 1 thread for the sleeve, cast on 7 new stitches on the needle (= in side under sleeve), work 73-83-93-93-103-113 stitches as before (= front piece), place the next 63-73-73-73-83-93 stitches on 1 thread for the sleeve and cast on 7 new stitches on the needle (= in side under sleeve). Body and sleeves are finished separately. Cut the strand. BODY: = 160-180-200-200-220-240 stitches. Start 3 stitches before the 7 new stitches cast on in the side and work A.4 over all stitches; make sure the pattern matches the pattern on the yoke. Continue working until the piece measures 23-21-23-25-22-20 cm from the division (there is approx. 6 cm left to finished length; you can try the jumper on and work to desired length). Change to circular needle size 4 mm and work rib (knit 1, purl 1) for 6 cm. Cast off with knit over knit and purl over purl – read CASTING-OFF TIP! The jumper measures approx. 56-58-60-62-64-66 cm from the shoulder down. SLEEVES: Place the 63-73-73-73-83-93 stitches from the thread on the one side of the piece on short circular needle/double pointed needles size 5 mm and knit up 1 stitch in each of the 7 stitches cast on under the sleeve = 70-80-80-80-90-100 stitches. Insert a marker thread in the middle of the 7 stitches under the sleeve. Allow the thread to follow your work onwards; it will be used when decreasing under the sleeve. Cut the strand and start working 3 stitches before the new stitches under the sleeve and continue the pattern in the round according to A.4; make sure the pattern matches the pattern on the yoke. When the sleeve measures 3 cm from the division in all sizes, decrease 2 stitches mid under the sleeve – read DECREASE TIP-2. Decrease like this every 3-2-1½-2-1-1 cm a total of 11-15-15-13-17-21 times = 48-50-50-54-56-58 stitches. The stitches which do not fit into the pattern when decreasing are worked in stocking stitch. Continue working until the sleeve measures 35-34-31-32-28-25 cm from the division (there is approx. 4 cm left to finished length; you can try the jumper on and work to desired length). NOTE: Shorter measurements in larger sizes due to wider neck and longer yoke. Knit 1 round where you decrease 8 stitches evenly spaced – read DECREASE TIP-1 = 40-42-42-46-48-50 stitches. Change to double pointed needles size 4 mm and work rib (knit 1, purl 1) for 4 cm. Cast off with knit over knit and purl over purl – remember CASTING-OFF TIP! The sleeve measures approx. 39-38-35-36-32-29 cm from the division. Work the other sleeve in the same way. |
||||||||||||||||
Diagram explanations |
||||||||||||||||
|
||||||||||||||||
|
||||||||||||||||
|
||||||||||||||||
|
||||||||||||||||
|
||||||||||||||||
Have you finished this pattern?Tag your pictures with #dropspattern #frostedleavessweater or submit them to the #dropsfan gallery. Do you need help with this pattern?You'll find 25 tutorial videos, a Comments/Questions area and more by visiting the pattern on garnstudio.com. © 1982-2025 DROPS Design A/S. We reserve all rights. This document, including all its sub-sections, has copyrights. Read more about what you can do with our patterns at the bottom of each pattern on our site. |
||||||||||||||||


With over 40 years in knitting and crochet design, DROPS Design offers one of the most extensive collections of free patterns on the internet - translated to 17 languages. As of today we count 314 catalogues and 11821 patterns translated into English (UK/cm). 11821
We work hard to bring you the best knitting and crochet have to offer, inspiration and advice as well as great quality yarns at incredible prices! Would you like to use our patterns for other than personal use? You can read what you are allowed to do in the Copyright text at the bottom of all our patterns. Happy crafting!
Post a comment to pattern DROPS 216-3
We would love to hear what you have to say about this pattern!
If you want to leave a question, please make sure you select the correct category in the form below, to speed up the answering process. Required fields are marked *.