
Popular categories
Looking for a yarn?


Comments / Questions (26)
![]() Kärt Merilain wrote:
Kärt Merilain wrote:
Eesti keelses tõlkes on jäänud välja see, et kaelust tehes tuleb kõigepealt kududa halli lõngaga soonikut 4cm. Ja alles siis hakata kuduma skeemi A1. Leidsin neef 4cm teistest keeltest pärast seda, kui olin juba kaeluse valesti kudunud. Vast saab mustris selle vea ära parandada?
24.03.2023 - 16:17
![]() Linda wrote:
Linda wrote:
Det står i str m at eg skal strikke 25 cm frahalskanten. Skal det vere fra halskantens start, brett, eller det halskanten slutter mot bærestykkw. Vart veldig usikker på kor eg skulle male frå…
06.01.2022 - 21:15DROPS Design answered:
Hei Linda, Du måler bærestykke fra merket du satte inn etter halsen. God fornøyelse!
07.01.2022 - 07:00
![]() Laila wrote:
Laila wrote:
Garnmængderne passer slet ikke.
22.11.2021 - 21:11
![]() Charlotte Mejlholm wrote:
Charlotte Mejlholm wrote:
Jeg havde ikke nok af farven natur. Jeg manglede til et helt ærme.
04.11.2021 - 15:09
![]() Simone wrote:
Simone wrote:
N. Flyt mærketråden hit. V Hvad menses der her? Skal man flytte mærketråden der hen til de 15 masker?
02.05.2021 - 22:19DROPS Design answered:
Hei Simone. Du setter en merketråd når du strikker halskanten (starten av omgangen). Når du er ferdig å strikke forhøyningen bak, flyttes merketråden slik; - Ved forhøyningens siste pinne strikkes det 15-15-15-18-18-18 masker forbi merketråden på starten av omgangen og merketråden flyttes hit (ved den 15-15-15-18-18-18 maske) . mvh DROPS design
03.05.2021 - 15:18
![]() Britt-Marie wrote:
Britt-Marie wrote:
Jag vill sticka tröjan i ett annat garn - Flora, hur mkt behövs till storlek M?
18.04.2021 - 14:13DROPS Design answered:
Hei Britt-Marie. Da bruker du vår garn konverter, klikk på den grønne linken i oppskriften: Testa vår konverterare! Fyll inn hvilken garn du vil bytte ut og hvor mange gram. Du vil da få opp garn du kan bytte til og til hvor mange gram. F.eks med 2 tråder Flora, så trenger du 301 gram grå, 101 gram natur og 101 gram beige. mvh DROPS design
19.04.2021 - 10:25
![]() Britta Aaen Jakobsen wrote:
Britta Aaen Jakobsen wrote:
Hejsa. Hvilken str. er trøjen til den mandlige model strikket i? Mvh Britta
12.04.2021 - 17:06DROPS Design answered:
Hej Britta, det skulle kunne være en medium, men du finder trøjens mål i måleskitsen nederst i opskriften. Mål en trøje og brug de den opskrift med de mål som kommer nærmest :)
13.04.2021 - 11:34
![]() Elizabeth Faltum wrote:
Elizabeth Faltum wrote:
Strikkede en str xxxl og måtte købe 200!gr ekstra mørk , men havde 150 hr beige til overs😉
28.01.2021 - 22:39
![]() Emmanouela Evangelatou wrote:
Emmanouela Evangelatou wrote:
Hello, happy new year , i would like you to help me with the elevation. The elevation is suppose to be at the back of the jumber but when i make the last elevation (purl 15)following the instructions and start to knit the yoke, i start on the left side of the marker that has no elavation, this is the front of the jumber. To start the yoke and have the elavation at the back of the jumber i have to start with knit 8 and purl 16 ..... finish with knit 15. Am I right? is something I' m missing?
07.01.2021 - 12:03DROPS Design answered:
Dear Mrs Evangelatou, happy New Year :) after the elevation has been worked, purl until 15 sts after marker thread on mid back, then turn and start now yoke from the beginning of back piece (and not from mid back anymore). Happy knitting!
07.01.2021 - 12:58
![]() Kristin Rößler wrote:
Kristin Rößler wrote:
Die Doppelmasche entsteht ja erst beim Wenden. Wie soll davor ein Umschlag möglich sein? Oder wird erst noch eine Runde nach dem Wenden gestrickt und dann mit dem Umschlag von A2a begonnen ?
04.06.2020 - 21:12DROPS Design answered:
Liebe Frau Rößler, Sie könen ja gerne 1 Runde zuerst stricken, und dann mit A.2a anfangen - beachten Sie nun, daß die Rundbeginn bei der korrekten ist. Viel Spaß beim stricken!
05.06.2020 - 07:24
|
||||||||||||||||
Akranes#akranessweater |
||||||||||||||||
 |
 |
|||||||||||||||
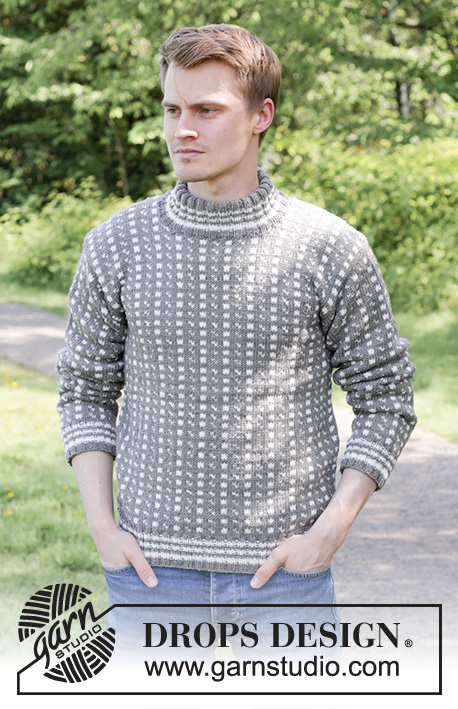
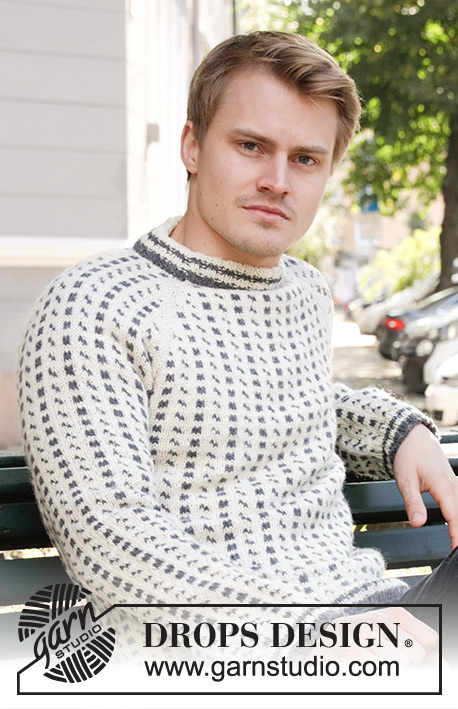
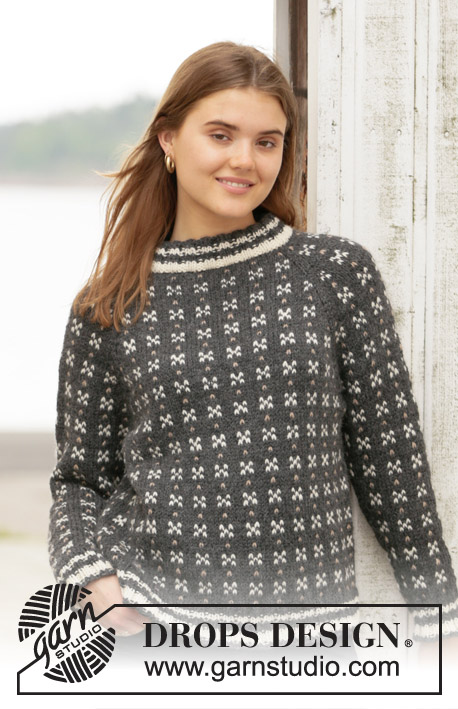
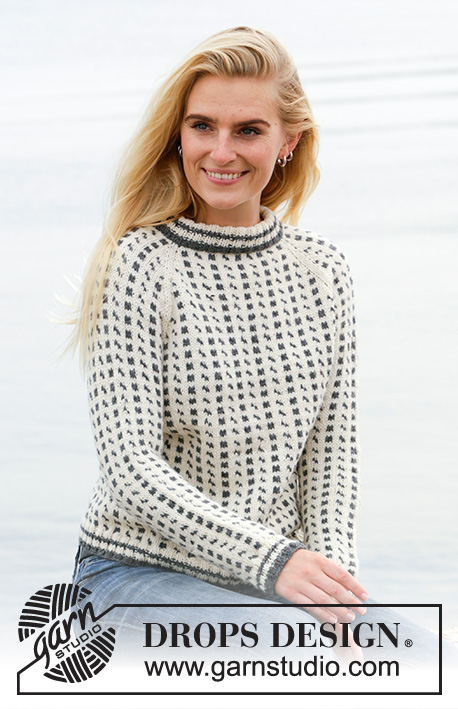
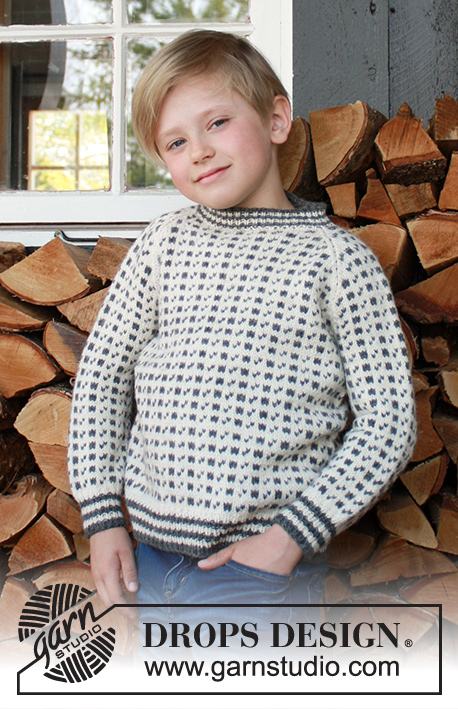
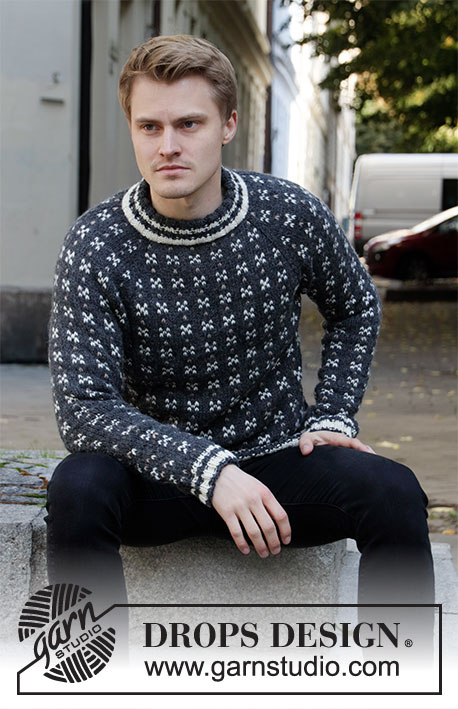
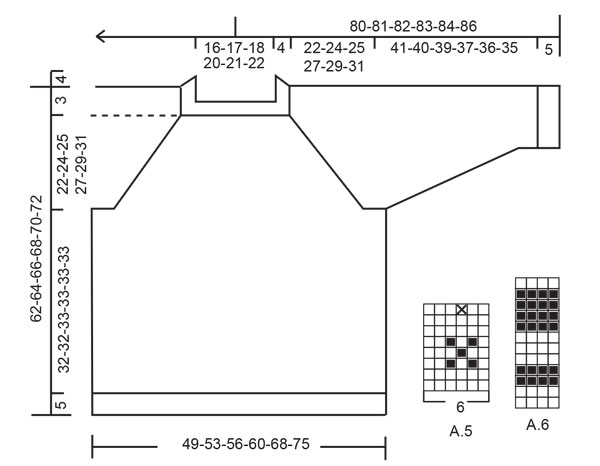
Knitted jumper for men with raglan in DROPS Alaska. The piece is worked top down with Nordic pattern. Sizes S - XXXL.
DROPS 208-4 |
||||||||||||||||
|
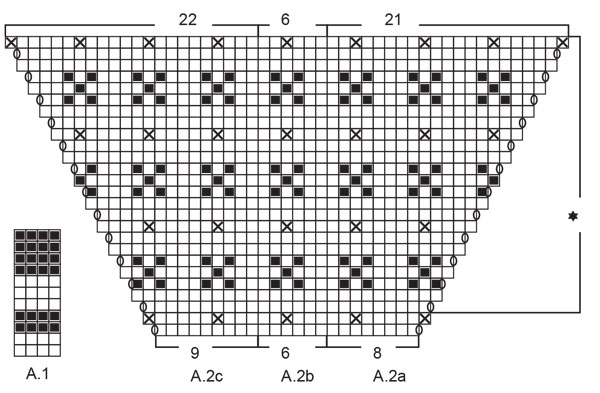
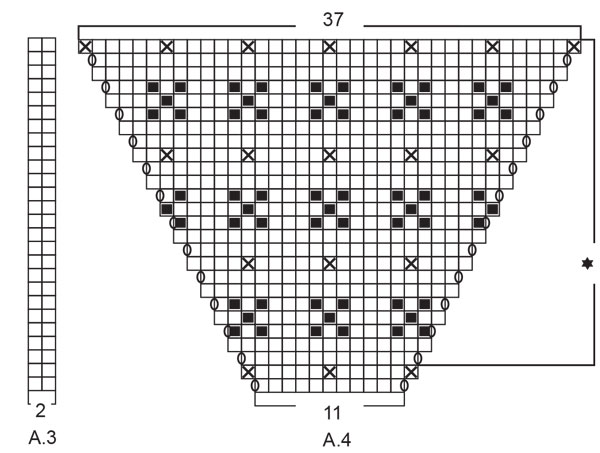
------------------------------------------------------- EXPLANATIONS FOR THE PATTERN: ------------------------------------------------------- PATTERN: See diagrams A.1 to A.6. Patterns A.1 and A.6 are worked in rib. Patterns A.2 to A.5 are worked in stocking stitch. INCREASE TIP (evenly spaced): To work out how to increase evenly, count the total number of stitches on the needle (e.g. 76 stitches) and divide by the number of increases to be made (e.g. 12) = 6.3. In this example, increase by making 1 yarn over after approx. each 6th stitch. On the next round knit the yarn overs twisted to avoid holes. ELEVATION (back of neck): Skip this section if you do not want an elevation. Start from the wrong side with dark grey and purl 8-8-8-9-9-9 stitches past the marker thread at the beginning of the round, turn, tighten the strand and knit 16-16-16-18-18-18 back. Turn, tighten the strand and purl 24-24-24-27-27-27, turn, tighten the strand and knit 32-32-32-36-36-36 back. Turn, tighten the strand and purl 40-40-40-45-45-45, turn, tighten the strand and knit 48-48-48-54-54-54 back. Turn, tighten the strand and purl to 15-15-15-18-18-18 stitches past the marker thread. Move the marker thread to this point. Then work YOKE as described in the text. KNITTING TIP: To avoid the knitting tension becoming tighter when working pattern with several colours, it is important that the strands at the back are not tight. Use a size larger needle when working pattern if this is a problem. CASTING-OFF TIP: To avoid the cast-off edge being tight you can use a ½ size larger needle. DECREASE TIP (for sleeves): Decrease 1 stitch on each side of the marker thread as follows: Work until there are 2 stitches left before the marker thread, knit 2 together with dark grey (marker thread sits here), slip 1 stitch as if to knit, knit 1 with dark grey and pass the slipped stitch over the knitted stitch. ------------------------------------------------------- START THE PIECE HERE: ------------------------------------------------------- JUMPER – SHORT OVERVIEW OF THE PIECE: The neck and yoke and body are worked in the round with circular needle, from mid back and top down. After the neck you can work an elevation at the back for a better fit. This elevation can be left out; the neck is then the same front and back – see description above. The sleeves are worked in the round with short circular needle/double pointed needles, top down. NECK: Cast on 76-80-80-88-88-92 stitches with short circular needle size 4.5 mm and off-white. Change to dark grey and knit 1 round. Work rib (= knit 2 / purl 2) for 4 cm, then work A.1 in rib – TAKE CARE when reading the symbols. Knit 1 round with dark grey where you increase 12-8-8-12-12-12-8 stitches evenly spaced – read INCREASE TIP = 88-88-88-100-100-100 stitches. Change to circular needle size 5.5 mm and insert a marker thread at the beginning of the round. You can now work an ELEVATION at the back of the neck – read description above or go straight to YOKE. YOKE: The first round is worked as follows: Work A.2a (= 8 stitches), A.2b over the next 12-12-12-18-18-18 stitches (= 2-2-2-3-3-3 repeats of 6 stitches) and A.2c (= 9 stitches) (= back piece), work A.3 (= 2 stitches, raglan-line), A.4 (= 11 stitches, sleeve), A.3 (= 2 stitches, raglan-line), A.2a (= 8 stitches), A.2b over the next 12-12-12-18-18-18 stitches (= 2-2-2-3-3-3 repeats of 6 stitches) and A.2c (= 9 stitches) (= front piece), work A.3 (= 2 stitches, raglan-line), A.4 (= 11 stitches, sleeve), A.3 (= 2 stitches, raglan-line). There are 96-96-96-108-108-108 stitches on the needle (= first increase to raglan is now completed). Continue this pattern onwards; i.e. increase 1 stitch on each side of A.2 and A.4 as shown in the diagrams (= a total of 8 stitches increased every 2nd round). Read KNITTING TIP and REMEMBER THE KNITTING TENSION! When A.2 to A.4 have been worked 1 time in height there are 192-192-192-204-204-204 stitches on the needle. Continue this pattern onwards; i.e. the pattern is repeated as shown in A.2/A.4. Diagram A.2b is worked 4 more times in width each time the 24 rows are repeated in height. Continue to increase until you have increased a total of 19-22-25-25-28-31 times on each side of A.2/A.4. When the last increase is finished there are 240-264-288-300-324-348 stitches on the needle and the piece measures approx. 19-22-25-25-28-31 cm from the neck-edge. Continue the pattern but without further increases. When the piece measures 22-24-25-27-29-31 cm from the neck-edge (making sure the next round is without pattern), work as follows: Work 70-76-82-88-94-103 stitches as before (= back piece), place the next 48-54-60-60-66-66 stitches on 1 thread for the sleeve, cast on 6-6-6-6-12-12 new stitches on the needle (= in side under the sleeve), work 72-78-84-90-96-108 stitches as before (= front piece), place the next 48-54-60-60-66-66 stitches on 1 thread for the sleeve, cast on 6-6-6-6-12-12 new stitches on the needle (= in side under the sleeve) and work the remaining 2-2-2-2-2-5 stitches as before (= back piece). Cut the strand. Body and sleeves are finished separately. THE PIECE IS NOW MEASURED FROM HERE! BODY: = 156-168-180-192-216-240 stitches. Insert 1 marker thread on the one side of the piece, in the middle of the 6-6-6-6-12-12 stitches cast on under the sleeve. Allow the thread to follow your work onwards; it marks the beginning of the round. Work A.5 in the round (= 26-28-30-32-36-40 repeats of 6 stitches) – start on the right stitch and the right round in the diagram to continue the repeats of the pattern in both width and height. Continue working until the piece measures approx. 32-32-33-33-33-33 cm from the division – adjust to after round 2 or 7 in A.5. Change to circular needle size 4.5 mm and knit 1 round with dark grey where you increase 28-32-36-36-40-48 stitches evenly spaced = 184-200-216-228-256-288 stitches. Work A.6 in rib (= knit 2 / purl 2). When A.6 is finished cast off with knit over knit and purl over purl and dark grey – read CASTING-OFF TIP. SLEEVE: Place the 48-54-60-60-66-66 stitches from the thread on the one side of the piece on short circular needle/double pointed needles size 5.5 mm and knit up 1 stitch in each of the 6-6-6-6-12-12 stitches cast on under the sleeve = 54-60-66-66-78-78 stitches. Insert a marker thread in the middle of the 6-6-6-6-12-12 stitches under the sleeve. Allow the thread to follow your work onwards; it will be used when decreasing under the sleeve. Start the round by the marker thread. Work A.5 in the round (= 9-10-11-11-13-13 repeats of 6 stitches) – start on the right stitch and the right round in the diagram to continue the repeats of the pattern in both width and height; but the first and last stitch on the round are always worked with dark grey (to give neat decreases mid under the sleeve). When the piece measures 1 cm from the division, decrease 2 stitches mid under the sleeve – read DECREASE TIP. Decrease like this every 2nd round a total of 1-2-1-1-3-2 times = 52-56-64-64-72-74 stitches. Then decrease like this every 4-3½-2½-2-1½-1½ cm a total of 8-9-12-12-14-15 times = 36-38-40-40-44-44 stitches left on the needles. Continue working until the sleeve measures 41-40-39-37-36-35 cm from the division (shorter measurements in larger sizes due to wider neck and longer yoke) – adjust to after round 2 or 7 in A.5. Change to double pointed needles size 4.5 mm and knit 1 round with dark grey where you increase 8-6-8-8-8-8 stitches evenly spaced = 44-44-48-48-52-52 stitches. Work A.6 in rib (= knit 2 / purl 2). When A.6 is finished cast off with knit over knit and purl over purl and dark grey – remember CASTING-OFF TIP. Work the other sleeve in the same way. ASSEMBLY: Fold the neck to the wrong side and sew the cast-on edge down with off-white – sew with small, neat stitches on the inside of the jumper (make sure the seam does not show on the right side and the seam is not tight). |
||||||||||||||||
Diagram explanations |
||||||||||||||||
|
||||||||||||||||
 |
||||||||||||||||
 |
||||||||||||||||
 |
||||||||||||||||
Have you finished this pattern?Tag your pictures with #dropspattern #akranessweater or submit them to the #dropsfan gallery. Do you need help with this pattern?You'll find 25 tutorial videos, a Comments/Questions area and more by visiting the pattern on garnstudio.com. © 1982-2026 DROPS Design A/S. We reserve all rights. This document, including all its sub-sections, has copyrights. Read more about what you can do with our patterns at the bottom of each pattern on our site. |
||||||||||||||||


With over 40 years in knitting and crochet design, DROPS Design offers one of the most extensive collections of free patterns on the internet - translated to 17 languages. As of today we count 324 catalogues and 12232 patterns translated into English (UK/cm). 12232
We work hard to bring you the best knitting and crochet have to offer, inspiration and advice as well as great quality yarns at incredible prices! Would you like to use our patterns for other than personal use? You can read what you are allowed to do in the Copyright text at the bottom of all our patterns. Happy crafting!
Post a comment to pattern DROPS 208-4
We would love to hear what you have to say about this pattern!
If you want to leave a question, please make sure you select the correct category in the form below, to speed up the answering process. Required fields are marked *.