DROPS Super Sale - SAVE 30% on 5 wonderful yarns!
Product image DROPS Merino Extra Fine yarn
DROPS Merino Extra Fine
100% Wool
from 3.75 € /50g
Get the yarn to make this pattern from 45.00€.

The yarn cost is calculated from the pattern’s smallest size and the yarn’s cheapest product type. Looking for an even better price? You might find it on the DROPS Deals!

DROPS Super Sale

Summers End

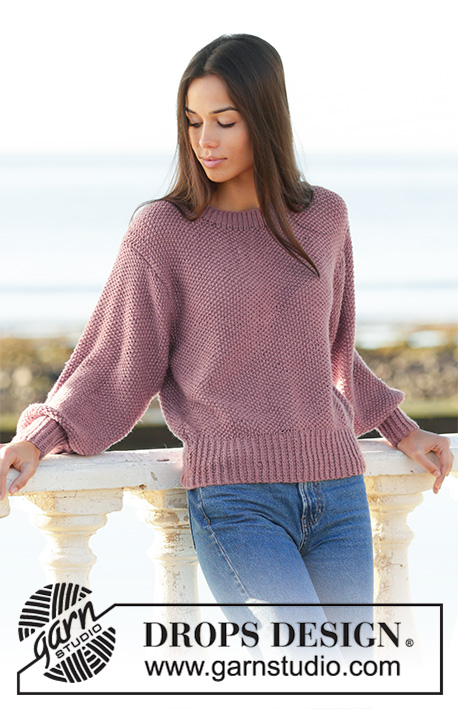
Knitted jumper with moss stitch, balloon sleeves and tight rib in DROPS Merino Extra Fine. Sizes S – XXXL.

Highlight Size:
DROPS 202-33

#summersendsweater

DROPS Design: Pattern no me-177
Yarn group B
-----------------------------------------------------------
SIZES: S - M - L - XL - XXL – XXXL

MATERIALS: 
DROPS MERINO EXTRA FINE from Garnstudio (belongs to yarn group B)
600-650-700-800-850-950 g colour 036, amethyst

KNITTING TENSION:
17 stitches in width and 30 rows in height with moss stitch = 10 x 10 cm.

NEEDLES:
DROPS DOUBLE POINTED NEEDLES SIZE 4 MM: for rib
DROPS CIRCULAR NEEDLE SIZE 4 MM: length 40 cm and 60 cm or 80 cm.
DROPS DOUBLE POINTED NEEDLES SIZE 6 MM.
DROPS CIRCULAR NEEDLE SIZE 6 MM: length 40 cm and 60 cm or 80 cm.
Needle size is only a guide. If you get too many stitches on 10 cm, change to a larger needle size. If you get too few stitches on 10 cm, change to a smaller needle size

-------------------------------------------------------

Alternative Yarn – See how to change yarns here
Yarn Groups A to F – Use the same pattern and change the yarn here
Yarn usage using an alternative yarn – Use our yarn converter here

-------------------------------------------------------

You might also like...

Product image DROPS Merino Extra Fine
DROPS Merino Extra Fine
100% Wool
from 3.75 € /50g
Get the yarn to make this pattern from 45.00€.

The yarn cost is calculated from the pattern’s smallest size and the yarn’s cheapest product type. Looking for an even better price? You might find it on the DROPS Deals!

Pattern instructions

-------------------------------------------------------

EXPLANATIONS FOR PATTERN:

-------------------------------------------------------

RIB (worked in the round):
Round 1: * Knit 1 twisted, purl 1 *, work from *-*.
Round 2: Knit (not twisted) over the twisted knit and purl over purl.
Repeat rounds 1 and 2 onwards.

MOSS STITCH (worked in the round):
Round 1: * Knit 1, purl 1 *, work from *-*.
Round 2: Knit over purl and purl over knit.
Repeat round 2 onwards.

MOSS STITCH (worked back and forth):
Row 1: * Knit 1 purl 1 *, work from *-*.
Row 2: Knit over purl and purl over knit.
Repeat row 2 onwards.

INCREASE TIP-1:
Increase 1 stitch between 2 stitches by making 1 yarn over; on the next round work this yarn over into the moss stitch – there will be a small hole at the increase.

INCREASE TIP-2:
Increase 2 stitches in 1 stitch as follows: Knit 1 stitch but do not slip this stitch from the needle, make 1 yarn over and work another stitch in the stitch, but in the back loop = 2 stitches increased..

CASTING-OFF TIP:
To avoid the cast-off edge being tight, you can cast off with a ½ needle-size larger. 

-------------------------------------------------------

START THE PIECE HERE:

-------------------------------------------------------

JUMPER:
The jumper is worked in the round with circular needle, bottom up as far as the armholes. Then the front and back pieces are finished separately, back and forth on circular needle. The sleeves are worked in the round with double pointed needles/short circular needle.

BODY:
Cast on 150-160-170-190-210-230 stitches with circular needle size 4 mm. Knit 1 round, then work RIB – see description above.
When the rib measures 10 cm, change to circular needle size 6 mm. Knit 1 round where you increase 6-5-10-7-7-5 stitches evenly spaced = 156-165-180-197-217-235 stitches on the round - read INCREASE TIP- 1. Then work MOSS STITCH – see description above - REMEMBER THE KNITTING TENSION!
Work 78-82-90-98-108-118 stitches (= back piece) and insert a marker thread between 2 stitches (= side) work 78-83-90-99-109-117 stitches (= front piece) and insert a marker thread between 2 stitches (= side).
When the piece measures 28-30-31-33-34-36 cm, divide the body at the markers and each piece is finished separately.

BACK PIECE:
= 78-82-90-98-108-118 stitches. Continue with moss stitch back and forth on the needle. Now cast off on each side for the armholes at the beginning of every 2nd row as follows: Cast off 2-3-4-5-7-9 stitches 1 time, 2 stitches 1-2-2-2-3-4 times, 1 stitch 1-0-1-2-3-4 times =68-68-72-76-76-76 stitches on row.
When the piece measures 46-48-50-52-54-56 cm, cast off the middle 24-26-26-26-28-28 stitches for neck and each shoulder is finished separately. Then cast off on each side towards the neck every 2nd row as follows: 2 stitches 2 times. Cast off the remaining stitches when the piece measures 50-52-54-56-58-60 cm .

FORSTYKKE:
= 78-83-90-99-109-117 stitches. Work as back piece, but when the piece measures 44-46-47-49-51-53 cm cast off for the neck as follows: Cast off the middle 20-21-22-23-25-25 stitches and finish each shoulder separately. Then cast off on side towards neck every 2nd row as follows: 3 stitches 1 time, 2 stitches 1 time and 1 stitch 1 time. Cast off the remaining stitches when the piece measures 50-52-54-56-58-60 cm .

SLEEVE: 
The sleeve is worked in the round with double pointed needles and short circular needle. Cast on 32-32-36-36-38-38 stitches with double pointed needles size 4 mm. Knit 1 round then work RIB – see description above – until the piece measures 11 cm.
Change to double pointed needles size 6 mm and knit 1 round where you increase 35 stitches evenly spaced = 67-67-71-71-73-73 stitches on the round - read INCREASE TIP-1.
Insert 1 marker thread at the beginning of the round = mid under sleeve. Then work moss stitch. AT THE SAME TIME increase 2 stitches mid under sleeve every 7-7-7-7-6-6 cm a total of 4 times = 75-75-79-79-81-81 stitches – read INCREASE TIP-2. When the piece measures 49-50-49-47-45-43 cm cast off for sleeve cap and the piece is finished back and forth. Cast off for sleeve cap every 2nd row on each side as follows: 2-3-4-5-6-7 stitches 1 time, 2 stitches 1 time. Then cast off 1 stitch on each side until the sleeve cap measures 4-4-5-8-9-12 cm. Cast off 3 stitches on each side 1 time. On the next round loosely cast off the remaining stitches. The sleeve measures approx. 54-55-55-56-55-56 cm. Work the other sleeve in the same way.

ASSEMBLY:
Sew shoulder seams. Sew in sleeves. Knit up approx. 110 stitches around the neck with double pointed needles size 4 mm and work rib (knit 1, purl 1) for 3 cm. Loosely cast off with knit over knit and purl over purl.

Diagram

Diagram measurements for DROPS 202-33
Do you have a question? See a list of frequently asked questions (FAQ)

Knitting tension is what determines the final measurements of your work, and is usually measured per 10 x 10 cm. It is provided like so: number of stitches in width x number of rows in height - eg: 19 stitches x 26 rows = 10 x 10 cm.

The knitting tension is very individual; some people knit/crochet loosely while others work tightly. You adjust the knitting tension with the needle size, which is why the suggested needle size is only meant as a guide! You need to adjust this (up or down) to ensure that YOUR knitting tension matches the knitting tension provided in the pattern. If you work with a different knitting tension than provided you will have a different yarn consumption, and your work will have different measurements than what the pattern suggests.

The knitting tension also determines which yarns can replace each other. As long as you achieve the same knitting tension you can replace one yarn with another.

See DROPS lesson: How to measure your tension/gauge

See DROPS video: How to make a gauge tension swatch

The required amount of yarn is provided in grams, eg: 450 g. To calculate how many balls you’ll need you first need to know how many grams are in 1 ball (25g, 50g or 100g). This information is available if you click on the individual yarn quality on our pages. Divide the amount required with the amount of each ball. For example, if each ball is 50g (the most common amount), the calculation will be as follows: 450 / 50 = 9 balls.

The important thing when changing from one yarn to another is that the knitting/crochet tension remains the same. This is so that the measurements of the finished piece will be the same as on the sketch provided. It is easier to achieve the same knitting tension using yarns from the same yarn group. It is also possible to work with multiple strands of a thinner yarn to achieve the knitting tension of a thicker one. Please try our yarn converter. We recommend you to always work a test swatch.

Please NOTE: when changing yarn the garment might have a different look and feel to the garment in the photo, due to individual properties and qualities of each yarn.

See DROPS lesson: Can I use a different yarn than the one mentioned in the pattern?

All our yarns are categorised into yarn groups (from A to F) according to thickness and knitting tension – group A contains the thinnest yarns and group F the thickest. This makes it easier for you to find alternative yarns to our patterns, should you wish to switch yarn. All yarns within the same group have a similar knitting tension and can easily replace each other. However, different yarn qualities have different structures and properties which will give the finished work a unique look and feel.

Click here for an overview of the yarns in each yarn group

At the top of all our patterns you’ll find a link to our yarn calculator, which is a helpful tool should you wish to use a different yarn than suggested. By filling in the yarn quality you wish to replace, the amount (in your size) and number of strands, the calculator will present good alternative yarns with the same knitting tension. Additionally it will tell you how much you’ll require in the new qualities and whether you’ll need to work with multiple strands. Most skeins are 50g (some are 25g or 100g).

If the pattern is worked with multiple colours, every colour will have to be calculated separately. Similarly, if the pattern is worked with several strands of different yarns (for example 1 strand Alpaca and 1 strand Kid-Silk) you will have to find alternatives for each, individually.

Click here to see our yarn calculator

Since different yarns have different qualities and textures we have chosen to keep the original yarn in our patterns. However, you can easily find options among our available qualities by using our yarn calculator, or simply pick a yarn from the same yarn group.

It is possible that some retailers still have discontinued yarns in stock, or that someone has a few skeins at home that they would like to find patterns for.

The yarn calculator will provide both alternative yarn as well as required amount in the new quality.

If you think it's hard to decide what size to make, it can be a good idea to measure a garment you own already and like the size of. Then you can pick the size by comparing those measures with the ones available in the pattern's size chart.

You'll find the size chart at the bottom of the pattern.

See DROPS lesson: How to read size chart

The needle size provided in the pattern serves only as a guide, the important thing is to follow the knitting tension. And since knitting tension is very individual, you will have to adjust the needle size to ensure that YOUR tension is the same as in the pattern – maybe you’ll have to adjust 1, or even 2 needle sizes, up or down to achieve the correct tension. For this, we recommend that you work test swatches.

Should you work with a different knitting tension than the one provided, the measurements of the finished garment might deviate from the measurement sketch.

See DROPS lesson: How to measure your tension/gauge

See DROPS video: How to make a tension/gauge swatch

Working a garment top-down provides more flexibility and room for personal adjustment. For example it is easier to try the garment on while working, as well as making adjustments to length of yoke and shoulder caps.

The instructions are carefully explaining every step, in the correct order. Diagrams are adjusted to the knitting direction and are worked as usual.

The diagram depicts all rows/rounds, and every stitch seen from the right side. It is read from bottom to top, from right to left. 1 square = 1 stitch.

When working back and forth, every other row is worked from the right side and every other row is worked from the wrong side. When working from the wrong side, the diagram will have to be worked reversed: from left to right, knit stitches are purled, purl stitches are knit etc.

When working in the round every round is worked from the right side and the diagram are worked from right to left on all rounds.

See DROPS lesson: How to read knitting diagrams

The diagram depicts all rows/rounds, and every stitch seen from the right side. It is worked from bottom to top, from right to left.

When working back and forth every other row is worked from the right side: from right to left and every other row is worked from the wrong side: from left to right.

When working in the round, every row in the diagram are worked from the right side, from right to left.

When working a circular diagram you start in the middle and work your way outwards, counter clockwise, row by row.

The rows usually start with a given number of chain stitches (equivalent to the height of the following stitch), this will either be depicted in the diagram or explained in the pattern.

See DROPS lesson: How to read crochet diagrams

Instructions for working several diagrams after each other on the same row/round, will often be written like so: “work A.1, A.2, A.3 a total of 0-0-2-3-4 times". This means you work A.1 once, then A.2 is worked once, and A.3 is repeated (in width) the number of times provided for your size – in this case like so: S = 0 times, M = 0 times, L=2 times, XL= 3 times and XXL = 4 times.

The diagrams are worked as usual: begin with the first row in A.1, then work the first row in A.2 etc.

See DROPS lesson: How to read knitting diagrams

See DROPS lesson: How to read crochet diagrams

The total width of the garment (from wrist-to-wrist) will be larger in the larger sizes, despite the actual sleeves being shorter. The larger sizes have longer sleeve caps and wider shoulders, so there will be a good fit in all sizes.

The measurement sketch/schematic drawing provides information regarding the full length of the garment. If it’s a jumper or a jacket the length is measured from the highest point on the shoulder closest to the neckline, and straight down to the bottom of the garment. It is NOT measured from the tip of shoulder. Similarly, the length of yoke is measured from the highest point on the shoulder and down to where yoke is split into body and sleeves.

On a jacket measures are never taken along bands, unless specifically stated. Always measure inside band stitches when measuring the length.

See DROPS lesson: How to read a schematic drawing

Diagrams are often repeated on the round or in height. 1 repeat is the diagram the way it appears in the pattern. If it says to work 5 repeats of A.1 in the round, then you work A.1 a total of 5 times after/next to each other in the round. If it says to work 2 repeats of A.1 vertically/in height you work the entire diagram once, then begin again at the start and work the entire diagram one more time.

Chain stitches are slightly narrower than other stitches and to avoid working the cast-on edge too tight, we simply chain more stitches to begin with. The stitch count will be adjusted on the following row to fit the pattern and measurement sketch.

The rib edge is more elastic and will contract slightly compared to, for example, stocking stitch. By increasing before the rib edge, you avoid a visible difference in width between the rib edge and the rest of the body.

It’s very easy to cast off too tightly, and by making yarn overs while casting off (and simultaneously casting these off) you avoid a too tight cast off edge.

See DROPS video: How to bind off with yarn overs (yo)

To achieve an even increase (or decrease) you can increase on, for example: every 3rd and 4th row alternately, like so: work 2 rows and increase on the 3rd row, work 3 rows and increase on the 4th. Repeat this until the increase is complete.

See DROPS lesson: Increase or decrease 1 st on every 3rd and 4th row alternately

Should you prefer to work in the round instead of back and forth, you may of course adjust the pattern. You’ll need to add steeks mid-front (usually 5 stitches), and follow the instructions. When you would normally turn and work from the wrong side, simply work across the steek and continue in the round. At the end you’ll cut the piece open, pick up stitches to work bands, and cover the cut edges.

See DROPS video: How to knit steeks and cut open

Should you prefer to work back and forth instead of in the round, you may of course adjust the pattern so you work the pieces separately and then assemble them at the end. Divide the stitches for the body in 2, add 1 edge stitch in each side (for sewing) and work the front and back pieces separately.

See DROPS lesson: Can I adapt a pattern for circular needles into straight needles?

Pattern repeats can vary slightly in the different sizes, in order to get the correct proportions. If you’re not working the exact same size as the garment in the photo, yours might deviate slightly. This has been carefully developed and adjusted so that the complete impression of the garment is the same in all sizes.

Make sure to follow instructions and diagrams for your size!

If you have found a pattern you like which is available in women’s size it’s not very difficult to convert it to men’s size. The biggest difference will be the length of sleeves and body. Start working on the women size that you think would fit across the chest. The additional length will be worked right before you cast off for the armhole/sleeve cap. If the pattern is worked top-down you can add the length right after the armhole or before the first decrease on sleeve.

Regarding additional yarn amount, this will depend on how much length you add, but it is better with a skein too many than too few.

All yarns will have excess fibres (from production) that might come off as lint or shedding. Brushed yarns (ie hairier yarns) have more of these loose, excess fibres, causing more shedding.

Shedding also depends on what is worn under or over the garment, and whether this pulls at the yarn fibres. It’s therefore not possible to guarantee that there will be no shedding

Below are some tips on how to get the best result when working with hairier yarns:

1. When the garment is finished (before you wash it) shake it vigorously so the looser hairs come off. NOTE: do NOT use a lint roller, brush or any method that pulls at the yarn.

2. Place the garment in a plastic bag and put it in your freezer - the temperature will cause the fibres to become less attached to each other, and excess fibres will come off easier.

3. Leave in the freezer for a few hours before taking it out and shaking it again.

4. Wash the garment according to the instructions on the yarn label.

Pilling is a natural process that happens to even the most exclusive of fibers. It's a natural sign of wear and tear that is hard to avoid, and that is most visible in high friction areas of your garment like a sweater's arms and cuffs.

You can make your garment look as new by removing the pilling, using a fabric comb or a pill/lint remover.

Still can't find the answer you need? Then scroll down and leave your question so one of our experts can try to help you. This will be done normally within 5 to 10 working days.
In the meantime, you can read the questions and answers that others have left to this pattern or join the DROPS Workshop on Facebook to get help from fellow knitters/crocheters!
Have you finished this pattern?
Tag your pictures with #dropspattern #summersendsweater or submit them to the #dropsfan gallery.

Post a comment to pattern DROPS 202-33

We would love to hear what you have to say about this pattern!

If you want to leave a question, please make sure you select the correct category in the form below, to speed up the answering process. Required fields are marked *.

Comments / Questions (34)

country flag Cecilia wrote:

Hello, I'm working on the sleeves and have come to the point to bind off for the sleeve cap. I'm a little confused with how the step is worded. From the beginning of my round, do I just change to knitting back and forth and follow the binding off/decreasing as written or do I bind off some of the stitches while still in the round and do the rest back and forth? Thank you for your help!

29.05.2021 - 03:21

DROPS Design answered:

Dear Cecilia, as you say, you should just do I just change to knitting back and forth and follow the binding off/decreasing as written. Happy Knitting!

29.05.2021 - 03:46

country flag Martha wrote:

Can you please tell me what the measrement is from the waist to where the sleeve fits in. I need to make it shorter. Thanks

24.04.2021 - 06:13

DROPS Design answered:

Dear Martha, all the relevant measurements can be found on the scematic drawing at the bottom of the pattent. You can calculate that length for the size you are making by taking th efull length and subtract the length of the armhole. Happy Knitting!

24.04.2021 - 10:55

country flag Nora wrote:

Hvordan kan man vaske genseren?

15.12.2020 - 17:54

country flag Jenny wrote:

So ein tolles Modell. Simpel zu machen und total modern. Einer meiner Lieblingspullis zur Zeit.

08.12.2020 - 21:37

country flag Eleonora wrote:

Ciao non riesco a capire cosa intendete per intrecciare ad ogni lato (vedi testo copiato sotto per la manica), quando sto lavorando in tondo, grazie mille. "Intrecciare per l’arrotondamento della manica ogni 2 ferri a ogni lato come segue: 2-3-4-5-6-7 maglie 1 volta, 2 maglie 1 volta"

31.10.2020 - 11:58

DROPS Design answered:

Buonasera Eleonora, deve intrecciare le maglie per l'arrotondamento della manica e poi il lavoro prosegue in piano. Buon lavoro!

21.11.2020 - 21:27

country flag BENZERARA wrote:

Je ne comprends pas comment tricoter les manches avec en meme temps les aiguilles à doubles pointes et l'aiguille circulaire, pour le modele n° me-177. merci pour votre réponse.

26.10.2020 - 15:48

DROPS Design answered:

Bonjour Mme Benzerara, en fait, on commence les manches en montant les mailles sur les aiguilles doubles pointes, puis, au fur et à mesure des augmentations, quand vous serez un peu à l'étroit sur les aiguilles doubles pointes, vous pourrez changer pour l'aiguille circulaire - vous pouvez également tricoter sur une longue aiguille circulaire dès le début avec la technique du magic loop. Bon tricot!

27.10.2020 - 11:38

country flag Amanda wrote:

Hey, how many balls of wool do you need for each size? I can't see it listed in the pattern

09.09.2020 - 00:32

DROPS Design answered:

Dear Amanda, you will find the total amount of yarn in grams at the top of the pattern, ie in size S you need 600 g DROPS Merino Extra Fine / 50 g a ball = 12 balls. Happy knitting!

09.09.2020 - 09:15

country flag Sophie wrote:

Ist die Merino Extra Fine Wolle von Drops von Schafen gewonnen, die kein Mulesing ertragen mussten? Vielen Dank für die Antwoet!

06.06.2020 - 11:19

DROPS Design answered:

Liebe Sophie, hier lesen Sie mehr über unsere Wolle bzw Merino. Viel Spaß beim stricken!

08.06.2020 - 08:16

country flag Katie Shearman wrote:

Hi, this is my first jumper i have ever knitted so still learning some basics. I am stuck on dividing the piece. I have the markers, just a little confused as to how to divide the piece when i have been using circular needles. Any help would be greatly appreciated. Thanks.

02.05.2020 - 17:33

DROPS Design answered:

Dear Mrs Shearman, you just have to slip one half of piece on a thread/stitch holder and continue working the second half of piece, back and forth ie alternately from RS and from WS casting off at the beginning of each row (= from RS + from WS) as explained for your size. Happy knitting!

04.05.2020 - 12:05

country flag Ella wrote:

Hello, just slightly confused on the back part of the project. Once my piece reaches 28cm, the pattern says to divide the front and the back (which I have done) and for the back it says continue moss stitch back and forth. How many rows do I knit before I start casting off? Thanks!

20.04.2020 - 10:12

DROPS Design answered:

Dear Ella, when piece measures 28 cm you continue over sts on back piece only binding off at the beginning of each row both from RS and from WS for armhoes: 2 sts 1 time + 2 st 1 time + 1 st 1 time = 68 sts remain. Then work until piece measures 46 and shape neck. Back piece should measure then 50 cm from shoulder to cast on edge. Hope this helps. Happy knitting!

20.04.2020 - 11:07