
Popular categories
Looking for a yarn?


Comments / Questions (9)
![]() Emma wrote:
Emma wrote:
Ik ben gekomen aan het stuk na het minderen voor de hiel. Ik moet nu 12 keer minderen. Moet ik dat op de bovenkant van de voet doen Of rond de hiel? Ik ben al aan het verder doen en minder op de bovenkant van de voet maar vindt dat dat er anders uitziet dan op de foto. Alvast bedankt om mij te helpen!
25.11.2023 - 15:55DROPS Design answered:
Dag Emma,
Na het minderen voor de hiel, haak je weer helemaal in de rondte. In de volgende paragraaf minder je weer steken aan elke kant van de steken op de bovenkant van de voet waardoor je de haak afmaakt voordat je de voet verder haakt.
26.11.2023 - 07:24
![]() Emma wrote:
Emma wrote:
Dag, Ik moet nu starten met minderen voor de hiel. Is het normaal dat ik dan geen symmetrie heb?
16.11.2023 - 19:54
![]() Alexandra wrote:
Alexandra wrote:
There are some empty spaces between dc in 2nd row in the scheme. I should skip it, or no?
09.04.2022 - 19:49DROPS Design answered:
Dear Alexandra, the scheme tries to fit in 2D a 3D pattern. This is why blank spaces are added: to fit in the scheme the space necessary for the higher number of stitches in the last rows. There are also some - symbols between some dc groups; these represent ch, which you should work over some dc; for example ch5 over 3 dc (these dc are skipped). Happy crochetting!
10.04.2022 - 19:55
![]() Pauline wrote:
Pauline wrote:
Bonjour, je ne comprends pas comment faire le talon et les diminutions. Merci d'avance pour votre aide.
15.09.2021 - 19:02DROPS Design answered:
Bonjour Pauline, le talon se crochète sur les 14-16-16 dernières brides à la fin des tours précédents + les 13-15-15 brides du début des tours = soit 5-5.5-6 cm en mailles serrées sur ces 27-31-31 brides. Crochetez ensuite les DIMINUTIONS TALON en suivant cette vidéo et, en même temps, le nombre de mailles indiqué pour votre taille dans ce modèle. Bon crochet!
16.09.2021 - 07:30
![]() Elfrieda wrote:
Elfrieda wrote:
Na 27 cm sok gehaakt te hebben moet je beginnen aan de hiel. Moet je daarvoor eerst afhechten en dan aanhechten aan de 1ste steek van de laatste 16st op de toer?
04.09.2019 - 17:41DROPS Design answered:
Dag Elfrieda,
Ja dat klopt, je haakt de hiel aan de achterkant, dus zodat het midden van de hiel midden achter komt.
08.09.2019 - 17:47
![]() Kyla Hill wrote:
Kyla Hill wrote:
I finished the heel decrease, the next steps tell me to dc 15, 16, 41, and 16. I can't figure out where they are supposed to go and now I'm not even sure if I have done anything correctly! I have a photo of where I am at on this, if that helps. Thank you in advance!
21.02.2019 - 03:18DROPS Design answered:
Dear Mrs Hill, after decrease for heel, work 1 st in each of the remaining 15 sts from heel, then work a total of 16 sts along the left side of heel, work 1 st in each of the 41 st for upper foot, a total of 16 sts along the right side of heel = there are now 88 sts and you have worked over all sts in the round for foot. Happy crocheting!
21.02.2019 - 10:19
![]() UneMailleEnLair wrote:
UneMailleEnLair wrote:
Merci pour ce joli modèle de chaussettes hautes. J'en ai fait une adaptation dans un fil de coton noir. A voir sur mon blog.
10.05.2017 - 10:58
![]() Manja wrote:
Manja wrote:
Het valt me op dat de 'naad' (overgang naar nieuwe toer) scheef loopt, dit is ook vrij logisch denk ik, omdat je telkens in 'de volgende' haakt, maar het ziet er niet zo mooi uit. Doe ik iets verkeerd, of hoort het zo?
27.08.2016 - 10:16DROPS Design answered:
Hoi Manja. Je begint elke toer op dezelfde plek. De begin moet niet opschuiven. Plaats eventueel een markeerder zodat je weet waar de toer begint.
29.08.2016 - 11:51
![]() Beth Noll wrote:
Beth Noll wrote:
I've gotten to the heel decrease portion of this pattern and I'm not able to make any sense of what I'm supposed to do after completing round 3. Can you please clarify how I am supposed to "Repeat 3rd row 12-14-14 times in total, i.e. Until all sts on each side of the middle 13-15-15 sc on heel are dec"?
03.06.2016 - 15:15DROPS Design answered:
Dear Mrs Noll, repeat the row 3, ie work every row like this: 12-14 sc (see size) and dec 1 st (= crochet 2 sc tog) until all sts on each side have been worked - see also video below. Happy crocheting!
03.06.2016 - 15:33
|
|||||||||||||||||||
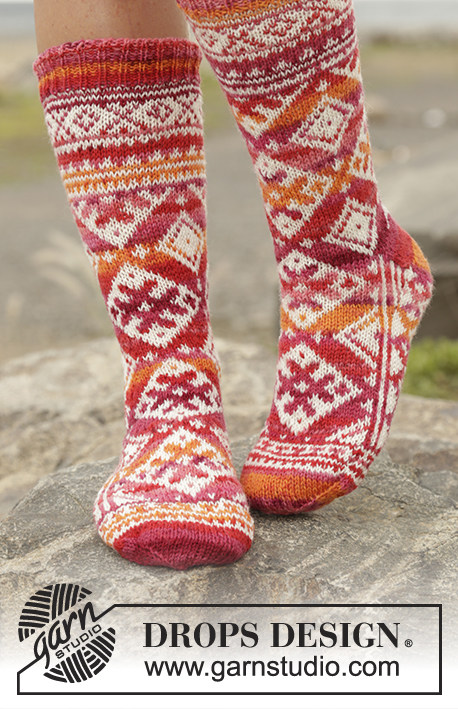
Walking on Sunshine#walkingonsunshinesocks |
|||||||||||||||||||
|
|
|||||||||||||||||||
Crochet DROPS socks with lace pattern in "Fabel". Size 35 - 43
DROPS Extra 0-1242 |
|||||||||||||||||||
|
CROCHET TIP: Replace first tr on round with 3 ch. Finish every round with 1 sl st in 3rd ch from beg of round. On heel turn every row with dc with 1 ch. PATTERN: See diagrams A.1, A.2 and A.3. DECREASE TIP: Dec 1 st as follows – beg 2 sts before marker: Work 1 dc/tr but wait with last pull through (= 2 sts on hook), then work next dc/tr but on last pull through, pull yarn through all sts on hook = 1 st dec. HEEL DECREASE: ROW 1 (= RS): Work 19-22-22 dc, 8-9-9 dc now remain on row, dec 1 dc - SEE DECREASE TIP = 20-23-23 dc. Turn piece. ROW 2 (= WS): Work 12-14-14 dc, 8-9-9 dc now remain on row, dec 1 dc = 13-15-15 dc, turn piece. ROW 3: Work 12-14-14 dc, dec 1 dc, turn piece. Repeat 3rd row 12-14-14 times in total, i.e. Until all sts on each side of the middle 13-15-15 dc on heel are dec. ---------------------------------------------------------- SOCKS: Crochet 98-105-112 ch on hook size 2 mm with Fabel and form a ring with 1 sl st in first ch. * Work 1 tr in each of the first 6 ch, skip 1 ch *, repeat from *-* = 84-90-96 tr - READ CROCHET TIP. Continue to work as follows: 12-15-18 tr, A.1A (= 5 tr), repeat A.1B over the next 40 sts (= 2 repetitions in width), work A.1C (= 15 tr), 12-15-18 tr. Continue this pattern, when A.1 has been worked one time vertically, continue with A.1 X. AT THE SAME TIME when piece measures 5-5-5 cm, dec 1 st at beg and end of round - READ DECREASE TIP. Repeat dec every 2 cm 9-10-11 more times = 64-68-72 tr. REMEMBER THE CROCHET TENSION! Work until piece measures 25-27-29 cm. Now continue by working heel with dc back and forth over the first 13-15-15 tr on round and the last 14-16-16 tr on round. Work 1 dc in every dc until approx. 5-5½-6 cm have been worked over heel sts. Insert 1 marker, NOW MEASURE PIECE FROM HERE! Now dec for heel - see HEEL DECREASE! After heel dec work as follows: 1 tr in each of the 13-15-15 dc on heel, work 14-15-16 tr along edge on heel, 1 tr in each of the 37-37-41 tr on top of foot and work 14-15-16 tr along edge on the other side of heel = 78-82-88 tr on round. Insert 1 marker on each side of the middle 33-37-41 tr on top of foot. Then work in the round with tr under foot and A.2 over the 33-37-41 tr on top of foot AT THE SAME TIME dec 1 tr on each side of the 33-37-41 sts on top of foot, repeat dec every round 11-11-12 more times (12-12-13 dec in total) = 54-58-62 tr. Work until piece measures 19-21-23 cm from marker on heel (= approx. 3-3-4 cm remain until finished measurements). Insert 1 marker in each side so that there are 27-29-31 tr both on top of foot and under foot. Finish as follows: 1 round with 1 dc in every tr, then work 1 dc in every dc AT THE SAME TIME dec 1 dc on each side of each marker – SEE DECREASE TIP, repeat dec every round 9-10-11 more times (10-11-12 dec in total) = 14 dc remain. On next round work all dc tog 2 by 2. Cut the yarn and pull it through the remaining dc, tighten tog and fasten. Finish with an edge at the top of sock, work according to A.3. Fasten off when A.3 has been worked one time vertically. Work another sock the same way. |
|||||||||||||||||||
Diagram explanations |
|||||||||||||||||||
|
|||||||||||||||||||

|
|||||||||||||||||||

|
|||||||||||||||||||
Have you finished this pattern?Tag your pictures with #dropspattern #walkingonsunshinesocks or submit them to the #dropsfan gallery. Do you need help with this pattern?You'll find 10 tutorial videos, a Comments/Questions area and more by visiting the pattern on garnstudio.com. © 1982-2025 DROPS Design A/S. We reserve all rights. This document, including all its sub-sections, has copyrights. Read more about what you can do with our patterns at the bottom of each pattern on our site. |
|||||||||||||||||||


With over 40 years in knitting and crochet design, DROPS Design offers one of the most extensive collections of free patterns on the internet - translated to 17 languages. As of today we count 314 catalogues and 11820 patterns translated into English (UK/cm). 11820
We work hard to bring you the best knitting and crochet have to offer, inspiration and advice as well as great quality yarns at incredible prices! Would you like to use our patterns for other than personal use? You can read what you are allowed to do in the Copyright text at the bottom of all our patterns. Happy crafting!
Post a comment to pattern DROPS Extra 0-1242
We would love to hear what you have to say about this pattern!
If you want to leave a question, please make sure you select the correct category in the form below, to speed up the answering process. Required fields are marked *.