
Looking for a yarn?


Comments / Questions (27)
![]() Rouillé Sylvie wrote:
Rouillé Sylvie wrote:
Bonjour, et tout d'abord merci pour la gratuité de vos modèles. Je n'ai encore jamais tricoté avec des aiguilles circulaires, et j'ai un peu de mal à m'y retrouver. Il semble que ce pull soit ouvert sur le dos, or, si je comprends bien les explications, et la vidéo , on le tricote en rond. Pouvez -vous m'expliquer ? très cordialement. Sylvie
05.03.2018 - 12:57DROPS Design answered:
Bonjour Mme Rouillé, le top se tricote de bas en haut, d'abord en rond, puis en allers et retours pour la fente de boutonnage du dos, on rabat ensuite les mailles des emmanchures et on termine le haut du top en allers et retours pour faire les bretelles. Bon tricot!
05.03.2018 - 14:22
![]() Christine Edwards wrote:
Christine Edwards wrote:
No picture of the back of the top, I am having trouble working out whether I should be making buttonholes in the 5 stitch band or the other side of the back yoke. Is the 5 stitch band visible? If it is hidden as the assembly instructions seem then surely the buttons need to be on the 5 stitch band. can you help
31.05.2016 - 17:38DROPS Design answered:
Dear Mrs Edwards, the 5 sts cast on at the beg of yoke are for the button band, button holes will be worked there, ie at beg of row from RS. Happy knitting!
01.06.2016 - 08:58Ariane wrote:
Thank you so much! A beautiful pattern, fun to make, and fun to wear!
12.05.2016 - 16:04
![]() Karin wrote:
Karin wrote:
Det ska inte stå "upprepa A2 totalt 2 ggr" utan "sticka A2..."
13.04.2016 - 08:58
![]() Margit Spaan wrote:
Margit Spaan wrote:
Ik kom er niet uit. Brei A2 boven A1. Herhaal 2x. Brei ik dan totaal 2 of 3 maal het stuk?
12.04.2016 - 14:07DROPS Design answered:
Hoi Margit. Er staat: Herhaal A.2 2 keer in totaal in de hoogte. Dus je breit A.2 2 keer.
12.04.2016 - 14:54
![]() Dilianne wrote:
Dilianne wrote:
Ik heb garen 32 x 48 nld. is 10x10. Als ik dit voor dit model dubbel neem, dubbele draad, zouden de afmetingen dan nog kloppen c.q. zou dit uberhaupt kunnen? Bedankt
01.04.2016 - 09:41DROPS Design answered:
Hoi Dilianne. Brei een proeflapje met dubbele draad en kijk of de stekenverhouding voor het patroon klopt: 24 st x 32 nld tricotsteek = 10 x 10 cm.
01.04.2016 - 10:05
![]() Mapau wrote:
Mapau wrote:
Je désire réaliser le modèle "sunkissed" n°e-238, en 2 couleurs, XL point mousse en noir, l'ajouré en turquoise, combien dois-je commander de pelotes pour l'une et l'autre couleur ? Merci d'avance pour votre réponse.
07.03.2016 - 10:25DROPS Design answered:
Bonjour Mme Mapau, nous ne sommes pas en mesure de pouvoir ajuster chaque modèle à chaque demande individuelle et vous invitons à contacter votre magasin DROPS pour toute assistance personnalisée. Bon tricot!
07.03.2016 - 13:45
![]() Gabi Fallnich wrote:
Gabi Fallnich wrote:
Hallo und guten Tag, Frage mich ob bei den Diagrammen nur die Hinrunden angezeigt sind oder auch die Rückrunden. Über eine schnelle Antwort wäre ich Ihnen sehr dankbar, da ich schon mit dem Strickteil begonnen habe. Vielen Dank
11.02.2016 - 22:48DROPS Design answered:
Liebe Gabi, in unseren Diagrammen sind immer alle Reihen bzw. Runden dargestellt. Achten Sie aber darauf, dass das Top in Runden gestrickt wird, es gibt also beim Muster keine Rückreihen.
01.03.2016 - 17:31
![]() Gunda Poll wrote:
Gunda Poll wrote:
Einfach fantastisch, diese Kollektion, wo soll ich nur anfangen, eins schöner als das andere, herrlich, danke, tausendmal danke!!!
10.02.2016 - 09:18
![]() M. Lorenz wrote:
M. Lorenz wrote:
Schönes Sommertop. Gibt es ein Photo von der Rückseite? Das würde das Verstehen der Anleitung erleichtern.
27.01.2016 - 16:40
|
||||||||||||||||
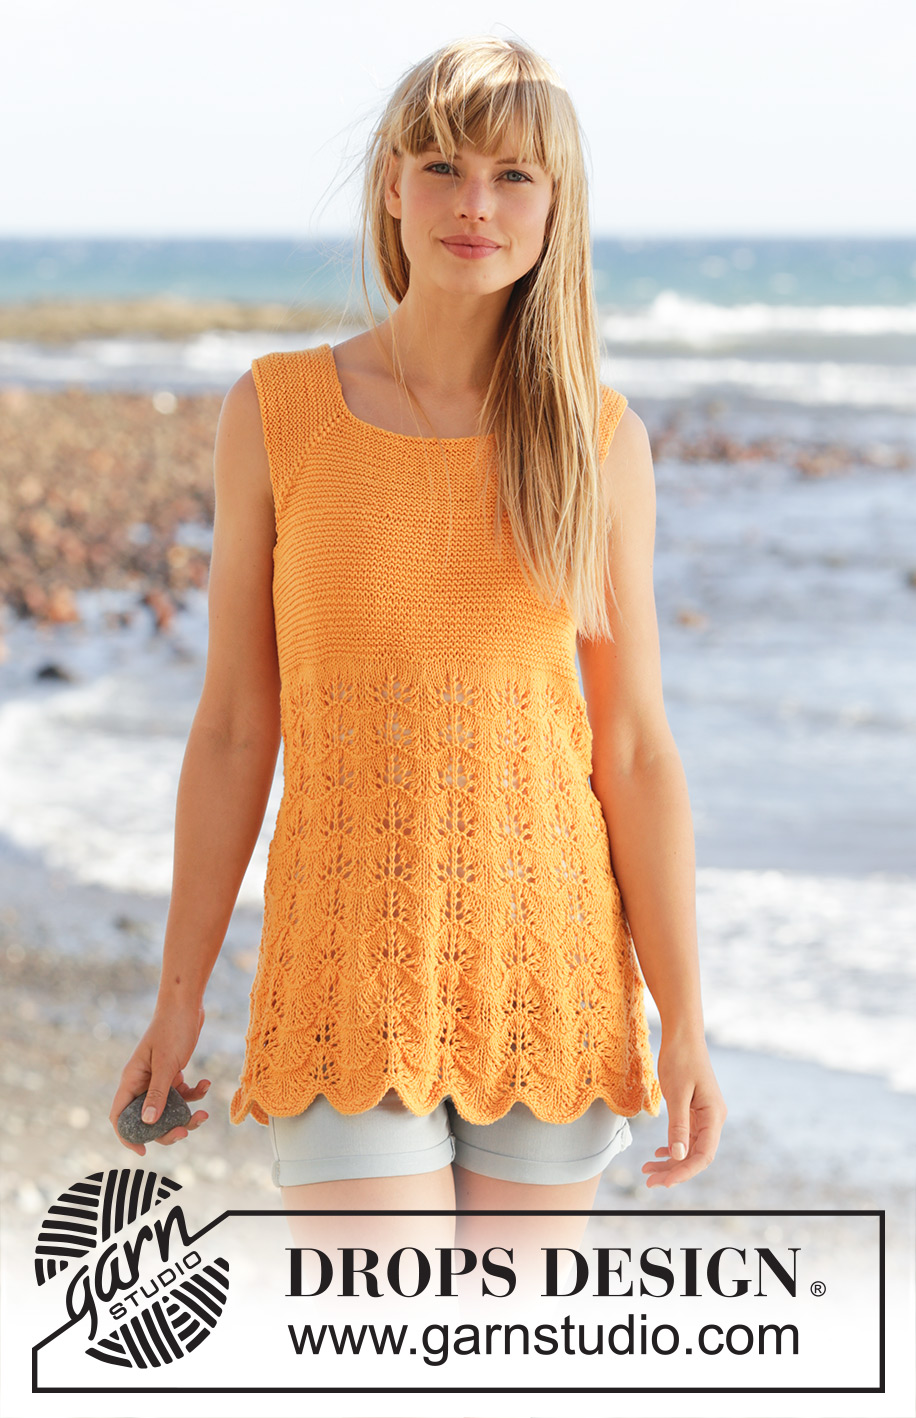
Sunkissed#sunkissedtop |
||||||||||||||||
|
|
||||||||||||||||
Knitted DROPS top in garter st with wave pattern and band mid back on yoke in “Safran”. Size: S - XXXL.
DROPS 170-6 |
||||||||||||||||
|
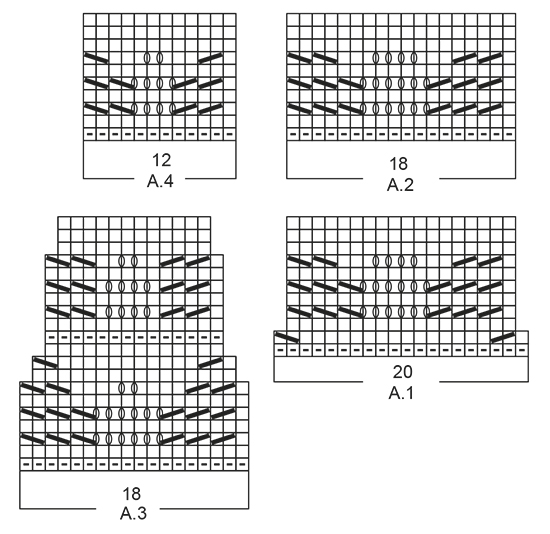
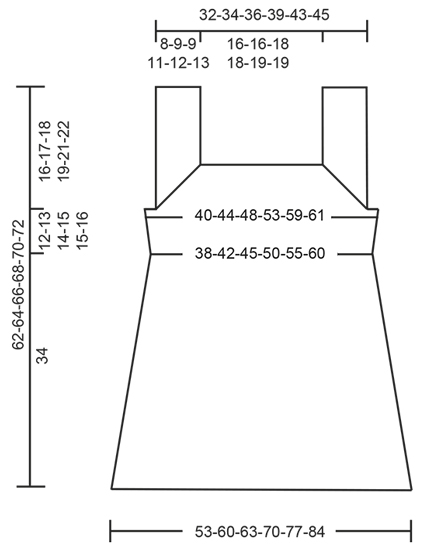
GARTER ST (worked in the round): 1 ridge = 2 rounds. * K 1 round and P 1 round *, repeat from *-*. GARTER ST (back and forth): K all rows. 1 ridge = 2 rows K. PATTERN: See diagrams A.1 to A.4. INCREASE TIP: All inc are done from RS. Work until 3 sts remain before marker, 1 YO, work 6 sts in garter st (marker is in the middle of these sts), 1 YO (= 2 sts inc). On next row K YO twisted to avoid holes. DECREASE TIP: All dec are done from RS! Dec as follows when 2 sts remain before marker: K 2 tog. Dec as follows after marker: Slip 1 st as if to K, K 1, psso BUTTONHOLES: Dec for buttonholes on left band i.e. in beg of row seen from RS. 1 buttonhole = K tog third and fourth st from edge and make 1 YO. Dec for buttonholes when piece measures: SIZE S: 35, 41, 47 and 53 cm SIZE M: 35, 40, 45, 50 and 55 cm SIZE L: 35, 41, 46, 51 and 56 cm SIZE XL: 35, 41, 47, 53 and 58 cm SIZE XXL: 35, 42, 48, 54 and 60 cm SIZE XXXL: 35, 41, 47, 52, 57 and 62 cm. ---------------------------------------------------------- TOP: Worked in the round on circular needle from mid back. Cast on 300-340-360-400-440-480 sts on circular needle size 3 mm with Safran. Work 1 ridge in GARTER ST - see explanation above. Repeat A.1 (= 20 sts) 15-17-18-20-22-24 times in total in width. REMEMBER THE KNITTING TENSION When A.1 has been worked 1 time vertically, there are 270-306-324-360-396-432 sts on needle. Work A.2 (= 18 sts) over A.1. Repeat A.2 2 times in total vertically. Work A.3 (= 18 sts) over A.2. When A.3 has been worked 1 time vertically, there are 180-204-216-240-264-288 sts on needle. Then work A.4 (= 12 sts) over A.3. When A.4 has been worked totally 6 times in height, piece measures approx. 34 cm. Switch to circular needle size 2.5 mm. YOKE: K 1 round and cast on 5 new sts at the end of row = 185-209-221-245-269-293 sts. Then work piece back and forth in GARTER ST - see explanation above, as follows: Work 50-56-59-65-71-77 sts (incl 5 band sts, insert 1 marker in piece, work 90-102-108-120-132-144 sts (= front piece), insert 1 marker in piece and work 45-51-54-60-66-72 sts. On next row inc 1 st on each side of every marker (= 4 sts inc) - READ INCREASE TIP! Remember BUTTONHOLES - see explanation above. Repeat inc every 4-8-5-5-3-0 cm 2-1-2-2-4-0 more times = 197-217-233-257-289-297 sts. When piece measures 46-47-48-49-49-50 cm in total, work next row from RS as follows: Work 39-41-43-47-52-54 sts in garter st, cast off the next 18-24-28-32-38-38 sts (= armhole), work in garter st over the next 78-82-86-94-104-108 (= front piece), cast off the next 18-24-28-32-38-38 sts (= armhole), work in garter st over the last 44-46-48-52-57-59 sts (= 161-169-177-193-213-221 sts). Turn and work in garter st from WS as follows: Work the first 44-46-48-52-57-59 sts, insert 1 marker, cast on 76-82-86-94-102-106 sts for strap, insert 1 marker, work the next 78-82-86-94-104-108 sts (= front piece), insert 1 marker, cast on 76-82-86-94-102-106 sts for strap, insert 1 marker, work the last 39-41-43-47-52-54 sts = 313-333-349-381-417-433 sts and 4 markers in piece. On next row dec 1 st on each side of each marker (= 8 sts dec) - SEE DECREASE TIP. Repeat dec on every row from RS 19-21-21-25-28-30 more times = 38-38-42-42-46-46 sts on front piece, 36-38-42-42-44-44 sts on each strap, 19-19-21-21-23-23 sts on left back piece and 24-24-26-26-28-28 sts on right back piece = 153-157-173-173-185-185 sts in total. Cast off. ASSEMBLY: Place the 5 band sts (= the 5 new sts on yoke), behind left back piece and fasten it nicely from WS (i.e. band on right back piece is under left back piece). Sew the buttons on to the right back piece. |
||||||||||||||||
Diagram explanations |
||||||||||||||||
|
||||||||||||||||
 |
||||||||||||||||
 |
||||||||||||||||
Have you finished this pattern?Tag your pictures with #dropspattern #sunkissedtop or submit them to the #dropsfan gallery. Do you need help with this pattern?You'll find 21 tutorial videos, a Comments/Questions area and more by visiting the pattern on garnstudio.com. © 1982-2025 DROPS Design A/S. We reserve all rights. This document, including all its sub-sections, has copyrights. Read more about what you can do with our patterns at the bottom of each pattern on our site. |
||||||||||||||||


With over 40 years in knitting and crochet design, DROPS Design offers one of the most extensive collections of free patterns on the internet - translated to 17 languages. As of today we count 320 catalogues and 12095 patterns translated into English (UK/cm). 12095
We work hard to bring you the best knitting and crochet have to offer, inspiration and advice as well as great quality yarns at incredible prices! Would you like to use our patterns for other than personal use? You can read what you are allowed to do in the Copyright text at the bottom of all our patterns. Happy crafting!
Post a comment to pattern DROPS 170-6
We would love to hear what you have to say about this pattern!
If you want to leave a question, please make sure you select the correct category in the form below, to speed up the answering process. Required fields are marked *.