DROPS Super Sale - SAVE 30% on 5 wonderful yarns!
Product image DROPS BabyAlpaca Silk yarn
DROPS BabyAlpaca Silk
70% Alpaca, 30% Silk
Discontinued
find alternatives
Product image DROPS Kid-Silk yarn
DROPS Kid-Silk
75% Mohair, 25% Silk
from 5.05 € /25g
Product image DROPS Glitter yarn
DROPS Glitter
60% Cupro, 40% Metal
from 2.10 € /10g
DROPS Super Sale

Fox Sweater

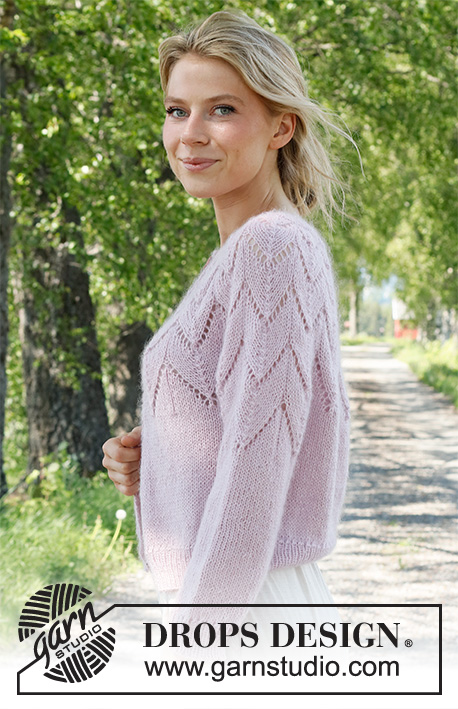
Knitted DROPS jumper with round yoke and lace pattern in ”BabyAlpaca Silk”, ”Kid-Silk” and ”Glitter”. Size: S - XXXL.

DROPS 150-7

#foxsweater

DROPS design: Pattern no bs-047
Yarn group A + A
-----------------------------------------------------------
Size: S/M - L/XL - XXL - XXXL
Materials:
DROPS BABYALPACA SILK from Garnstudio
250-250-300-300 g, colour no 8465, medium grey
and use:
DROPS KID-SILK from Garnstudio
100-100-125-125 g colour no 10, grey
and use:
DROPS GLITTER from Garnstudio
4 spools for all sizes in colour no 02, silver.

DROPS DOUBLE POINTED NEEDLES and CIRCULAR NEEDLE (40 and 80 cm) SIZE 5 mm – or size needed to get 17 sts x 22 rows in stocking st with 1 strand of each yarn = 10 x 10 cm.

-------------------------------------------------------

Alternative Yarn – See how to change yarns here
Yarn Groups A to F – Use the same pattern and change the yarn here
Yarn usage using an alternative yarn – Use our yarn converter here

-------------------------------------------------------

You might also like...

Product image DROPS BabyAlpaca Silk
DROPS BabyAlpaca Silk
70% Alpaca, 30% Silk
Discontinued
find alternatives
Product image DROPS Kid-Silk yarn
DROPS Kid-Silk
75% Mohair, 25% Silk
from 5.05 € /25g
Product image DROPS Glitter yarn
DROPS Glitter
60% Cupro, 40% Metal
from 2.10 € /10g

Pattern instructions

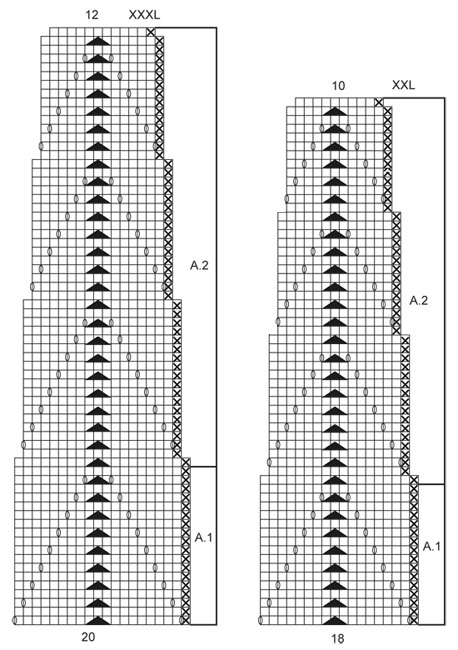
GARTER ST (in the round on circular needle):
* K 1 round and P 1 round *, repeat from *-*. 1 ridge = 2 rounds.

PATTERN:
See diagrams A.1 and A.2. Diagrams show all rows in pattern from RS. See diagram for size!

DECREASE TIP (applies to the body):
Dec as follows before marker: K 2 tog.
Dec as follows after marker: Slip 1 st as if to K, K 1, psso.

INCREASE TIP:
Inc 1 st by making 1 YO. On next row/round work YO twisted to avoid holes.
--------------------------------------------------------

BODY:
Worked in the round on circular needle.
Cast on 168-192-216-240 sts on circular needle size 5 mm with 1 strand BabyAlpaca Silk + 1 strand Kid-Silk + 2 strands Glitter. Work 1 RIDGE in garter st - see explanation above. Then work as follows: A.1 over all sts (= 12 repetitions in the round). When A.1 has been worked 1 time vertically, insert 2 markers in piece; 1 after 7th-8th-9th-10th st and 1 after 91st-104th-117th-130th st (= 1 marker in each side, front/back piece = 84-96-108-120 sts). Then work in stocking st. REMEMBER THE KNITTING TENSION. When piece measures 7 cm, dec 1 st on each side of both markers - READ DECREASE TIP (= 4 sts dec). Repeat dec every 3½-4-4½-5 cm 3 more times (= 4 dec in total) = 152-176-200-224 sts. When piece measures 24-26-27-29 cm, inc 1 st on each side of both markers – READ INCREASE TIP (= 4 sts inc). Repeat inc every 3-3-2½-2 cm 3 more times (= 4 inc in total) = 168-192-216-240 sts. When piece measures 38-38-37-37 cm, cast off 14-16-18-20 sts in each side for armhole (i.e. cast off 7-8-9-10 sts on each side of both markers) = 70-80-90-100 sts remain on back/front piece. Put piece aside and knit the sleeves.

SLEEVE:
Worked in the round on double pointed needles. Cast on 42-48-54-60 sts on double pointed needles size 5 mm with 1 strand BabyAlpaca Silk + 1 strand Kid-
Silk + 2 strands Glitter. Work 1 ridge in garter st. Work A.1 over all sts (= 3 repetitions in width). When A.1 has been worked 1 time vertically, continue in stocking st.
Insert 1 marker at beg of round (= mid under sleeve).
When piece measures 8 cm, inc 1 st on each side of marker. Repeat inc every 5-4-3-2 cm 6-7-8-9 more times (= 7-8-9-10 inc in total) = 56-64-72-80 sts. When piece measures 41-38-34-31 cm (shorter measurements in the larger sizes because of wider shoulders), work A.1 over all sts (= 4 repetitions) - NOTE! Start first repeat of A.1 7-8-9-10 sts before the marker! On last round with A.1 cast off 14-16-18-20 sts mid under sleeve (i.e. cast off 7-8-9-10 sts on each side of marker) = 42-48-54-60 sts remain on needle (= 3 whole repetitions of A.1).
Sleeve measures 46-44-41-39 cm. Put piece aside and knit another sleeve.


YOKE:
Slip sleeves on to same circular needle as body = 224-256-288-320 sts. Work A.1 over all sts (= 16 repetitions in width). When A.1 has been worked one time vertically, continue with A.2 over A.1. Continue the pattern like this. Switch to a shorter circular needle when needed. When A.2 has been worked, 96-128-160-192 sts remain on needle. K 1 round AT THE SAME TIME on 1st row dec 22-50-68-92 sts evenly = 74-78-92-100 sts. Then work an elevation at the back of neck as follows in stocking st, insert 1 marker in middle st (= mid back), cut the yarn and beg here: K 7 sts past marker mid back, turn, tighten yarn and P 14 sts back, turn, tighten yarn and K 21 sts, turn, tighten yarn and P 28 sts back. Continue like this - work 7 sts more on every turn until a total of 56-56-70-70 sts have been worked, turn and K 1 round until mid back again. Work 2 ridges in garter st. Cast off with K from RS. Yoke measures approx. 20-24-27-31 cm (mid front) and entire jumper measures approx. 58-62-64-68 cm.


ASSEMBLY:
Sew the openings under the sleeves tog.

This pattern has been corrected.

Updated online: 05.09.2013
SLEEVE:...
Insert 1 marker at beg of round (= mid under sleeve).....
When piece measures 41-38-34-31 cm (shorter measurements in the larger sizes because of wider shoulders), work A.1 over all sts (= 4 repetitions) - NOTE! Start first repeat of A.1 7-8-9-10 sts before the marker! On last round with A.1 cast off 14-16-18-20 sts mid under sleeve (i.e. cast off 7-8-9-10 sts on each side of marker) = 42-48-54-60 sts remain on needle ...
Updated online: 30.09.2016
Correction diagram size XXL row 34 and 48.
Correction diagram size S/M row 26.

Diagram

K = K
P = P
slip 1 st as if to K, K 2 tog, psso = slip 1 st as if to K, K 2 tog, psso
1 YO between 2 sts = 1 YO between 2 sts
Diagram for DROPS 150-7
Do you have a question? See a list of frequently asked questions (FAQ)

Knitting tension is what determines the final measurements of your work, and is usually measured per 10 x 10 cm. It is provided like so: number of stitches in width x number of rows in height - eg: 19 stitches x 26 rows = 10 x 10 cm.

The knitting tension is very individual; some people knit/crochet loosely while others work tightly. You adjust the knitting tension with the needle size, which is why the suggested needle size is only meant as a guide! You need to adjust this (up or down) to ensure that YOUR knitting tension matches the knitting tension provided in the pattern. If you work with a different knitting tension than provided you will have a different yarn consumption, and your work will have different measurements than what the pattern suggests.

The knitting tension also determines which yarns can replace each other. As long as you achieve the same knitting tension you can replace one yarn with another.

See DROPS lesson: How to measure your tension/gauge

See DROPS video: How to make a gauge tension swatch

The required amount of yarn is provided in grams, eg: 450 g. To calculate how many balls you’ll need you first need to know how many grams are in 1 ball (25g, 50g or 100g). This information is available if you click on the individual yarn quality on our pages. Divide the amount required with the amount of each ball. For example, if each ball is 50g (the most common amount), the calculation will be as follows: 450 / 50 = 9 balls.

The important thing when changing from one yarn to another is that the knitting/crochet tension remains the same. This is so that the measurements of the finished piece will be the same as on the sketch provided. It is easier to achieve the same knitting tension using yarns from the same yarn group. It is also possible to work with multiple strands of a thinner yarn to achieve the knitting tension of a thicker one. Please try our yarn converter. We recommend you to always work a test swatch.

Please NOTE: when changing yarn the garment might have a different look and feel to the garment in the photo, due to individual properties and qualities of each yarn.

See DROPS lesson: Can I use a different yarn than the one mentioned in the pattern?

All our yarns are categorised into yarn groups (from A to F) according to thickness and knitting tension – group A contains the thinnest yarns and group F the thickest. This makes it easier for you to find alternative yarns to our patterns, should you wish to switch yarn. All yarns within the same group have a similar knitting tension and can easily replace each other. However, different yarn qualities have different structures and properties which will give the finished work a unique look and feel.

Click here for an overview of the yarns in each yarn group

At the top of all our patterns you’ll find a link to our yarn calculator, which is a helpful tool should you wish to use a different yarn than suggested. By filling in the yarn quality you wish to replace, the amount (in your size) and number of strands, the calculator will present good alternative yarns with the same knitting tension. Additionally it will tell you how much you’ll require in the new qualities and whether you’ll need to work with multiple strands. Most skeins are 50g (some are 25g or 100g).

If the pattern is worked with multiple colours, every colour will have to be calculated separately. Similarly, if the pattern is worked with several strands of different yarns (for example 1 strand Alpaca and 1 strand Kid-Silk) you will have to find alternatives for each, individually.

Click here to see our yarn calculator

Since different yarns have different qualities and textures we have chosen to keep the original yarn in our patterns. However, you can easily find options among our available qualities by using our yarn calculator, or simply pick a yarn from the same yarn group.

It is possible that some retailers still have discontinued yarns in stock, or that someone has a few skeins at home that they would like to find patterns for.

The yarn calculator will provide both alternative yarn as well as required amount in the new quality.

If you think it's hard to decide what size to make, it can be a good idea to measure a garment you own already and like the size of. Then you can pick the size by comparing those measures with the ones available in the pattern's size chart.

You'll find the size chart at the bottom of the pattern.

See DROPS lesson: How to read size chart

The needle size provided in the pattern serves only as a guide, the important thing is to follow the knitting tension. And since knitting tension is very individual, you will have to adjust the needle size to ensure that YOUR tension is the same as in the pattern – maybe you’ll have to adjust 1, or even 2 needle sizes, up or down to achieve the correct tension. For this, we recommend that you work test swatches.

Should you work with a different knitting tension than the one provided, the measurements of the finished garment might deviate from the measurement sketch.

See DROPS lesson: How to measure your tension/gauge

See DROPS video: How to make a tension/gauge swatch

Working a garment top-down provides more flexibility and room for personal adjustment. For example it is easier to try the garment on while working, as well as making adjustments to length of yoke and shoulder caps.

The instructions are carefully explaining every step, in the correct order. Diagrams are adjusted to the knitting direction and are worked as usual.

The diagram depicts all rows/rounds, and every stitch seen from the right side. It is read from bottom to top, from right to left. 1 square = 1 stitch.

When working back and forth, every other row is worked from the right side and every other row is worked from the wrong side. When working from the wrong side, the diagram will have to be worked reversed: from left to right, knit stitches are purled, purl stitches are knit etc.

When working in the round every round is worked from the right side and the diagram are worked from right to left on all rounds.

See DROPS lesson: How to read knitting diagrams

The diagram depicts all rows/rounds, and every stitch seen from the right side. It is worked from bottom to top, from right to left.

When working back and forth every other row is worked from the right side: from right to left and every other row is worked from the wrong side: from left to right.

When working in the round, every row in the diagram are worked from the right side, from right to left.

When working a circular diagram you start in the middle and work your way outwards, counter clockwise, row by row.

The rows usually start with a given number of chain stitches (equivalent to the height of the following stitch), this will either be depicted in the diagram or explained in the pattern.

See DROPS lesson: How to read crochet diagrams

Instructions for working several diagrams after each other on the same row/round, will often be written like so: “work A.1, A.2, A.3 a total of 0-0-2-3-4 times". This means you work A.1 once, then A.2 is worked once, and A.3 is repeated (in width) the number of times provided for your size – in this case like so: S = 0 times, M = 0 times, L=2 times, XL= 3 times and XXL = 4 times.

The diagrams are worked as usual: begin with the first row in A.1, then work the first row in A.2 etc.

See DROPS lesson: How to read knitting diagrams

See DROPS lesson: How to read crochet diagrams

The total width of the garment (from wrist-to-wrist) will be larger in the larger sizes, despite the actual sleeves being shorter. The larger sizes have longer sleeve caps and wider shoulders, so there will be a good fit in all sizes.

The measurement sketch/schematic drawing provides information regarding the full length of the garment. If it’s a jumper or a jacket the length is measured from the highest point on the shoulder closest to the neckline, and straight down to the bottom of the garment. It is NOT measured from the tip of shoulder. Similarly, the length of yoke is measured from the highest point on the shoulder and down to where yoke is split into body and sleeves.

On a jacket measures are never taken along bands, unless specifically stated. Always measure inside band stitches when measuring the length.

See DROPS lesson: How to read a schematic drawing

Diagrams are often repeated on the round or in height. 1 repeat is the diagram the way it appears in the pattern. If it says to work 5 repeats of A.1 in the round, then you work A.1 a total of 5 times after/next to each other in the round. If it says to work 2 repeats of A.1 vertically/in height you work the entire diagram once, then begin again at the start and work the entire diagram one more time.

Chain stitches are slightly narrower than other stitches and to avoid working the cast-on edge too tight, we simply chain more stitches to begin with. The stitch count will be adjusted on the following row to fit the pattern and measurement sketch.

The rib edge is more elastic and will contract slightly compared to, for example, stocking stitch. By increasing before the rib edge, you avoid a visible difference in width between the rib edge and the rest of the body.

It’s very easy to cast off too tightly, and by making yarn overs while casting off (and simultaneously casting these off) you avoid a too tight cast off edge.

See DROPS video: How to bind off with yarn overs (yo)

To achieve an even increase (or decrease) you can increase on, for example: every 3rd and 4th row alternately, like so: work 2 rows and increase on the 3rd row, work 3 rows and increase on the 4th. Repeat this until the increase is complete.

See DROPS lesson: Increase or decrease 1 st on every 3rd and 4th row alternately

Should you prefer to work in the round instead of back and forth, you may of course adjust the pattern. You’ll need to add steeks mid-front (usually 5 stitches), and follow the instructions. When you would normally turn and work from the wrong side, simply work across the steek and continue in the round. At the end you’ll cut the piece open, pick up stitches to work bands, and cover the cut edges.

See DROPS video: How to knit steeks and cut open

Should you prefer to work back and forth instead of in the round, you may of course adjust the pattern so you work the pieces separately and then assemble them at the end. Divide the stitches for the body in 2, add 1 edge stitch in each side (for sewing) and work the front and back pieces separately.

See DROPS lesson: Can I adapt a pattern for circular needles into straight needles?

Pattern repeats can vary slightly in the different sizes, in order to get the correct proportions. If you’re not working the exact same size as the garment in the photo, yours might deviate slightly. This has been carefully developed and adjusted so that the complete impression of the garment is the same in all sizes.

Make sure to follow instructions and diagrams for your size!

If you have found a pattern you like which is available in women’s size it’s not very difficult to convert it to men’s size. The biggest difference will be the length of sleeves and body. Start working on the women size that you think would fit across the chest. The additional length will be worked right before you cast off for the armhole/sleeve cap. If the pattern is worked top-down you can add the length right after the armhole or before the first decrease on sleeve.

Regarding additional yarn amount, this will depend on how much length you add, but it is better with a skein too many than too few.

All yarns will have excess fibres (from production) that might come off as lint or shedding. Brushed yarns (ie hairier yarns) have more of these loose, excess fibres, causing more shedding.

Shedding also depends on what is worn under or over the garment, and whether this pulls at the yarn fibres. It’s therefore not possible to guarantee that there will be no shedding

Below are some tips on how to get the best result when working with hairier yarns:

1. When the garment is finished (before you wash it) shake it vigorously so the looser hairs come off. NOTE: do NOT use a lint roller, brush or any method that pulls at the yarn.

2. Place the garment in a plastic bag and put it in your freezer - the temperature will cause the fibres to become less attached to each other, and excess fibres will come off easier.

3. Leave in the freezer for a few hours before taking it out and shaking it again.

4. Wash the garment according to the instructions on the yarn label.

Pilling is a natural process that happens to even the most exclusive of fibers. It's a natural sign of wear and tear that is hard to avoid, and that is most visible in high friction areas of your garment like a sweater's arms and cuffs.

You can make your garment look as new by removing the pilling, using a fabric comb or a pill/lint remover.

Still can't find the answer you need? Then scroll down and leave your question so one of our experts can try to help you. This will be done normally within 5 to 10 working days.
In the meantime, you can read the questions and answers that others have left to this pattern or join the DROPS Workshop on Facebook to get help from fellow knitters/crocheters!

Post a comment to pattern DROPS 150-7

We would love to hear what you have to say about this pattern!

If you want to leave a question, please make sure you select the correct category in the form below, to speed up the answering process. Required fields are marked *.

Comments / Questions (210)

country flag Glenn wrote:

Visst framgår det! Rader i A2 med bara en svart triangel utan motsvarande omslag minskar ju maskantalet.

04.11.2013 - 11:30

country flag Gittan wrote:

Hej! Har stickat fram/bakstycket och ärmar, men får inte ihop mönstret efter ihopsättningen. Rimligen borde man minska antalet maskor regelbundet när man stickar A2,men det framgår inte av beskrivningen. Kan jag få en förklaring.

03.11.2013 - 18:47

DROPS Design answered:

Antalet maskor minskas regelbundet när du följer diagrammet. Du ser att det i diagrammet regelbundet finns en minskning utan omslag i varje sida. Lycka till :)

04.11.2013 - 11:42

country flag Jacqueline wrote:

Dus als ik goed begrijp bij het patroon A2 wordt er in het patroon geminderd

22.10.2013 - 14:47

DROPS Design answered:

Dat klopt, in een aantal naalden in het patroon zie je wel minderingen en geen omslagen, vandaar dat het patroon in de hoogte ook steeds smaller wordt. Succes!

22.10.2013 - 17:46

country flag Marianne wrote:

Dankjewel voor het antwoord op min vorige vraag. Ik was er intussen zelf ook al achter gekomen ;-) Nu ben ik op het punt gekomen dat ik moet beginnen met de mouwen en dat wil niet goed lukken. Ik heb nog nooit met vier naalden gebreid en het lukt mijn niet om mijn cirkel mooi dicht te krijgen onderaan. Hebben jullie tips voor mij? Ook zou ik graag weten hoe ik dit patroon het beste kan breien op vier naalden om omslagen te vermijden op het einde van een naald. Alvast bedankt. groetjes, Marianne

21.10.2013 - 16:53

DROPS Design answered:

Kijk bij onze instructievideo's voor meer hulp en uitleg: https://www.garnstudio.com/lang/nl/video.php?id=42. Een omslag aan het einde van de naald is geen probleem, gewoon de draad om de naald slaan en met een vinger of uw duim tegenhouden.

22.10.2013 - 08:44

country flag Elfriede Greslehner wrote:

Ich finde ja ihre anleitungen super toll. wäre es nicht möglich, dass die anleitungen als pdf zum herunterladen eingestellt werden? das wäre eine grosse erleichterung wenn man die modelle nachstricken möchte. hoffe ich finde noch viele tolle anleitungen auf ihrer seite. mfg elfriede g

20.10.2013 - 13:40

DROPS Design answered:

Liebe Elfriede, es freut uns, dass Sie mit unseren Anleitungen so zufrieden sind. Sie können die Anleitungen ganz einfach von unserer Seite ausdrucken (indem Sie den Button DRUCKEN: ANLEITUNG anklicken). Oder Sie kopieren sich die gewünschten Anleitungsteile in ein Worddokument.

21.10.2013 - 09:03

country flag Jacqueline wrote:

Bij de pas begin met 288 st.na patroon A2 heb je nog 160 st. hoe minder ik dan die 128 st.

19.10.2013 - 09:47

DROPS Design answered:

Dit staat in het patroon: Als A.2 klaar is, staan er nog 96-128-160-192 st op de nld. Brei 1 nld recht en minder TEGELIJKERTIJD in de 1e nld 22-50-68-92 st gelijkmatig = 74-78-92-100 st. U hebt dus 160 st over, mindert 68 st gelijktmatig en houdt 92 st over, geen 128 st.

21.10.2013 - 08:28

country flag Lyda wrote:

Probleme pour ce modele.comment faire un jeté entre deux mailles envers,sur les mailles endroit pas de problème,mais entre deux mailles envert,je suis bloquée

11.10.2013 - 16:08

DROPS Design answered:

Bonjour Lyda, pour faire 1 jeté entre 2 m env, procédez ainsi: fil devant, tricotez la 1ère m env, passez le fil par-dessus l'aiguille droite et faites le revenir entre les 2 aiguilles (dans le sens des aiguilles d'une montre), le fil est de nouveau devant l'ouvrage, vous pouvez tricoter votre 2ème m env. Bon tricot!

11.10.2013 - 17:19

country flag Marianne wrote:

Ik ben begonnen met deze pull te breien met ander garen maar met wel dezelfde stekenverhouding. Wat ik niet heb is dat mooie gaatjespatroon. In de beschrijving staat dat je de omslagen die je gemaakt heb om te meerderen in de volgende rij rechts gedraaid moet breien om gaatjes te voorkomen. Moet ik dit nu net niet doen om die gaatjes in het patroon te krijgen?

11.10.2013 - 15:41

DROPS Design answered:

Hoi Marianne. Het gedraaid breien van de omslagen is alleen voor het MEERDEREN en niet tijdens het breien van het motief. Hier volg je de beschrijving bij de symbolen en de omslagen worden niet verdraaid gebreid. Veel breiplezier verder

16.10.2013 - 13:45

country flag Lyda wrote:

Bonjour pour debuter ce modelevous dites commencer par un tour point mousse,voir plus haut et la il est marqué.tour pont mousse un rang endroit et un rang envers,c'est la que je ne comprends pas pour moi le point mousse c'est tous les rangs a l'endroit,un rang a l'endroit et un rang a l'envers pour moi c'est du jersey.

09.10.2013 - 14:19

DROPS Design answered:

Bonjour Lyda, vous avez tout à fait raison, en allers et retours, on tricote tous les rangs à l'end pour avoir du point mousse, mais ce pull se tricote en rond jusqu'à la fin, et pour avoir du point mousse en rond, on doit tricoter alternativement 1 tour end, 1 tour env - cf vidéo ci-dessous. Bon tricot!

09.10.2013 - 16:00

country flag Giselheid Bicker wrote:

Vor vielen Jahren habe ich einen ähnlichen Pullover gestrickt, der aber von oben begonnen wurde. Leider fehlt mir dazu die Anleitung. Kann man mit der Anleitung zu diesen Pullover auch von oben beginnen und dann die glatten Teile auch gleich anstricken? Danke für eine kurze Nachricht.

11.09.2013 - 13:40

DROPS Design answered:

Liebe Giselheid, dies würde eine recht komplizierte Umrechnung des Modells bedeuten, wir empfehlen es daher nicht.

18.09.2013 - 08:15