
Popular categories
Looking for a yarn?


Comments / Questions (59)
Antoaneta Atanasova wrote:
Hello, I'm working on the back piece, and I can't understand the 1st 4 rows - does the turning chain count as a dc?
28.08.2015 - 19:46DROPS Design answered:
Dear Mrs Atanasova, that's right, see also "crochet info" at the beg of the pattern. Happy crocheting!
31.08.2015 - 11:34Mary wrote:
Hello, i am writing from Greece. I have bought a magazine here for the above pattern.As general instructions begin,the sizes are for 6-9 months, 9-12,12-18,18-24 months, 2-3 years,etc. But later on, the mesurements begin from 3-4 years old.And the measurements through the pattern are for these sizes.I think the magazine has made a mistake.Could you please advise what the measurements would be for a 2-3 year old child, so that I can crochet it for my little boy?Thank you
05.08.2015 - 12:24DROPS Design answered:
Dear Mary, that's right this jumper starts with size 3/4 years - you can adjust pattern following your tension and your own measurements (see measurement chart at the end of the pattern you can adapt to measurements to the correct sizes). Your DROPS store will also give you tips & advices. Happy crocheting!
05.08.2015 - 17:51
![]() Silje wrote:
Silje wrote:
Jeg har heklet ferdig genseren og alt ble rett og fint bortsett fra halsen. Syns ikke den ble så rund og fin som på bildet. Den er litt mer kantete. Har fulgt oppskriften og dobbeltsjekket, men ser ikke noen feil. Hva kan jeg gjøre for å få den finere? Heklet str 6 år.
24.07.2015 - 20:14DROPS Design answered:
Hej, Det er svært at sige, men hvis du fex hækler en m mere imellem striberne, så vil halsen muligvis blive mere rund. God fornøjelse! Du kan prøve at vise den for din lokale butik, så er jeg sikker på at du får hjælp!
28.07.2015 - 14:24
![]() Tracy Orr wrote:
Tracy Orr wrote:
I am currently working on the back piece at the arm hole decrease. My concern is the pattern only shapes one side with the arm hole am I reading this wrong?
11.01.2015 - 00:33DROPS Design answered:
Dear Mrs Orr, when you dec for armhole, you have to dec each side:: working sl st over the first 4 tr, then work until 4 tr remain and turn - see video below for how to dec each side - then at the beg of next row, work 3 ch (=1st tr), 2 tr tog, work until 3 tr remain, 2 tr tog, 1 tr in last tr (= 1 tr dec each side). Happy crocheting!
12.01.2015 - 09:57
![]() Jasmin wrote:
Jasmin wrote:
Hallo, bei mir passt der Ärmel absolut nicht an den Armausschnitt, was könnte denn schief gelaufen sein???? =(
20.12.2014 - 20:58DROPS Design answered:
Ohne genauere Beschreibung lässt sich das leider schwer feststellen. Vielleicht haben Sie am Ärmel zu viele R gehäkelt oder die Abnahmen nicht korrekt gemacht?
06.03.2015 - 12:17
![]() Andrea wrote:
Andrea wrote:
Ingenting stemmer på denne genseren, deling av fremstykket ved splitten så blir den ene siden bredere enn den andre.. og armen passer ikke inn i ermehullet når genseren er sydd sammen (9/10år). Har tatt opp alt for mange ganger nå og denne skal være julegave.. utrolig dårlig oppskrift
12.12.2014 - 15:25
![]() Segers wrote:
Segers wrote:
Kunt u mijn uitleggen hoe de mouw in de trui moet? Ik vind de mouw een rare vorm hebben.
11.09.2014 - 10:56DROPS Design answered:
Hoi Segers. Ik kan voor deze soort vragen helaas niet op afstand helpen. In dit geval is het beter om naar een handwerkwinkel te gaan voor hulp.
11.09.2014 - 17:22
![]() Sabrina wrote:
Sabrina wrote:
Hallo, in der Anleitung für die kleinste Größe, beim Ärmel steht: "Den Faden abschneiden und wie folgt häkeln: 4 lockere Lm, 1 fM in jedes der 38-40-42-46-48 Stb häkeln und dann 6 lockere Lm, Arbeit wenden und 1 Stb in die 4. Lm von der Nadel häkeln, 1 Stb in jede der 2 nächsten Lm, 1 Stb in jede der 38-40-42-46-48 fM der R und schließen mit 1 Stb in jede der 4 Lm am Ende der R = = 46-48-50-54-56 Stb." ich weiß nicht ob ich da einen Rechenfehler habe, aber 1+2+38+4 sind doch 45 und nicht 46?
13.05.2014 - 21:32DROPS Design answered:
Liebe Sabrina, die ersten 3 Lm werden mitgezählt - sie gelten als 1 Stb. Dann passt die Rechnung. Die Info, dass zu Beginn jeder R mit Stb das erste Stb durch 3 Lm ersetzt wird, finden Sie am Anfang der Anleitung unter "Häkelinfo". Weiterhin gutes Gelingen!
14.05.2014 - 00:09
![]() Princelfe wrote:
Princelfe wrote:
Bonjour , Je me demande s'il n'y a pas une erreur. Au moment ou on ajoute 4 ml et 6ml pour les manches , en tout n'y aurait il pas 46B et non 44? 38 B avant le rajout plus 4B de chaque côté .
03.02.2014 - 16:09
![]() Liesbeth wrote:
Liesbeth wrote:
Goedenavond, Het is gelukt! :) Dat wilde ik toch ook even kwijt na al mijn vragen.
23.01.2014 - 19:44
|
|
Little Oliver#littleoliversweater |
|
|
|
|
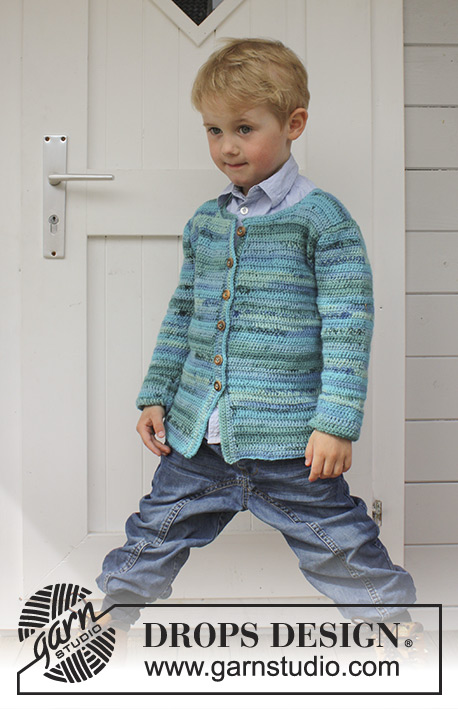
Crochet jumper with vent and buttons at the front in DROPS Merino Extra Fine. Size children 3 - 12 years.
DROPS Children 24-28 |
|
|
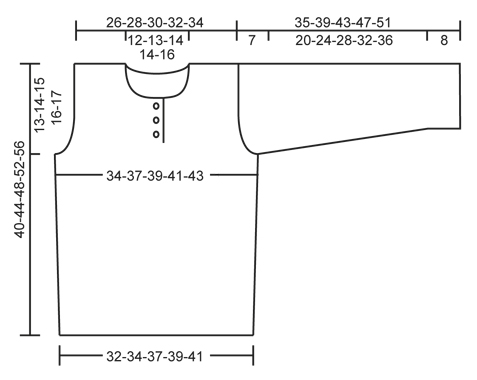
CROCHET INFO: On every dc row replace first dc with 1 ch. On every tr row replace first tr with 3 ch. PATTERN ON BODY: ROW 1: 1 tr in every dc in light greyish green. ROW 2: 1 dc in every tr in light greyish green. ROW 3: 1 tr in every dc in grey blue ROW 4: 1 dc in every tr grey blue. Repeat rows 1 to 4. PATTERN SLEEVE: ROW 1: 1 dc in every tr grey blue. ROW 2: 1 tr in every dc in grey blue ROW 3: 1 dc in every tr grey blue. ROW 4: 1 tr in every dc in grey blue ROW 5: 1 dc in every tr grey blue. ROW 6: 1 tr in every dc in grey blue ROW 7: 1 dc in every tr in light greyish green. ROW 8: 1 tr in every dc in light greyish green. Repeat rows 1 to 8. DECREASE TIP: Dec 1 st by working 2 sts tog. Work 2 dc tog as follows: Insert hook in first st and pull thread through, insert hook in next st and pull thread through, make 1 YO and pull thread through all 3 loops on hook. Work 2 tr tog as follows: Work 1 tr in first st but wait with last pull through, work 1 tr in next st but on last pull through, pull thread through all 3 loops on hook. -------------------------------------------------------- JUMPER: To make the texture the same on the piece work all parts back and forth and sew tog when finished. BACK PIECE: Work 67-71-76-81-85 ch with grey blue on hook size 4 mm. Continue with 1 dc in 2nd ch from hook, then 1 dc in each of the next 2-6-4-2-6 ch, * skip 1 ch, 1 dc in each of the next 6 ch *, repeat from *-* the entire row = 58-62-66-70-74 dc (first ch = 1 dc). READ CROCHET INFO! Turn and work 4 rows with 1 dc in every dc. Then work PATTERN BODY until finished measurements - see explanation above. REMEMBER THE CROCHET TENSION! When piece measures 10-11-12-13-14 cm, inc 1 st in each side by working 2 sts in the second and next to last st. Repeat inc when piece measures 20-21-22-23-24 cm = 62-66-70-74-78 sts. When piece measures approx. 27-30-33-36-39 cm (adjust so that next row is a row with dc), dec for armholes as follows: Work sl sts over the first 4 tr, then work dc until 4 tr remain, turn. * Work 3 ch (= 1 tr), then work the next 2 tr tog – SEE DECREASE TIP, then work tr until 3 dc remain, work the next 2 tr tog, then 1 tr in last dc. Turn and work 1 row with dc over all sts, turn *. Repeat from *-* 3 more times = 46-50-54-58-62 sts on row. Continue to work until piece measures approx. 39-43-47-51-55 cm. Now work 2 rows with pattern as before only over the 12-13-14-16-17 sts in each side (the middle 22-24-26-26-28 sts = neck). Fasten off. FRONT PIECE: Work as back piece until piece measures approx. 27-30-33-36-39 cm (adjust so that next row is a row with dc) = 62-66-70-74-78 tr. Now beg armhole dec - at the same time divide mid front for vent. 1ST SIDE: Work sl sts over the first 4 tr, then work dc over the next 29-31-33-35-37 tr. * Turn and work tr until 3 dc remain, work the next 2 tr tog – SEE DECREASE TIP, then work 1 tr in last dc. Turn and work dc over all tr *, repeat from *-* 3 more times. 8 sts have been dec in total for armhole and 25-27-29-31-33 sts remain on row. Continue as before. When piece measures approx. 35-38-42-45-49 cm (adjust so that next row beg from the side), beg neck dec. Now only work over the first 17-18-19-21-22 sts. Turn and work back - at the same time work the first 4 sts towards neck tog 2 by 2 – SEE DECREASE TIP! On next row work the 2 outermost sts towards neck tog, repeat this dec on every row 2 more times = 12-13-14-16-17 sts remain on shoulder. Continue to work until piece measures 40-44-48-52-56 cm, fasten off. 2ND SIDE: Beg mid front and work 1 dc at the back of each of the outermost 4 sts from 1st side (so that the button bands overlap at the bottom). Then work dc until 4 tr remain, turn and work back. Then work this side as 1st side. SLEEVE: Worked top down. Work 32-35-38-43-46 ch on hook size 4 mm with grey blue. Work first row as follows: Work 1 dc in 2nd ch from hook, work 1 dc in each of the next 2-1-0-1-0 ch, * skip 1 ch, 1 dc in each of the next 3 ch *, repeat from *-* the entire row = 24-26-28-32-34 dc on row (this is 1st row in PATTERN SLEEVE - see explanation above). Then continue stripes as explained in PATTERN SLEEVE. AT THE SAME TIME inc in each side on every row with tr as follows: Inc on every tr row by working 2 tr in st inside outermost st in each side (= 1 tr inc in each side – NOTE: on rows with dc work 1 dc in every tr without inc). Continue inc like this until there are 38-40-42-46-48 sts on row (adjust so that next row is a row with dc). Cut the yarn and work as follows: Work 4 loose ch, work 1 dc in each of the 38-40-42-46-48 tr on row and then work 6 loose ch, turn piece and work 1 tr in 4th ch from hook, 1 tr in each of the next 2 ch, work 1 tr in each of the 38-40-42-46-48 dc on row and finish with 1 tr in each of the 4 ch at the end of row = 46-48-50-54-56 tr on row. Insert 1 marker at the end in one side of piece. Sleeve cap is now done. Continue down the sleeve as follows: Continue with PATTERN SLEEVE in stripes as before. AT THE SAME TIME when piece measures 2 cm from marker, dec 1 tr/dc in each side by working the second and third tr/dc and the 2 next to last tr/dc tog – SEE DECREASE TIP! Repeat dec every 4th-4th-5th-5th-5th row 5-6-6-7-8 more times (= 6-7-7-8-9 dec in total) = 34-34-36-38-38 sts on row. AT THE SAME TIME when sleeve measures approx. 30-34-39-43-47 cm – adjust after 1 stripe with light greyish green, work with grey blue until finished measurements. When piece measures 35-39-43-47-51 cm, fasten off. Work another sleeve. ASSEMBLY: Sew shoulder seams, side seams and sleeve seams edge to edge to avoid a chunky seam. Sew in the sleeves in body. Sew the buttons on right side of mid front and button through sts. CROCHET EDGE: Work an edge up along the vent mid front, around the neck and down along the other vent at the front. Beg from RS and work with grey blue on hook size 4 mm as follows: Work 1 dc in 1st st, * 1 ch, 1 dc in next st *, repeat from *-* - make sure that the edge is nice and even. Fasten off. |
|
|
|
Have you finished this pattern?Tag your pictures with #dropspattern #littleoliversweater or submit them to the #dropsfan gallery. Do you need help with this pattern?You'll find 8 tutorial videos, a Comments/Questions area and more by visiting the pattern on garnstudio.com. © 1982-2025 DROPS Design A/S. We reserve all rights. This document, including all its sub-sections, has copyrights. Read more about what you can do with our patterns at the bottom of each pattern on our site. |


With over 40 years in knitting and crochet design, DROPS Design offers one of the most extensive collections of free patterns on the internet - translated to 17 languages. As of today we count 314 catalogues and 11820 patterns translated into English (UK/cm). 11820
We work hard to bring you the best knitting and crochet have to offer, inspiration and advice as well as great quality yarns at incredible prices! Would you like to use our patterns for other than personal use? You can read what you are allowed to do in the Copyright text at the bottom of all our patterns. Happy crafting!
Post a comment to pattern DROPS Children 24-28
We would love to hear what you have to say about this pattern!
If you want to leave a question, please make sure you select the correct category in the form below, to speed up the answering process. Required fields are marked *.