
Popular categories
Looking for a yarn?


|
|
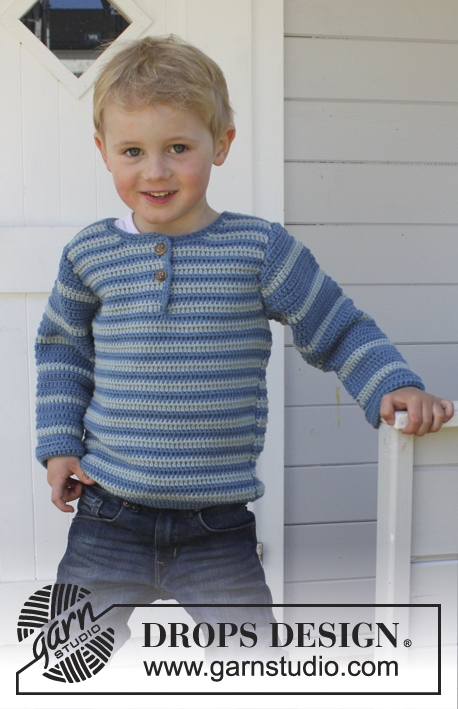
Little Lord |
|
 |
 |
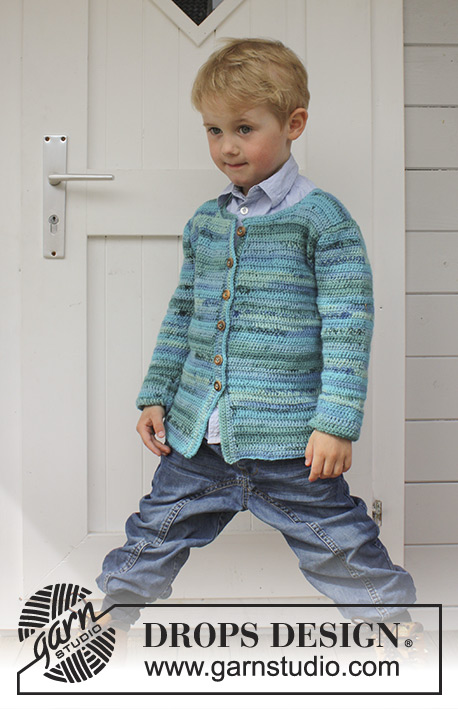
Crochet jacket in DROPS Fabel. Size children 3 - 12 years.
DROPS Children 24-46 |
|
|
CROCHET INFO: On every dc row replace first dc with 1 ch. On every tr row replace first tr with 3 ch. PATTERN: ROW 1: 1 tr in every dc. ROW 2: 1 dc in every tr. Repeat rows 1 and 2. DECREASE TIP: Dec 1 st by working 2 sts tog. Work 2 dc tog as follows: Insert hook in first st and pull thread through, insert hook in next st and pull thread through, make 1 YO and pull thread through all 3 loops on hook. Work 2 tr tog as follows: Work 1 tr in first st but wait with last pull through, work 1 tr in next st but on last pull through, pull thread through all 3 loops on hook. -------------------------------------------------------- JACKET: To make the texture the same on the piece work all parts back and forth and sew tog when finished. BACK PIECE: Work 82-89-96-101-105 ch with Fabel on hook size 3.5 mm. Continue with 1 dc in 2nd ch from hook, then 1 dc in each of the next 3-3-3-1-5 ch, * skip 1 ch, 1 dc in each of the next 6 ch *, repeat from *-* the entire row = 70-76-82-86-90 dc. READ CROCHET INFO! Turn and work 4 rows with 1 dc in every dc. Then work PATTERN until finished measurements - see explanation above. REMEMBER THE CROCHET TENSION! When piece measures 10-11-12-13-14 cm, inc 1 st in each side by working 2 sts in the second and next to last st. Repeat inc when piece measures 20-21-22-23-24 cm = 74-80-86-90-94 sts. When piece measures approx. 27-30-33-36-39 cm (adjust so that next row is a row with dc), dec for armholes as follows: Work sl sts over the first 4 tr, then work dc until 4 tr remain, turn. * Work 3 ch (= 1 tr), then work the next 2 tr tog – SEE DECREASE TIP, then work tr until 3 dc remain, work the next 2 tr tog, then 1 tr in last dc. Turn and work 1 row with dc over all sts, turn *. Repeat from *-* 3-4-5-5-5 more times = 58-62-66-70-74 sts on row. Continue to work until piece measures approx. 39-43-47-51-55 cm. Now work 2 rows with pattern as before only over the 16-17-18-19-20 sts in each side (the middle 26-28-30-32-34 sts = neck). Fasten off. RIGHT FRONT PIECE: Work 41-45-48-50-53 ch with Fabel on hook size 3.5 mm. Continue with 1 dc in 2nd ch from hook, then 1 dc in each of the next 4-1-4-6-2 ch, * skip 1 ch, 1 dc in each of the next 6 ch *, repeat from *-* the entire row = 35-38-41-43-45 dc. READ CROCHET INFO! Turn and work 4 rows with 1 dc in every dc. Then work PATTERN until finished measurements - see explanation above. REMEMBER THE CROCHET TENSION! When piece measures 10-11-12-13-14 cm, inc 1 st in the side by working 2 sts in the next to last st. Repeat inc when piece measures 20-21-22-23-24 cm = 37-40-43-45-47 sts. When piece measures approx. 27-30-33-36-39 cm (adjust so that next row is a row with dc), dec for armhole in the side as on back piece = 29-31-33-35-37 sts on row. When piece measures approx. 35-38-42-45-49 cm (adjust so that next row beg from the side), beg neck dec. Now only work over the first 21-22-23-24-25 sts. Turn and work back - at the same time work the first 4 sts towards neck tog 2 by 2 – SEE DECREASE TIP! On next row work the 2 outermost sts towards neck tog, repeat this dec on every row 2 more times = 16-17-18-19-20 sts remain on shoulder. Continue to work until piece measures 40-44-48-52-56 cm, fasten off. LEFT FRONT PIECE: Work as right but reversed. SLEEVE: Work 47-47-49-49-52 ch with Fabel on hook size 3.5 mm. Turn and work 1 dc in 2nd ch from hook, then work 1 dc in each of the next 3-3-5-5-1 ch, * skip 1 ch, work 1 dc in each of the next 6 ch *, repeat from *-* the rest of row = 40-40-42-42-44 dc. Work 4 more rows with dc. Then work pattern as on body until finished measurements. When piece measures 8 cm, inc 1 st in each side by working 2 sts in next to last st. Repeat inc every 3 cm 5-7-8-10-11 more times = 52-56-60-64-68 sts. When piece measures approx. 28-32-36-40-44 cm (adjust so that next row is a row with dc), beg dec for sleeve cap. Work sl sts over the first 4 tr, then work dc until 4 tr remain, turn piece. Work 3 ch, then work the next 2 tr tog, work tr until 3 dc remain, work the first 2 tog, then 1 tr in last dc. Continue like this by working the second and third and the 2 next to last sts tog on every row until piece measures 35-39-43-47-51 cm, fasten off. ASSEMBLY: Sew shoulder seams, side seams and sleeve seams edge to edge to avoid a chunky seam. Sew in the sleeves in body. RIGHT BAND: Work 77-84-92-99-108 dc up along right band with Fabel on hook size 3.5 mm. Work 1 dc in every dc. Work next row as follows – from bottom edge: Work 1 dc in each of the first 24-21-29-26-25 dc,* 1 ch, skip next dc, 1 dc in each of the next 9 dc *, repeat from *-* 5-6-6-7-8 times in total, 1 ch, skip 1 dc, 1 dc in each of the last 2 dc. Work 1 dc in every dc and 1 dc in every ch-space. Turn and work 1 dc in every dc. Fasten off. LEFT BAND: Work 77-84-92-99-108 dc up along left band. Work 5 rows in total with 1 dc in every dc. NECK EDGE: Work approx. 70 to 90 dc around the neck (also over bands). Work 3 rows with 1 dc in every dc. Fasten off. Sew the buttons on to the left band. |
|

|
|
|
Have you made this or any other of our designs? Tag your pictures in social media with #dropsdesign so we can see them! Do you need help with this pattern?You'll find tutorial videos, a Comments/Questions area and more by visiting the pattern on garnstudio.com. © 1982-2024 DROPS Design A/S. We reserve all rights. This document, including all its sub-sections, has copyrights. Read more about what you can do with our patterns at the bottom of each pattern on our site. |
|


With over 40 years in knitting and crochet design, DROPS Design offers one of the most extensive collections of free patterns on the internet - translated to 17 languages. As of today we count 304 catalogues and 11422 patterns - 11422 of which are translated into English (UK/cm).
We work hard to bring you the best knitting and crochet have to offer, inspiration and advice as well as great quality yarns at incredible prices! Would you like to use our patterns for other than personal use? You can read what you are allowed to do in the Copyright text at the bottom of all our patterns. Happy crafting!
Comments / Questions (12)
Hallo, ich hänge an der rechten Blende. Habe die FM in der 1. Reihe, dann eine Weitere drauf. Die 2.reihe wie beschrieben mit einer Lm nach 9 FM Bus zum Ende des Vorderteils. Jetzt meine Problem: Wie geht es weiter? Ich finde eine LM zuklein für ein Knopfloch. Wie gehe ich weiter vor? Die Blende wird ja mehr als nur 4 reihen haben oder? LG
26.10.2022 - 08:31DROPS Design answered:
Liebe Claudia, die Knopflöcher können Sie gerne je nach den Knöpfegröße anpassen - es sind insgesamt 5 Reihen: 2 Reihen + 1 mit den Knopflöchern + 2 Reihen. Viel Spaß beim häkeln!
26.10.2022 - 16:30Rechtervoorpand. Daar staat bij het begin 4-1-4-6- 2l. Is dit wel goed? En moet ik dan aan het eind nog 4 vaste doen, om op 38 uit te komen? Graag uw reactie.
20.12.2021 - 12:59DROPS Design answered:
Dag Henny,
Ja, dit zou wel moeten kloppen. Het stuk tussen de sterretjes herhaal je 6 keer, waardoor je 36 steken hebt, plus de 2 steken aan het begin = 38 steken.
06.01.2022 - 11:10Ik lees niets over knoopsgaten en er zitten wel knippen op het vest; hoe ga ik dat doen?
16.05.2020 - 08:20DROPS Design answered:
Dag Mieke,
De knoopsgaten worden op de rechter voorbies gemaakt. (Je slaat dan af en toe een vaste over en haakt een extra losse daarboven.)
19.05.2020 - 13:40Hallo, ich verstehe den letzten Satz beim Ärmel nicht ("Weiter bis zu einer Gesamthöhe von 35-39-43-47-51 cm in jeder R jeweils die 2. und 3. M bzw. die zweitletzte und drittletzte M zusammenhäkeln. Faden abschneiden."). Soll wirklich in jeder Reihe abgenommen werden, also sowohl in den Reihen mit festen Maschen als auch in den Reihen mit Stäbchen? Dann wird die Ärmelkugel sehr steil und passt kaum zu den anderen Teilen.
07.07.2019 - 08:28DROPS Design answered:
Liebe Sylvia, ja genau, so wird es abgenommen, der Armkugel misst 7 cm und soll dann mit dem Armloch anpassen. Viel Spaß beim häkeln!
08.07.2019 - 10:01Hei. Jeg hekler den minste størrelsen, bruker riktig heklenål og garn i samme størrelse som fabel. Nå sitter jeg med en rygg på 43 cm og ikke 34. Hvordan er dette mulig når jeg har fulgt alle instruksjonene korrekt? Jeg hekler heller ikke stort, heller stramt. Utrolig irriterende når jeg har en toåring som skal bruke det, men størrelsen blir til en 11-12 åring.
05.05.2019 - 12:10DROPS Design answered:
Hei Ina. Jeg skjønner godt at dette er frustrerende. Det høres ut som du ikke har korrekt heklefasthet. Det er dette som er avgjørende for at målene på plagget blir riktige. Vi hekler alle ulikt, så nålstørrelsen som er oppgitt i oppskriften er kun veiledende, du må selv justere denne slik at du oppnår den korrekte heklefastheten. I dette tilfellet er den 22 masker i bredden = 10 cm. Om du hekler den minste størrelsen har du 70 masker: 70/2,2 = 32 cm (nederst på bolen). God fornøyelse
06.05.2019 - 09:32Garnet räckte inte i storlek 128. Nu måste jag beställa ett enda nystan till med dyr fraktkostnad. /Maria
03.04.2018 - 22:19Hallo. Ich bin gerade beim rechten Vorderteil (Größe 134/140) dazu meine Frage: es heisst "nach 13 cm auf jeder Seite 1M aufnehmen.... nach 23cm wiederholen =47 M" . Vor den Aufnahmen sind es 45 M, dann müssten es doch nach 2 mal 2M zunehmen 49 M sein? Muss vielleicht nur auf 1Seite (Ausenkante) zugenommen werden?
03.10.2017 - 22:15DROPS Design answered:
Liebe Stefanie, es muß nur auf 1 Seite (gegen Rückenteil) zugenommen, dh 1 M wird 2 x zugenommen. Viel Spaß beim stricken!
04.10.2017 - 11:30Hallo, ich bin gerade dabei, diese Jacke in 146/152 zu häkeln, und ich glaube, 300g Garn ist zu knapp bemessen. Ich hab nur noch 1 Knäuel, aber anderthalb Ärmel vor mir - und die Maschenprobe passte ;)
01.05.2014 - 20:32Buen día. Por favor, si es posible, pongan GRAFICOS. uN SALUDO, cARMEN
29.04.2014 - 19:38Schönes Modell, die Farbe ist im Original viel schöner als auf dem Bild und die Wolle lässt sich einfach verarbeiten. Leider reichen 250 g für Gr. 122/128 nicht. Musste 1 Knäuel nachbestellen. So ärgerlich...
29.08.2013 - 09:47DROPS Design answered:
Liebe Renate, vielen Dank für die Rückmeldung. Wir werden die Bemerkung zum Überprüfen an die Designabteilung weitergeben. Wenn nichts geändert wird, stimmt die Angabe für eine durchschnittliche Häkeltechnik.
03.09.2013 - 07:42