
Popular categories
Looking for a yarn?


Comments / Questions (4)
![]() MYRIAM DEVAUCHELLE wrote:
MYRIAM DEVAUCHELLE wrote:
Bonjour, je me permets de renouveler ma question, concernant les augmentations, j'ai fait des jetés classiques et au retour des mailles endroits torses, mais j'ai des trous. Faut il faires des jetés torses et au retour des mailles normales? Merci de vos réponses car les trous dans le jacquard, cela ne va pas être très joli. à bientôt M. DEVAUCHELLE
08.09.2025 - 15:53DROPS Design answered:
Bonjour Mme Devauchelle, lorsque l'on augmente avec des jetés sans motif ajouré, on tricote les jetés torse - cf AUGMENTATIONS - cf aussi réponse ci-dessous. Bon tricot!
11.09.2025 - 11:24
![]() Myriam DEVAUCHELLE wrote:
Myriam DEVAUCHELLE wrote:
Je me remets au tricot après quelques mois d'absence. ici, mon premier problème dès le départ est celui des augmentations, j'ai fait des jetés classiques et sur le rang suivant, j'ai fait une maille torse à l'endroit, mais j'ai quand même un trou, est ce qu'il faut faire l'augmentation par un jeté torse et au rang suivant une maille normale à l'endroit? merci de votre aide
07.09.2025 - 18:54DROPS Design answered:
Bonjour Mme Devauchelle, lorsque vous augmentez en faisant 1 jeté, veillez à ce qu'il ne soit pas trop lâche sur l'aiguille droite, bien souvent au premier lavage ou au blocage, ce petit trou disparaît, mais vous pouvez également utiliser une autre technique pour augmenter si vous préférez - retrouvez différentes techniques d'augmentations ici. Bon tricot!
11.09.2025 - 11:07
![]() Rae wrote:
Rae wrote:
Do you know the actual colors used in this sweater? Drops Lima in the shade chestnut seems too dark?
05.09.2025 - 17:35
![]() Ariane wrote:
Ariane wrote:
Bjr à toute l'équipe. Déjà un grand merci pour ce que vous faites. Le soucis pour moi, est que je suis de la vieille école et je tricote encore avec des aiguilles droites. J'essaye de me mettre aux aiguilles circulaires mais j'ai beaucoup beaucoup de mal. Il est donc dommage que tous vos modèles soient conçus pour ces dernières :(
29.08.2025 - 18:03
|
||||||||||
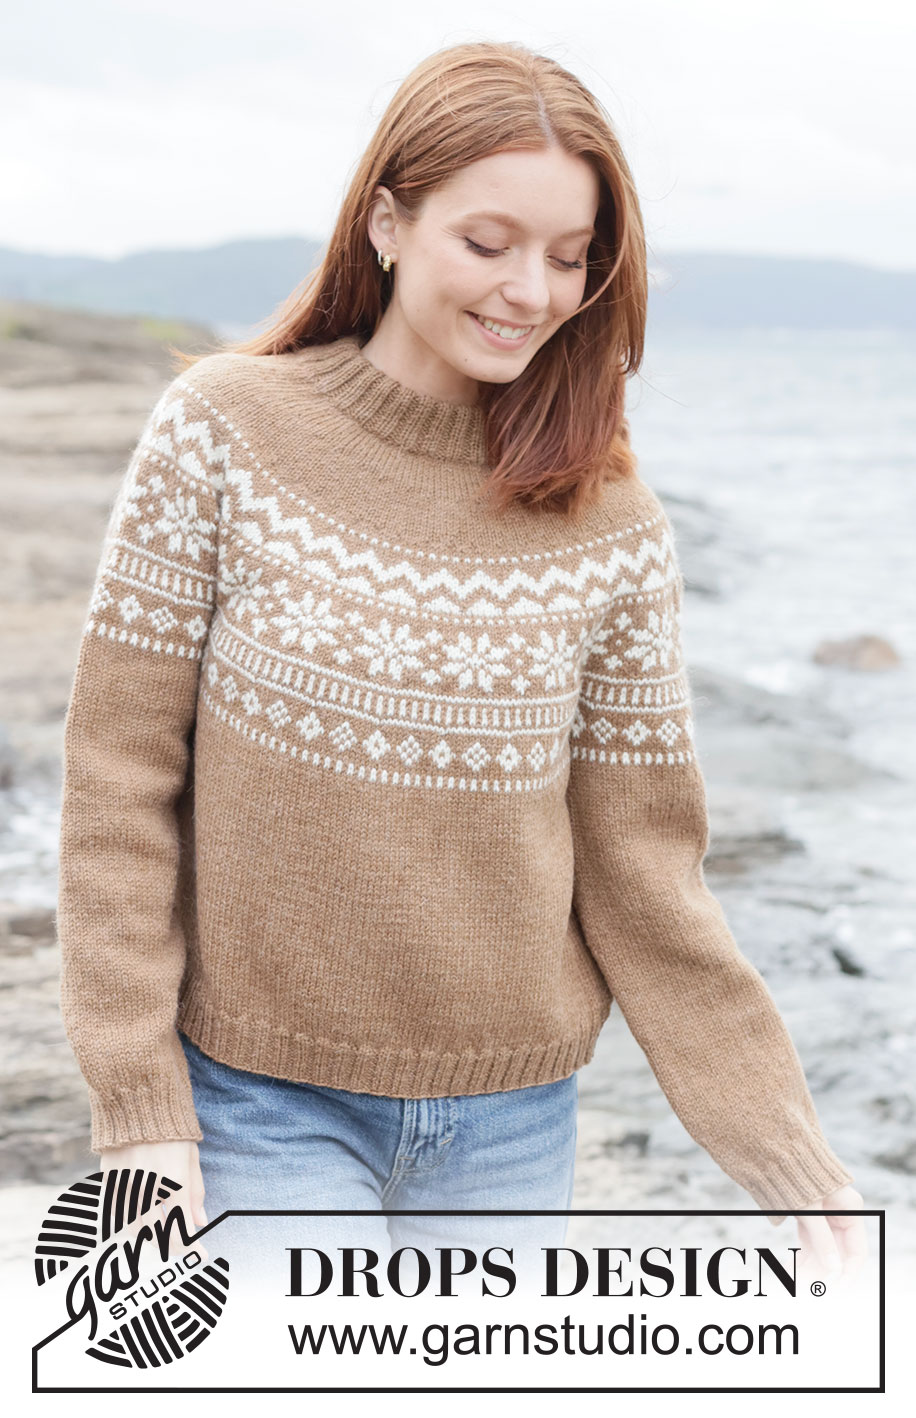
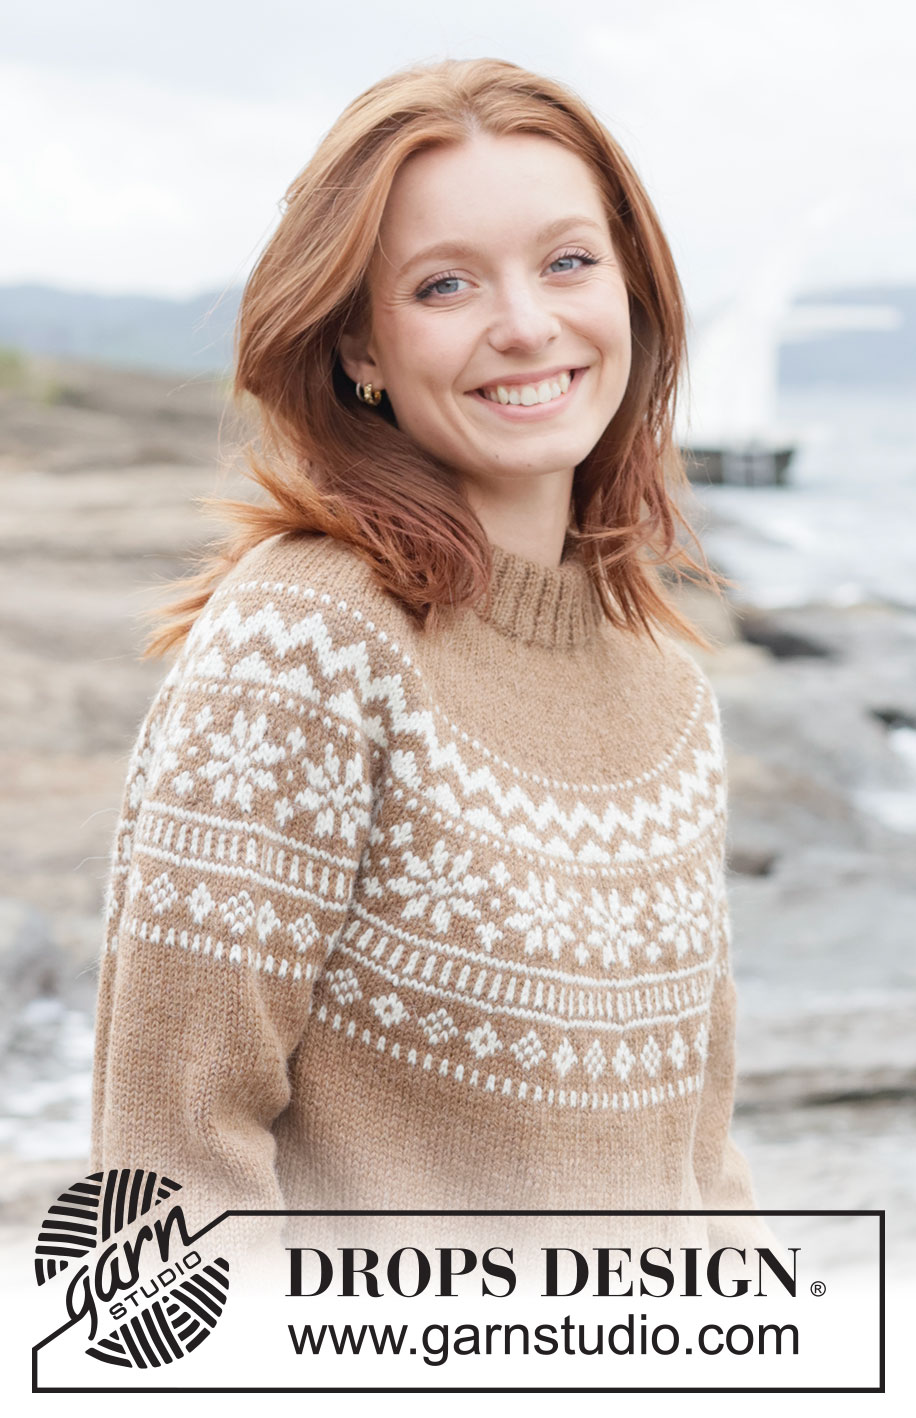
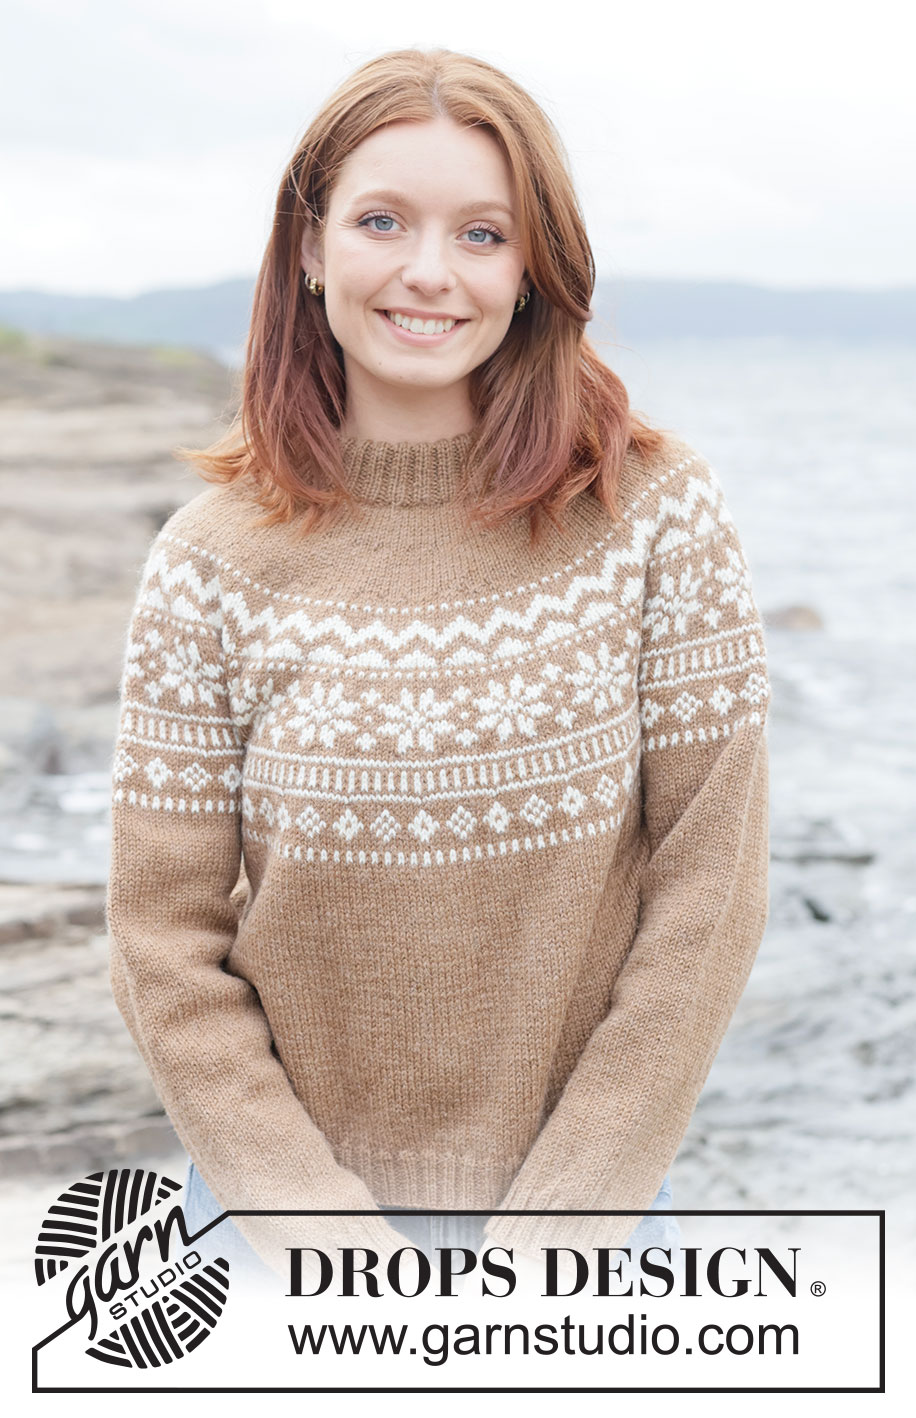
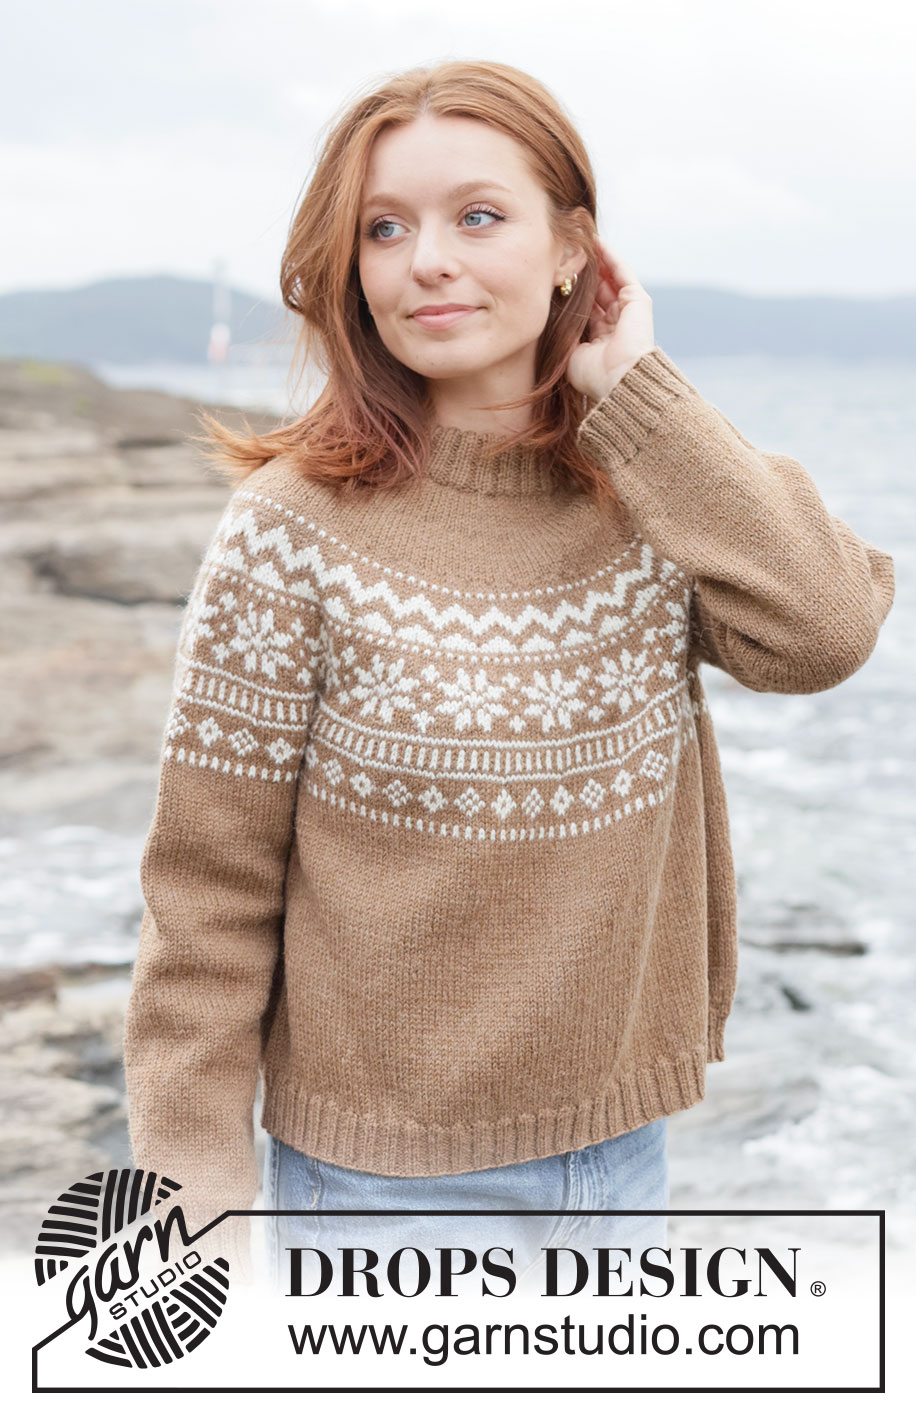
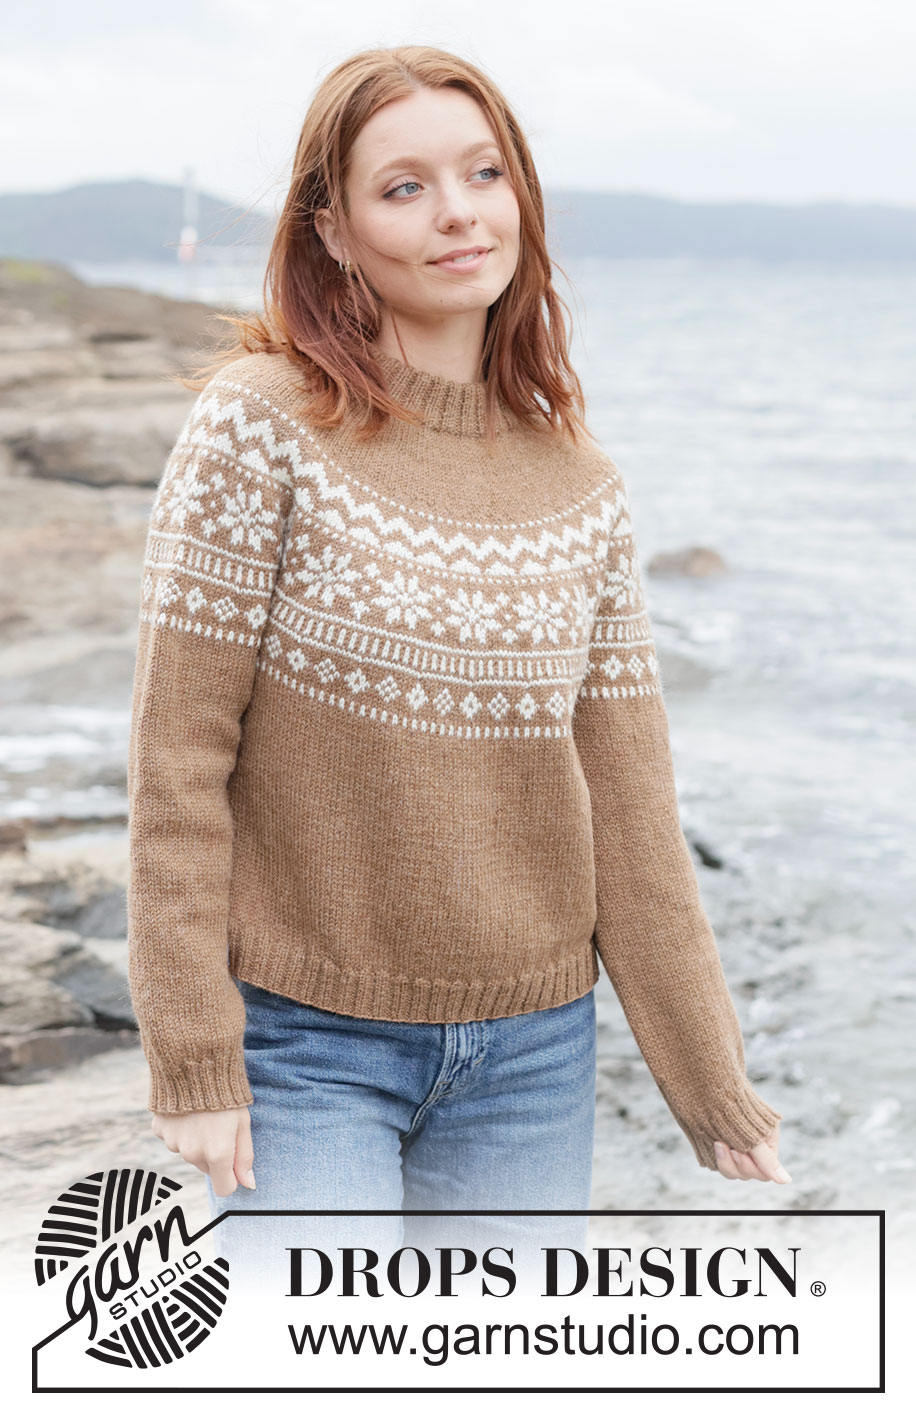
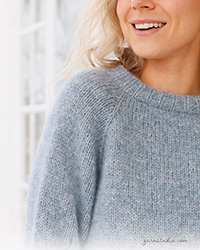
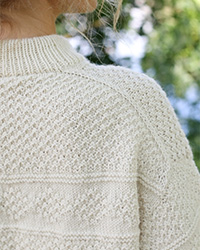
Maple Whisper Sweater#maplewhispersweater |
||||||||||
 |
 |
|||||||||
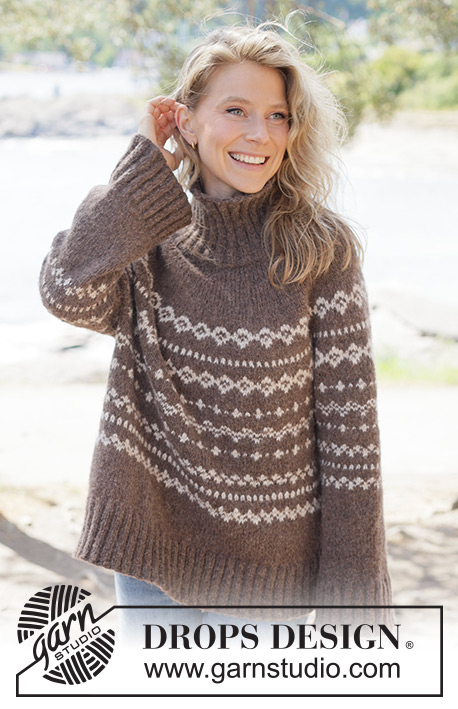
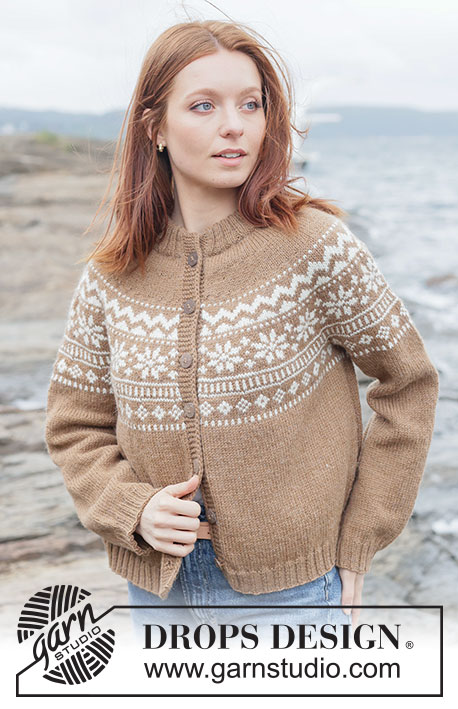
Knitted jumper in DROPS Lima or DROPS Karisma. The piece is worked top down with round yoke, Nordic pattern and double neck. Sizes XS - XXXL.
DROPS 262-5 |
||||||||||
|
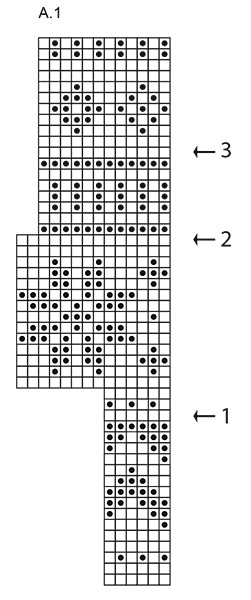
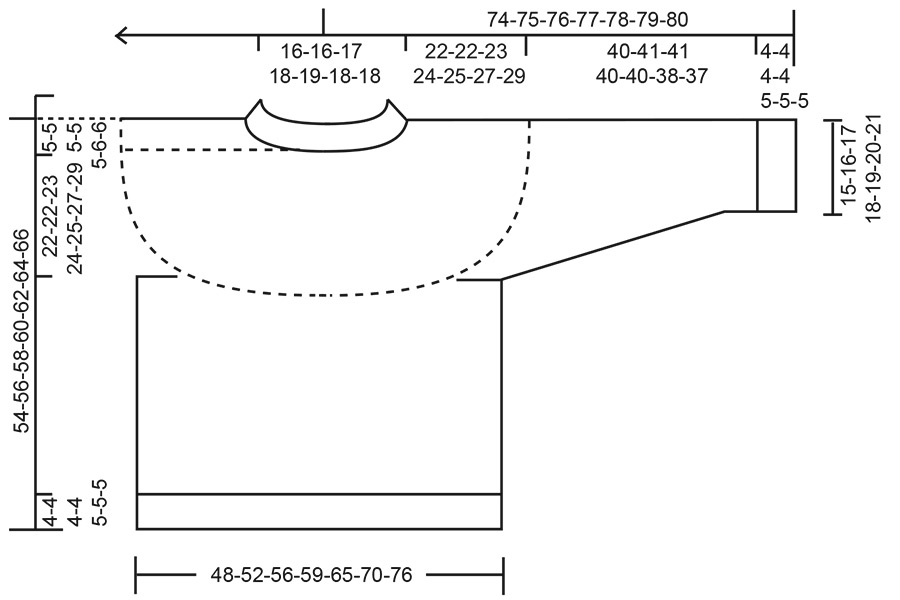
------------------------------------------------------- EXPLANATIONS FOR THE PATTERN: ------------------------------------------------------- INCREASE TIP (evenly spaced): To work out how to increase evenly, count the total number of stitches on the needle (e.g., 108 stitches) and divide by the number of increases to be made (e.g., 12) = 9. In this example, increase by making 1 yarn over after each 9th stitch. On the next round knit the yarn overs twisted to avoid holes. PATTERN: See diagram A.1. The pattern is worked in stocking stitch. KNITTING TIP: To avoid the knitting tension becoming tight when working pattern, it is important that the strands at the back are not tight. Use a size larger needle when working pattern if this is necessary. SLEEVE TIP: When knitting up stitches under the sleeve, you can get a small hole in the transition between stitches on the body and sleeve. This hole can be closed by picking up the strand between 2 stitches and working this strand twisted together with the first stitch between body and sleeve. DECREASE TIP: Decrease 1 stitch on each side of the marker thread as follows: Work until there are 3 stitches left before the marker thread, knit 2 together, knit 2 (marker thread sits between these 2 stitches) slip 1 stitch knit-wise, knit 1 and pass the slipped stitch over the knitted stitch (= 2 stitches decreased). ------------------------------------------------------- START THE PIECE HERE: ------------------------------------------------------- JUMPER – SHORT OVERVIEW OF THE PIECE: The pattern uses both long and short needles; start with the length which fits the number of stitches and change when necessary. The neck and yoke are worked in the round with circular needle, top down and from the right back shoulder. When the yoke is finished, it is divided for the body and sleeves and the body continued in the round, while the sleeves wait. The sleeves are worked top down, in the round. The neck is folded double and fastened to the inside. NECK: Cast on 108-108-112-116-120-124-128 stitches with circular needle size 4 mm and colour Chestnut DROPS Lima or colour Cocoa Bean DROPS Karisma. Change to circular needle size 3 mm (casting on with a larger needle size makes the cast-on edge elastic). Work rib in the round (knit 2, purl 2) for 8-8-8-8-10-10-10 cm. The neck is later folded double to the inside, giving a neck of approx. 4-4-4-4-5-5-5 cm. The round begins on the right back shoulder. Insert 1 marker after the first 36-36-37-39-40-41-43 stitches (approx. mid-front), the piece is now measured from here. YOKE: Change to circular needle size 4 mm. Knit 1 round and increase 12-14-16-16-18-18-20 stitches evenly spaced – read INCREASE TIP = 120-122-128-132-138-142-148 stitches. Continue with stocking stitch. Remember to maintain the knitting tension. When the yoke measures 4-4-4-4-4-4-4 cm from the marker, increase 28-30-36-36-44-42-46 stitches evenly spaced – remember INCREASE TIP = 148-152-164-168-182-184-194 stitches. Continue working until the yoke measures 8-8-8-8-9-9-9 cm from the marker. On the next round begin the PATTERN – read explanation above. Work A.1 across all stitches, AT THE SAME TIME increase 38-46-52-54-58-62-64 stitches evenly spaced = 186-198-216-222-240-246-258 stitches. Read KNITTING TIP! Continue the pattern increasing stitches on each row marked with an arrow as follows – remember INCREASE TIP: Arrow-1: Increase 38-54-50-58-54-62-64 stitches evenly spaced = 224-252-266-280-294-308-322 stitches. Continue A.1. Arrow-2: Increase 44-48-58-58-62-66-70 stitches evenly spaced = 268-300-324-338-356-374-392 stitches. Continue A.1. Arrow-3: Increase 44-48-48-46-52-58-64 stitches evenly spaced = 312-348-372-384-408-432-456 stitches. Continue A.1. AT THE SAME TIME, when the yoke measures 22-22-23-24-25-27-29 cm from the marker, divide for the body and sleeves. If A.1 is not finished, divide and continue the pattern on the body and sleeves – make sure you divide on a round with pattern (not a round of colour Chestnut/Cocoa Bean). NOTE! All the increases in A.1 should be finished before dividing. DIVIDE FOR BODY AND SLEEVES: Place the first 62-70-76-78-80-82-84 stitches on a thread for the sleeve, cast on 6-6-8-10-12-14-16 stitches (mid-under the sleeve), knit 94-104-110-114-124-134-144 (= front piece), place the next 62-70-76-78-80-82-84 stitches on a thread for the sleeve, cast on 6-6-8-10-12-14-16 stitches (mid-under the sleeve), knit the last 94-104-110-114-124-134-144 stitches (= back piece). The body and sleeves are finished separately. BODY: = 200-220-236-248-272-296-320 stitches. If A.1 is not finished, continue the pattern on the body. The pattern will not fit under the sleeves; continue the pattern neatly from the yoke and work it as far as it will go under each sleeve. When the pattern is finished continue with colour Chestnut/Cocoa Bean until the piece measures 45-47-49-51-52-53-55 cm from the marker mid-front. Change to circular needle size 3 mm. Work rib (knit 2, purl 2), AT THE SAME TIME increase 20-20-24-24-28-28-28 stitches evenly on the first round = 220-240-260-272-300-324-348 stitches. When the rib measures 4-4-4-4-5-5-5 cm, cast off. The jumper measures approx. 49-51-53-55-57-58-60 cm from the marker and 54-56-58-60-62-64-66 cm from the shoulder. SLEEVES: Place the 62-70-76-78-80-82-84 sleeve-stitches from one thread on circular needle size 4 mm and knit up 1 stitch in each of the 6-6-8-10-12-14-16 stitches cast on under the sleeve – read SLEEVE TIP = 68-76-84-88-92-96-100 stitches. Insert a marker-thread in the middle of the 6-6-8-10-12-14-16 stitches under the sleeve- the round starts by the marker-thread. Work stocking stitch in the round. If A.1 is not finished, continue the pattern on the sleeve. The pattern will not fit under the sleeve; continue the pattern neatly from the yoke and work it as far as it will go mid-under sleeve. When the pattern is finished continue with stocking stitch and colour Chestnut/Cocoa Bean. AT THE SAME TIME, when the sleeve measures 3 cm from the division, decrease mid-under the sleeve – read DECREASE TIP as follows: Decrease 2 stitches every 8-8-5-5-5-5-5 cm a total of 2-4-6-6-6-6-6 times = 64-68-72-76-80-84-88 stitches. Continue working until the sleeve measures 40-41-41-40-40-38-37 cm from the division. Change to double pointed needles size 3 mm. Work rib (knit 2, purl 2), AT THE SAME TIME increase 8-8-8-8-8-8-8 stitches evenly on the first round = 72-76-80-84-88-92-96 stitches. When the rib measures 4-4-4-4-5-5-5 cm, cast off. The sleeve measures approx. 44-45-45-44-45-43-42 cm from the division. ASSEMBLY: Fold the neck double to the inside and sew down. To avoid the neck being tight and rolling outwards, it is important that the seam is elastic. |
||||||||||
Diagram explanations |
||||||||||
|
||||||||||
|
||||||||||
|
||||||||||
Have you finished this pattern?Tag your pictures with #dropspattern #maplewhispersweater or submit them to the #dropsfan gallery. Do you need help with this pattern?You'll find 28 tutorial videos, a Comments/Questions area and more by visiting the pattern on garnstudio.com. © 1982-2025 DROPS Design A/S. We reserve all rights. This document, including all its sub-sections, has copyrights. Read more about what you can do with our patterns at the bottom of each pattern on our site. |
||||||||||
With over 40 years in knitting and crochet design, DROPS Design offers one of the most extensive collections of free patterns on the internet - translated to 17 languages. As of today we count 319 catalogues and 11886 patterns translated into English (UK/cm). 11886
We work hard to bring you the best knitting and crochet have to offer, inspiration and advice as well as great quality yarns at incredible prices! Would you like to use our patterns for other than personal use? You can read what you are allowed to do in the Copyright text at the bottom of all our patterns. Happy crafting!
Post a comment to pattern DROPS 262-5
We would love to hear what you have to say about this pattern!
If you want to leave a question, please make sure you select the correct category in the form below, to speed up the answering process. Required fields are marked *.